I figured it out. RPints didn't like me using sql server 2008. I installed MySQL and had to use a different port for sql 2008 to get it to work as they both wanted to use 3306.
Makes sense, nice work, enjoy!
Cheers,
Kal

I figured it out. RPints didn't like me using sql server 2008. I installed MySQL and had to use a different port for sql 2008 to get it to work as they both wanted to use 3306.
UPDATE: Kevin Osborn from Wyolum, replied that he'll "take a look at it" so I've sent him the dump files of both a successful Jessie upload and an unsuccessful Stretch upload to an Alamode.
Watch this space...
I'm travelling, but I happen to have a Raspi, but not an alamode, but I
think I've figured it out.
they changed the name of the serialport in cmdline.txt.
getty is now disabled by default, so I also commented that out.
download stretch-setup from
https://raw.githubusercontent.com/wyolum/alamode/master/alamode-setup/stretch-setup
(e.g.:
wget
https://raw.githubusercontent.com/wyolum/alamode/master/alamode-setup/stretch-setup
)
into the alamode-setup directory, and run it sudo:
cd alamode-setup
sudo ./stretch-setup
reboot.
Let me know if it works or not. I'll have access to an alamode this
weekend, so I can do more testing.
 , I just don't have the cycles to deal with Stretch these days.
My pleasure, you've done more than your fair share over the years from the beginning until now long after the original devs abandoned the project. I just figure if I've got a spare SD card might as well give it a crack when I'm already up drinking beer and the rest of the house are in bed.Thanks for pursuing this
Btw, did Wyolum ever fix the jessie-setup script?
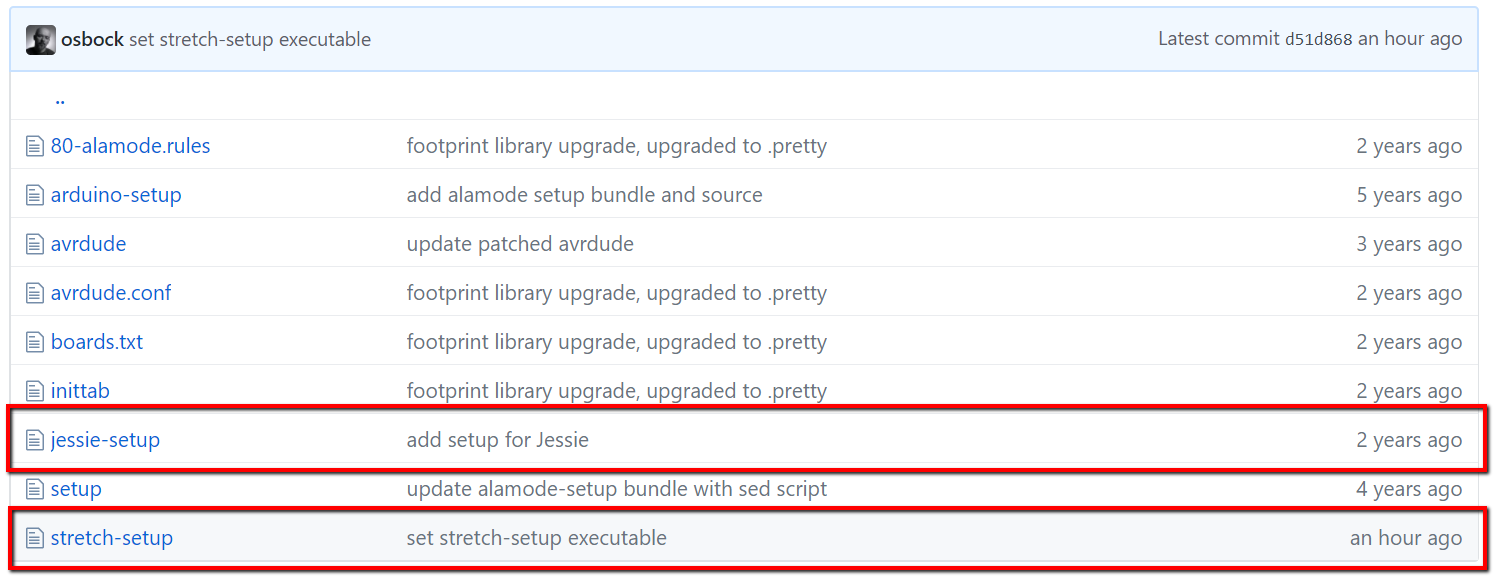
UPDATE: Just in from Kevin Osborn at Wyolum:
So I'll give it a crack tonight and all going well we'll have Stretch nailed down now too.


![Craft A Brew - Safale S-04 Dry Yeast - Fermentis - English Ale Dry Yeast - For English and American Ales and Hard Apple Ciders - Ingredients for Home Brewing - Beer Making Supplies - [1 Pack]](https://m.media-amazon.com/images/I/41fVGNh6JfL._SL500_.jpg)


Could I do this:
Sudo nano /boot/config.txt
And then at the bottom add
Enable_uart=0
And then save the boot file?
That is if I'm in the right file to begin with.
enable_uart=1
Oh man, I hadn't considered that interpretation
No, you really do want to set Enable_uart=0 to keep Jessie from streaming console messages to the serial port.
I may have to do a fresh re-post with a few edits for clarity's sake...
Cheers!
Interesting. Setting enable_uart=0 literally was the step that got me over the Jessie hurdle using an Alamode on an RPi2B.
That line in my system log has a big "Fer F@ck Sake!" next to it
If you're using an RPi3 you're not using the same port as I do.
That may make a difference, I can't be sure...
Cheers!

To be fair I figured I would share my findings after setting up a new Raspberry pi 3 running stretch with an alaMode. And to be really fair this with help from this forum (DrunkleJon, day_trippr, ...):
Here is how to get the alamode working
Start Menu > Preferences > Raspberry Pi Configuration ->Enable Serial on Interfaces tap
Run the following through terminal
sudo rpi-update
sudo apt-get update
sudo apt-get upgrade
wget https://github.com/wyolum/alamode/raw/master/bundles/alamode-setup.tar.gz
tar -xvzf alamode-setup.tar.gz
cd alamode-setup
wget https://github.com/wyolum/alamode/raw/master/alamode-setup/stretch-setup
sudo dos2unix ./*
sudo ./stretch-setup
Also Im working on updating the actual code to run on Stretch, needed to update how it connects to the database. Im also going to look at all the versions on github and merge in the best parts of them. Im through CaptnDelta's version, I thought it was a much simpler solution to setup. Will post when I got something on github


#The following line is for serial over GPIO
port = '/dev/ttyS0'I'm building some confidence, so I went ahead and ran the following:
At this point you should be ready to run the python script.
Copy the flowmon file from the python (/var/www/python) directory to /etc/init.d
$ sudo cp flowmon /etc/init.d
Then give it the proper permissions:
$ sudo chmod a+x /etc/init.d/flowmon
I modified everything initially so my install is in /var/www
**IF YOUR INSTALL IS IN /var/www you should be good to go forward. if not, you need to edit the 14th line and set the root dir for your install.
You can test the program by running:
$ sudo /etc/init.d/flowmon start
$ ps aux | grep flow_monitor.py
Should return:
pi 3508 0.0 0.9 8796 4112 ? S 15:35 0:00 /usr/bin/python /home/pi/raspberrypints/python/flow_monitor.py pi 3558 0.0 0.1 3548 808 pts/0 S+ 15:43 0:00 grep color=auto flow_monitor.py
But it didn't return the /home/pi/raspberrypints/python/flow_monitor.py etc...
I've attached another image of what I got. Did I do something wrong for it not to return the /home/pi/raspberrypints line?
Any help is greatly appreciated.
Thanks.
cd /var/www/pythonsudo cp flowmon /etc/init.dTo be fair I figured I would share my findings after setting up a new Raspberry pi 3 running stretch with an alaMode. And to be really fair this with help from this forum (DrunkleJon, day_trippr, ...):
Here is how to get the alamode working
Start Menu > Preferences > Raspberry Pi Configuration ->Enable Serial on Interfaces tap
Run the following through terminal
sudo rpi-update
sudo apt-get update
sudo apt-get upgrade
wget https://github.com/wyolum/alamode/raw/master/bundles/alamode-setup.tar.gz
tar -xvzf alamode-setup.tar.gz
cd alamode-setup
wget https://github.com/wyolum/alamode/raw/master/alamode-setup/stretch-setup
sudo dos2unix ./*
sudo ./stretch-setup
Also Im working on updating the actual code to run on Stretch, needed to update how it connects to the database. Im also going to look at all the versions on github and merge in the best parts of them. Im through CaptnDelta's version, I thought it was a much simpler solution to setup. Will post when I got something on github
Kal,
I did execute cd /var/www/python
and then
sudo cp flowman /etc/init.d
then I executed the permissions command. Just to be sure I did it again, and I confirmed that flowmon is in the /etc/init.d directory. Then I executed the sudo /etc/init.d/flowmon start
flowmon started
then I executed ps aux | grep flow_monitor.py
and still get the line ... /usr/bin/python /var/www/python/flow_monitor.py
vs. the ... /usr/bin/python /home/pi/raspberrypints/python/flow_monitor.py
Why would it be pointing to /var/www/python ... vs. /home/pi/raspberrypints/python ...
is that why I'm unable to see the data when I execute the flow_monitor.py command to watch the pours?
pi@raspberrypi:~ $ ps aux | grep flow_monitor.py
pi 645 0.0 0.7 13856 7148 ? S 10:44 0:00 /usr/bin/python /var/www/python/flow_monitor.py
pi 10592 0.0 0.1 4276 1852 pts/0 S+ 11:28 0:00 grep --color=auto flow_monitor.py
2 things, but one of them is very stupid.
In the getty screen, I uploaded the example blink sketch to make sure my alamode was working. So now the led light associated with pin 13 is blinking and I don't know how to make it stop.
The other problem is I don't I'm not recognizing pours.
One of day_trippr's tests was to run the following:
- Manually run the listener script:
Code:
________________________________________
$ sudo python /var/www/python/flow_monitor.py
________________________________________
- Pour a few ounces (I lightly blew in the adafruit flowmeter)
A three line (iirc) blurb of text should appear in the terminal window.
One of those is the pin number (it'll be obvious which).
- Try the other faucet and see if you get anything at all.
Let us know what you see...
I have done that, but nothing happens which leads me to believe it's not recognizing my pours.
I did make sure that i ran "sudo /etc/init.d/flowmon stop" and then ... status to make sure the flowmon isn't active.
Kal,
Here's what I see:
pi@raspberrypi:~ $ sudo python /var/www/python/flow_monitor.py
^CExiting
Traceback (most recent call last):
File "/var/www/python/flow_monitor.py", line 23, in <module>
msg = arduino.readline()
File "/usr/lib/python2.7/dist-packages/serial/serialposix.py", line 446, in read
ready,_,_ = select.select([self.fd],[],[], self._timeout)
KeyboardInterrupt
pi@raspberrypi:~ $
        digitalWrite(13, HIGH);
        delay(3 * 1000);
digitalWrite(13, LOW);//This line is the number of flow sensors connected.
const uint8_t numSensors = 6;
//This line initializes an array with the pins connected to the flow sensors
uint8_t pulsePin[] = {2,5,6,7,8,9};
//number of milliseconds to wait after pour before sending message
unsigned int pourMsgDelay = 300;
unsigned int pulseCount[numSensors];
unsigned int kickedCount[numSensors];
unsigned long nowTime;
unsigned long lastPourTime = 0;
unsigned long lastPinStateChangeTime[numSensors];
int lastPinState[numSensors];
unsigned long lastSend = 0;
void setup() {
pinMode(13, OUTPUT);
// initialize serial communications at 9600 bps:
Serial.begin(9600);
while (!Serial) {
; // wait for serial port to connect. Needed for Leonardo only
}
Serial.flush();
for( int i = 0; i < numSensors; i++ ) {
pinMode(pulsePin[i], INPUT);
digitalWrite(pulsePin[i], HIGH);
kickedCount[i] = 0;
lastPinState[i] = digitalRead(pulsePin[i]);
}
}
void loop() {
nowTime = millis();
pollPins();
if ( (nowTime - lastPourTime) > pourMsgDelay && lastPourTime > 0) {
//only send pour messages after all taps have stopped pulsing for a short period
//use lastPourTime=0 to ensure this code doesn't get run constantly
lastPourTime = 0;
checkPours();
checkKicks();
}
}
void pollPins() {
for ( int i = 0; i < numSensors; i++ ) {
int pinState = digitalRead(pulsePin[i]);
if ( pinState != lastPinState[i] ) {
if ( pinState == HIGH ) {
//separate high speed pulses to detect kicked kegs
if( nowTime - lastPinStateChangeTime[i] > 0 ){
pulseCount[i] ++;
}
else{
kickedCount[i] ++;
}
lastPinStateChangeTime[i] = nowTime;
lastPourTime = nowTime;
}
lastPinState[i] = pinState;
}
}
}
void checkPours() {
for( int i = 0; i < numSensors; i++ ) {
if ( pulseCount[i] > 0 ) {
if ( pulseCount[i] > 100 ) {
//filter out tiny bursts
sendPulseCount(0, pulsePin[i], pulseCount[i]);
        digitalWrite(13, HIGH);
        delay(3 * 1000);
        digitalWrite(13, LOW);
}
pulseCount[i] = 0;
}
}
}
void checkKicks() {
for( int i = 0; i < numSensors; i++ ) {
if ( kickedCount[i] > 0 ) {
if ( kickedCount[i] > 30 ) {
//if there are enough high speed pulses, send a kicked message
sendKickedMsg(0, pulsePin[i]);
}
//reset the counter if any high speed pulses exist
kickedCount[i] = 0;
}
}
}Running the listener in a terminal session on Jessie does not work like it did on Wheezy. I've mentioned this here a few times now.
You no longer get the nice clean three line pour message, now you get a "crapload of fail" messages. But if you get the "crapload of fail" it at least indicates the listener "heard" something. No crapload, nothing heard.
To at least try to break the problem in half (ie: was the the Arduino not picking up the meter, or was it the listener not hearing a sent message?) you can use this lightly modified raspberrypints.ino sketch. It lights up the Alamode's "Blink" LED (which is hardwired to GPIO13) for a few seconds when the Arduino sends a pour message. Down near the bottom of the sketch you'll see these three lines right after the pour message gets sent:
Code:digitalWrite(13, HIGH); delay(3 * 1000); digitalWrite(13, LOW);
The sketch has to have the same site-specific edits (meter count and pin numbers) but otherwise it's a drop-in replacement. Once it's resident you can do the meter test. If the LED doesn't light the Arduino isn't seeing the meter. If the LED lights, the Arduino saw the meter and sent a pour message to the RPi...
Cheers!
==============================================
Code://This line is the number of flow sensors connected. const uint8_t numSensors = 6; //This line initializes an array with the pins connected to the flow sensors uint8_t pulsePin[] = {2,5,6,7,8,9}; //number of milliseconds to wait after pour before sending message unsigned int pourMsgDelay = 300; unsigned int pulseCount[numSensors]; unsigned int kickedCount[numSensors]; unsigned long nowTime; unsigned long lastPourTime = 0; unsigned long lastPinStateChangeTime[numSensors]; int lastPinState[numSensors]; unsigned long lastSend = 0; void setup() { pinMode(13, OUTPUT); // initialize serial communications at 9600 bps: Serial.begin(9600); while (!Serial) { ; // wait for serial port to connect. Needed for Leonardo only } Serial.flush(); for( int i = 0; i < numSensors; i++ ) { pinMode(pulsePin[i], INPUT); digitalWrite(pulsePin[i], HIGH); kickedCount[i] = 0; lastPinState[i] = digitalRead(pulsePin[i]); } } void loop() { nowTime = millis(); pollPins(); if ( (nowTime - lastPourTime) > pourMsgDelay && lastPourTime > 0) { //only send pour messages after all taps have stopped pulsing for a short period //use lastPourTime=0 to ensure this code doesn't get run constantly lastPourTime = 0; checkPours(); checkKicks(); } } void pollPins() { for ( int i = 0; i < numSensors; i++ ) { int pinState = digitalRead(pulsePin[i]); if ( pinState != lastPinState[i] ) { if ( pinState == HIGH ) { //separate high speed pulses to detect kicked kegs if( nowTime - lastPinStateChangeTime[i] > 0 ){ pulseCount[i] ++; } else{ kickedCount[i] ++; } lastPinStateChangeTime[i] = nowTime; lastPourTime = nowTime; } lastPinState[i] = pinState; } } } void checkPours() { for( int i = 0; i < numSensors; i++ ) { if ( pulseCount[i] > 0 ) { if ( pulseCount[i] > 100 ) { //filter out tiny bursts sendPulseCount(0, pulsePin[i], pulseCount[i]); digitalWrite(13, HIGH); delay(3 * 1000); digitalWrite(13, LOW); } pulseCount[i] = 0; } } } void checkKicks() { for( int i = 0; i < numSensors; i++ ) { if ( kickedCount[i] > 0 ) { if ( kickedCount[i] > 30 ) { //if there are enough high speed pulses, send a kicked message sendKickedMsg(0, pulsePin[i]); } //reset the counter if any high speed pulses exist kickedCount[i] = 0; } } }
Should I be hooking the red wire to VIN, the black wire to GND, and the yellow wire to pin 8, 9, 10, or 11 for my adafruit meters?
In the rpints installation instructions it says to connect the flow meter to the alamode:
Pin1(red) -> Ground
Pin2 (middle)-> Any digital pin 2-13. Be sure to set this at the top of the Arduino code
Pin3 -> VIN
So that's how I connected my meters. However, I just looked at the adafruit flow meter description and on those meters, the red wire is power, the black wire is ground, and the yellow wire is the pulse output.
So here's the dumb question. Should I be hooking the red wire to VIN, the black wire to GND, and the yellow wire to pin 8, 9, 10, or 11 for my adafruit meters? I've had it set where the red wire is on GND and the black wire is on VIN.
Don't laugh too hard. I was just following instructions and not thinking about what I was doing until Kal said to recheck my wiring.
Also if you're using Adafruit meters, be sure to adjust your pours.php file for the different flow rate.


