I had a system like yours for years but now have a full 3 pot herms and I just switched my mash temp probe to be going on top of the mash so I measure going out and in and the temp probe is on the in side now that powers the element, that way I know what temp I'm adding to the mash
You are using an out of date browser. It may not display this or other websites correctly.
You should upgrade or use an alternative browser.
You should upgrade or use an alternative browser.
Unboxing the Nano from CO Brewing
- Thread starter pretzelb
- Start date

Help Support Homebrew Talk:
This site may earn a commission from merchant affiliate
links, including eBay, Amazon, and others.
Dockside_Brewing
Well-Known Member
- Joined
- Oct 29, 2017
- Messages
- 192
- Reaction score
- 86
Interesting concept, is this really that much better than the recirc arm?
Do you use both the recirc arm AND the SS manifold while mashing? Not seeing how that would work with 10 gallon batches is all.
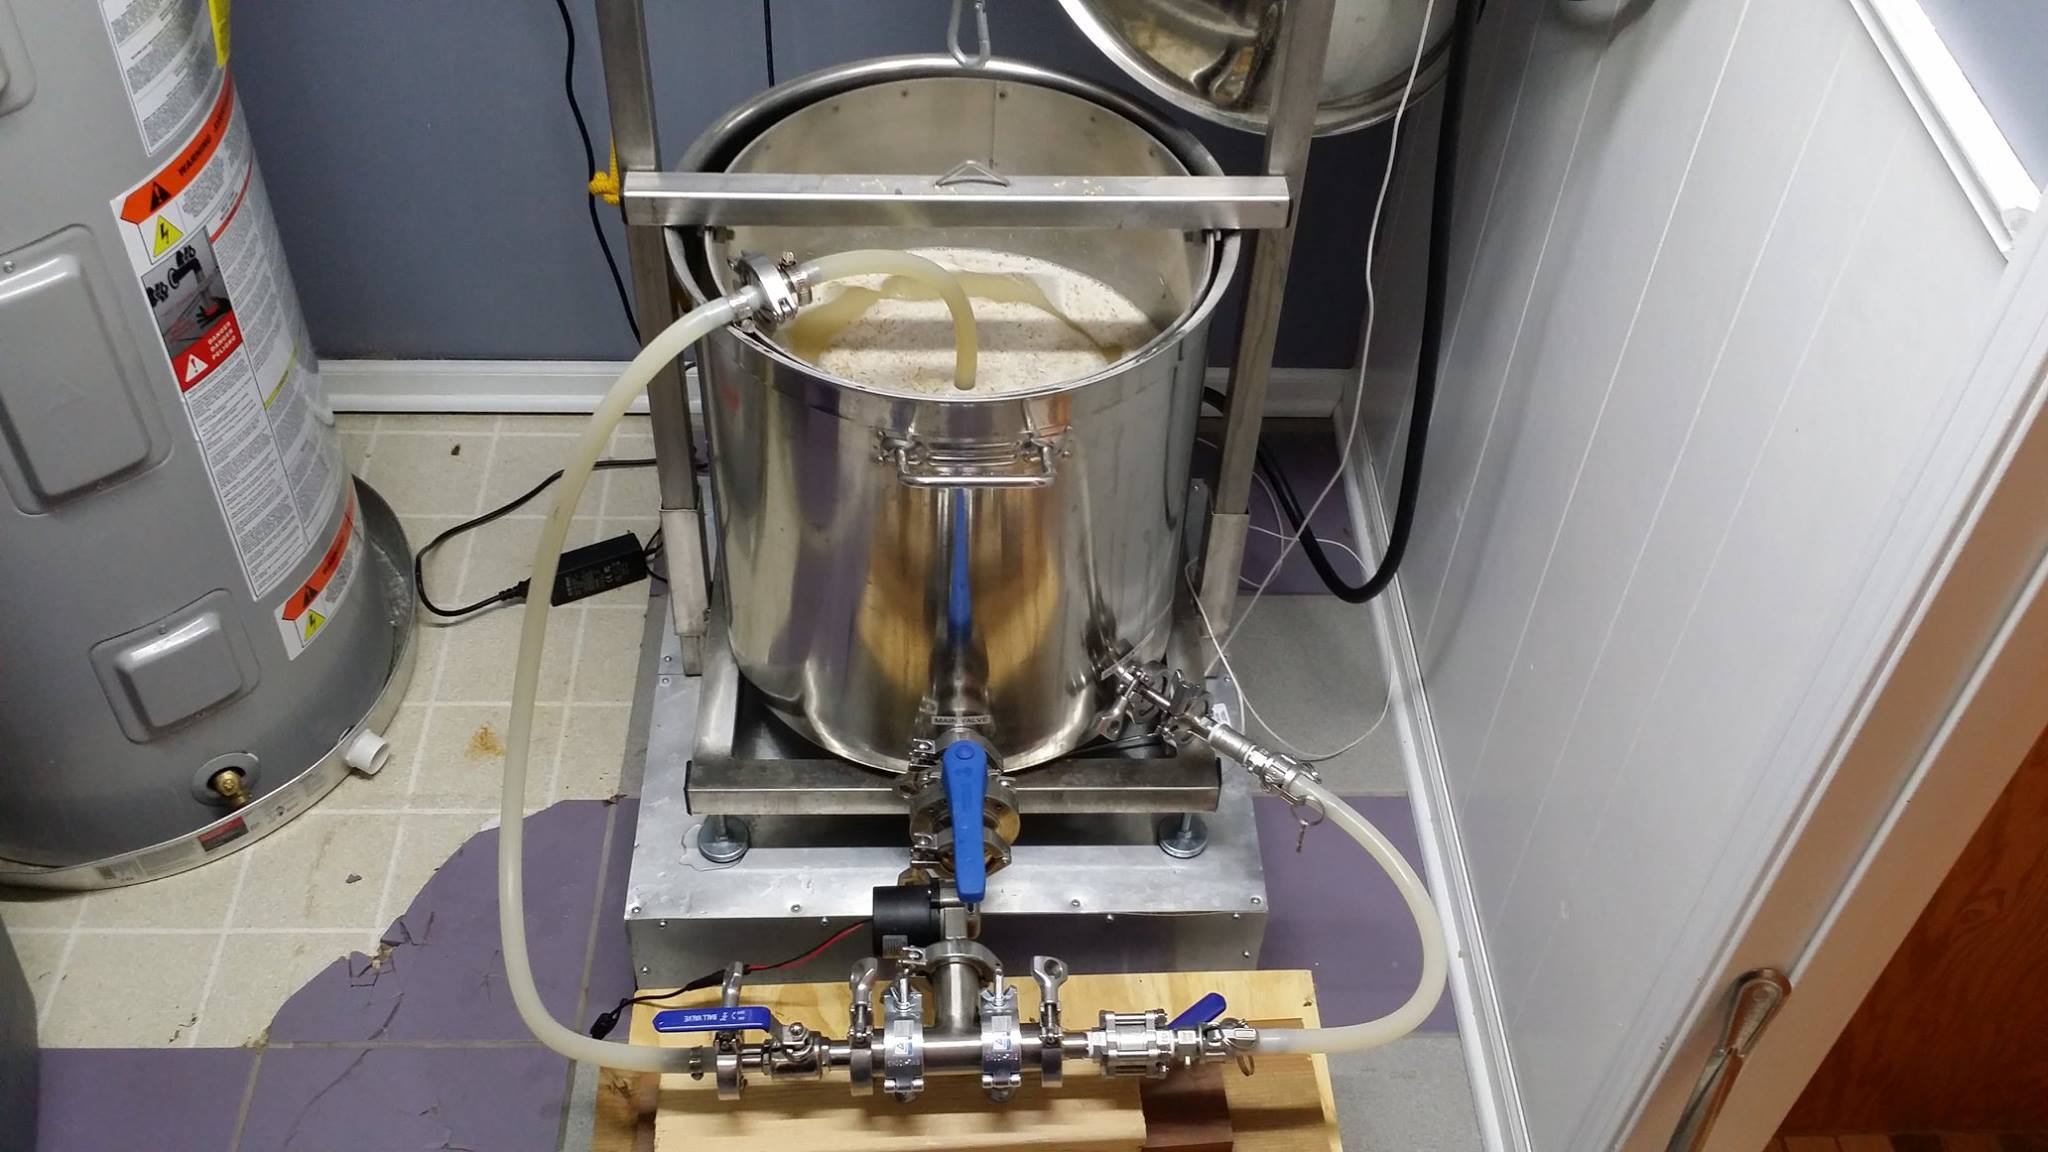
I do not use the arm that came with the system, I use the SS manifold. I also have the whirlpool option on my kettle. Water exits the kettle and is pumped through the SS manifold as well as back under the basket. Each output has a valve so you can balance it out and keep water under the basket. This eliminates scorched elements and keeps the temp steady.
30Bones
Well-Known Member
Got it thanks., I used to have a 3 vessel system and wanted this for the footprint and cost. I am happy with it. It is just a hobby for me, I don't get too worked up over things anymore.I had a system like yours for years but now have a full 3 pot herms and I just switched my mash temp probe to be going on top of the mash so I measure going out and in and the temp probe is on the in side now that powers the element, that way I know what temp I'm adding to the mash
Dockside_Brewing
Well-Known Member
- Joined
- Oct 29, 2017
- Messages
- 192
- Reaction score
- 86
I definitely love the footprint of this setup. And I Love only cleaning one pot! My temp probe is under the basket and being recirculated. From there it goes right on top of the mash so that gives me an accurate mash temp.
30Bones
Well-Known Member
I see what you are saying now. That would really help with the element going dry if you aren't paying attention. A pic would really help if you have any handy.I do not use the arm that came with the system, I use the SS manifold. I also have the whirlpool option on my kettle. Water exits the kettle and is pumped through the SS manifold as well as back under the basket. Each output has a valve so you can balance it out and keep water under the basket. This eliminates scorched elements and keeps the temp steady.
Do you stir your grains from time to time? I have to or when I am not paying attention it will run low around the element. Another shortcoming I think of the solid sided basket. I thought about drilling some holes in mine, but have not gotten to that level of crazy yet

Dockside_Brewing
Well-Known Member
- Joined
- Oct 29, 2017
- Messages
- 192
- Reaction score
- 86
Here is a pic of the whirlpool option. I just keep my eye on the sight glass and never let it drop below 5 gallons. I only perform an initial stir. I ALWAYS use 1lb of rice hulls( 10 gallon batches). I like the solid sided basket. It ensures that all the water is passing through the grains. You just have to use rice hulls and adjust your flow. Th SS manifold is a must.


$159.50 ($26.58 / Count)
3M High Flow Series System BREW120-MS, 5616001, For Brewed Coffee and Hot Tea, Valve-in-Head Design
Amazon.com


$172.35
2 Inch Tri Clamp Keg Manifold With Ball Lock Posts, Pressure Gauge, PRV (0-30 PSI) – Homebrew, Fermentation, Kegging System
wuhanshijiayangzhiyimaoyiyouxiangongsi


$22.00 ($623.23 / Ounce)
AMZLMPKNTW Ball Lock Sample Faucet 30cm Reinforced Silicone Hose Secondary Fermentation Homebrew Kegging joyful
无为中南商贸有限公司


$44.99
$49.95
Craft A Brew - Mead Making Kit – Reusable Make Your Own Mead Kit – Yields 1 Gallon of Mead
Craft a Brew


$719.00
$799.00
EdgeStar KC2000TWIN Full Size Dual Tap Kegerator & Draft Beer Dispenser - Black
Amazon.com


$176.97
1pc Commercial Keg Manifold 2" Tri Clamp,Ball Lock Tapping Head,Pressure Gauge/Adjustable PRV for Kegging,Fermentation Control
hanhanbaihuoxiaoshoudian


$53.24
1pc Hose Barb/MFL 1.5" Tri Clamp to Ball Lock Post Liquid Gas Homebrew Kegging Fermentation Parts Brewer Hardware SUS304(Liquid Hose Barb)
yunchengshiyanhuqucuichendianzishangwuyouxiangongsi


$33.99 ($17.00 / Count)
$41.99 ($21.00 / Count)
2 Pack 1 Gallon Large Fermentation Jars with 3 Airlocks and 2 SCREW Lids(100% Airtight Heavy Duty Lid w Silicone) - Wide Mouth Glass Jars w Scale Mark - Pickle Jars for Sauerkraut, Sourdough Starter
Qianfenie Direct

$53.24
1pc Hose Barb/MFL 1.5" Tri Clamp to Ball Lock Post Liquid Gas Homebrew Kegging Fermentation Parts Brewer Hardware SUS304(Liquid Hose Barb)
Guangshui Weilu You Trading Co., Ltd

$49.95 ($0.08 / Fl Oz)
$52.99 ($0.08 / Fl Oz)
Brewer's Best - 1073 - Home Brew Beer Ingredient Kit (5 gallon), (Blueberry Honey Ale) Golden
Amazon.com


$58.16
HUIZHUGS Brewing Equipment Keg Ball Lock Faucet 30cm Reinforced Silicone Hose Secondary Fermentation Homebrew Kegging Brewing Equipment
xiangshuizhenzhanglingfengshop


$20.94
$29.99
The Brew Your Own Big Book of Clone Recipes: Featuring 300 Homebrew Recipes from Your Favorite Breweries
Amazon.com


$7.79 ($7.79 / Count)
Craft A Brew - LalBrew Voss™ - Kveik Ale Yeast - For Craft Lagers - Ingredients for Home Brewing - Beer Making Supplies - (1 Pack)
Craft a Brew


$10.99 ($31.16 / Ounce)
Hornindal Kveik Yeast for Homebrewing - Mead, Cider, Wine, Beer - 10g Packet - Saccharomyces Cerevisiae - Sold by Shadowhive.com
Shadowhive


![Craft A Brew - Safale S-04 Dry Yeast - Fermentis - English Ale Dry Yeast - For English and American Ales and Hard Apple Ciders - Ingredients for Home Brewing - Beer Making Supplies - [1 Pack]](https://m.media-amazon.com/images/I/41fVGNh6JfL._SL500_.jpg)
$6.95 ($17.38 / Ounce)
$7.47 ($18.68 / Ounce)
Craft A Brew - Safale S-04 Dry Yeast - Fermentis - English Ale Dry Yeast - For English and American Ales and Hard Apple Ciders - Ingredients for Home Brewing - Beer Making Supplies - [1 Pack]
Hobby Homebrew
Dockside_Brewing
Well-Known Member
- Joined
- Oct 29, 2017
- Messages
- 192
- Reaction score
- 86
I know you can do a 35# in the nano 20 but that is the max.
jabba11
www.CeeGeeBrewing.com
Old topic...
How many folks had rapidly fluctuating temperatures while mashing and fixed the issue with either the SS Brewtech Mashing Manifold, adding recirculation under the grain basket, or both?
Ive done both. Ive checked the mash temps I don't know how many times anymore. I know the temp probe is adjustable if you are getting consistently off readings IE its always off a few degrees etc you may be able to adjust it. For me Ive never really had much of an issue. I will say that anytime I step to a different temp once the probe indicates I'm at temp I stir the grain a little. It does seem to take abit for the bed to catch up if you dont. That seems to set the temp fine for me as it consistently reads almost dead on in my system even after just sitting and recirculating.
jabba11
www.CeeGeeBrewing.com
This is my system. I have the SS and recirc under the bottom. Not nearly as complete awesome as docksides above but still function the same. As noted above I almost always run both my valves wide open unless its a large grain bill
Attachments
30Bones
Well-Known Member
Nice setup, I want to avoid rice hulls for no other reason than having to keep them on hand and I rarely get to the LHBS. Stirring has never been a hindrance and I have found running the pump wide open seems to work better than trying to throttle it. Brewing tomorrow and I will mess with the flow a bit. Best part about electric is step mashes and avoiding the need for carafoam/pils for head retention. Works great on my IPAsHere is a pic of the whirlpool option. I just keep my eye on the sight glass and never let it drop below 5 gallons. I only perform an initial stir. I ALWAYS use 1lb of rice hulls( 10 gallon batches). I like the solid sided basket. It ensures that all the water is passing through the grains. You just have to use rice hulls and adjust your flow. Th SS manifold is a must.
I was reading about underletting water into the mash tun in one of the LODO discussions. Has anyone tried lowering the basket full of dry grain into the kettle of water?
I'm not interested in the low oxygen thing right now, but dunking the basket sounds a tad easier than pouring and stirring and pouring and stirring... Even if you have to do it in stages, it will be less hands-on time because you can lock the pulley in place and drink some beer for a minute while the water soaks in.
Any reason this wouldn't work?
The_Bishop
Well-Known Member
- Joined
- Dec 8, 2013
- Messages
- 2,100
- Reaction score
- 676
I dough in like that. You need to be patient or you end up with a giant dough ball.
Thank you, I will give it a try.
30Bones
Well-Known Member
Seems like a PITA. I brewed with 22.5# last night and imagine the basket at near head level, lowering it, raising it, repeating it. Is it really that difficult to dump some in, stir, repeat until done? Takes me less than 5 minutes to be fully doughed in.I was reading about underletting water into the mash tun in one of the LODO discussions. Has anyone tried lowering the basket full of dry grain into the kettle of water?
I'm not interested in the low oxygen thing right now, but dunking the basket sounds a tad easier than pouring and stirring and pouring and stirring... Even if you have to do it in stages, it will be less hands-on time because you can lock the pulley in place and drink some beer for a minute while the water soaks in.
Any reason this wouldn't work?
andrewmaixner
Well-Known Member
I had the same experience here when I heard about underletting and tried that method. I just stir a bunch now, or dump the crushed grains into the immersed basket while stirring.I dough in like that. You need to be patient or you end up with a giant dough ball.
It takes a lot more patience than I had to slowly let the bag down over 5 minutes or so.
30Bones
Well-Known Member
Anyone know where one could source another 90 degree fitting for inside the kettle to use as a whirlpool like it has on the output? Brewers Hardware does not carry it. Unsure if CO Brewing sells individual parts or not?
EDIT, waiting to hear back from Tim and COBS, but found what i am looking for from Brew Boss
https://www.brew-boss.com/1-5-Tri-Clamp-Pickup-Tube-p/tc-pickuptube.htm
EDIT, waiting to hear back from Tim and COBS, but found what i am looking for from Brew Boss
https://www.brew-boss.com/1-5-Tri-Clamp-Pickup-Tube-p/tc-pickuptube.htm
Last edited:
mcgimpkins
Well-Known Member
- Joined
- Feb 23, 2014
- Messages
- 201
- Reaction score
- 56
Anyone know where one could source another 90 degree fitting for inside the kettle to use as a whirlpool like it has on the output? Brewers Hardware does not carry it. Unsure if CO Brewing sells individual parts or not?
EDIT, waiting to hear back from Tim and COBS, but found what i am looking for from Brew Boss
https://www.brew-boss.com/1-5-Tri-Clamp-Pickup-Tube-p/tc-pickuptube.htm
FYI this one from Nor Cal does a better job of getting the swirl going on the whirlpool. The one from Brew Boss works well as a pickup, however I find the smaller 0.5" tube creates some pressure to really get the wort moving.
http://www.norcalbrewingsolutions.com/store/Tri-Clover-Whirlpool-Tube-1.5-TC-x-1.5-TC-x-.5-Tube.html
30Bones
Well-Known Member
You are correct. Tim from CBS said the same thing (and sells one for $40). Unfortunately making this work will run me $140 in parts. So for now I am sticking with the whirlpool arm that came with my system and for $0 moving my temp probe to the output valve for the mash process to get it away from the element. I feel that is more important anyway.FYI this one from Nor Cal does a better job of getting the swirl going on the whirlpool. The one from Brew Boss works well as a pickup, however I find the smaller 0.5" tube creates some pressure to really get the wort moving.
http://www.norcalbrewingsolutions.com/store/Tri-Clover-Whirlpool-Tube-1.5-TC-x-1.5-TC-x-.5-Tube.html
30Bones
Well-Known Member
Anyone wanting the framework and pulley system from my 20 gallon nano let me know. Shipping might be a hassle. Located in eastern Iowa
I've had this system for over a year and yesterday ran into a issue that I can't figure out. When I turn the switch to turn on the heating element I hear a clicking noise but the element doesn't turn on. If I toggle the switch a few times I can get it to turn on sometimes. Once it's on it works as expected, firing when necessary to keep the set temperature. I don't have much experience with electrical systems so I'm not sure where to start or what to replace. I assume it's a short somewhere. Any ideas would be great. Thanks!
The_Bishop
Well-Known Member
- Joined
- Dec 8, 2013
- Messages
- 2,100
- Reaction score
- 676
Sounds as if the contactor or relay has gone bad.

30Bones
Well-Known Member
Yeah that looks like a contactor/relay. I need to get a spare just for this reason.
Please forgive my ignorance, I'm a software guy by trade and know very little when it comes to hardware and electrical systems. Are contactors/relays the same thing? I think that the relay is at the top of the box, with the heat sink on top of it. Where can I get the part to replace this? Thanks for the help!
We just got the system this recent weekend but could someone take a pic of how they assembled all the parts? We have a ball valve connection left over and not sure where it should go.
Also we noticed the control panel seems to have two power wires? one thick one without a plug (assuming 240v and need to be spliced into the appropiate plug) and a smaller one that looks like 120v? Anyone can clarify this?
Lastly- what did you guys do to set up dual whirlpool at the bottom and at the top? Is there a Y-connection I need to buy for the pump?
Last edited:
BoilerInSoCal
Well-Known Member
- Joined
- Mar 18, 2009
- Messages
- 87
- Reaction score
- 56
Hi All,
This is a wonderfully informative thread...but, wow, it is long, so I apologize in advance if this question has already been asked/answered and I missed it. I see that people have reported that once you lift the basket, the mash bed is disrupted and the wort gets cloudy again. Makes sense. Has anyone, after mashing, tried lifting the basket to just over the level of wort in the kettle and continuing to recirculate into the basket in an attempt to clarify the wort before boiling?
This is a wonderfully informative thread...but, wow, it is long, so I apologize in advance if this question has already been asked/answered and I missed it. I see that people have reported that once you lift the basket, the mash bed is disrupted and the wort gets cloudy again. Makes sense. Has anyone, after mashing, tried lifting the basket to just over the level of wort in the kettle and continuing to recirculate into the basket in an attempt to clarify the wort before boiling?
- Joined
- Feb 29, 2016
- Messages
- 502
- Reaction score
- 316
We just got the system this recent weekend but could someone take a pic of how they assembled all the parts? We have a ball valve connection left over and not sure where it should go.
Also we noticed the control panel seems to have two power wires? one thick one without a plug (assuming 240v and need to be spliced into the appropiate plug) and a smaller one that looks like 120v? Anyone can clarify this?
Lastly- what did you guys do to set up dual whirlpool at the bottom and at the top? Is there a Y-connection I need to buy for the pump?
I can try to get pics tonight the second question:
Yes the thick one needs the 240 plug. They don’t include it so you can customize it to your outlet. My election installed the plug, the outlet and a gfi 30a breaker for like $200. (And some beer)
The small plug is new to me guessing it is for the new control panel? There should also be an outlet for your pump.
The 120V plug is for the control panel.
When they first made these systems, they used a 4-wire 240V plug and internally split off 120V for the computer. Then, they changed to using 2 separate power connections as part of getting a specific UL certification.
(Unfortunately they made this switch while my unit was being built and didn't notify me. They told me to install a 4-wire outlet when I ordered, so I was pretty ticked when I received a unit with 240V and 120V power connections instead!)
prosperbrews
Well-Known Member
- Joined
- Feb 16, 2018
- Messages
- 67
- Reaction score
- 20
This is a great thread full of information. I have read through nearly every page over past 48 hours. I am seriously considering pulling the trigger on the nano home. I have a couple of questions and would appreciate anyone's feedback based on experience.
* I am torn between this system and the brew boss. Both are similar, but the CO system uses all tri clamp fittings and appears to offer similiar automation features as the brew boss through their new controllers. The brew boss stand with rotating hoist is super slick. I am really not a fan of CO's stand for the nano home. Trying to remove the basket while hanging over the pot doesnt seem appealing. Was anyone else considering the CO and Brew Boss systems? What made you go one way vs the other?
* The stand issue brings up another concern. The steam condenser looks awesome. I was planning on having CO weld an additional 1.5 inch ferrule at the top of the kettle at 4 oclock position. However, I also see that this also has a pretty significant impact on reducing the boil off rate. How does everyone feel about this, especially when brewing bigger beers? With the limitations of BIAB, boiling off extra water is a great way to go about making bigger beers without getting a stuck mash. I am still trying to figure out a good solution to have a hoist AND a condensation hood with exhaust.
* I will be doing primarily 5 gallon batches in the 20 gallon pot. With the efficiencies ya'll are seeing on this system, what are realistic OGs people are getting on bigger beers without sparging?
* Any mods anyone would recommend for this system other than what has been mentioned? I am going to tee off the pump exit and recirculate through the top and the whirlpool port. I am also going to implement the SS mash manifold.
* I'll be using a chugger mini max pump with this setup. This has about the same power and flow rate as the normal chugger. I also plan on using a counterflow chiller. Can anyone with experience comment on whether or not these pumps have the oomph to allow an effective whirlpool while passing through the counterflow chiller?
Last edited:
Similar threads
- Replies
- 11
- Views
- 751
