• Please visit and share your knowledge at our sister communities:
  • If you have not, please join our official Homebrewing Facebook Group!

    Homebrewing Facebook Group

The full Monti

Homebrew Talk

Help Support Homebrew Talk:

This site may earn a commission from merchant affiliate links, including eBay, Amazon, and others.
Yes, traditionally steam jackets go up the sides as well. I don't have the patience or the cash "RIGHT NOW" to take on a build that involved. So, just the bottom will have to do.

Hey if it works that's all that matters.... and from reading your other thread (which I missed up to this point) it sounds pretty good.

You could probably also just run a few stainless tubes around the inside wall of the kettle, connected to the bottom steam reservoir to increase the contact area. Not sure how much that would help though...
 
Very interesting project Monti, did you attempt any other forms of steam heating? Namely coils guess, i worked at a micro brewery for a short time and they had steam coils in their MLT and BK. It would seem that might be a more efficient at transfering heat than even a full steam jacket. I understand at least one advantage to a jacket is cleaning is no more complicated than a regular kettle, while cleaning coils might be annoying.

I wasn't able to find any threads on the subject although i only did a quick search.

Yes, I have. I have done a couple different coils. The links that are posted by bendavanza are good links if my pics hadn't gone south. A lot of info in my FB thread is gone and I believe all my info is gone in the MK-I thread. I had an issue with my photo account and I only kept a few pics on disc. I put back what I had, the others are lost.

My main reason for this method is what you mentioned, cleaning.


Yea, see above post.

Hey if it works that's all that matters.... and from reading your other thread (which I missed up to this point) it sounds pretty good.

You could probably also just run a few stainless tubes around the inside wall of the kettle, connected to the bottom steam reservoir to increase the contact area. Not sure how much that would help though...

I just like the cleanliness of this better. There is nothing wrong with the coils. I am just after a clean interior in my kettle. I am also thinking of doing the drain different then using my puller. (those pics are gone too)
 
Ok, I'll say sorry right up front. I didn't get to take any pics until this point of this build.

This is the beginning of my siphon gauge build. I am using 1/4" OD tubing, 1/2" OD tubing, and 1" OD tubing for this. This is really nothing more then a fancy water trap. The idea is to trap and keep water in this piece so there is a water barrier between the steam and the pressure gauge. This prevents high temp steam from entering the gauge and destroying the insides of it. This piece will go in the T section I just finished. I am going to place it in between the pressure gauge and the steam manifold.


This is built on the same idea of an air lock only the insides don't move.
This is the inside piece. This sets the water level inside and diverts any incoming steam down into the water. So, the flow goes in through the 1/4" tubing, then down the inside of the 1/2" tubing that you see here.
P1010028.jpg


This is the inside piece sitting inside the main body.
P1010030.jpg


This is the same assembly as the above pic, only flipped over. Your looking at the washer from the first pic, that is going to get welded to the main body.
P1010029.jpg


Here is an over view of what it will all look like when done. I am missing a coupling in this pic for the gauge to screw into but, you get the idea. The male threads will screw into my steam manifold.
P1010031.jpg
 
Looks real nice GM, sure beats the pipe pigtails for steam gauge isolation. The pressure cookers get by because the steam is never over 220 degrees, the flash boiler can take it to 500+ degrees if you let it.
 
Loving the steam trap! These are really good ideas. I am looking for a container right this second to jacket my kettle with. I love your steam setup, but I wish you could try a 14 gallon boil so I could see what is possible with your setup. What are your plans after the metalwork? Are you going to insulate the kettle? If you could see it in your heart to try the 14 gallon with insulation, it sure would save me a lot of sleepless nights wondering what I should do. LOL, I am still thinking for me to be happy with all those welds I would have to be jacketed, but for what you are wanting to accomplish... I think you are golden!!! Great work Monti.
 
Looks real nice GM, sure beats the pipe pigtails for steam gauge isolation. The pressure cookers get by because the steam is never over 220 degrees, the flash boiler can take it to 500+ degrees if you let it.

Thank you Kladue, and thank you for bringing this piece to my attention. I never paid much attention in the past when I saw them on other equipment. I just figured my steam gauge would be ok since it was made for steam. As you mentioned though, the FB has the ability to make big time HOT steam.

If you have any other ideas or you see something I am missing please let me know.
Prost:mug:

Loving the steam trap! These are really good ideas. I am looking for a container right this second to jacket my kettle with. I love your steam setup, but I wish you could try a 14 gallon boil so I could see what is possible with your setup. What are your plans after the metalwork? Are you going to insulate the kettle? If you could see it in your heart to try the 14 gallon with insulation, it sure would save me a lot of sleepless nights wondering what I should do. LOL, I am still thinking for me to be happy with all those welds I would have to be jacketed, but for what you are wanting to accomplish... I think you are golden!!! Great work Monti.

Thank You,
I may find the time to setup the test rig again and see how it does with larger amounts of water. I may, I am having a pretty good time building right now.:D Though I am very curious about that myself. What if I want to do a 10 gallon batch, or if I should ever decide to brew 10 gallon batches all the time. I have thought about insulating the kettle bottom area. I kinda want to insulate it up to the first rib in the keg. I am still unsure if I want too yet. I haven't come up with a nice enough idea in my mind that pleases me. I am toying with either a brass or copper sheet that will cover the insulation to break up all the SS. I think SS is nice but, it gets cold feeling real quick IMO. That's part of the reason I'm doing a mild steel stand. It's for the paint.
Cheers friend.:mug:


On another note. I got the siphon gauge completed. I am hoping to get some work done on the bottom. I can't stand looking at that ugly bottom. I hope to get the drain in and a nice finish on it so I can weld in the steam manifold.
P1010033.jpg

P1010032.jpg
 
The only thing left is a way to trap the steam and release the condensate cheaply and automaticaly. In your case maybe a short coil of 1/4" copper tube will work like the capillary tube does in refrigeration, liquid flows better than gas does through tube, and the condensate will hold the steam back. Some research is needed to get the required length worked out, or else start with 10' and reduce length until steam pressure drops to where you want to run at.
 
The only thing left is a way to trap the steam and release the condensate cheaply and automaticaly. In your case maybe a short coil of 1/4" copper tube will work like the capillary tube does in refrigeration, liquid flows better than gas does through tube, and the condensate will hold the steam back. Some research is needed to get the required length worked out, or else start with 10' and reduce length until steam pressure drops to where you want to run at.


What I was hoping to do was. Use a ball or a gate valve at the drain of the kettle. Directly after the valve I will place the heat exchanger/pre-heat coil for the boiler feed water. My thoughts were that the condensate would flash back to steam when it entered the heat exchanger. The valve would be closed to the point that I would get my pressure.

Do you think this is a good idea?
 
That looks awesome. I love following your threads Monti. Quick question: Does that siphon work like an airlock on a fermenter to isolate the gauge from the steam?
 
This is off topic, but can you post a video showing how you clean/brush those fittings so perfectly?
 
That looks awesome. I love following your threads Monti. Quick question: Does that siphon work like an airlock on a fermenter to isolate the gauge from the steam?

Yes, that's almost exactly how it works. I say almost, cause there is no moving parts in this. But, it holds water just like an air lock, and yes. Its purpose is to isolate the gauge from the steam. In order for steam to reach the gauge it will have to go through the water first which will make it condense.

This is off topic, but can you post a video showing how you clean/brush those fittings so perfectly?

The secret is my wood lathe. I chuck up the parts in it so it does the spinning for me. I can't cut any metal on it or machine parts, but I can turn them for the polishing.

Today after I get the drain welded in the bottom. I am going to turn the head stock 180* so that the bottom will clear the bed on my lathe. I am going to turn it with a polishing wheel to get rid of the AB stamping on it and give an even finish. I hope it all works out.

All I can say Monti is that I wish you lived next door to me.:)

Hey, all you gotta do is move.:) Joking. Thank You for the kind words.

Cheers you guys.
 
Whoa Whoa WHoa, your going to chuck the entire keg and turn it on your wood lathe? I have a sizeable wood lathe but I don't know how I would manage that. Did you make a special faceplate to hold it? By the way, you don't have to go to all that trouble on my pieces you're welding.
 
My curbside ShopSmith multi tool find will swing a keg.
A steel plate with 3 rod couplings with allen bolts to lock
below the bottom hand ring of the keg.
At the kegs top a live center on the tailstock mount on the
ShopSmith with a stepped sleeve that fits into the the kegs
filler, this on kegs before the tops were cut open. A steel disk
with six 1/2" nuts welded to center keg tops that have been cut.
This with a 9" buffer and a 1 1/2 HP tread mill motor with its speed
control (a neighbors curbside find) to get the kegs surface speed way
down low to buff. Zero money involved just curbside items. Ths ShopSmith
tailstock also works on the Bridgeport with a rotary table holding kegs horzontal
to mill and maintain a solid and slow rotation.
 
Whoa Whoa WHoa, your going to chuck the entire keg and turn it on your wood lathe? I have a sizeable wood lathe but I don't know how I would manage that. Did you make a special faceplate to hold it? By the way, you don't have to go to all that trouble on my pieces you're welding.


No. I don't have a large enough lathe to swing the entire keg on it. I only have a 14" diameter lathe. So I just miss the ability. Other wise as BrewBeemer mentioned, I would probly come up with some way to mount a full keg on there.:D I just turn small parts on it to get the nice finish. What I turned today was the bottom the will be welded to my kettle. The piece that is pictured with the manifold.


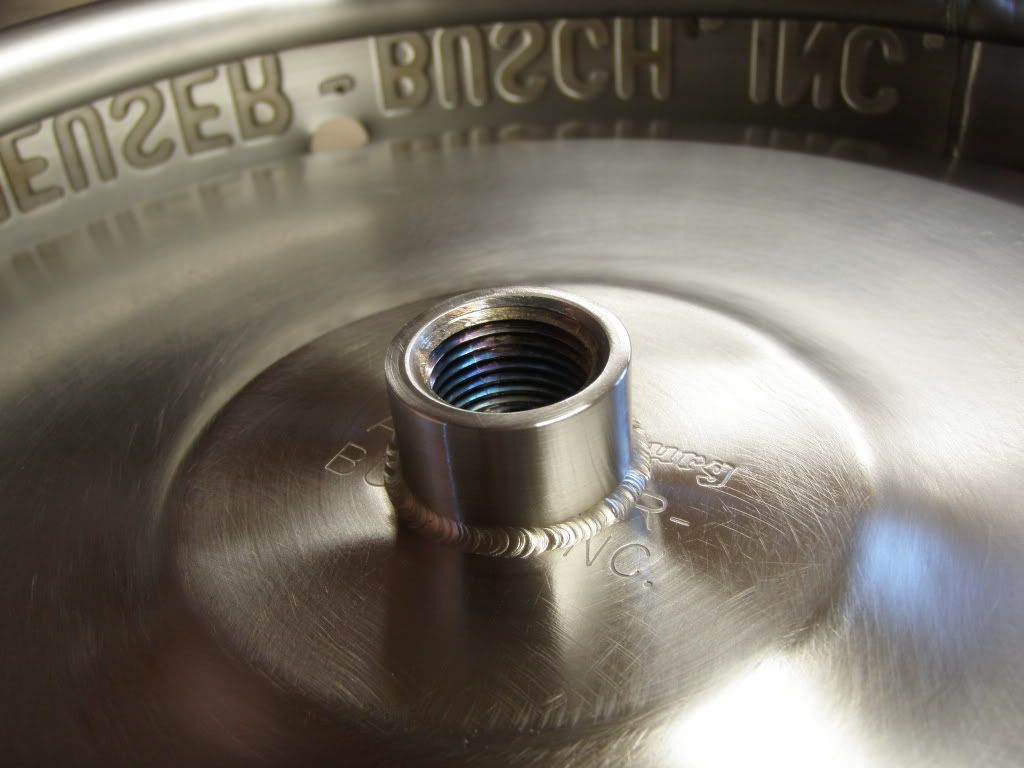
So, after a few hours of work I have the bottom at a place I think I am happy with it. I got the drain welded in and I got a pretty good finish on the outside of it.

I drilled a 7/8" hole in the bottom and I cut a coupling in half. This a shot of the fit. I ran a bead along the joint and polished it off. I had thoughts of doing a fusion weld only, then I thought what the heck. I'll add wire.
P1010034.jpg


Here is how it came out.
P1010035.jpg


I also ran a bead on the outside of the coupling. You can see the stamping of the AB nomenclature from the inside of the skirt.
P1010037.jpg


But on the outside it is.....Anheuser who??:D
P1010036.jpg


So, now I am going to stare at this stuff for a while, while I try and figure out how I want to go about the purge for the manifold welds. Once that's welded in I can fine tune the fit to the bottom of my kettle and get it welded on.

Thanks for looking everyone.
 
ShopSmith will swing 16 1/2" vs a keg's 15.756" OD on the larger size kegs down to 15.517" OD on a Full Sail keg. I also have Jack a Jack Daniels 15.5 keg.
Monti, those tread mill motors are 90 VDC with a LED shutter to maintain constant rpm's no matter the different loading on the tread mill. A solid constant speed motor also great for a grain mill drive. The one I have is rated at 1 1/2 HP, bad part the big plastic eyesore control panel has to tag along.
 
Ok, its been a busy day. I managed to get the manifold welded in on the inside. Looks like its time to fit the bottom. :rockin:

Once I get my kettle done I may just start using it on a wood stand of 2x4's or something.

Some pics for the crowd.
P1010039.jpg

P1010038.jpg
 
GM,

Like everyone else, I am in awe and envious of your skills, not just welding but design and fabrication.

You show a die grinder in one of your pics with a burr of some sort you use for cutting odd shape holes in stainless. What kind of burr is it, what material of construction, where can I get one? I have a couple oval holes I need to cut in stainless. Thanks.


The bit is nothing special. Its just a carbide bit. That one is made by GARR TOOL. Its a double cut bit cause I like to minimize the shavings ability to stick in me. Single cut bits throw a longer (more splinter like) shaving. I used that shape cause it allowed me to use different size bits, kind of an all in one if you will. If I wanted a bigger radius I would just stick the bit in further. That's all, it kept me from having to change bits.

Go slow. Check your burr often, SS likes to break off the cutting faces.

Here is a link to GARR. Its the one listed as EDP# 64012. The third one down.
http://www.garrtool.com/doc/pdf/SF.pdf
 
Thanks GM, I just ordered one from Amazon. I assume you mean slow feed rate as opposed to slow tool rpm?
 
Top workmanship as always. This has been a pure joy in following your process.

I'm just waiting for the other shoe to drop.

I think the welder you have just needs a little work and will serve you for many years. I think back to the High Freq. box and buzz box I first started trying to Tig weld with and have a good lol.

Keep up the Great work and I know you will.

God Bless
Dominus Vobiscum
Swagman:cool:
 
Funny, I just sold my High Freq box a couple weeks ago. The owner of the welding supply knew I had it. A guy comes in looking for one. A little dusting and everybody's happy.
 
Top workmanship as always. This has been a pure joy in following your process.

I'm just waiting for the other shoe to drop.

I think the welder you have just needs a little work and will serve you for many years. I think back to the High Freq. box and buzz box I first started trying to Tig weld with and have a good lol.

Keep up the Great work and I know you will.

God Bless
Dominus Vobiscum
Swagman:cool:

Hey Swagman.

I haven't seen you around much lately. Maybe its just me. Thank you for the kind words. :mug:

I have been busy getting some other things done around the house. In a couple of my pics you can see some tile. I still have more to do, I just don't get in there and get it done. I get side tracked on different projects. I am still at the point of figuring out the clocking position so I can weld on the bottom.


Funny, I just sold my High Freq box a couple weeks ago. The owner of the welding supply knew I had it. A guy comes in looking for one. A little dusting and everybody's happy.

Story of my life, a day late and a dollar short.
How's you build coming along? Did you get the welding done?
 
Been busy this year but I'm closing the shed for the month of July also have a long list. I start with an old forney welder with front pugs and a Hi Freq box. I made a spring loaded foot switch so I could start at a higher amp and switch to a lower setting. In fact the freq box is still around here someplace.
Monti question how large is the argon tent you use at work. Was thinking of one for the shed but maybe a little smaller


God Bless
Dominus Vobiscum
Swagman:cool:


Are you asking about the purge chamber I used on my FB build? If so that unit is at work. I am far too cheap to have one here at the house. Those things SUCK the life out of a tank of gas. I just build make shift purges here at the house to fit the application at the time. Metal tape, pieces of copper or brass shim stock, ect... I do have a couple back purges I built and one diffuser that I use inside my little "tents".

A small acrylic box to weld up all the funky stuff would be real cool though. If you build or buy one I will be very envious of you.
 
GM,

A follow up to your good advice on die grinders and bits. I used them tonight to open up the mis-measured opening of my eHLT, and in maybe 20 minutes took an 1/8" more out of the radius of the opening, and now the top fits perfectly. The bit you recommended worked nice and smoothly. I couldn't be more pleased.

Now I have some other holes in the eHLT to finish off, and it'll be good to go.

Thanks!
 
Back
Top