stamandster
undefined member
My journey started with the issue of my DS18B20 sensors not reporting data in CraftBeerPi 4 after many hours of uptime. I tried many things, different resistors, capacitors, 5v rails, etc (though two different busses seemed to help). It seems that in conjunction with not great OneWire support, OneWire bus not being able to handle 4 sensors, and wiring issues (length, I didn't want to chain) I had to find an alternative. And I wanted to a find an alternative using off the shelf hardware and firmware that would be connected fairly close to the sensor powered by a USB adapter, then that would send sensor data to CraftbeerPi. Initially I was going to write custom code for the Arduino but fell short as my knowledge/time for this is limited. I finally settled on Tasmota for its simplicity to configure for the layman. However, using MQTT for sensor data the lowest possible reporting interval is 10 seconds. While potentially fast enough for a boil kettle, it was not fast enough for my RIMS tube. So what is required for stable 1 second response times? Just an FYI on pre-requisites, you really should already know how to configure a DS18B20 sensor on an Arduino ESP32/8266, as well as some Linux based file editing and commands. I didn't do anything really "new", simply gathered various pieces of what others have done to develop a process that seems to work, but had not been documented in a single thread. Also, currently CraftbeerPi 4 does NOT have a temperature offset control for MQTTSensor. Though I did ask for that enhancement.
Core Configuration for Hardware and Software:
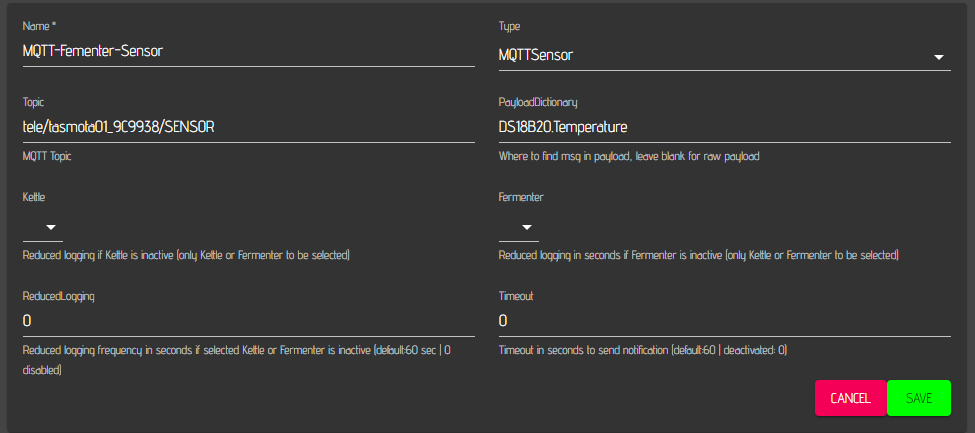
Configuring Basic MQTT Sensor on CraftbeerPi 4: This will be based on the Tasmota Teleperiod, a minimum of 10 seconds. This is just to validate we're getting sensor data into CraftbeerPi, but this configuration would be useful for fermenters (as shown in the example image below).
Configure Advanced MQTT Sensor Polling on the Raspberry Pi and CraftbeerPi: Basic process, we will use a python script on the Raspberry Pi with an HTTP query to command Tasmota to report every second the status of all connected sensors via MQTT.
Hopefully I've clearly described how to configure properly. Also, this configuration has been tested for over 24hrs without dropping a beat. Hopefully this saves others a similar frustration. You can also configure the same Tasmota to be an MQTT Actor (relay), but that's a store for another day.
Core Configuration for Hardware and Software:
- For the Raspberry Pi
- Download and initial setup Craftbeerpi 4 (**you need to configure this to have a static IP address or DHCP Reservation!**) - https://openbrewing.gitbook.io/craftbeerpi4_support/readme/server-installation
- Install and configure MQTT on the Raspberry Pi - https://openbrewing.gitbook.io/craftbeerpi4_support/readme/craftbeerpi-4-server/mqtt-connectivity
- If you used a username and password please keep this handy somewhere!
- You can use MQTT Explorer to validate that MQTT is working, and that Craftbeerpi is connected as well - https://mqtt-explorer.com/
- Install and configure MQTT on the Raspberry Pi - https://openbrewing.gitbook.io/craftbeerpi4_support/readme/craftbeerpi-4-server/mqtt-connectivity
- Download and initial setup Craftbeerpi 4 (**you need to configure this to have a static IP address or DHCP Reservation!**) - https://openbrewing.gitbook.io/craftbeerpi4_support/readme/server-installation
- For Tasmota (most Arduino ESP32/8266 boards), install and configure - https://tasmota.github.io/install/
- On the newly flashed Tasmota's dashboard, browse to
- Configure your network to reserve the DHCP IP address of the Tasmota OR assign a specific IP address via Tools > Console, then type the command and press enter -- IPAddress1 <IP Address>
- Go to Configuration
- Configure MQTTand then click save -- enter Host IP, user and password (if configured previously), the port should be 1883. You can change the client and topic if so desired, but keep it default for now to make sure things work
- You'll want to remember the "topic" displayed, or you can use MQTT Explorer to find it
- Configure Module and then click save -- select the GPIO pin that has your sensor, I chose GPIO27. In the dropdown select DS18x20, and set it to 1.
- Configure MQTTand then click save -- enter Host IP, user and password (if configured previously), the port should be 1883. You can change the client and topic if so desired, but keep it default for now to make sure things work
- (OPTIONAL but likely) To set the sensor to Fahrenheit instead of the default Celsius go to Tools > Console
- Type the command and press enter --- SetOption8 1
- (OPTIONAL) To configure the Teleperiod (the time that sensors will report) to something faster for testing (default is 300s), you can to to Configuration > Configure Logging. Set Telemetry Period to 10. Click Save.
- The Arduino should be powered off before connecting DS18B20 sensor hardware to the Arduino - https://tasmota.github.io/docs/DS18x20
- Within the Tasmota dashboard landing page you should see the sensor display the temperature like so

- On the newly flashed Tasmota's dashboard, browse to
Configuring Basic MQTT Sensor on CraftbeerPi 4: This will be based on the Tasmota Teleperiod, a minimum of 10 seconds. This is just to validate we're getting sensor data into CraftbeerPi, but this configuration would be useful for fermenters (as shown in the example image below).
- Navigate to Hardware
- Click the + sign to add a sensor
- Assign a name to the sensor
- Select from Type > MQTTSensor
- From the Tasmota Topic you had saved previously, type tele/<topic>/SENSOR
- For PayloadDictionary, type DS18B20.Temperature
- For testing, disable ReducedLogging and Timeout by changing these to 0

- Click Save
- After the Teleperiod elapses you should now see the temperature (either in F or C)

Configure Advanced MQTT Sensor Polling on the Raspberry Pi and CraftbeerPi: Basic process, we will use a python script on the Raspberry Pi with an HTTP query to command Tasmota to report every second the status of all connected sensors via MQTT.
- Configure your Raspberry PI --- https://github.com/stamandster/TasmotaAutoStatus
- For testing, follow the alternative at the end of the readme
- In CraftbeerPi configure MQTT Sensor as before, however the following changes occur
- Topic will become stat/<topic>/STATUS8
- PayloadDictionary will become StatusSNS.DS18B20.Temperature
- All other settings same as before

- Click Save
- If all has gone well, when you hold your hand to the sensor you should be an almost immediate change in the dashboard.

Hopefully I've clearly described how to configure properly. Also, this configuration has been tested for over 24hrs without dropping a beat. Hopefully this saves others a similar frustration. You can also configure the same Tasmota to be an MQTT Actor (relay), but that's a store for another day.
Last edited:


![Craft A Brew - Safale S-04 Dry Yeast - Fermentis - English Ale Dry Yeast - For English and American Ales and Hard Apple Ciders - Ingredients for Home Brewing - Beer Making Supplies - [1 Pack]](https://m.media-amazon.com/images/I/41fVGNh6JfL._SL500_.jpg)


