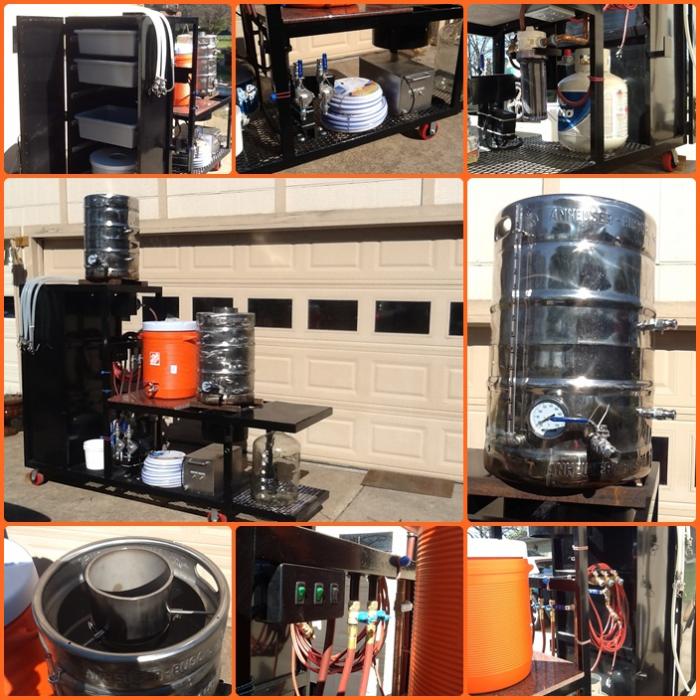
Stepping up my game. Going to Keggles. My setup so far.

Homebrew Talk - Beer, Wine, Mead, & Cider Brewing Discussion Forum

Help Support Homebrew Talk - Beer, Wine, Mead, & Cider Brewing Discussion Forum:

This site may earn a commission from merchant affiliate links, including eBay, Amazon, and others.

CincyJoe

Member
Joined
Sep 17, 2013
Messages
14
Reaction score
0
Looking for advise from people who have been there before. I plan on adding 2 pumps. Just setting this up. Thinking of welding up a structure on wheels for all three burners. If any of you have any suggestions, please, let em fly.... I purchased 3 kegs from a local stainless dealer and found a welder to weld in half inch couplers. Just leak tested them tonight and all looks well. Using a pico false bottom in the MLT Using the Bayou 10" burners and they seem like they rock! I purchased from Adventures in Homebrew these three burners. They come with a single regulator, but as this is right now, you must burn all three burners at once. I am thinking of going with valves on each burner, any advice? This is my very first post so I hope I put it in the right place.

image-318072135.jpg


image-2231213183.jpg


image-3579776823.jpg
 
CCBrewer said:
Nice start... down a very expensive hobby ;)

Oh my God can it be expensive, but the reward is Amazing! I have about 2k into my setup, and that is just to make Wort.
 
two_hearted said:
Yeah, I just switched to keggles and my god... the cost of fittings, bulkheads, sight glass....

All the fittings, two pumps and tubing was $800.00, luckily I only had to pay for one keg.

This is the finished rig, well I'm always tinkering with it.

image-1112802457.jpg
 
The pumps and cam-locks were the big expense for me. I got them from BobbyM (he sells kits, that I like). He has full-port fittings that give the best flow IMHO. I got my casters from caster city, when I called them, the guy helped me get the 4" casters that fit up in, the 2x2 tubing.
 
The pumps and cam-locks were the big expense for me. I got them from BobbyM (he sells kits, that I like). He has full-port fittings that give the best flow IMHO. I got my casters from caster city, when I called them, the guy helped me get the 4" casters that fit up in, the 2x2 tubing.

Does Bobby have a website?
 
Hey herc
Do you have problems getting your pumps to prime ever? It looks like you have the pump oriented so the output is down, I thought I had read that the output should go up as its easier for the pump to clear the air in the lines. Nice build though, that controller looks awesome.
 
sethlovex said:
Hey herc Do you have problems getting your pumps to prime ever? It looks like you have the pump oriented so the output is down, I thought I had read that the output should go up as its easier for the pump to clear the air in the lines. Nice build though, that controller looks awesome.
As a matter of fact Yes I do have priming issues, if reversing the head so the output is up helps then I'll give it a try, going to brew this Saturday so I'll give it try. Thanks, it was a long process but has payed off. My big screw up was placing the burners way to far from the kettles, going to fix and test tonight before tomorrow's brew.
 
I just ordered a march pump but have yet to use it so I've been reading about how to use it effectively. Let me know if changing orientation helps! One other thing...do you have valves on the output side? I think to prime you open all downstream valves and then open your supply valve. This should create a nice siphon effect...there is a thread on here but I can't find it to link it the ipad search sux
 
sethlovex said:
I just ordered a march pump but have yet to use it so I've been reading about how to use it effectively. Let me know if changing orientation helps! One other thing...do you have valves on the output side? I think to prime you open all downstream valves and then open your supply valve. This should create a nice siphon effect...there is a thread on here but I can't find it to link it the ipad search sux

Output up is definitely the way to orient them.
I do have valves on the output sides of the pump for flow control so as to not put pressure on my silicone tubing.
To prime, I open all valves and try to get any air in the line past the pump before turning it on.
 
krazydave said:
Output up is definitely the way to orient them. I do have valves on the output sides of the pump for flow control so as to not put pressure on my silicone tubing. To prime, I open all valves and try to get any air in the line past the pump before turning it on.

Yep the way to go is output up, works great, primes every time.
 
Man, your garage looks freaking huge. I'm jealous, I bet there's all sorts of cool toys in that beast.

Nice looking set up by the way. I've always been a fan of the way the Wood stands look. I was going to do that myself, before i found a steal on one of those Werner Compact scaffolding set ups.
 
Man you could hard plumb a gas manifold with needle valves and mount it right to the front, then you would only need one regulator. How high are the tops of your kettles on those burners?
 
two_hearted said:
I stepped up my game too. I took the kiss method (cheap/can't weld method).

Looks good, I wish I had taken the KISS method, I would have saved a ton.
 
The Keggles stand just under 4 and a half feet tall which is perfect for me, I am a tall guy so I hate bending over a lot on brew day... I will be installing gas manifold with Honeywell controllers, pilot lights, the works....
 
@cincyjoe, would love to see details of your burner and honeywell build
 
CincyJoe, looking good! As a fellow recent convert to keggles, I can safely say that it does tend to be a fairly large front end investment, but the beer I've made since the conversion is incredible. My stepdad just dropped the final piece to my electric setup... the extra prep table from the restaurant with a backsplash :). Look forward to watching the progress and best of luck!!

Btw I'm another Cincy boy on the East side if youre ever interested in hanging out on brew days!
 
CincyJoe, I would highly suggest putting the wort kettle on a different level than the HLT and MLT. This way you save one pump and you can gravity feed the wort kettle from the MLT that way you don't suck on the grain bed. Sucking on the grain bed will lose serious efficiency and I find that gravity works in our favor here. You could tune the GPM by toggling a valve on the outlet of the pump but that it honestly a waste of time in my opinion, especially if you just drain the sucker through a high temp hose (to keep a siphon) into the kettle. This will open up some nice space on your brew bench to keep spoons, hops, etc.
 
Just added and tested control. I simply copied almost exactly what I've seen others do with the pid's works like a champ. I can't wait to hang the pumps the thermonator and start brewing. Pics below

image-3316593446.jpg


image-2598206365.jpg


image-140272639.jpg


image-4112804121.jpg


image-3712353266.jpg


image-780784573.jpg


image-4119977345.jpg


image-1982456896.jpg
 
waffle418 said:
CincyJoe, looking good! As a fellow recent convert to keggles, I can safely say that it does tend to be a fairly large front end investment, but the beer I've made since the conversion is incredible. My stepdad just dropped the final piece to my electric setup... the extra prep table from the restaurant with a backsplash :). Look forward to watching the progress and best of luck!! Btw I'm another Cincy boy on the East side if youre ever interested in hanging out on brew days!

Hey sounds great. Post up some pics of ur Brew Rig!!
 
Looks good! Make sure you're using the PIDs in on/off mode though, instead of PID mode. The gas valves don't like PID mode at all.
 
krazydave said:
Looks good! Make sure you're using the PIDs in on/off mode though, instead of PID mode. The gas valves don't like PID mode at all.

Very good advice.
 
sethlovex said:
I just ordered a march pump but have yet to use it so I've been reading about how to use it effectively. Let me know if changing orientation helps! One other thing...do you have valves on the output side? I think to prime you open all downstream valves and then open your supply valve. This should create a nice siphon effect...there is a thread on here but I can't find it to link it the ipad search sux

I have valves on the output side of each pump, I also rotated the pump heads so the output is facing up, no prime issues at all.
 
herc1354 said:
I have valves on the output side of each pump, I also rotated the pump heads so the output is facing up, no prime issues at all.

Sweet now you can show me how to wire a PID
 
CincyJoe said:
Just added and tested control. I simply copied almost exactly what I've seen others do with the pid's works like a champ. I can't wait to hang the pumps the thermonator and start brewing. Pics below

I like your pilot system. Do you have a parts list? Maybe the most progress in five days of any build I've seen.
 
I like your pilot system. Do you have a parts list? Maybe the most progress in five days of any build I've seen.

I totally coppied what I have seen others do with a few of my own twists.
Here is the parts list.

Burners I bought complete on AIH homebrewing.org I chose the large 14" banjo burners with 18X11 Steel stands. They came complete, but I had to change the orfices to low pressure, I bought the low pressure orfices with needle valves and low pressure regulator at http://www.tejassmokers.com

The Pilot system and valves are all honeywell and I bought them on Amazon.

Honeywells: http://www.amazon.com/gp/product/B00069CR8S/?tag=skimlinks_replacement-20

Thermocouples: http://www.amazon.com/gp/product/B000BPHNW2/?tag=skimlinks_replacement-20

Pilot Assy: http://www.amazon.com/dp/B003CW0D1E/?tag=skimlinks_replacement-20

The Gas Supply lines and the 24v transformer were sourced at my local Home Depot

Pid's from Auber I used the SYL2362's
http://www.auberins.com/index.php?main_page=product_info&cPath=1&products_id=106

Temp Sensors I bought the nice SS Cable Option. Worked Great!
http://www.auberins.com/index.php?main_page=product_info&cPath=20_15&products_id=84

Nema Enclosure on Ebay: http://www.ebay.com/itm/310665459122?ssPageName=STRK:MEWNX:IT&_trksid=p3984.m1497.l2649#ht_433wt_904

sourced switches at Radio Shack
 
Last edited by a moderator:
Awesome, thanks! Did you build your own manifold? I like your pilot system but I can't really tell what you did is that copper for the gas line

.
 
sethlovex said:
Awesome, thanks! Did you build your own manifold? I like your pilot system but I can't really tell what you did is that copper for the gas line .

I just used 1/4" copper tubing from Home Depot. The manifold was part of the pilot light assembly that I purchased It was pretty easy. I mounted the pilot light on the stainless guard that came pre mounted in the burner
 
Nice stepping up of the game!!! I have a steel stand that I intend on automating in a similar way. Keep the updates coming.

How are you going to light the boil burner?
 
Nice stepping up of the game!!! I have a steel stand that I intend on automating in a similar way. Keep the updates coming.

How are you going to light the boil burner?

The boil burner is all manual as it is High pressure and the honeywells only function on low pressure. The boil occurs 2x faster w high pressure and constant steady temperatures are not as important as the hlt and Mash
 
sethlovex said:
Sweet now you can show me how to wire a PID

I just followed the instructions that came with the PID, if you are using a transformer wire that to the PID rather then straight 110ac, switching 24ac is easier on the relay inside of the PID.
 
Back
Top