wizbrewery
Member
- Joined
- Mar 29, 2015
- Messages
- 12
- Reaction score
- 2
Yes, my confusion from an earlier post in this thread, should have read your notes first. Thanks for the info, will get an enclosure for this and test it out hopefully v. soon.

") marvelous work Mats See here
marvelous work Mats See hereHi,
had a brewday with the single vessel release on my new diy single vessel recirc setup. I can report only great things with terrific results:
strike temp reached with constant power OK
mashing steps (simple infusion) timing OK
temperature maintained during mash OK with thermostatic output Po
Pulsed output worked OK
boilup alarm and constant OP boil fine
all user input to pause/continue program OK
So brewday was a success
https://wizbrewery.wordpress.com/
Now for minor comments
hop alarms were untested will do that next time.
I think there is a problem when hot break temp is detected. I set it to 98 deg C and it correctly detected . However once detected, the output was set to HO ok but the temp went up to 100 oC & was maintained at 100 oC for Hd.
My pump o/p from the stc is showing 0V, even when the pump should be on. I used an independant pump controller during brewday
Many thanks for your hard work
idea:
Love the countdown for boil time. Could the same be implemented for mash steps, maybe flashing with temp reading? Be really nice to see some indication of progress of the mash steps
cheers Waldy
Once the proteins are broken down (i.e. hot break) then switch to normal boil output.


![Craft A Brew - Safale S-04 Dry Yeast - Fermentis - English Ale Dry Yeast - For English and American Ales and Hard Apple Ciders - Ingredients for Home Brewing - Beer Making Supplies - [1 Pack]](https://m.media-amazon.com/images/I/41fVGNh6JfL._SL500_.jpg)

Hi Mats,It is just that there are a *lot* of things that go into making a good beer. Cleaning/sanitization, yeast selection, yeast health, pitch rate, malt selection, hop selection, recipe formulation, fermentation temperature, pH levels, salts, et.c., et.c.
So IMHO, there are a lot of things to tweak before what would make the beer better is 6 mash steps instead of 4

Hi!
I have pushed some changes to the one vessel brew controller firmware:
* Added two more mash steps (this one's for you @Will_D )
* Added a parameter to enable/disable specific alarms and pauses
* Added a parameter to control during which parts of the program pump should be active
* Added possibility to choose which element is the primary one for each power setting
Check it out here.
I have (as always) done ZERO testing. So, please report bugs when found.
Cheers!
Love your work! The control parameters are pure genius, very intelligent way to incorporate them. Just gotta wait for my new Arduino Pro Mini to arrive so that I can flash it.
I completely agree, and not only does it reduce the number of required parameters, but makes it extensible as well!Thanks a lot!
The control parameters are just bit fields. It would probably be easier for the user to have a binary parameter for each of them, but that would make for more parameters than I'd like, so this was the trade off.
Anyway, I don't think those are parameters that you'd change frequently, so I think it is ok.
Actually it was more to ensure I didn't request anything that had already been requested and I have to commend your patience throughout this project as I can see it did happen to you on several occasions
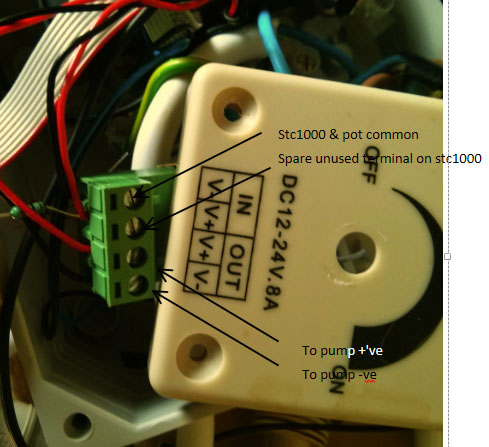
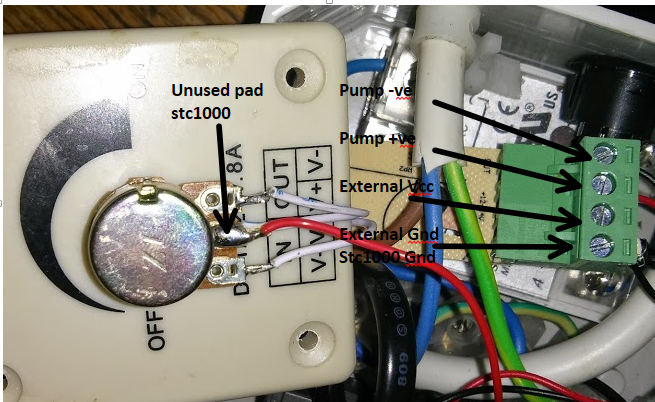
So here is the STC-1000p ready to go back into the Grainfather:

(on the dual probe unit I just used a stereo 3.5mm socket instead of a mono like this one)
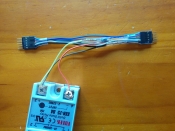
This is the cable with the resistor, etc for the pump controller:
Then I connected an outlet to the cooling relay (1) and hooked up the in built heater element to that, which I have set to the mash setting (Normal = 2000w, Mash = 500w), and then knocked a hole in the side of it and fitted a 2200w immersion element (2) which I connected to the heating relay:

I created a lookup table for the Grainfather thermistor using a 4000 step multimeter and with the STC-1000's thermistor connected to the controller and a brand new Thermopen to keep it honest:

So as for feedback, firstly it's AWESOME!!! I could happily use it as is without any further development required.
Some observations though:
Mash out temp is hard to maintain at the same output level as other mash steps, this is easily overcome on the Grainfather by switching from Mash back to Normal but for other setups might not be as easy. A possible solution would be a new output setting the utilises existing outputs for the final mash set eg. P6o has a value of 0 = SO, 1 = PO, 2 = HO, 3 = BO with a default value of 1 so that if someone does not change it then it will be the same as other mash steps.
A flame out alarm would be really cool for flame out hop additions, allowing negative values for the alarms might be an elegant solution here eg. -10 would be an alarm 10 mins after the boil has finished?
The other observation is more of a "nice to have" rather than valid feedback and that is that the profile editor page would be awesome if you could add the lut output if you are using a non-standard thermistor.
So the low hanging fruit would be a couple of free text areas where you could paste in your lut output and it would replace the corresponding lines in the page0.c file:
Code:const int ad_lookup[] = { 0, -552, -312, -158, -40, 58, 143, 220, 291, 358, 421, 483, 543, 602, 660, 719, 778, 839, 901, 965, 1033, 1104, 1180, 1263, 1353, 1455, 1571, 1709, 1880, 2105, 2439, 3073 };
Code:const int ad_lookup[] = { 0, -484, -351, -266, -200, -146, -98, -55, -16, 21, 56, 90, 124, 156, 189, 222, 255, 288, 323, 359, 396, 436, 478, 524, 574, 630, 695, 772, 867, 992, 1177, 1529 };
This does still require the user to be able to make the lut so the ultimate solution would be a table with two columns and 32 rows to enter the temperatures and resistance values into?
Anyway, sorry for the picture heavy post but I feel t makes it a lot easier to describe.
Cheers!
@mattrox: Pump output is ovbsc only. I don't see the upside of using minute based version over ovbsc for a single vessel system.
If you want to manually conteol the pump, then there is no meed to hook up to the stc at all. The 'pump output' in ivbsc can't drive the pump, it is only a control signal, you still need a driver (like the 8A LED dimmer).
Hi Alpha,
Love the firmware!
I Have a quick question, would it be possible to flash presets directly to the controller?
I regularly change recipe's but brew the same recipe's frequently, while my brew days are easier then ever, it would be nice to be able to flash a profile to the device without having to manually change the settings on the controller.
I'd download a different version of the .ino file with the profiles you use and give them all different names. It's easy enough to flash, just flash the one you want prior to brew day.
Yea didnt think of actually searching through the code and replacing the variable in there, good idea.
Edit: Looked at the .ino code anyone know which hex's change what
On a side note, anyone know how many writes the memory of the STC would be able to take before it fails?
I scanned through the 15 pages, and don't see that anyone has tried the F version of the PI yet. Has anyone?
I'm hoping to pop out my Omega PID this weekend and do a 'wet run' with it and see how it goes.
The #1 thing I don't like about the current PID is that it takes FOREVER to get the last few degrees up to the final set point. I have a 120/240 switch on my RIMS tube and run it on 240 until I reach strike temp, then switch to 120 for mashing. I waited 15 minutes the last time for the last few degrees, and finally gave up and set the temp up 20F and then backed it off once it reached strike temp. I did the auto tune on 120 as that is the primary use, but I would image that on 240 it would be overly aggressive, but apparently not.
I've been using PID controllers on an industrial oven at my business for years, but have only a vague understanding of their detailed PID operation. 95% of the time it's set to hit 2000F, as fast as it can, and then stop. The other 5% is an 8 step ramp and soak.
I've tried to use it on 120 for the mashout rise, but it's just too slow. It's a 4000w at 240, 1000 at 120, but I'm concerned about scorching the wort if I use it on 240 to get the needed rise. I don't recall if the same 'last few degrees' problem was part of the issue, it's been so long since I last tried. The RIMS is 75% insulated, 10 gal cooler for a MT, and SS chugger pump. I added expanding foam to fill in the lid of the cooler.
So given my lack of PID knowledge, are some of the settings in the STC1000PI able to influence the rise rate? I got kinda lost in some of the settings discussions. And, any settings to keep in mind for the 240 rise to strike, then 120 for mashing, and Mashout?
Thanks!
You are welcome to try it out if you want to, but just know I have pretty much abandoned the project (in favor of OVBSC, which is more targeted and simpler). It's been a while, but I think I got the PID sort of working, but it is not without limitations.
https://04377c9983bdba740a8b0c997fe...t/0B7OSUyUx3xJzUVlLdkFyQ1lMLTg/hextabbed.html
Just use that page to generate the different sketches with the different profiles. Just make sure you rename the file to match the profile you want so you know which one is what.
I haven't even seen a grainfather IRL, so hopefully someone else can contribute some useful info to you (like @kaljade perhaps?).
The pump is probably easies to hook up with an SSR, just like kaljade shows a few pages back in this thread.
Regarding the parameters, I can't really help with the power output parameters. You'd probably want 200% for bO. Ht, HO and Hd are a matter of preference as well.
PF depends on wether you use pump control as well or if you want to handle that manually.
cO, cP and cSP are only used when run mode (rUn) is set to Co or Ct (that is, the manual modes).
)?

Hei @bjarneo !
Maybe you shorted it, but even if not, I really don't think the STC can handle the current draw from a pump directly.


