Stalled project, need advice

Homebrew Talk - Beer, Wine, Mead, & Cider Brewing Discussion Forum

Help Support Homebrew Talk - Beer, Wine, Mead, & Cider Brewing Discussion Forum:

This site may earn a commission from merchant affiliate links, including eBay, Amazon, and others.

Rossbrau

Member
Joined
May 29, 2011
Messages
8
Reaction score
0
Location
Fishers
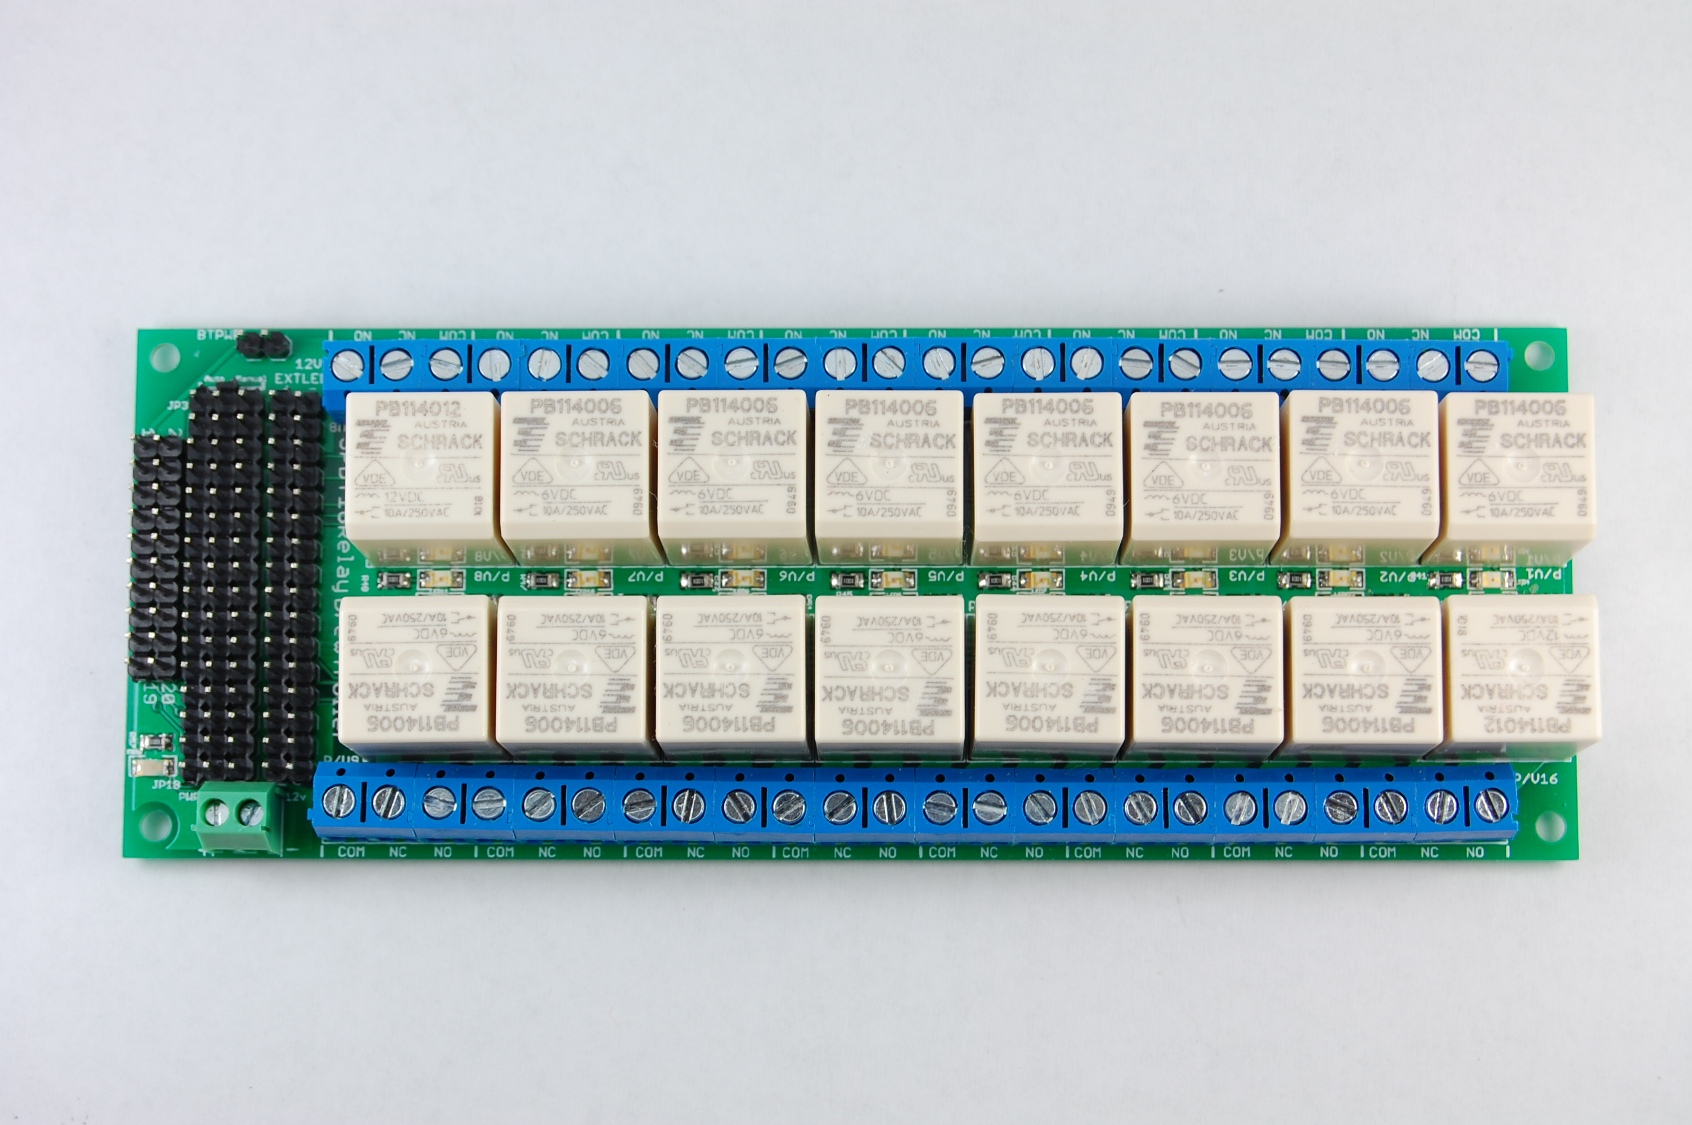
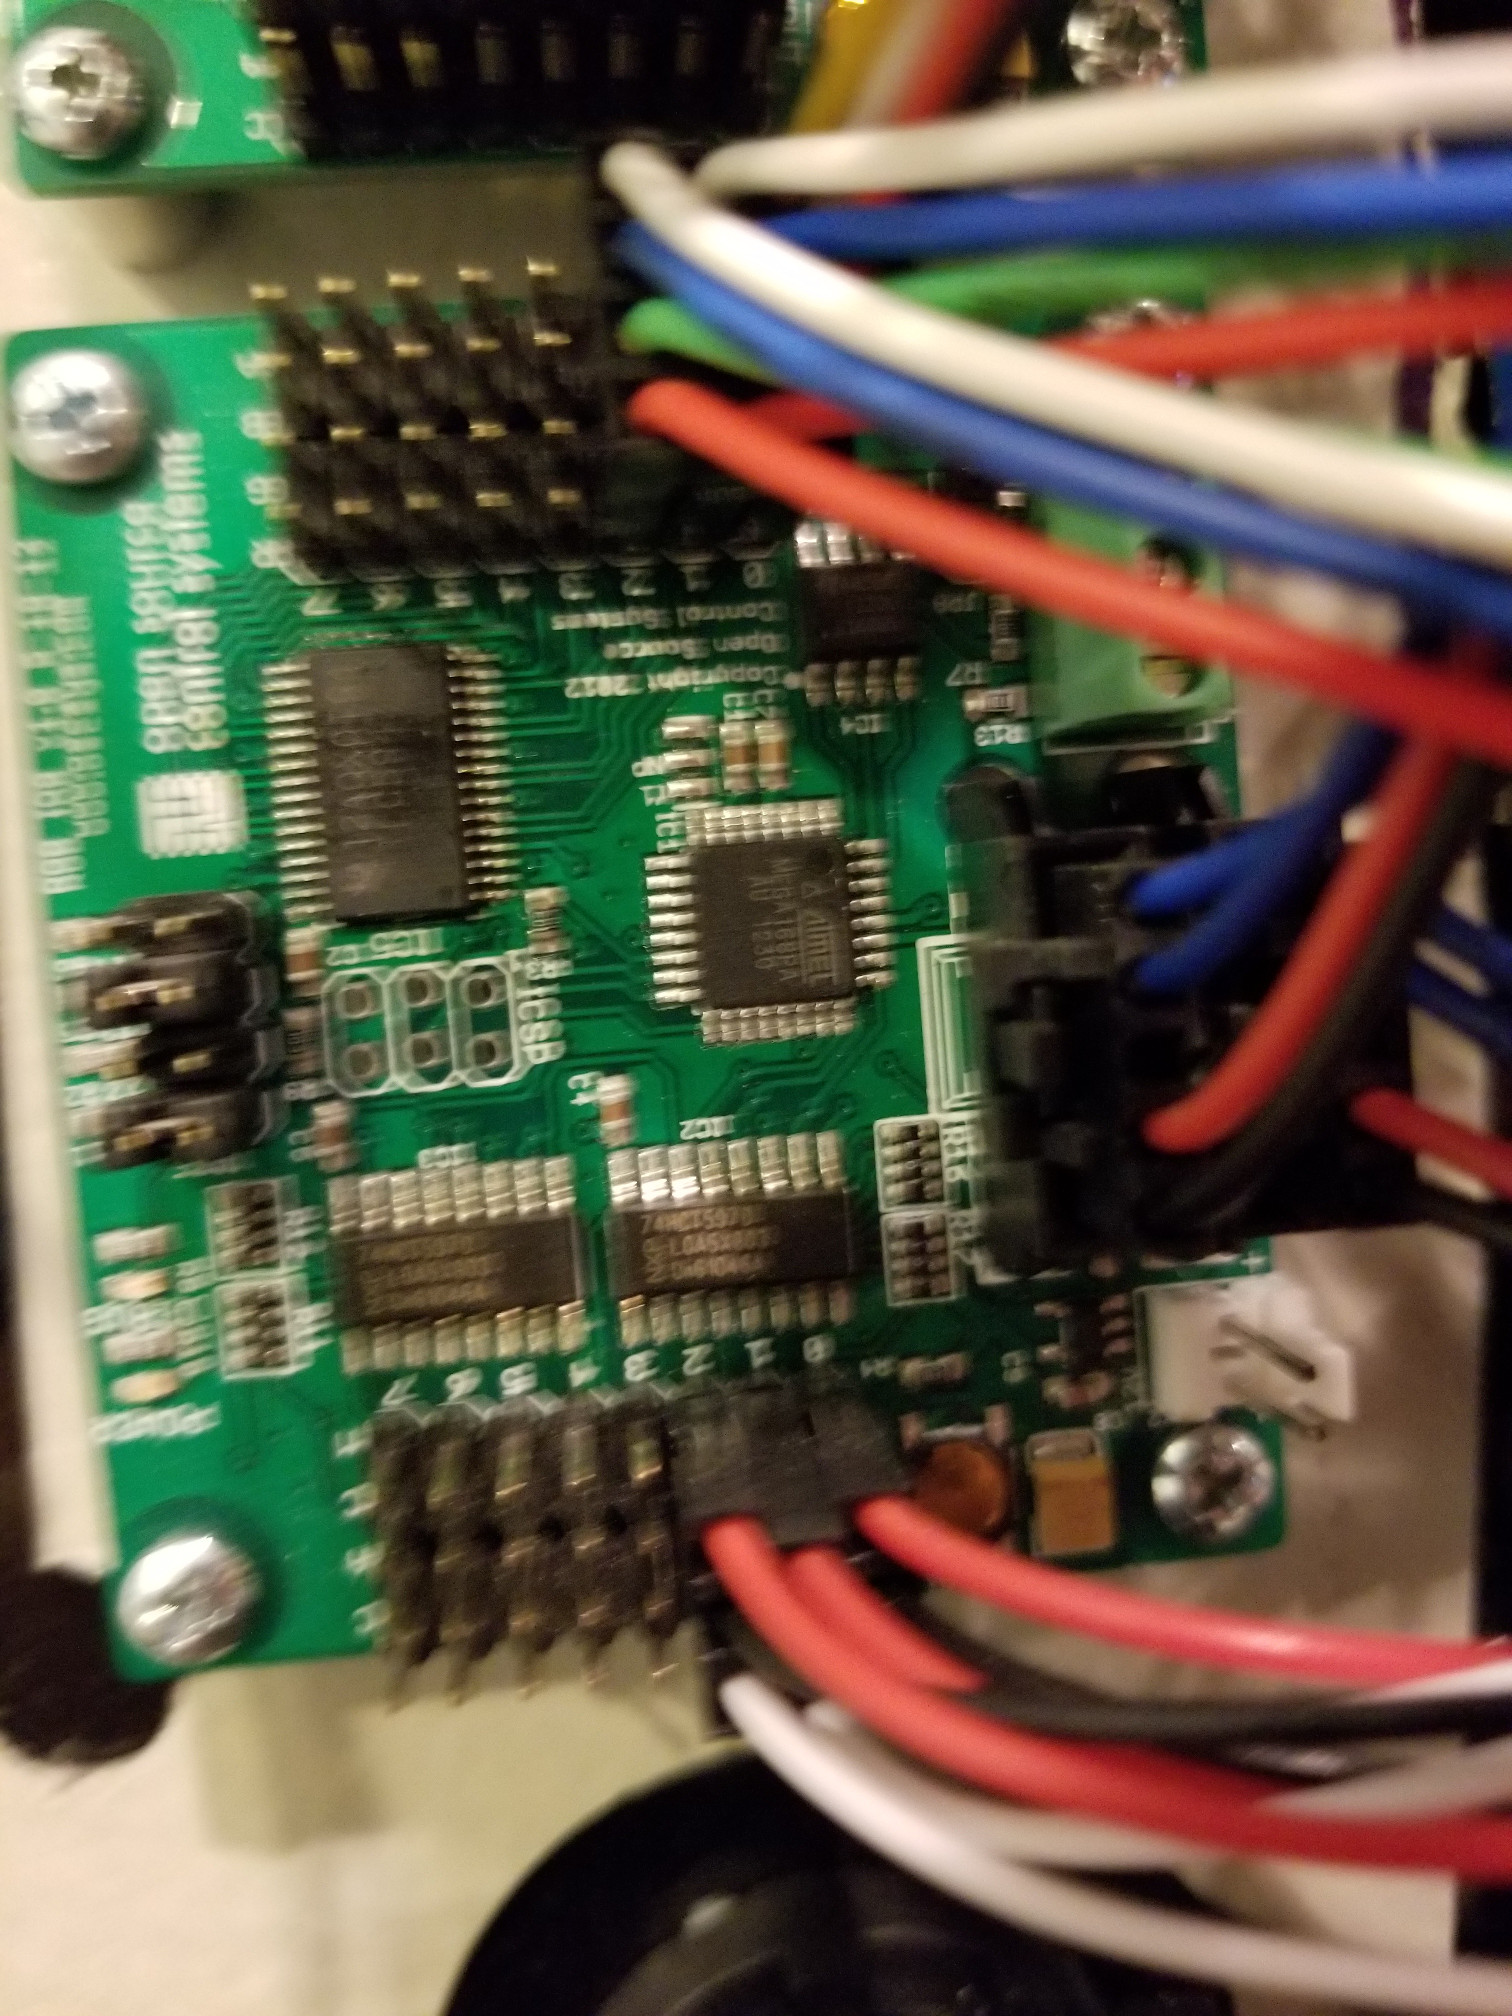
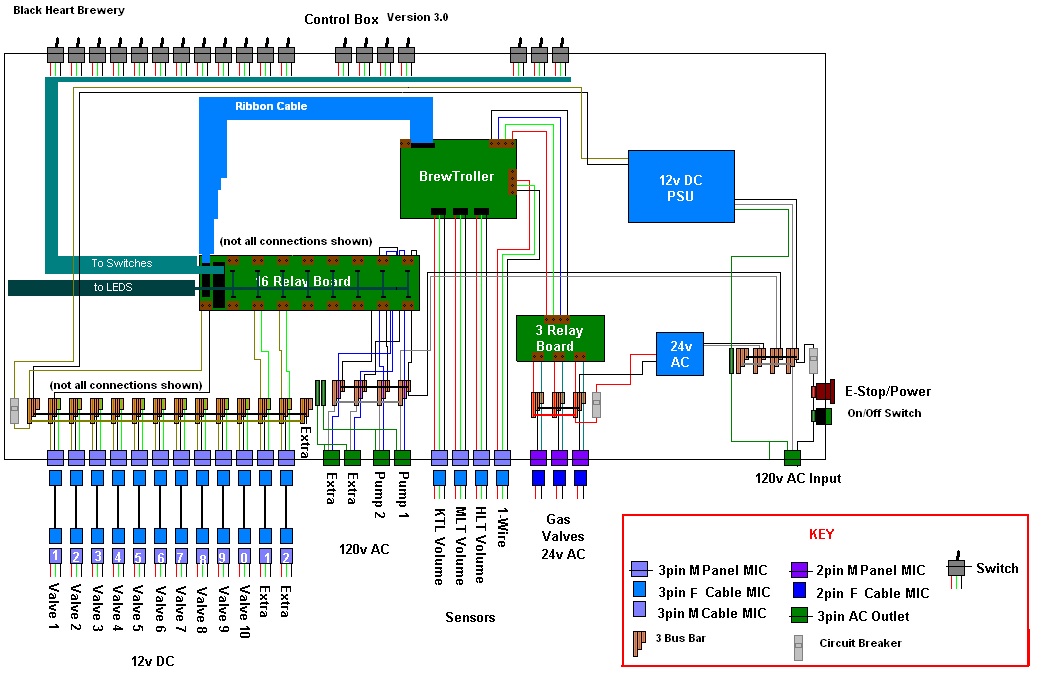
Hello wise automated folks! I need your advice and guidance. I have a system all rigged up with a HLT, mash tun, boil kettle, 3 pumps, automated valves, temp sensors etc that was supposed to use brewtroller to function. From reading through the forum way back in the day, it seemed like it was something I could handle...until stuff didn't work. The board didn't work, flashing firmware lead to a dead board, buy new board and hook it up and it doesn't work. Get frustrated, quit on it for 6 months, redo wiring, get new modules, stuff gets outdated or is unavailable....

So, here I am after 9 years of off and on tinkering, still with no working brew system. It seems like my biggest problem is working with the controller itself and the modules. I have no idea how to code/compile or do any of that stuff. Honestly it's the worst feeling when I follow the instructions blindly and get stuck when it doesnt work (which has really been the past 7 years off/on for me). My question to you all:

1) is there a control system out the that I could plug and play with what I have? I dont mind stripping out the guts of my control panel. It seems like Bru control is popular, but it looks like coding/Arduino expertise is needed. Thoughts?

2) Should I just give up and buy a Picobrew thing? This hurts me bad, but maybe it's the best option.

Help!
 
I'd look into BruControl. You might not even need to change much in your design to switch over.

Brew on :mug:
I switched from brewtroller to BruControl during the early stages of my build. You should check it out. Runs on Arduino, and you can make your build as simple or complex as you want. Programming is simple. I couldn't recommend it more.
 
Also the community is very active. With plenty of people to help you out.
 
Hi @Rossbrau. As @doug293cz mentioned, implementing BruControl is fairly easy as the basic hardware is the same. For about $15, you can acquire an Arduino MEGA which is essentially plug and play, though a shield and network connection will add some more cost.

You do not need to write, manage, or compile any code. The firmware installation is fairly simple. BruControl does have some scripting capability for when you want to automate sequences, but you don’t need to use any of that to brew.

Let us know how we can help.
 
@Rossbrau, I've been working on developing and deploying a BruControl system since November or so. Can't say enough good about the level of support from @BrunDog, and I really like the way the system has come together and works. I'm fine on the electrical and control side, but programming is not on my resume, so BruControl is a pretty good fit for my rig.
 
Alrighty then! If there's active support for it (and it sounds like there is) I'll give it a go. What should I be buying up front to get things started? I checked the buylist, but I have some stuff from brewtroller (relay panel, estop, lcd with icd connect board, icd led displays). What would be compatible and what do I need to buy new?
 
I already have this board. It has pins for LEDs that I already have wired up. Could I use this?


16relayboard.jpg
 
Do those relay front-ends require active high (aka sourced aka positive voltage) to switch or active low (aka sinked aka ground signal) to switch? Assuming the latter, as long as you have a 6V power supply, you can use that board. But agreed, it is a little atypical.

If you have a schematic and discuss what you are trying to do, we can help you. The manual can give you some direction in the "considerations" sections. For example... how do you want to connect the application to the interface... Serial/USB? Ethernet? Wi-Fi? etc.
 
Here's my panel. A closeup of the schematic is at the bottom of the post:
20180524_185235.jpg


Here is the inside of the panel as is currently:
20180524_185327.jpg


Here is a pic of the back of the door.
20180524_185331.jpg


Below is a close up of one of the two boards that control the RGB leds and contact with the switches that control off/auto/on mode. The other is attached at the end of the post.

20180524_185427.jpg


Is any of this usable except the power supplies and the DIN rail and the relays?

As far as wiring schematic, if I'm starting from scratch, I don't have one. My general setup would be as per the bottom schematic on the front panel. The numbered things are valves, the letters are pumps. Both the HLT and the boil kettle have heating elements. I need something that could do these things. I'd like the interface to be wifi with USB as a backup. I'm no EE, but can follow direct instructions with the best of them. Help me oh wise ones. What do it need to scrap, what do I need to buy?
 

Attachments

  • 20180524_185448.jpg
    20180524_185448.jpg
    716.4 KB · Views: 312
  • 20180524_185240.jpg
    20180524_185240.jpg
    609.9 KB · Views: 273
Rossbrau
I am looking at the post and you stated that a schematic is at the bottom of the post. What I am seeing is not an electrical schematic, it's a process diagram. If you post a real schematic maybe I can help. Also, not sure if you bought this panel or put it together yourself. The first issue is that wiring that looks like that is very difficult to troubleshoot. Second I would put terminal blocks in for power and common. I would also have one for ground. Every ground should only be connected at one place. My guess right now is from your description is you have something shorted. All the circuit boards need power and common, all devices need power, common and have a signal that my also need to referance common. So we need to clean up the wiring and we need a good electrical schematic. Also, how are you flashing the circuit boards? Do you have the latest software for that board. It sounds like you either have wrong software or possible bad files. You need to make sure that the software/ firmware is correct for the control you are using. And the files have not been corrupted. 9 years is a long time, something's may have changed?

Scott
 
Also I wanted to say that when running power, common and ground make power red wire, common black, and ground green. Then pick colors for signals and write them down or write the color on the schematic.
 
Depends if normal is AC or DC. I was talking about the DC connections. And yes you are correct for AC connection. But if you connect AC where DC should be the control board won't work ever again.

Cheers
 
lol - yeah, that's true.
fwiw, for any enclosure wiring I prioritize the AC wiring color scheme for safety sake, and then use different colors for DC power/return and signals.

Eg:
Orange 5V
Yellow 12V
Brown DC return
Blue/Purple/Gray and everything striped (except green/yellow) are used for signaling...

Cheers!
 
Thanks all for the feedback! I based my setup on this. I never actually sat down and made a wiring diagram (I know, bad idea).

connections4.jpg


I'll definitely take the recommendations for the wiring color changes and make a proper wiring diagram. I'll post that and then just ground up most of the off wiring again and we'll see how that goes. Thanks! I'll be back...
 
When working with controls I start with the Control power. I want to test that all the boards that have a blinking light, blink. I would connect a cheater cord to power the supplies and make sure all power supplies put out the proper voltage, then connect the supplies to the proper terminal strips. Once I am convinced that is good. I would start with the AC side. I am less worried about putting my hands into something that has 5,12,24 vdc, than I am putting my hands in with 120/240 VAC. My point is start somewhere, and then move to the next. Test whatever you can, or at least make sure that you don't have shorts/grounds by checking with a meter then apply power. Pick a color code, write it down and stick to it. There is no way in hell to troubleshoot the spaghetti in the picture. You would have to do a point to point and mark the wire with something, or create a point list...can you say shoot me now.
I have tried to troubleshoot things that have looked like that...it is very painful and tedious. I have found it is better to pull everything apart and start from scratch...as long as you have a schematic. If not your taking board information and making a schematic/ diagrams.
Again...not a fun time. But when I was done it all worked.

Cheers!
Beer time
 
Keep the wires as best as possible..use tie wraps to keep the wires down and in line with the device. Take the above and mark what pins are being used. I.e. gpio 17 pin 5 & common pin 10...just an example. I don't know what the pin numbers are. Taking time up front saves aggravation later. I will keep an eye on the thread.
Cheers!
 
Great advice! Thanks! Gonna do the best I can in MS paint for a wiring diagram and I'll post it. The CAD programs are terrifying. I'll keep the color coding stuff straight. I'll strip out everything except the switches/LEDs (God I hope those are alright, took me forever) hopefully go with a new scheme.
 
There is a lot of progress on your project shown in the pics above. With all due respect for the effort.... the wiring is a mess and will make it difficult to make progress in any direction. Very few of the wires are in the ducts, so it is going to be difficult to work with and debug.

Without a doubt, you can replace/upgrade this to BruControl, or it may be easier/faster to continue the development to get a working Brewtroller solution. I see the controller is not wired, so maybe that's all that is required?

If you go the BC route... you can remove/replace all the front panel stuff. You wouldn't need the encoder, LCD, LED's, switches, or valve status LEDs. These are all handled in the BruControl user interface. For safety sake, I would suggest removing all the wiring, and re-wiring according to a bona-fide schematic. Look at our universal schematic for guidance. Your system is gas fired I assume... so this might be a time to consider going full electric if you can supply the 30A or 50A power needed. If you go that path, start with a new, larger enclosure and build the right system from the beginning, salvaging most of the components you already have. If you choose to stay with gas, you can use the existing enclosure etc.
 
@Rossbrau I second the advice above from @Stoney315 and @BrunDog. Trying to work through your existing setup will take more time than it would to draw a schematic, disconnect your existing wiring, reconfigure the layout, and wire it to your new schematic. @BrunDog's schematics are pretty good.

I also agree that at least as far as single phase 120/240 VAC power goes, you should follow the conventional color code of red & black for L1 and L2 (doesn't matter which goes where), white for neutral, and green for ground. Spend a little time learning why to balance the load on L1/L2, and try to design your system to stay as balanced as is reasonable to expect.

There is an old usage of the word "common" to refer to AC neutral. In an environment with contactors and relays, it can get pretty confusing, as "common" is also one of the terminals on the switching side of a relay or contactor. It's far less confusing to call the white wire "neutral" and leave "common" to refer to a terminal on a relay or contactor.

Finally, and perhaps most importantly, please make sure you have proper overcurrent protection built into your system. Circuit breakers and fuses exist to protect the wires downstream. If you have a piece of 16AWG wire that needs to land on a terminal block fed by a piece of 10AWG connected to a 30A breaker, please make sure there is a 10A fuse or breaker between the terminal block and the 16AWG.

Last word: Ground everything carefully. If it's metal and is not a normally current-carrying conductor, ground it.
 
Spend a little time learning why to balance the load on L1/L2, and try to design your system to stay as balanced as is reasonable to expect.
Do you have any links to explain the importance of balancing the load. I was going to make only 1 120V leg, as to capture the total load using a ammeter. I thought the only considerations had something to do with the power company's transformers and the total capacity of the wire we are using. Since the 120 leg will be carrying less than 6A, I did not think it would matter.
 
I need your advice and guidance.

So, here I am after 9 years of off and on tinkering, still with no working brew system.

2) Should I just give up and buy a Picobrew thing? This hurts me bad, but maybe it's the best option.

Help!

Perhaps you should consider more options, specifically, dumping the idea that you "need" an automated brewing rig.
If you can't make an automated brewing rig work after trying for 9 years, isn't it better to just accept that its not going to work for you?
The bottom line is that its really easy to make consistent wort using low tech gear. Hobbies are supposed to be fun, not a hassle. If tinkering with your automated system that doesn't work is fun for you, keep doing it.
But if your goal is to just make good beer, maybe its time to change direction.
 
Have you reached out to me for help on this? I can't always troubleshoot remotely, but I try my best!
 
Back
Top