Is there a nice easy utility to install firmware on ESP32 boards like there is for ESP8266? - Brewpiless on Lolin D32

Homebrew Talk - Beer, Wine, Mead, & Cider Brewing Discussion Forum

Help Support Homebrew Talk - Beer, Wine, Mead, & Cider Brewing Discussion Forum:

This site may earn a commission from merchant affiliate links, including eBay, Amazon, and others.

rkhanso

Well-Known Member
Joined
Jan 24, 2017
Messages
774
Reaction score
174
Location
Plymouth, MN - terrible tap water for brewing
Probably a stupid question....

I have a homemade PCB I made for Keg Cop and a Lolin D32 with 32 pins - but want to use Brewpiless instead. I'm hoping to set it up with a pressure switch and flow meter, along with 3 temp probes. The D1 mini won't work on that PCB - different pin count, thus the need to reflash the D32.

I use 8266Flasher.exe (Nodemcu Firmware Programmer) to install the firmware on a D1 Mini PCB and that works great. I'm guessing that utility only works for 8266 boards and not ESP32 boards because it doesn't seem to work with the D32 board.

Is there a similar utility for ESP32 boards like my Lolin D32? (firmware - BrewPiLess.v4.2rc4.esp32.bin). Or do I need to use Visual Studio Code to install the firmware instead? I've not been successful with Visual Studio Code in the past.
 
brewflasher will have the download for you.
Brewpiless does work on ESP 32 and the github has info about the install method.
Also if you look at problem 218 on the github for brewpiless there are install details and also a link to more info about the esp 32 install. @korev has installed brewpiless on esp32 I noted on another thread.
 
It's not the same thing. They both share a fair bit of code, but they're very different. BrewPiLess is under project "Other".

Edit - The version that is in there is the ESP8266 version, so it won't work in this case. Sorry about that. :(
 
Have a read of sedginton in this issue explains how to get brewpiless on esp32.
https://github.com/vitotai/BrewPiLess/issues/128
Issue 218 discusses how to set up autospunding on the esp32 in brewpiless, I've been setting up spunding but on the 8266.
Thanks. Those directions worked surprisingly well.
I still need to make a new homemade PCB anyway since the pinouts aren't the same between the two projects. Oh well.
iSpindel is currently updating into BrewPiLess nicely.
Waiting now for the pressure sensor and ADC board.
 
Are the pinouts different for the ESP32 vs 8266?

On Github it shows:
ESP8266 GPIO
NodeMcu Label​
Connect to​
GPIO16
D0​
Buzzer​
GPIO5
D1​
I2C SCL​
GPIO4
D2​
I2C SDA​
GPIO0
D3​
INT from PCF8574 * Or UP Button​
GPIO2
D4​
DOWN Button​
GPIO14
D5​
Cooling Actuator*​
GPIO12
D6​
Temperature Sensors​
GPIO13
D7​
Heating Actuator*​
GPIO15
D8​

I'm looking at the Dallas Sensor connection right now. Where do I have to set the dallas address? In the platformio thing? I don't see a place in the web GUI for the temp sensors.
Or is it somehow automatically detected and I just need to figure out which sensor I need to put where?


FYI - in case it matters, I ferment under low pressure in corny kegs (no temperature control) and plan on using Brewpiless to:
1. intake iSpindel data from inside one of the corny kegs during fermenting.
2. monitor pressure when fermenting. I have a Blow-Tie spunding valve so no automatic spunding control.
3. control the kegerator compressor on/off to keep it at temperature for serving beer.
4. Hopefully be able to monitor tower temperature in the kegerator and control a fan to blow cold air up in the tower (or just leave the fan on all the time, I suppose).
5. if possible, monitor how much beer is served with a flow-meter (but I'm not sure this is going to be possible)
 
Last edited:
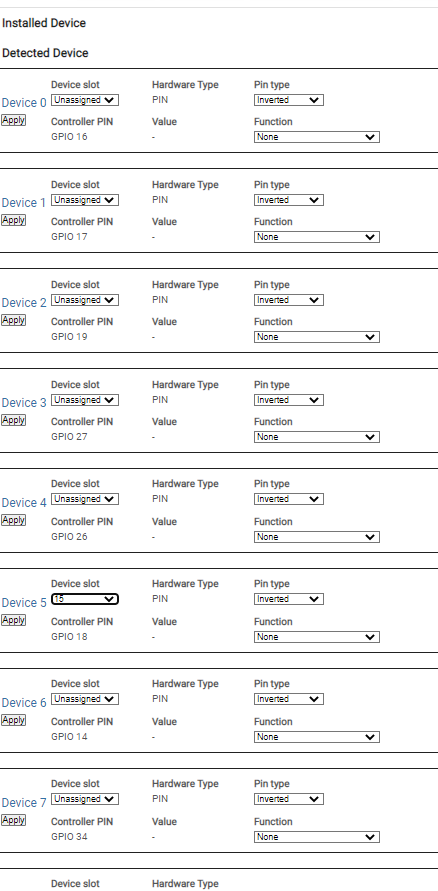
I found how to add sensors at this post.
But all of mine (except the last one) say Hardware Type is PIN and can't be changed.
I've tried changing the Device Slot and Function, but the PIN type is not changeable to SENSOR.

1682709912794.png
 
Last edited:
I have an ESP32 that VSCode can't upload the firmware to. Another ESP worked OK. Is it possible to somehow get this ESP working?
Unless I don't understand how to use VSCode (which I really don't).

After successfully flashing one ESP, I removed it and connected the second ESP. I went to View, Command Palette, PlatformIO: UPload and get the following error:
Code:
RAM:   [==        ]  18.5% (used 60760 bytes from 327680 bytes)
Flash: [========= ]  90.9% (used 1609153 bytes from 1769472 bytes)
Configuring upload protocol...
AVAILABLE: cmsis-dap, esp-bridge, esp-prog, espota, esptool, iot-bus-jtag, jlink, minimodule, olimex-arm-usb-ocd, olimex-arm-usb-ocd-h, olimex-arm-usb-tiny-h, olimex-jtag-tiny, tumpa
CURRENT: upload_protocol = esptool
Looking for upload port...
Error: Please specify `upload_port` for environment or use global `--upload-port` option.
For some development platforms it can be a USB flash drive (i.e. /media/<user>/<device name>)
*** [upload] Explicit exit, status 1
======================================================================= [FAILED] Took 45.65 seconds =======================================================================

Environment    Status    Duration
-------------  --------  ------------
esp32-dev      FAILED    00:00:45.646
================================================================== 1 failed, 0 succeeded in 00:00:45.646 ==================================================================

 *  The terminal process "C:\Users\Roger\.platformio\penv\Scripts\platformio.exe 'run', '--target', 'upload'" terminated with exit code: 1.
 *  Terminal will be reused by tasks, press any key to close it.

The same logs from the successful upload:

Code:
Configuring upload protocol...
AVAILABLE: cmsis-dap, esp-bridge, esp-prog, espota, esptool, iot-bus-jtag, jlink, minimodule, olimex-arm-usb-ocd, olimex-arm-usb-ocd-h, olimex-arm-usb-tiny-h, olimex-jtag-tiny, tumpa
CURRENT: upload_protocol = esptool
Looking for upload port...
Auto-detected: COM2
Uploading .pio\build\esp32-dev\firmware.bin
esptool.py v3.3
Serial port COM2
Connecting....
Chip is ESP32-D0WDQ6 (revision 1)
Features: WiFi, BT, Dual Core, 240MHz, VRef calibration in efuse, Coding Scheme None
Crystal is 40MHz
MAC: c8:f0:9e:9b:2c:f0
Uploading stub...
Running stub...
Stub running...
Configuring flash size...
Flash will be erased from 0x00001000 to 0x00005fff...
 
The only suggestion I have is to try holding down the "boot" button as you plug the board in and see if that helps. I don't have any experience with that specific board, however, and don't know if this is something that is likely/expected to help.
 
Back
Top