• Please visit and share your knowledge at our sister communities:
  • If you have not, please join our official Homebrewing Facebook Group!

    Homebrewing Facebook Group

Speidel fermentors - now with stainless rotating racking arm!

Homebrew Talk

Help Support Homebrew Talk:

This site may earn a commission from merchant affiliate links, including eBay, Amazon, and others.

BSD_Glass

Member
Joined
Mar 30, 2010
Messages
169
Reaction score
20
Location
Madison
I got sick of the valves on the racking port of my spiedel fermentors (lack of barb, small clamping area, weird hose sizes accepted) so I started looking into putting weldless bulkheads through the cap that ships with the units. In my investigations, I was hitting around $30 per fermentor to put together a hose barb, ball valve and bulkhead assembly. In looking further, I wandered to the ssbrewing website (home of the chronical and brew bucket stainles fermenters that are new to the market) and saw that they sell the rotating racking arm for around that same $30. Good deal, thought I and I put myself on the email list for some when they came in.

The next day I got an email they were in. Two days later I was drilling out my cap to accept one. After assembling for leak checking, I noticed a small leak, which would not do for a fermentor at all! I disassembled and noticed the orings looked a little small to give a good seal in this application. Off to an orings website and I picked up 3/32" thick food safe silicone orings (I also got the 1/8" thick but they were too thick doubled up in this application). Reassembled,rotating and leak free!

With the rotating racking valve/arm in place, my 60 litre Speidel drains to less than a gallon of dead space in a water test which sounds like a lot but is kind of perfect as I scale my brews for 11 gallons into the fermentor so I can get 2 clean cornies per batch. After yeast and trub, I should have less than a half gallon of wasted beer this way. Win for me! I find it too much trouble to worry about getting that last bit of beer in bottles after kegging 2 full kegs.

After the kids go back to school, I'll get a batch fermenting and report back.

Hope this helps someone.

Merry Christmas!

BSD

dead_space-61678.jpg


front-61679.jpg


installed-61680.jpg


oring113-61681.jpg
 
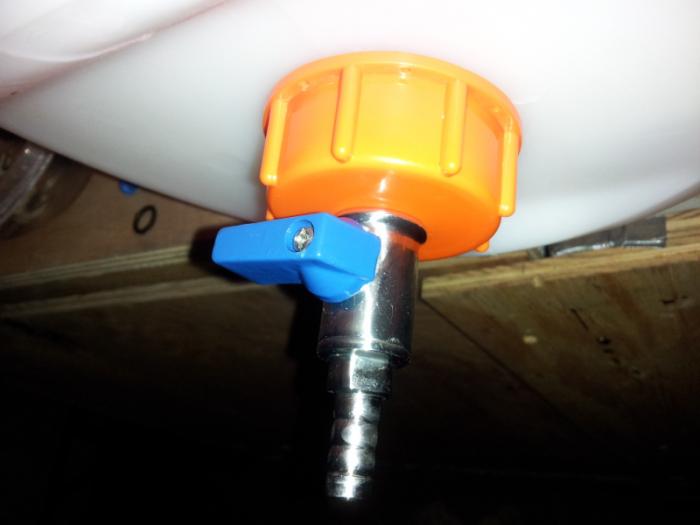
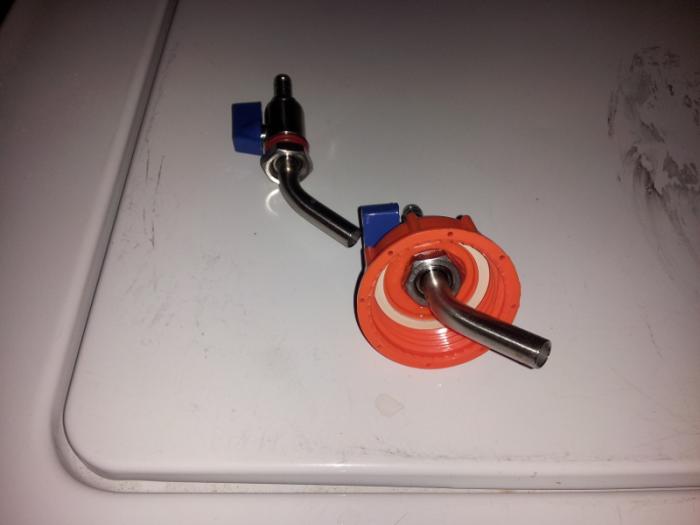
It's just a simple weldless install. Orings sandwich the cap with the valve face on the outside and a nut on the inside.

Merry Christmas

back-61684.jpg
 
I used a step bit and went until the valve fit. It is a LITTLE looser than I would prefer but works fine. Both fermenters I have modified this way are in use so I can't measure. With calipers or a drill guide, you could easily size the hole you need to fit the valve's threaded section through.

Cheers.

BSD
 
Nicely done. Solves one of my few gripes with the Spiedel - now I may need to chase one of these down!
 
I've done 4 batches since doing this mod and it is perfect. No complaints whatsoever.
 
Dumb question, are you able to rotate the racking arm once it's installed? I'm assuming the answer is yes, but I thought I'd check before moving forward with this.
 
To the OP - great mod! I've been waiting on their new chrome spigots from MoreBeer but even those don't have a racking arm.

I usually play with the height of the opening by very carefully loosening the valve cap and then rotating it but I always feel like I'm playing with fire when I do that risking a leak. Yours is a much more elegant solution!
 
Thanks, man. I see that I've had these in service for 1 day shy of a year now and have had ZERO issues with leaks or anything going wrong.

Totally happy I went this way.

Cheers.

BSD

p.s. they will take around 3 psi no problem for pressure transfers. They'll take more pressure but the lid bulges up pretty big and that is a little scary for me.
 
I gravity drain today into the dip tube connection - occasionally a chunk of yeast clogs the ball lock fitting and then it's a pain to clear it - I usually just pinch of the tube, pull the disconnect off, quickly sanitize the tube and drop it into the keg. A small amount of pressure would be enough to clear that.

Do you have any pics of how you did the pressure connection?

Thanks!
Carlscan
 
I find that trub line is almost always just below the inlet anyways so the racking arm doesn't do much for me, but I had a terrible problem with the plastic valves that came with the fermenter leaking. This has totally solved that issue so thanks again!
 
I gravity drain today into the dip tube connection - occasionally a chunk of yeast clogs the ball lock fitting and then it's a pain to clear it - I usually just pinch of the tube, pull the disconnect off, quickly sanitize the tube and drop it into the keg. A small amount of pressure would be enough to clear that.

Do you have any pics of how you did the pressure connection?

Thanks!
Carlscan

I use the old plastic spigot on the top and just pop a short piece of 3/8" silicon tubing onto it. The pvc tubing I have set up on the pressure pushing end of my regulator simply pressure fits into the silicon. Easy peasy.


BSD
 
SSBrewTech has newer racking arms that dip further down into the their Brew Buckets to leave less beer behind. Here's a picture:

7438_ball_valve_w_longer_racking_arm_shopify_thumbnail_grande_grande.jpg


Do you foresee any issues with a longer racking arm in the 60L Speidel? Do you think it bump into the sides or the bottom?
 
Just a quick follow-up. I did this same project. The only difference is that I used the newer, deeper diptube version of the ball valve from SsBrewTech. It works flawlessly. The diptube actually reaches pretty much all the way to the bottom of the Speidel so you can get pretty much every drop of wort out that you want. My plan is to watch the wort level go down as I rack and then slowly rotate the racking arm down as it gets closer to the bottom.

If you ferment with the Speidel propped up a bit away from the spigot, you could prop it up the opposite direction during racking and you'd get every bit of wort you could want. Awesome idea. Thanks again for doing the up-front work.
 
I did this to my 120l Spiedel spigot after reading this thread. What a great tip. Thank you!
 
does the ball valve that you are using disassemble...fully? similar to a regular 2 piece ball valve? it looks like there is a spot for a wrench on the barb, but i wanted to make sure i can get down to the insides before pulling the trigger, had problems before getting my 2 piece valves 100% clean with out breaking them down

also, i purchased the Chrome Spigot and its pretty lame, the base piece is threaded 1/2 but not NPT, no taper on it but 1/2 NPT nipple fit fine(no leak test done yet)...tossing the valve, not easy to keep a hose on it even with clamp, and cant get down to the insides, tried numerous ways...at least i have a nice 1/2 threaded port plastic base...
 
You could also just take off the blue plastic knob and boil the valve for extra peace of mind.
 
Back
Top