Yes, the hole required for the spud is just a touch over 1.5" so you may need to file the opening a little more. The first thing you'd want to do though is to check the fit of your element in the spud. There are a few elements out there with oversized threads that barely thread into the spuds. What's frustrating is that I can't isolate it down to a brand or model number. Another option is to solder my 1.5" TC adapter over the hole.
You are using an out of date browser. It may not display this or other websites correctly.
You should upgrade or use an alternative browser.
You should upgrade or use an alternative browser.
Soldering Stainless steel
- Thread starter BargainFittings
- Start date

Help Support Homebrew Talk:
This site may earn a commission from merchant affiliate
links, including eBay, Amazon, and others.
Thanks for the quick reply. I've ordered the spud and will check it out with my element. One follow up: I've already purchased your weldless element enclosure (EWL 3). Assuming the element threads into the spud, would I still be able to use the enclosure?
Yes, you can use the enclosure. You'll just need to use teflon tape on the threads as your seal since you'll have an extra layer of metal to deal with. In other words, the gasket that is typically on the element would seal to the enclosure, but nothing seals between the spud and enclosure.
BillKlineVT
Well-Known Member
Just another happy camper here, soldered 3 full couplings in my keggle and it worked like a champ... Used the solder kit from Bobby M's store and the video made it so easy!
I made the $4.57 dimple tool for this too and it worked like a champ, other than the bolt threads were shot after the third dimple
I made the $4.57 dimple tool for this too and it worked like a champ, other than the bolt threads were shot after the third dimple
wbarber69
Well-Known Member
- Joined
- Oct 13, 2013
- Messages
- 2,191
- Reaction score
- 263
I made the same dimple tool only I went with a piece of stainless all thread instead of a bolt. I haven't yet ruined the threads and I've done 6 so far. I used olive oil as a lubricant to pull with and used a bit on the threads too. Worked like a charm and it cleans off with some BKF. A wire brush and a sanding wheel to clean the stainless up a bit more before I use the acetone. I haven't had a single problem with my solder sticking using this method.
GotPushrods
Well-Known Member
I made the same dimple tool only I went with a piece of stainless all thread instead of a bolt. I haven't yet ruined the threads and I've done 6 so far. I used olive oil as a lubricant to pull with and used a bit on the threads too. Worked like a charm and it cleans off with some BKF. A wire brush and a sanding wheel to clean the stainless up a bit more before I use the acetone. I haven't had a single problem with my solder sticking using this method.
My tool is also a piece of all-thread. 1/2" and 12" long for less than 2 bucks, cheap stuff. I cut it in half and its a perfect length. Use 2 nuts on the back end to lock it in place. I've used it well over a dozen times. It would go dozens more without problems. Not sure why I haven't seen it recommended more.


$176.97
1pc Commercial Keg Manifold 2" Tri Clamp,Ball Lock Tapping Head,Pressure Gauge/Adjustable PRV for Kegging,Fermentation Control
hanhanbaihuoxiaoshoudian


$58.16
HUIZHUGS Brewing Equipment Keg Ball Lock Faucet 30cm Reinforced Silicone Hose Secondary Fermentation Homebrew Kegging Brewing Equipment
xiangshuizhenzhanglingfengshop


$53.24
1pc Hose Barb/MFL 1.5" Tri Clamp to Ball Lock Post Liquid Gas Homebrew Kegging Fermentation Parts Brewer Hardware SUS304(Gas MFL)
yunchengshiyanhuqucuichendianzishangwuyouxiangongsi


$22.00 ($623.23 / Ounce)
AMZLMPKNTW Ball Lock Sample Faucet 30cm Reinforced Silicone Hose Secondary Fermentation Homebrew Kegging joyful
无为中南商贸有限公司

$45.74 ($45.74 / Count)
Brewer's Best Home Brew Beer Ingredient Kit - 5 Gallon (Grapefruit IPA)
Amazon.com


$7.79 ($7.79 / Count)
Craft A Brew - LalBrew Voss™ - Kveik Ale Yeast - For Craft Lagers - Ingredients for Home Brewing - Beer Making Supplies - (1 Pack)
Craft a Brew

$82.50
Wilbur Curtis Brew Cone Assembly with Splash Pocket, High Volume - Commercial-Grade Brew Basket - WC-3422 (Each)
Global Commercial Parts


![Craft A Brew - Safale S-04 Dry Yeast - Fermentis - English Ale Dry Yeast - For English and American Ales and Hard Apple Ciders - Ingredients for Home Brewing - Beer Making Supplies - [1 Pack]](https://m.media-amazon.com/images/I/41fVGNh6JfL._SL500_.jpg)
$6.95 ($17.38 / Ounce)
$7.47 ($18.68 / Ounce)
Craft A Brew - Safale S-04 Dry Yeast - Fermentis - English Ale Dry Yeast - For English and American Ales and Hard Apple Ciders - Ingredients for Home Brewing - Beer Making Supplies - [1 Pack]
BellaRae


$33.99 ($17.00 / Count)
$41.99 ($21.00 / Count)
2 Pack 1 Gallon Large Fermentation Jars with 3 Airlocks and 2 SCREW Lids(100% Airtight Heavy Duty Lid w Silicone) - Wide Mouth Glass Jars w Scale Mark - Pickle Jars for Sauerkraut, Sourdough Starter
Qianfenie Direct


$53.24
1pc Hose Barb/MFL 1.5" Tri Clamp to Ball Lock Post Liquid Gas Homebrew Kegging Fermentation Parts Brewer Hardware SUS304(Gas Hose Barb)
Guangshui Weilu You Trading Co., Ltd

$10.99 ($31.16 / Ounce)
Hornindal Kveik Yeast for Homebrewing - Mead, Cider, Wine, Beer - 10g Packet - Saccharomyces Cerevisiae - Sold by Shadowhive.com
Shadowhive


Yes, you can use the enclosure. You'll just need to use teflon tape on the threads as your seal since you'll have an extra layer of metal to deal with. In other words, the gasket that is typically on the element would seal to the enclosure, but nothing seals between the spud and enclosure.
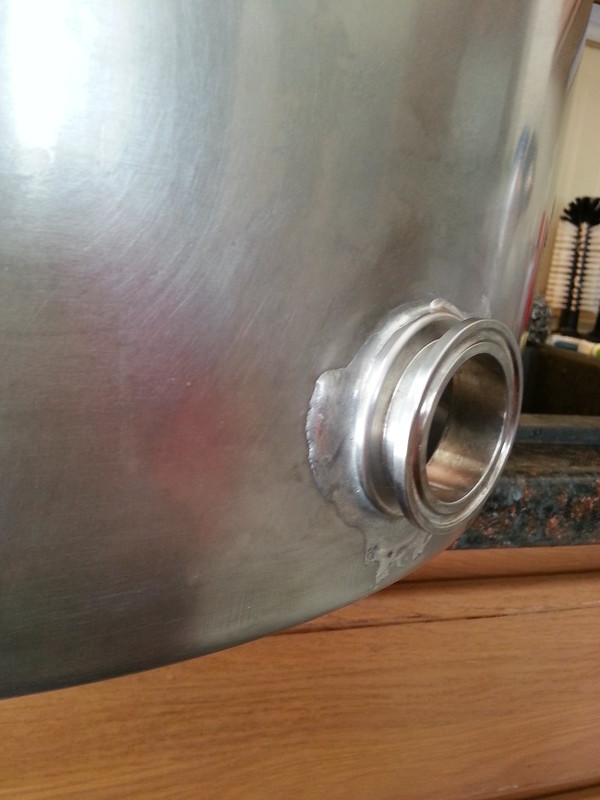
Got the spud and solder kit on Friday - that was fast shipping! After one failed attempt, I soldered the spud in place and it seems to be holding. One problem though: the original hole was large enough that some of solder fell through before it melted, leaving a small gap between the edge of the spud and the kettle wall. I'm pretty sure it will leak. Can the spud be reheated and re-soldered, or can more solder be added to the joint? I used three turns of the thin solder sold with the Brewhardware kit. Perhaps I need more?
I've attached a pic.
Thanks.

One thing that I learned when working with the solder TC flanges is that applying clamping pressure works wonders to close gaps.
Alright just found this thread and there Are a lot of post so forgive me if it's been asked and answered. When soldering a bung in a keg what's the best way to go about it does anyone have a step by step for doing a keggel?
I'd clamp that snug with a butterfly wall anchor setup like bobbym uses then reapply heat. It may nestle in tight as the solder begins to flow.
Sent from
Is this in one of his vids? I haven't run across it yet. I'm willing to give it a try - nothing to lose!
Sent from my iPad using Home Brew
One thing that needs to be stressed on soldering these bungs or 1.5" tri-clovers is to apply the heat slooooowww. If you watch Bobby's video when he is heating up the 1.5" tri-clover when the flux starts to boil he removes the heat for a few seconds tests for solder flow and then heats again if it doesn't. The trick is to get the flux to boil then turn to a light brown goo (technical term) which helps etch the SS so the solder will flow. You know you've applied the heat to fast if the flux boils and turns to a black char. You will still get some black char but it happens after the solder flows.
I watched Bobby's video 1 time and when out and attempted to solder on my first tri-clover after I had experience doing 9 nipples on the same kegs. The first attempt was BAD. My leak test failed 4 times before I got it sealed. I was not happy with the solder job so off it came. Watched the video again and paid much closer attention to how he applied the heat and solder, 2nd attempt turned out great. I did my other keg after that and it was even better.
I hope this doesn't scare anyone off of attempting the soldering. It is actually very easy to do if you take your time.
One thing that needs to be stressed on soldering these bungs or 1.5" tri-clovers is to apply the heat slooooowww. If you watch Bobby's video when he is heating up the 1.5" tri-clover when the flux starts to boil he removes the heat for a few seconds tests for solder flow and then heats again if it doesn't. The trick is to get the flux to boil then turn to a light brown goo (technical term) which helps etch the SS so the solder will flow. You know you've applied the heat to fast if the flux boils and turns to a black char. You will still get some black char but it happens after the solder flows.
I watched Bobby's video 1 time and when out and attempted to solder on my first tri-clover after I had experience doing 9 nipples on the same kegs. The first attempt was BAD. My leak test failed 4 times before I got it sealed. I was not happy with the solder job so off it came. Watched the video again and paid much closer attention to how he applied the heat and solder, 2nd attempt turned out great. I did my other keg after that and it was even better.
I hope this doesn't scare anyone off of attempting the soldering. It is actually very easy to do if you take your time.
Great advice, all. I will work on fabricating a clamp, although it will have to be a little different than BobbyM's because the interior portion of the clamp will need to clear the flange in order to clamp against the pot wall. But I think it can be done, perhaps with toggle arms on both ends. I also will follow the advice from here and on the video about heating slowly until the solder flows. I'm using MAP gas, so it's easy to heat too quickly. I suspect that the technique takes some practice, and there's nothing wrong with that. After I'm done, I'll sure I'll be looking around for more stuff to solder!
wbarber69
Well-Known Member
- Joined
- Oct 13, 2013
- Messages
- 2,191
- Reaction score
- 263
I think the step most people scrimp on is the initial prep work. Grind/sand the hell out of the are to be soldered. And when it looks nice and clean sand it some more. Use acetone to clean all oil and sanding residue. If your joint is squeaky clean then it can't fail. Seriously. Is you look at your work and say that looks about good, your only half way there. Mor time spent prepping equals less time trying to get it to work. The soldering part should be the easiest and fastest part of the whole thing.
snowman_fs
Well-Known Member
Thanks guys.
I cut the top off my first keg today. On my way to a new BK. Also made my first dimple in the scrap and I'm impressed.
I used the dimpling tool pretty much as detailed on this post. The one exception is that I made it work with a sch40 1/2" bushing from McMaster. The fitting that is thicker than the original parts detailed here.
To do this I formed the dimple in two stages. First I used the typical reducing bushing and pulled all the way through. Then I made a second punch by grinding the leading edge of one of my thicker fittings to form a taper from the OD of the first punch to the final OD of the bushings I have.
I made sure to de-burr prior to any forming as well as using a light oil to lube the dimpling. Went really easy and formed a nice deep dimple that I think will give lots of strength to my keg fittings. I'll make the practice solder tomorrow night along with the holes I need in the keg. Fingers crossed it all goes well.
Oh, I also used the smaller diameter bolt to not worry about grinding out the fitting. To help center the punch I just wrapped the shank of the bolt with some tape to build up the thickness to a snug fit.
Sent from my SCH-I535 using Home Brew mobile app
One thing that needs to be stressed on soldering these bungs or 1.5" tri-clovers is to apply the heat slooooowww. If you watch Bobby's video when he is heating up the 1.5" tri-clover when the flux starts to boil he removes the heat for a few seconds tests for solder flow and then heats again if it doesn't. The trick is to get the flux to boil then turn to a light brown goo (technical term) which helps etch the SS so the solder will flow. You know you've applied the heat to fast if the flux boils and turns to a black char. You will still get some black char but it happens after the solder flows.
I watched Bobby's video 1 time and when out and attempted to solder on my first tri-clover after I had experience doing 9 nipples on the same kegs. The first attempt was BAD. My leak test failed 4 times before I got it sealed. I was not happy with the solder job so off it came. Watched the video again and paid much closer attention to how he applied the heat and solder, 2nd attempt turned out great. I did my other keg after that and it was even better.
I hope this doesn't scare anyone off of attempting the soldering. It is actually very easy to do if you take your time.
This is a pretty good explanation of the nuances of doing it right. I can see it being really frustrating because I realize that some people want to just get the job done rather than learn a new skill. To really get it, to the point where you can repeat it on a few pots, is to maybe practice on some scrap copper and brass parts using cheaper flux and solder. The concept is the same, even though copper is a little more forgiving.
If you do happen to overheat and burn the hell out of the flux, reapplying some flux to those charred areas will freshen it up and flush the char away.
Keeping the flame away from the fluxed surfaces is also important because that will burn it before the metal is near hot enough to melt the solder. Finally, you do not want to hold the solder anywhere near your work at the same time as the flame is on it. Melt the solder with your work piece, not the flame.
snowman_fs
Well-Known Member
Here is the result. Pretty happy for boss #1. I didn't realize how much heat was needed for silver braze to flow. The larger mass fitting didn't help...
For those following along I used black silver flux paste, (superior flux 601b), Prince Izant Silver Braze 56 and MPS gas.
Nice and strong, threaded in the nipple and valve with no need to apply countering torque.
I'll leaked test next and then use some pbw but I don't expect problems. The braze is smoother than the center weld on my keg!
Sent from my SCH-I535 using Home Brew mobile app
snowman_fs
Well-Known Member
Sorry. I could only add one photo per post from my phone.
Sent from my SCH-I535 using Home Brew mobile app

Sent from my SCH-I535 using Home Brew mobile app
The result looks good, but just for everyone's clarification, the silver solder you used requires brazing temperatures of around 1200F. Everything in this thread is referring to soft soldering or silver bearing solders that flow at 430F. Pretty big difference.
snowman_fs
Well-Known Member
Haha good point. I got so involved with this I forgot what the thread title was!
The performance benefit of brazing vs soldering is higher strength and smaller capillary zones needed to achieve full strength. At the risk of carbide precipitation if the carbon content of the steel is high and the time above 1200F is held too long. If carbide precip happens to 304/316 SS it reduces the corrosion properties and overall strength of the base metal. For a critical application you would want to dig into this a little deeper and prevent it.
For me the small chance of any negatives are worth the benefit since the risks are nill. Well maybe some spilt beer or a BK that can't be passed onto my kids
Sent from my SCH-I535 using Home Brew mobile app
cyberbackpacker
Well-Known Member
Snowman I believe everyone would agree with you about brazing, but this thread exists for the overwhelming number of people without the materials or wherewithal to braze. That, and silver soldering has proven time and again to be great for our applications.
I finally got my 1.5" tri-clover flange soldered on!!! After many failed attempts (the pic below being one of them),

I finally though I should use my IR thermometer to see how hot the flange was actually getting. To my surprise I wasnt even in the 300's F Now that I realized that all I needed was patients and more time. I also changed my torch to the simple pencil style (I was using a HB torch before). This allowed me to get more focused heat on the flange and not as much near the flux. Anyway here is the final version product:

I finally though I should use my IR thermometer to see how hot the flange was actually getting. To my surprise I wasnt even in the 300's F
Now that I realized that all I needed was patients and more time. I also changed my torch to the simple pencil style (I was using a HB torch before). This allowed me to get more focused heat on the flange and not as much near the flux. Anyway here is the final version product:
Hey, leak free is the most important thing right? There's definitely more solder on there than you needed but it can't be pretty the first time. To be perfectly honest, my first try had extra blobs of solder too.
How do you guys clean your stainless after you are done soldering? I have flux drip marks and other discoloring all over my pots after I am done. I've tried bar keepers friend but that doesn't completely remove the marks.
EDIT: 1500 then 2000 grid sand paper seems to do the trick
EDIT: 1500 then 2000 grid sand paper seems to do the trick
What gas do you use for soldering, oxy/propane, oxy/acetylene or just propane?
I have small propane torch for copper soldering and flux coated rods, it is pretty tough to melt them, it can be done on small pieces but it is damn tough to do it on kettle.
I have small propane torch for copper soldering and flux coated rods, it is pretty tough to melt them, it can be done on small pieces but it is damn tough to do it on kettle.
Similar threads
- Replies
- 41
- Views
- 4K
- Replies
- 0
- Views
- 2K
