Simple Immersion Wort Chiller

Homebrew Talk - Beer, Wine, Mead, & Cider Brewing Discussion Forum

Help Support Homebrew Talk - Beer, Wine, Mead, & Cider Brewing Discussion Forum:

This site may earn a commission from merchant affiliate links, including eBay, Amazon, and others.
I stirr constantly until my temp is below 140F. Which is about 5 minutes with 50' 3/8" coil. 140F is the threshold for DMS. After that, you are in the clear. Then I stir every 3-4 minutes as I get things ready for draining. (15 minutes total)

During this interval in stirring I usually get my fermentor over to drain valve and attach the aeration nozzle to the drain. Then I'm making sure my O2 wand is ready to oxygenate.

Wait, stir, wait, stir.......

That's what I do.
 
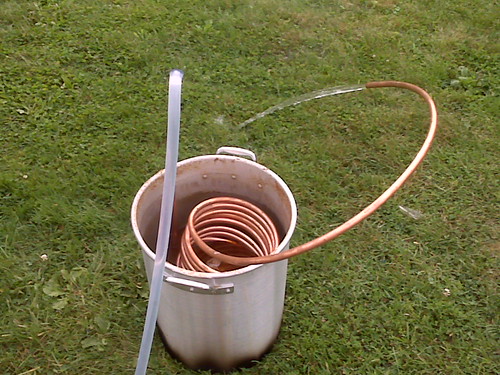
Thanks for the tip on the copper, I finally got to making my chiller, used it my last two batches. It's really quite ghetto compared to some others around here but still works.
3802148606_66a4835413.jpg
 
Thanks a lot for posting this, it was really quite helpful as I now have a (25' mind, being slightly less prolifigate) wonderful immersion wort chiller to use.

But as a slight modification to the OP, this might be self-evident, but you need two (2) Watts A-668 (1/4" to 3/4") Hose Adapters. The OP doesn't mention quantity, and it looks like only one is required. Although, I suppose that you don't really need a washing machine hose for the outflow--any plastic tubing will do, right?


I fixed that. Surprised nobody mentioned in 2 years!!! :D

I use the washer hoses still to this day. I attach my white RV brewing hose to the washer hose and I use an old beat up garden hose on the drain. The end is cut on on the POS garden hose. It just drains down the hill in my yard.

I also use this chiller in the winter on partial mashes when I don't feel like brewing in the cold. I use the kitchen sink, so the 4' washer hoses are worth every penny for me.
 
Well, I got the hoses anyway, for symmetry and wear. It looks great: simple, elegant and effective. Thanks again for the post!
 
Just finished mine on a budget of $40. I found 3/8" x 20' copper tubing at Lowes for $22. It's a little small but should be fine for 5 gallon batches.

WortChiller001.jpg


WortChiller002.jpg


Materials list:

3/8" x 20' copper tubing = 22.62
1/2" x 3/4" barbed garden hose adapter = 5.46
#4 Hose clamp x4 = 1.94
1/2" ID Vinyl tubing x6ft = 1.86

Optional:

Spring type pipe bender 4 sizes = 7.57 (cheaper if you can find them packaged individually)

Total cost was $39.45 but if you wanted to do it caveman style without the pipe bender it would only be $31.88 but kinks can happen in a blink of an eye so I didn't want to chance it.
 
If you use a double flare tubing tool but only use the first stage of the flare you can add a bulb behind the end of your copper tubing like on automotive radiator stubs to prevent a hose from blowing off your chiller ends. Do not make a single flare like a funnel be it a shallow one as it will cut into your hose.
 
nice looking chiller tidehouse, one suggestion - throw a hose clamp on the outbound side of your chiller -- I made the mistake of not doing that and got blasted with hot water when the tubing popped off during chilling...
 
nice looking chiller tidehouse, one suggestion - throw a hose clamp on the outbound side of your chiller -- I made the mistake of not doing that and got blasted with hot water when the tubing popped off during chilling...

Put it on both in case you connect the wrong hoses.
 
Nice Job!!! :rockin:

Thanks, if it wasn't for this thread I wouldn't have thought to just make one.

nice looking chiller tidehouse, one suggestion - throw a hose clamp on the outbound side of your chiller -- I made the mistake of not doing that and got blasted with hot water when the tubing popped off during chilling...

Good call, I'll throw another one on there, probably going to get some high temp tubing as well.
 
tidehouse, that looks awesome. perfect for my budget too. nice job!

I'm planning on building one of these myself here pretty soon. I need some advice what size (length of copper) I should make that can handle 5 gallon all grain batches. I'm currently doing 3 gallon partial boils. My tap water runs pretty hot -- probably around 80F. I'm planning on first running tap water through, then using an aquarium pump to cycle ice water.
 
Just finished a dry run and got 7 gallons from boiling to 75f in about 20 minutes :fro: The only thing I might do is lower the coils, with any less volume they'd be sticking out.

I need some advice what size (length of copper) I should make that can handle 5 gallon all grain batches. I'm currently doing 3 gallon partial boils. My tap water runs pretty hot -- probably around 80F. I'm planning on first running tap water through, then using an aquarium pump to cycle ice water.

Mine is 20 ft, I probably wouldn't go any shorter than that but it seemed to work fine during the test run. I live on Lake Superior so my tap water is pretty cold even during the summer. One thing I noticed is the discharge water was not scalding hot like some people have said, even when the pot was boiling, which leads me to believe that the water doesn't have time to pick up as much heat before exiting the chiller. That makes me think it might be a bit undersized at 20' but still 20 minutes beats 2 hours in the sink any day.
 
I just made a chiller following the OP instructions and it formed up nice but I hate compression fittings. I've never had much luck with them and they tend to leak on me. I'm working on it.
 
OK--hoping someone can help out with a bit of a problem. I purchased the parts for the chiller, bent my copper (20', I only brew 3 gal. batches at a time) into a fancy looking coil and all, but couldn't figure out the attachments? I thought it'd be pretty self explanatory but I tried every which way but couldn't come up with a connection from the copper to the connectors.

Because I couldn't figure it out I took some extra vinyl tube and rigged up a chiller with the vinyl tubing over the copper coil. But when I hooked up the chiller to the faucet, I couldn't turn the faucet on past half power or it would blow the vinyl off the copper tube (Yea, I think I went through two rolls of paper towels tonight). After 1 hour, the wort was finally down to 80 degrees. After another 30 minutes it'd only dropped to 75, so I threw the wort into the fermenter and angrily pitched.

Any suggestions???

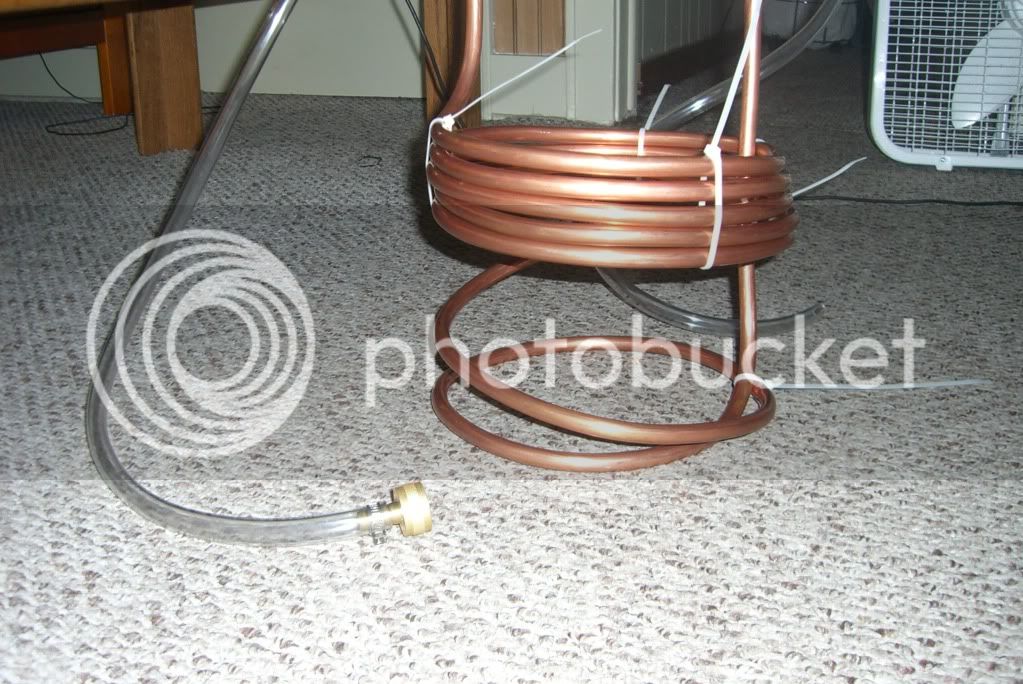
OK These are your parts Look at this picture closely.

3761-WortChiller004.jpg


Its a simple set-up:
- 50' of 3/8" Copper Tubing (your case 20')
- 2 Compression to Pipe Union (3/8" - 1/2NPT) Watts A-124
(These fittings are compression and go on the tubing and bite down on it putting a threaded end on the tubing. Tighten the compressions real good.)
- 2 Hose Adapters (1/2" NPT - 3/4 male garden hose) Watts A-668
(These fittings go on the end of the other, above, fittings to put a set of garden hose threads on your chiller)
- 2 Clothes Washer attachment hoses 4' each.
(The basic washer hose attaches to both ends of chiller and one to the faucet)
- 1 faucet to garden hose adapter
(Only one is needed, goes on the faucet if used indoors. Like the picture above.)
- 7 wire ties to hold it together well (less slinky-like)
 
Ok...but one of my problems is that I built it and it simply leaks terribly--water spraying everywhere. I tried to tape the leaky spots but it doesn't really work and i don't want water dripping into the wort. The compression fittings are as tight as they go and I can just pull them right off the ends of the copper? Any ideas?
 
Ok...but one of my problems is that I built it and it simply leaks terribly--water spraying everywhere. I tried to tape the leaky spots but it doesn't really work and i don't want water dripping into the wort. The compression fittings are as tight as they go and I can just pull them right off the ends of the copper? Any ideas?

You are using the ferrule ring right?

I wonder if you got the wrong size fitting or tubing......

They should bugger down good and not leak. I would use two wrenches to tighten them. One on the hex body and the other on the cap nut. Tighten them really damn good. The angle of the wrenches should be so that you can push the wrenches together with a good amount of force.
 
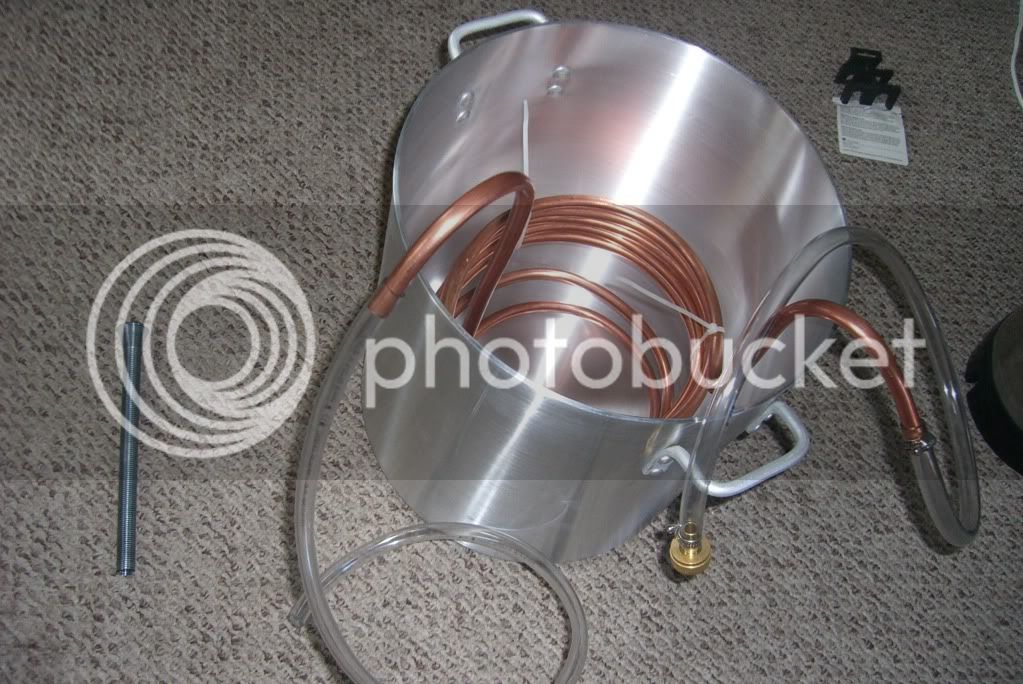
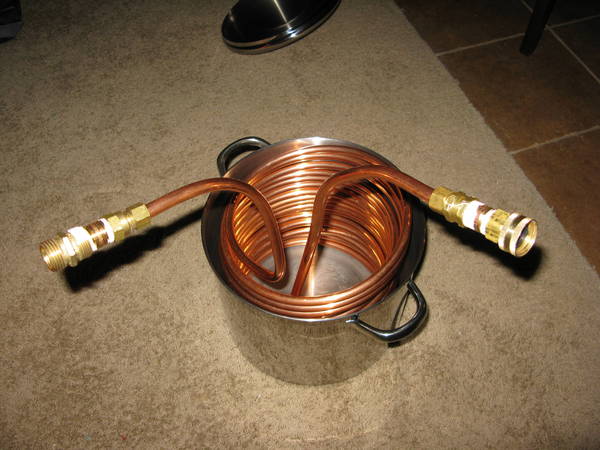
Finally, here's mine! It's made out of 1/2" x 50' copper from local plumbing store.

Along side my 20 qt SS pot.


Inside my 20 qt SS pot. One side of it slightly protrudes out of the pot. It will definably stick out of the wort in my 2 or 3 gallon partial boils. Just made sure to get a decent sized one for full boils when I get a new bigger pot.


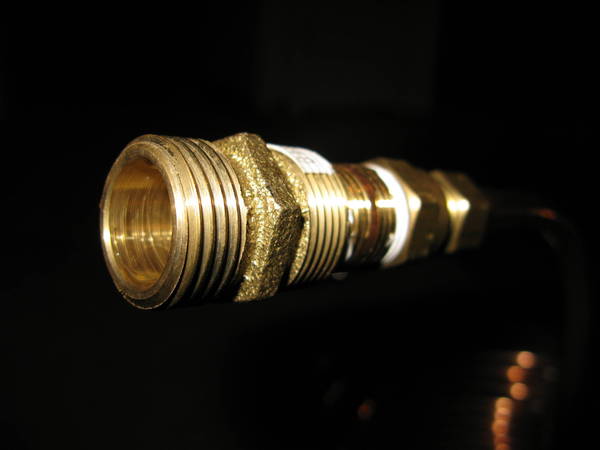
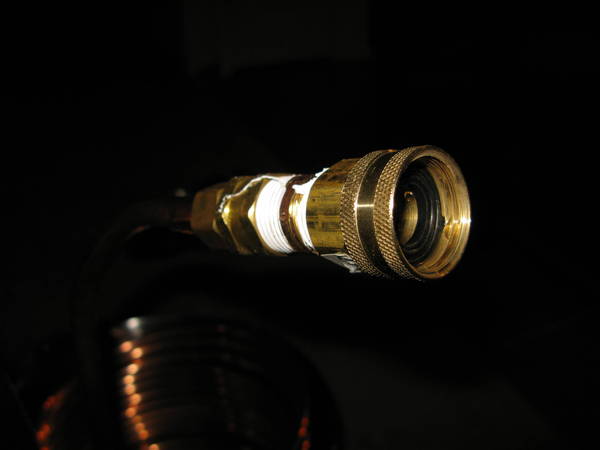
Male hose fitting to 1/2" brass nipple to 1/2" compression fitting.


Female hose fitting to 1/2" brass nipple to 1/2" compression fitting.
 
I already have an IC, but it does not get my wort down much past 100*. I was thinking of making a pre-chiller to put in a bucket of ice water. Would I be ok to use 20' of 3/8'' tubing?
 
Backing up a few dozen posts, someone mentioned that discharging into the grass might kill the grass because of the heat. Has anyone tried running the discharge hose to an impact sprinkler? I would think the blasting it into droplets would cool it enough to not hurt the lawn. I think the water police would give me a break if I'm running the sprinkler for 20 minutes once a month :D
 
Backing up a few dozen posts, someone mentioned that discharging into the grass might kill the grass because of the heat. Has anyone tried running the discharge hose to an impact sprinkler? I would think the blasting it into droplets would cool it enough to not hurt the lawn. I think the water police would give me a break if I'm running the sprinkler for 20 minutes once a month :D


I still think the water would too f'n hot. I'd bet the grass would get burnt.
 
Run off the first 5 gal for later cleaning, then I bet it will be fine as long as it goes through the sprinkler, will cool on the way there and will cool evaporativly as it flies through the air to it's destination. If I didn't brew indoors now and use the water in the washing machine I'd give it a try (in the summer)
 
Do I need a flare tool or something to connect the fittings to the tubing? I can't figure it out. I've got my copper coiled up and I want to try it out tomorrow for brew day.
 
Never mind. I just torqued down on the nuts real well and it works! Brought 3 gallons of water to a boil and ran the chiller with 60*ish water and it got down to 75 in 5 min.s! I've got some really good water pressure on the kitchen sink man!
 
My water comes out of the hose onto the driveway, and by the time it gets 20 feet to the grass it has cooled off, and doesn't bother the grass.
 
I am thinking about building one of these for my 12 gallon pot. Is this 3/8 inch copper tubing the inside diameter or outside diameter of the tubing?

Maybe you just go buy 3/8 inch copper tubing and you don't worry about it..its all the same?
 
I already have an IC, but it does not get my wort down much past 100*. I was thinking of making a pre-chiller to put in a bucket of ice water. Would I be ok to use 20' of 3/8'' tubing?

That should be plenty. You can check the discharge temp after the ice bucket just to make sure.
 
Thanks for these directions; built a chiller with 20' of tubing from Home Depot and it's a huge improvement over an ice bath.

Next time I think I might go for full soldiered connections to allow the uprights to look nicer.
 
Has anyone measured how much water you have to run through the chiller for a 5 gal batch to get it down to adequate temps? Also, how long does it take? I've thought about including a stainless steel chiller as a permenant solution in my new system. was also thinking about putting a copper chiller in a 5 gal round igloo filled with water and frozen as a pre-chiller. My current method is to just leave the carboy in my kegorator at 34F until it is cool ... roughly 8 hrs later. Never had a problem with DMS.
 
For me, since I have very warm water from the tap (85-90*F during the summer), I collect about 20 gallons into a tub. That typically gets me down to 100-110 within 10-15 min. Then I recirculate ice water using a fountain pump. There's probably 5-10g of that. It probably takes a good 20-30 minutes to get down to 65*F.
 
I think I am going to stop by HD on the way home and start my next project! =)

Quick question...any need for rubber washers? I assume they are already in the washer hoses but didn't know if they were needed anywhere esle.

TIA,

John
 
Here is an updated price list from HD (all items available in my local store). I chose to do 50ft of the 3/8" coil since my kettle will be 15 gallons.

1x 3/8 In. x 50 Ft. Copper Pipe, Type Refrigeration, Soft Coil - $56.36
Model 3/8 R 50
Store SKU# 256897
http://www.homedepot.com/webapp/wcs...eId=10051&catalogId=10053&productId=100354212

1x Tube Bending Spring Set - $9.48
Model T073
Store SKU# 639246
http://www.homedepot.com/webapp/wcs...eId=10051&catalogId=10053&productId=100158906

2x 3/8 In. x 1/2 In. Brass Compression Adapter with Insert - $7.68
Model A-124
Store SKU# 544019
http://www.homedepot.com/webapp/wcs...eId=10051&catalogId=10053&productId=100637921

2x 3/4 In. x 1/2 In. Brass Male Hose x FIP Adapter - $5.74
Model A-668
Store SKU# 550388
http://www.homedepot.com/webapp/wcs...eId=10051&catalogId=10053&productId=100637795

A couple of notes:

  • Unfiortunately, it doesn't look like they have single sized tube bending tools so I have to buy the kit.

  • I have a extra washing machine hose at home so no need to buy one. Unfortunately, it is only 5ft long so I may end up replacing it in the end with a 10ft one. I plan on doing all brewing in my garage which has a hose bib so I have some flexibility with placement of equipment.

  • I have an old length of garden hose that I ran over with my tractor. :rockin: I will use this for the output. (damn glad I saved it). :)
  • I also had the teflon tape already. Saved a wopping $1.18 :mug:
Total cost for me is $79.26 (before tax). Probably not the most economical path but I do love my projects. :)

Please review guys and let me know if you think I have missed anthing. Props and thanks to Schlenkera for getting me started in the right direction!

John
 
No problem! It looks good. I use old garden hoses on the ends of the washer hose. Sometimes mine is connected to a sink faucet other times the its on outdoor garden hose. It just depend on the weather.
 
You can get the copper cheaper on eBay if you spend some time. And I've read a few IC builds where people didn't need the bender. Using salt/sand in the pipe will help prevent kinks when doing a tight bend...
 
I just bought a 50' x 3/8" from NY Brew Supply for $79, best price I've seen:

http://www.nybrewsupply.com/products/wort-chiller-copper-immersion.php#c1250

Description Unit price Qty Amount
Copper Immersion Wort Chiller - 3/8 in x 50 ft
Item# W3850-CV $64.99 USD 1 $64.99 USD
Subtotal $64.99 USD
Shipping and handling $13.99 USD
Total $78.98 USD
Payment $78.98 USD
Charge will appear on your credit card statement as "PAYPAL *NYBREWSUPPL"
Payment sent to [email protected]
 
Bumping up an old thread. I'm researching the build today since I am in need of a chiller. My plan is to go 50' so that in the future I could cannibalize the immersion chiller to build a counterflow and maybe a HERMS coil if I end up going that route down the road. Anyway, just immersion chiller for today.

  • Coppertubingsales.com has 50' of 3/8" copper for $63.42 shipped.
  • eBay has 50' of 3/8" copper for $61.84 shipped.
  • NYbrewsupply.com has the completed 50' 3/8" chiller for $82.98 shipped.
  • I dont know if my local Home Depot or Lowes has the copper anymore.

I realize if I buy the coil I still need fittings and hoses, at this time does it still pay to go DIY?

I just built one a couple of weeks ago. My local Home Depot has 50' of 3/8" copper refrigeration tubing for about $43.00. I picked up a 3/8" spring tube bender (~$3) from Ace Hardware because they sell them individually. 3/8" plastic tubing will slide over the 3/8" copper, so I used some of that and a Watt's 3/8" hose barb to female garden hose adapter (~$8). Hope that helps.
 

Latest posts

Back
Top