• Please visit and share your knowledge at our sister communities:
  • If you have not, please join our official Homebrewing Facebook Group!

    Homebrewing Facebook Group

Side by Side Fermenter/Keggerator

Homebrew Talk

Help Support Homebrew Talk:

This site may earn a commission from merchant affiliate links, including eBay, Amazon, and others.
Great looking build! I hope the recipient was pleased with it.

I'm curious about the shelves you installed. How did you get that L-shaped metal attached to the sides of the freezer and fridge? And what did you use as the shelving base? It looks like you added in some white closet type shelving to fill in the gaps so bottles of beer wouldn't fall over but I don't recognize the non-white shelves. Did they come from a lowes/home depot?

I've got a similar build started. Still in the beginning stages of gutting and cleaning. In its previous life it housed oats (or whatever it is that horses eat) in a barn so it's kinda gross. Is there a particular type of metal flashing to use on the freezer size door or will any type work?
 
Thanks aplus01. The aluminum L-shape I attached with 10-24 screws all the way thru the center and outside walls. I used 3 screws in each one and it ends up being pretty strong. The shelving base was purchased at Lowes. They have some black metal shelving that you can buy extra shelves for. They weren't very expensive, $5 each (tops) for the bigger ones on the fridge side. Yes the white shelves are the standard 20" pantry (closet) shelves. I cut them up with with an angle grinder using a cut-off wheel. The sheet metal is just standard flashing out of HD, they have different widths and colors available. Looking back, maybe I should have used white instead... Next time! Good luck on your project and we hope to see some photos!
 
This is so awesome! You did a great job with this. Thanks for posting such detailed photos as the build went along. Would you mind giving us a rough estimate of man hours this took as well as a ballpark cost (less fridge) for the build? You just changed my mind about wanting a chest freezer kegerator!
 
Here is the list you requested ibuhoosier. You could cut the cost down if you buy a couple of the Chinese controllers off of Ebay (and learn Celsius while you're at it!), and maybe get some smaller fans since those were the biggest expense. The rest of the stuff isn't really to expensive, it just starts to add up.

Just looking at the post, I started the build on the 25th of March and was done on the 2nd of April. So that was only 9 days from start to finish. I think I worked every one of those days except one. There were definitely a couple of 8+ hour days, but also some shorter days. I remember building the fan shroud on the freezer side took me about an hour and a half to make. When I thought about it like that, I just lost all motivation and quit for the day! The next day was one of those long ones.

The list doesn't cover any cost of the tap system itself, but I still think its worth the build when I look at the prices of kegerators out there and know that I can fit 4 corny kegs if I want PLUS have a fermenting chamber that can hold a couple of carboys!

Individual Item List 2.jpg
 
I realize this is an old thread, but just wanted to thank OP for all your work documenting the process. I have a similar fridge and followed this build VERY closely doing mine over the last couple weeks. It was most useful and the fridge is working great!
 
You are welcome. Glad it worked out for you! That's why we post, so others with the motivation can build their own. Congrats!
 
Fabulous job! Just curious why you chose Love controllers over STC-1000F controllers. Cost difference is pretty significant and both appear to have the same features. Relay amperage?
 
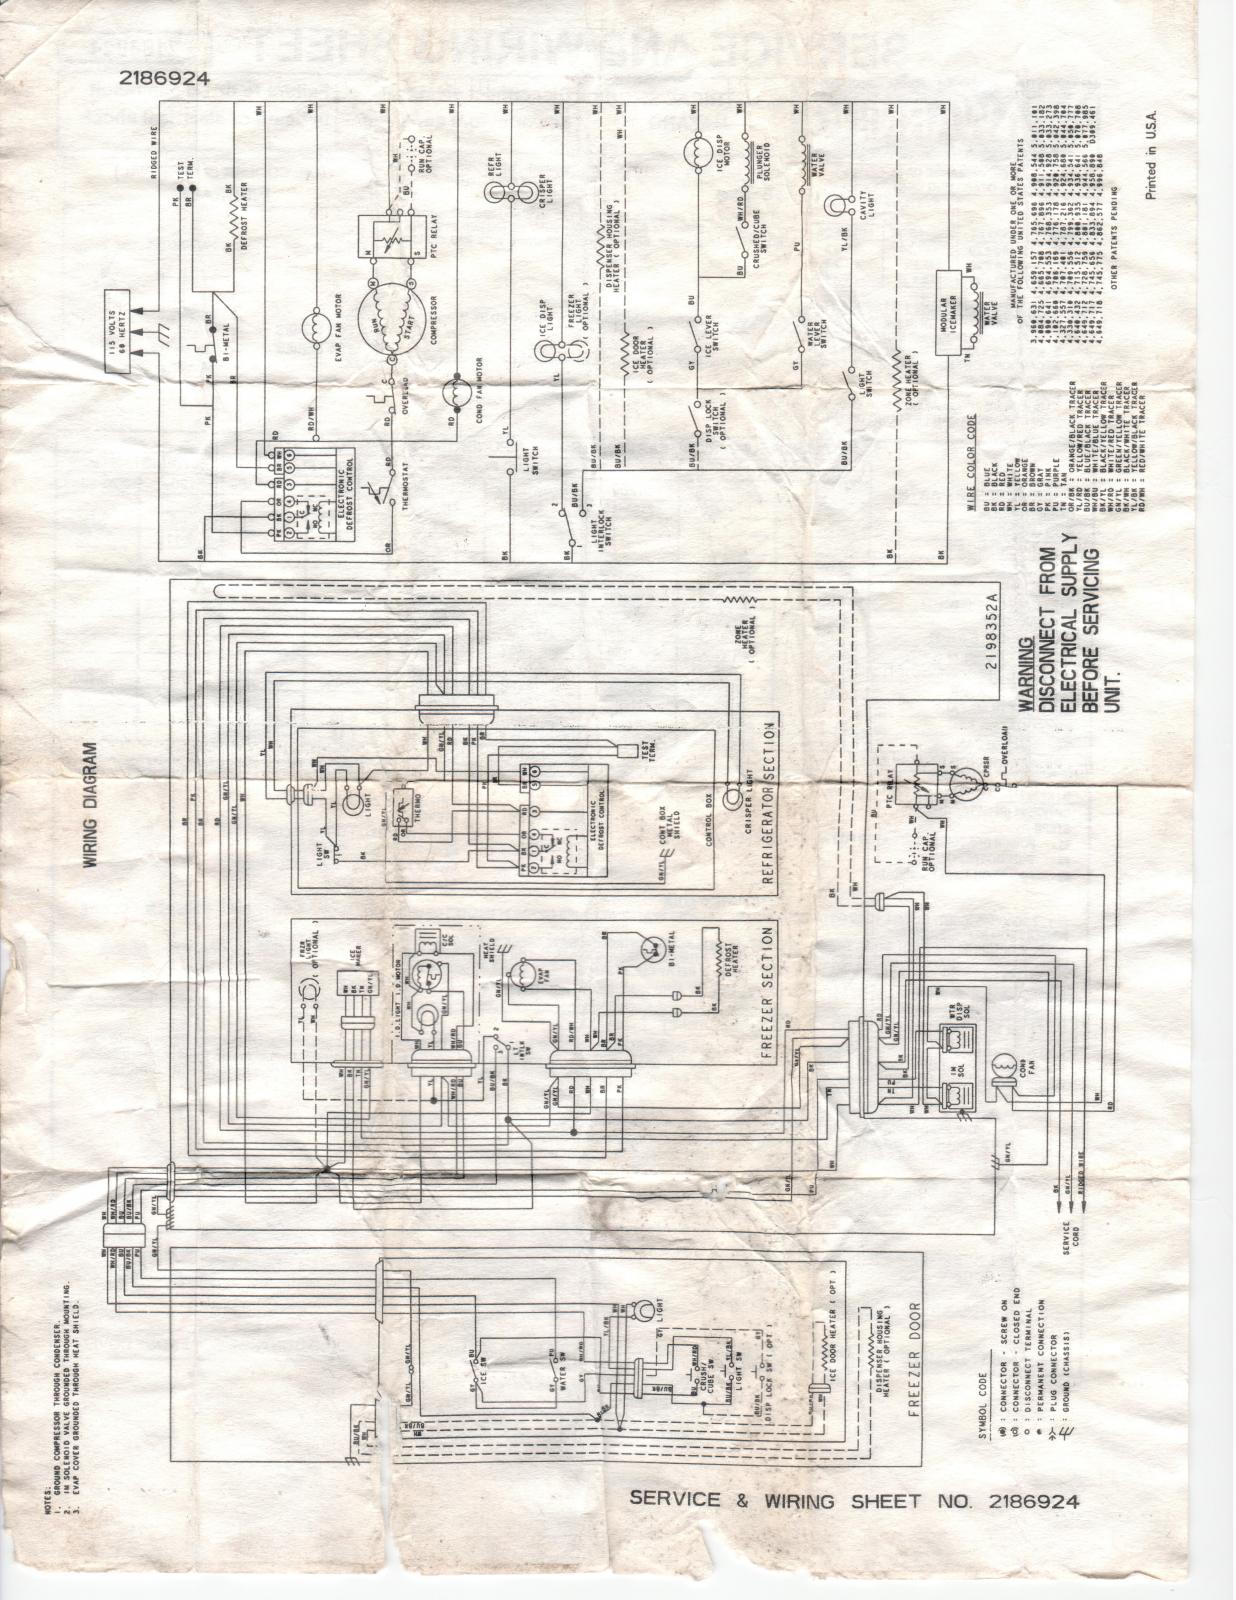
Hey odd question, and I know this is a bit of an old thread. Do you happen to still have the Kenmore wiring diagram?

Of course I have it, as the "Beast" is still running! This is the Kenmore Schematic. Its not the one for this build, but for my Black & Red Kegerator. On my fridge, its kept in the front kick-plate. Just pull it off and its folded up and stuck into the back of the plate. On the Maytag (this build) it was located inside the control housing in the top inside portion of the fridge.

Kenmore Fridge Schematic.jpg
 
Sweet! That is the exact same model that I have. There wasn't a wiring diagram in the used one that I got. Wiring looks pretty much the same as the maytag, although the diagram is right? Thanks for the help sir.
 
Hey, on your Kenmore build, did you put the freezer side controller on the orange or black wire? I'm a little confused as to how it goes through the defrost board.
 
Hey, on your Kenmore build, did you put the freezer side controller on the orange or black wire? I'm a little confused as to how it goes through the defrost board.

Looking at the schematic, since you want to keep the Defrost Timer working, I would splice into the Black and White wires running to the Electronic Defrost Control (I'm assuming you are installing STC-1000's) and attach the Black (hot) to terminal #1 and the White (neutral) to terminal #2 to power up the STC. Now, since the STC is taking the place of the old thermostat, disconnect the Orange and Red wires from the old thermostat and connect them to the STC Cooling Terminals #7 & #8. Of course hook your Temp Sensor to terminals #3 & #4, and there is no heat involved with the Freezer side so the Heating Terminals #5 & #6 will have nothing attached to them.
 
Back
Top