Sibe By Side kegerator/fermenting chamber conversion

Homebrew Talk - Beer, Wine, Mead, & Cider Brewing Discussion Forum

Help Support Homebrew Talk - Beer, Wine, Mead, & Cider Brewing Discussion Forum:

This site may earn a commission from merchant affiliate links, including eBay, Amazon, and others.

rtrevino

Well-Known Member
Joined
Apr 29, 2008
Messages
343
Reaction score
4
Location
San Antonio
This thread outlines my build of my Side By Side Kegerator and Fermentation Chamber. First off thanks to Forbein11 (Link) his build inspired me and I just took the build a little further. Originally I used his schematics and Love TSS2 settings and duplicated his results, but I was not able to get the right side any lower than mid 40s. Forbien11 installed his controller in the side and it does make for a nice clean setup when you have the door open, but I choose to install the controller in the door so that it is easily seen every time I pass by.

kegerator3.jpg


kegerator4.jpg


kegerator.jpg


kegerator1.jpg


kegerator2.jpg
 
Got some work done today. I trimed out the door so that I could fit all three kegs in the left side, plumed in the co2 lines and fixed them in place, and insulated the door with expanding foam. The last thing to do is get the fittings to finish up the beer lines, add a second regulator so that I can pressurize and serve at the same time and tiddy up the wiring on the right side.

3784-inside-door-panel-trimed-backfilled-foam-i-am-going-replace-trimed-out-section-piece-dry-erase-board.jpg


This is looking into the space that use to be where the ice would come through the door.

3785-tap-handle-connections-inside-door.jpg
 
I haven't check the right side for fermenting vessel fit but I would say 2 carboys/buckets no problem and with some custom shelving you could probably fit 3. I would say that 4 corny kegs can fit, so if you haven't started using them to ferment in this would be a good time to start.
 
I have decided to add a pc fan in place of the damper in the fridge side. Can someone help with the programming so I can get sp1 to control the compressor and sp2 to control the pc fan?
 
Update to this build. I could not get the right side (refrigerator side) to cool lower than mid 40s so I have bypassed the adaptive defrost board and have the Love TSS2 controlling the compressor and fan on one switch (SP1) and a 120 VAC pc fan on the other switch (SP2). In this setup I now believe I can equalize the two sides and get the same temp in both zones. If this works I can keep my kegs on tap on the left (SP1) and lager on the right, cold crash, ferment ales, or store extra groceries. Here are a few pics of the pc fan installed in the separating wall and tomorrow I will install a dryer vent to help keep the right side SP2 at the set temperature.

image-1283298150.jpg


image-3878828146.jpg
 
Everything seems to be working just fine. I can equalize the temps or adjust he two compartments to separate temps. I haven't checked what the max temperature differential is between the two but I have had the left set at 37 F and the right at 60 F, so as you can see the differential can be pretty damn high. I will keep this thread updated and upload a wiring schematic and love tss2 settings once I'm confident that it's "done".
 
Nice work. How difficult was it to cut out the ice dispenser assembly? Any tips on the expanding foam? I have a set up similar to this and currently only have two corny kegs on the freezer dispensing side. I think I could get four corny kegs in there if I could trim the door molding and remove the ice dispenser.

On mine, I also installed a 120v PC fan. I have it mounted approximately four inches away from the vent in the center wall and am able to keep the freezer at 40F while getting the refrigerator side down to 55F (not bad considering my garage has been as hot as 120F this summer. I'm wondering if enlarging the vent so that the fan is mounted in the center wall like you have done would enable lower temps.

Are you able to get both sides down to 40F at the same time?

Do you have any difficulty keeping the refrigerator side up to 65F while the freezer is at 40F?

Again - nice job!
 
Cutting out the ice/water dispenser was not too difficult, I just used a small cut off wheel and trimmed the plastic covering on the inside so that the door would be flush in that area. Initially I was going to take out the entire plastic door panel and replace it with dryerase board or plastic but I decided to keep the factory shelves othe door so that I had extra space for mugs, bottles or brewing supplies. I can easily get 3 cornies ithe freezer side without changing the factory shelving but I might weld or build something out of wood to get a fourth in there.

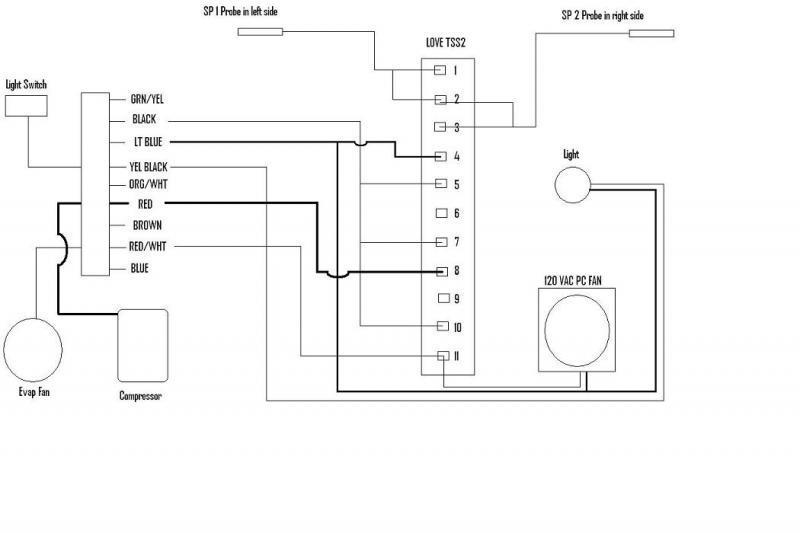
The PC fan is installed directly in the wall and the output side is almost the size of the entire fan so I can exchange a large volume of air and get the right side temps down fairly low. If you look at the design of the right side and how air is exchanged you may not have a good flow if you have the original two exchange holes and another for the pc fan, that's why I installed my fan directly in place of the damper exchange. I also have the fridge wired so that the evaporator fan kicks in with the pc fan, this should create a good flow of warmer air from the right side to come up through the bottom of the right side and be chilled as it moves up and back out the top.

Before installing the fan I couldnt get the right below about 52 F and without a warming source I couldnt get it but a few degrees warmer than the set temp. Right now I have a lager fermenting in the right side so I haven't played with the temps much more but initially I had the left at 38 F and the right at 65 F with no problem. Currenlty I have the left at 38 and the right at 48 with a lager fermenting. Oh and by the way I would guess that my garage is routinely 120 F.

I had planned on installing a louvered dryer vent flush with the fan to prevent air from exchanging on it's own but it seems to be working as is so im not really that concerned with doing this quite yet.

I hope that answered all your questions. I am really confident in how this is working and if anyone needs help, feel free to ask.
 
Thank you for taking the time to reply in detail.

What are you using for shelving on the freezer side? From one of the pictures above, it looks like you might be using the stock shelf. Does it support two filled corny kegs?
 
Currently I'm just using the stock wire shelving and it can hold two cornies but it has some give in it. I plan on making some adjustable wire shelves when I get a chance. I'm going to try and get some good pictures of it all today and upload them.
 
I took some better pictures and uploaded them to my gallery but I'll add a few to this post to show some of the work.

This is the fan looking in from the left side, it is installed in the wall seperating the two sides. There is a metal plate that runs up the back of the refrigerator. The refrigerator is designed so that the fan pulls air from the bottom of the unit passing over the coils and then out the top through the fan.
fc3.jpg


This is a picture looking at the fan from the right side.
fc7.jpg


Here is a view looking into the left side. The way it is right now I can fit two kegs on the stock top shelf and another on the floor. My plan is to weld some metal shelves with expanded metal shelfs so that air can circulate in the unit.
fc2.jpg


Here is a picture looking in the right side. All of the wiring is hidden behind the stock panel. The bulk of the wires come out the right side and connect to the Love TSS2 that installed in the door.
fc4.jpg
 

Attachments

  • fc tss2 schematic.jpg
    fc tss2 schematic.jpg
    30.1 KB · Views: 2,376
Here is another picture looking at the right side of the refrigerator. At the bottom you can see my latest lager fermenting.
fc5.jpg


This is the outside of the entire project. There are three Perlicks installed in the aluminum diamond plate on the left and the Love TSS2 can be seen in the top right corner of the refrigerator.
fc9.jpg
 
great build! What is the min and max temperature difference you have achieved between the two sides?

I'm wondering if it would be helpful to leave the damper in place and add the computer fan on the fridge-side of the damper-hole (that's what she said). Then they would both be activated wehn the fridge side calls for cold.

Or do you achieve enough isolation just turning off the fan when the fridge side is cool enough?
 
Unfortunately I found that the coils have frozen over. I think that I made need to keep the adaptive defrost function in place so that I don't have to keep manually defrosting the coils. I'll be working on it this week and keep this thread updated with what I find.
 
thanks for the update . I'll make sure to leave the defrost function intact for my build. I assume there is a thermistor that sits on or near the coils? Or is it just based on a timer?
 
Actually I believe it's both. The thermistor activates the defrost cycle and then when the higher temp is reached the timer makes sure that the defrost cycle does not run again too soon. A friend of mine does refrigeration work for a large restaurant supply company and may have a good solution but he's out of town until tomorrow.

I had tried swapping the damper with the pc fan with the defrost board in place but for some reason the defrost cycle seemed to stay on too long keeping the temps higher then the set temp causing the compressor to keep running. One good solution may be to wire up the fridge just like Forbien11 and add the pc fan in the freezer side, splicing into the damper controls. The only problem is that the air exchange hole is really small.

I'll keep everyone updated with what solution I find.
 
Well the adage KISS "keep it simple stupid" is true. I rewired the adaptive defrost board back into the fridge so that the defrost functions will work and the fridge is working perfectly now. I am going to redo the wiring schematics to show how it is hooked but if your too impatient and want to get it done, then hook up everything like Forbien11 did in his post; remove the purple and white wire leading from the defrost board to the damper controls (this is not needed and the damper motor can also be removed); The PC Fan is still wired the same way as above but the evap fan is being run by the defrost board and not the love controller.

Like I said, I will be redoing the schematic and it will all make sense.
 
So the only functions you've disabled is the damper motor? Do you think you'll get enough isolation between with sides with the damper always-open?

Do you think I can safely remove all the water and ice features in the door without disabling some critical feature of the defrost cycle?
 
I would just check out the schematic to be sure but on my model, the door functions had no control of the defrost.

With a louvered dryer vent the two sides will remain independent. The right side will get cold air when the pc fan turns on and pushes the louvers open.
 
I don't know why the Homebrewtqlk iPad app is resizing the schematic and shrinking it. I'll repost it in the morning when I have a chance to get on the PC.
 
It's only been a few weeks since you posted your temp ranges with the lager in there and I doubt it's finished, but I thought it was worth a shot. I was curious if you've been able to get that 68-72 rane on the fridge side for the warmer ale yeasts.

Also, with the louvered vent, do you think a heater in the fridge side for fermenting ales during the winter months would not impact the freezer side too much?
 
Mid 70s have been easy to hit, but I'm also in Texas and the fridge is in the garage where I'm sure it can easily reach 100. I'm sure that even with a louvered vent there will be some spill over to the freezer side but I do not think that it would affect that side too much. With newer adaptive defrost functions the freezer side gets heated up a little to melt the built up ice. So I'm sure that the spill over of heat would have the same effect as when the defrost cycle kicks on.
 
Mid 70s have been easy to hit, but I'm also in Texas and the fridge is in the garage where I'm sure it can easily reach 100. I'm sure that even with a louvered vent there will be some spill over to the freezer side but I do not think that it would affect that side too much. With newer adaptive defrost functions the freezer side gets heated up a little to melt the built up ice. So I'm sure that the spill over of heat would have the same effect as when the defrost cycle kicks on.

I had a similar question about heating the fridge side for ales. I'll have my unit outside where the temps can drop to 30 or 40 F. Even with a closed damper, the fridge side will be thermally closer to the freezer temperature than the ambient temperature. I wonder if there is a "three stage" Love controller, where you could use a light bulb to add some heat to the fridge side when needed.
 
Last I checked Dwyer did not have a three stage controller but I can't see why there would not possibly be one out there. I am not too familiar with the BCS460 or the Brewtroller but these have a lot of functionality and may be able to do this, but they are much more expensive.
 
yeah, I though the three-stage controller would be a long shot. I could just leave the light bulb on 24/7 for those few cold days we get in Arizona.

If I understand your description, your system is setup to kick on the compressor and evaporator fan when the freezer probe calls for cold, and the PC fan when the fridge side calls for cold? Is that all there is to it?

I inspected the circuit card in the back of my fridge today and I'm trying to wrap my mind around how to wire the TSS controller such that I don't completely bypass the main control board, while leaving the defrost functions in place.
 
By leaving the defrost board in place it will control the evaporator fan and the defrost functions. I am not completely sure but I believe that the board monitors when the compressor receives the signal to turn on and then takes over and turns on each function as it is needed in the whole cooling and defrosting process. You are just eliminating the factory thermostats and putting another in their place. Does that make sense?
 
By leaving the defrost board in place it will control the evaporator fan and the defrost functions. I am not completely sure but I believe that the board monitors when the compressor receives the signal to turn on and then takes over and turns on each function as it is needed in the whole cooling and defrosting process. You are just eliminating the factory thermostats and putting another in their place. Does that make sense?

yeah I got ya. I didn't think it would be that simple. I assumed the factory thermistors were converting the temperature to voltage internally and sending that signal to the compressor, fan, heater, etc. But I guess the line voltage output from the TSS2 is similar enough to the factory thermistor signals that the board basically doesn't "know" they're been replaced.
 
So did you use the 120 V AC version of the Love TSS2, or the 12 or 24 V DC TSS2? Is ask because you need 120 VAC for the PC fan, but it seems that if you're just replacing the factory thermostats, you want to output some low voltage DC signal from that stage of the Love TSS2
 
twd000 said:
yeah I got ya. I didn't think it would be that simple. I assumed the factory thermistors were converting the temperature to voltage internally and sending that signal to the compressor, fan, heater, etc. But I guess the line voltage output from the TSS2 is similar enough to the factory thermistor signals that the board basically doesn't "know" they're been replaced.

Is it that the thermistor sends a specific voltage, or does the manual dial act as the equivalent of a manual switch? Just by the looks of it and what these temp controllers do, my guess is that they close the circuit to the board when temps rise above the set point.

I have 2 eBay controllers on order and will simply replace the thermostats and not go the pc fan route unless I have to. Also, I will add a ceramic heater to the fridge side since we are now headed to colder weather.
 
twd000 said:
So did you use the 120 V AC version of the Love TSS2, or the 12 or 24 V DC TSS2? Is ask because you need 120 VAC for the PC fan, but it seems that if you're just replacing the factory thermostats, you want to output some low voltage DC signal from that stage of the Love TSS2

You can get 110vac fans if you search for them.
 
So did you use the 120 V AC version of the Love TSS2, or the 12 or 24 V DC TSS2? Is ask because you need 120 VAC for the PC fan, but it seems that if you're just replacing the factory thermostats, you want to output some low voltage DC signal from that stage of the Love TSS2

If you have the schematic for the refrigerator it should indicate the voltage going from the thermistors to the board or show a transformer that would indicate a drop in voltage. But I would take a voltage reading on the thermistors just to make sure. On my unit it was all 120 so I just went the 120 route with everything; a 120 VAC TSS2 and a 120 VAC PC fan. I would bet that it will be 120 on yours as well.
 
Got some work done today. I trimed out the door so that I could fit all three kegs in the left side, plumed in the co2 lines and fixed them in place, and insulated the door with expanding foam. The last thing to do is get the fittings to finish up the beer lines, add a second regulator so that I can pressurize and serve at the same time and tiddy up the wiring on the right side.

3784-inside-door-panel-trimed-backfilled-foam-i-am-going-replace-trimed-out-section-piece-dry-erase-board.jpg


This is looking into the space that use to be where the ice would come through the door.

3785-tap-handle-connections-inside-door.jpg

I just cut out part of my ice maker. Did you end up cutting out the whole ice/water dispenser area, or just that roughly 4x10" recess where the water, wires, and ice equipment fit?
 
I cut the whole thing out but it's not necessary. I would start out with as little as possible and then work your way up if necessary.
 
has anyone figured out a way to separate the two halves of the door-sandwich? The freezer door seems like it is made with an outer slab with the textured sheet metal, then an inner molded plastic panel that makes the door shelves. I have removed the gasket but I don;t see any fasteners between the two parts - is the sandwich just glued together?
 
twd000 said:
has anyone figured out a way to separate the two halves of the door-sandwich? The freezer door seems like it is made with an outer slab with the textured sheet metal, then an inner molded plastic panel that makes the door shelves. I have removed the gasket but I don;t see any fasteners between the two parts - is the sandwich just glued together?

I just cut into mine this week. The inside plastic shell is glued to the insulating foam. It's messy and a bit of a pain. I used a dremmel for some of the thicker plastic but a box cutter did a better job overall... And much quicker.
 

Latest posts

Back
Top