I built my stir plate for less than $5. If you want to do the same here's what you need.
Philips Head Screwdriver
Torx Wrench Set
Power Drill
Hammer
Old dinner knife u dont mind abusing
Razor (wire cutters/stripper)
Super glue
3 Watt Rheometer (Potentiometer) - can be bought from any Radio Shack $4
Computer Hard Drive
Computer Power Supply
12Volt Power cord (Most cell phone chargers, router cords or appliances use theses)
Electrical tape
You need to get your hands on an old computer that has or is going to be thrown away. Yank out the hard drive and using a Torx Wrench, dissassemble the hard drive so you can get to the two rare earth magnets inside. (When pulling apart the hard drive know that some of the nuts are hidden beneath stickers.) There are videos on youtube of how to do this. I used a dinner knife and a hammer to separate the magnets from the piece of metal that they are glued to. Tap gently because the magnets are brittle. I broke one in half but it still works fine.
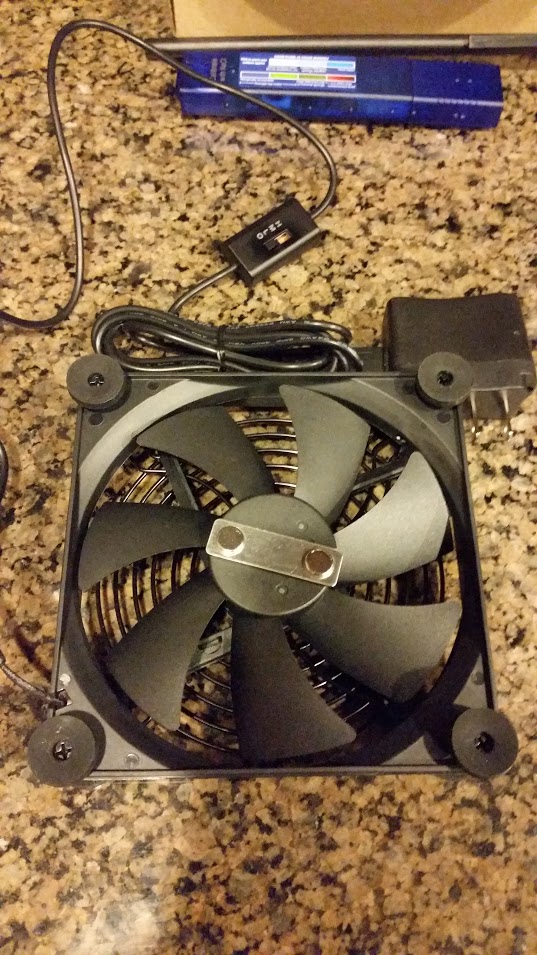
Next you want to pull the computer power supply out. It's the black box that the power cable plugs into. This will act as the body of the stir plate and will contain your rheomter which is used to control the speed of the fan which spins the magnet. Dissassemble the box using a screwdriver. I had to pry it open using the dinner knife. Once inside you want to remove all the wiring and the computer chip with electronics soldered to it. There is already a fan mounted inside. Leave that alone but cut the fan's power supply leaving as much wire as possible for you to work with.
Next you need to drill a hole in the side of the box to mount your rheometer. I believe it's about 5/8" so start with a small bit and work your way up. There is a small tab built into the rheometer that prevents it from spinning while mounted. You need to drill a tiny hole next to the larger one to fit this tab. After you get the Rheometer installed you can start the process of wiring. If you have soldering skills (I don't), feel free to use them. I just twisted the wires around the attachments.
At this point I took a 12Volt power cord from an old router and cut and stripped the cables. I'm no electrician so it took a little trial and error to figure out which way to wire the rheometer to get it to do what I was looking for. There are also some helpful links that I can send you. Also, I wired our stir plate simply so that when you plug it in the fan starts spinning. There is a second step that you can take that involves wiring the hot wire to a switch and then wiring the switch over to the rheometer. This way u can flick the unit on with a switch. I simplified mine though.
The last part was removing the metal screen that the power supply fan sits behind. Afterwards I took the two rare earth magnets from the hard drive and centered them to the fan to prevent wobble. I super glued them in place. Then you just need to find a non-metalic barrier to sit closely to the fan. I plan on screwing a piece of plexiglass but in the meantime I just took a Rubbermaid tuperware lid and rested it over the magnet. It needs to be as close as possible to attract the stir bar but not so close that it rubs and stops the fan. It also needs to be pretty sturdy so as to support the weight of the flask and wort within.
That's pretty much it. Here are some links and videos that helped me with the process.
[ame]https://www.youtube.com/watch?v=vz3yYcdYEZI[/ame] This video have me the idea of using the power supply as a project box which saves you $10-15.
http://beermumbo.com/how-to-build-a-simple-homemade-stir-plate/ This guide helped me with the wiring process
[ame]https://www.youtube.com/watch?v=YKzPt18aE_0[/ame] Pulling apart a hard drive
[ame]https://www.youtube.com/watch?v=GQhSy-Kz5DM[/ame] Separating magnets from their mounts

Philips Head Screwdriver
Torx Wrench Set
Power Drill
Hammer
Old dinner knife u dont mind abusing
Razor (wire cutters/stripper)
Super glue
3 Watt Rheometer (Potentiometer) - can be bought from any Radio Shack $4
Computer Hard Drive
Computer Power Supply
12Volt Power cord (Most cell phone chargers, router cords or appliances use theses)
Electrical tape
You need to get your hands on an old computer that has or is going to be thrown away. Yank out the hard drive and using a Torx Wrench, dissassemble the hard drive so you can get to the two rare earth magnets inside. (When pulling apart the hard drive know that some of the nuts are hidden beneath stickers.) There are videos on youtube of how to do this. I used a dinner knife and a hammer to separate the magnets from the piece of metal that they are glued to. Tap gently because the magnets are brittle. I broke one in half but it still works fine.
Next you want to pull the computer power supply out. It's the black box that the power cable plugs into. This will act as the body of the stir plate and will contain your rheomter which is used to control the speed of the fan which spins the magnet. Dissassemble the box using a screwdriver. I had to pry it open using the dinner knife. Once inside you want to remove all the wiring and the computer chip with electronics soldered to it. There is already a fan mounted inside. Leave that alone but cut the fan's power supply leaving as much wire as possible for you to work with.
Next you need to drill a hole in the side of the box to mount your rheometer. I believe it's about 5/8" so start with a small bit and work your way up. There is a small tab built into the rheometer that prevents it from spinning while mounted. You need to drill a tiny hole next to the larger one to fit this tab. After you get the Rheometer installed you can start the process of wiring. If you have soldering skills (I don't), feel free to use them. I just twisted the wires around the attachments.
At this point I took a 12Volt power cord from an old router and cut and stripped the cables. I'm no electrician so it took a little trial and error to figure out which way to wire the rheometer to get it to do what I was looking for. There are also some helpful links that I can send you. Also, I wired our stir plate simply so that when you plug it in the fan starts spinning. There is a second step that you can take that involves wiring the hot wire to a switch and then wiring the switch over to the rheometer. This way u can flick the unit on with a switch. I simplified mine though.
The last part was removing the metal screen that the power supply fan sits behind. Afterwards I took the two rare earth magnets from the hard drive and centered them to the fan to prevent wobble. I super glued them in place. Then you just need to find a non-metalic barrier to sit closely to the fan. I plan on screwing a piece of plexiglass but in the meantime I just took a Rubbermaid tuperware lid and rested it over the magnet. It needs to be as close as possible to attract the stir bar but not so close that it rubs and stops the fan. It also needs to be pretty sturdy so as to support the weight of the flask and wort within.
That's pretty much it. Here are some links and videos that helped me with the process.
[ame]https://www.youtube.com/watch?v=vz3yYcdYEZI[/ame] This video have me the idea of using the power supply as a project box which saves you $10-15.
http://beermumbo.com/how-to-build-a-simple-homemade-stir-plate/ This guide helped me with the wiring process
[ame]https://www.youtube.com/watch?v=YKzPt18aE_0[/ame] Pulling apart a hard drive
[ame]https://www.youtube.com/watch?v=GQhSy-Kz5DM[/ame] Separating magnets from their mounts


")


![Craft A Brew - Safale S-04 Dry Yeast - Fermentis - English Ale Dry Yeast - For English and American Ales and Hard Apple Ciders - Ingredients for Home Brewing - Beer Making Supplies - [1 Pack]](https://m.media-amazon.com/images/I/41fVGNh6JfL._SL500_.jpg)


.jpg")
.jpg")
.jpg")