Sanke Fermenters

Homebrew Talk - Beer, Wine, Mead, & Cider Brewing Discussion Forum

Help Support Homebrew Talk - Beer, Wine, Mead, & Cider Brewing Discussion Forum:

This site may earn a commission from merchant affiliate links, including eBay, Amazon, and others.

Gordie

Well-Known Member
Joined
Feb 21, 2008
Messages
381
Reaction score
33
Location
Healdsburg, CA
Ok. I've just finished reading everything I could find on the Closed System Pressurized Fermentation process and I'm not sure my Kung-Fu is quite there yet, but I'd be a happy monkey if I am able to simply move fermented wort with CO2.

So I am thinking that a sanke keg is my best option for upgrading my fermenters and would like people's thoughts on what I'm planning to do (ahem, Wortmonger, Poindexter, WBC...).

So my plan is to

(1) pump cooled wort into a sanke with the dip tube and spear assembly removed,

(2) re-attach the dip tube and spear and attach a modified tap with an airlock for fermentation,

(3) and then use a standard tap to move the wort out of primary once its done.

This would have the added benefit of letting me leave the sanke in my chest freezer throughout fermentation and I wouldn't break my back.

Also - is there an effective way to fill the sanke with the dip tube and spear assembly in place an also pitch yeast?

Finally - I'm also thinking I might be able to rack off the trub and harvest some yeast by simply pumping out the trub with CO2 and effectively secondary the wort in place a-la conical fermenters.

What am I missing (other than it will be hard to get all the trub out...)?

Gordie
 
You won't be able to pitch dry yeast directly if you don't remove the spear, of course. You could pitch it into the BK, and when you siphon off it's mixed in -- I'd assume this is how you would pitch a starter with a spear installed.

Trub? I'm thinking unless you trim down the spear, you will get alot of yeast when you rack to the serving kegs. Assuming you do so, yeast harvesting should be easy once the beer's been removed - dump a bit of clean water into the keg, swirl, and apply your preferred yeast washing method from there. :)
-keith
 
:ban:Gordie I would be happy to walk you through anything to do with fermenting in a Sanke keg, and you are on the right track.

With a pump and a modified tap, there is no need to unhook your Sanke dip tube assembly. The pump can fill it with the gas-in check valve removed, for gas escape on the tap. A fully sealed and sanitized fermentation keg is way better for piece of mind, and is simple to pitch into. Like keithd mentioned, pitching in the BK is fine if you are at your pitching temperature and your kettle is clean (you filtered it somehow and are going to the fermenter with what you will be removing while the yeast is in there). I do this with my system now and it works great. I may be changing this in the future and going to pitching in-line at the bottom of a hop back or other, I really don't know. My thinking is, I would hate to pitch my yeast in a sanitized container and have it sit there getting killed with remaining Star-San before I could get the beer on top of it. When you are done you only have to swap Sanke taps (or the same one re-modified for your airlock purposes). Then wait until fermented and simply tap with a regular Sanke tap and hit it with a touch of CO2 to get you moving to your destination vessel.

The main difference in what you will be doing and what I do (other than the pressurized ferment of course) is my transfer would be under pressure due to me being already carbonated in my primary fermenter. You are pushing flat beer so you can push into a serving keg (forced carbonation), primed keg, or bottling bucket from your primary Sanke. I have to push to another keg under counter-pressure or it will be all foam in my target destination.

So, you can see how easy it is to do what you are wanting in a Sanke. Pitching is a cinch, fermentation is easy as pie, and transfer is as hard as you want to make it, lol. You are going to get some sediment when you transfer. I have avoided most of this by cutting 3/4" off the end of my dip tube, however, I am working on a larger dip tube end piece that diverts away like the smaller ones home brewers use on racking canes now. You have to go slow if you don't cut your tube and you may want to dump your first half pint or so at the start of transfer. Typically, that little bit that made it into the serving vessel will be pushed out in your first couple of serving pints and then the rest is clear beer.

Finally, yeast washing is horribly easy. Take your keg out of the freezer, fill your keg with the water described in the yeast washing threads (reattach the filling modified tap you used to fill the keg), and then shake and let settle the length of time dictated. Then all you have to do is transfer out of the sealed keg like you did before for your transfer out of the primary. Now you have a collection jar full of all the thin yeast slurry that was on top of that sediment layer you just left inside the keg. Time to start pouring and settling as the washing instructions say. Now go clean that keg for another ferment. :)
 
My only concern has always been cleaning out the keg after fermentation. I tried it once, but decided to cut the lid off and affix a top for fermenting. I was surprised on the amount of krausen that was left after I thought I had cleaned it thoroughly. Wort Monger, how do you clean your kegs between fermentations?
 
with Oxy-Clean or PBW, gets them very clean. You do need to make a mirror on a stick and a light to check them every now and then, but a day soak in oxy followed by a good rinse and a Star-San final gets me really clean. I don't scrub anything, even the spear assemble, so I can see when I am clean. The kraeusen crud really stays controllable with a pressurized ferment and everything stays real moist and easy to clean inside a keg.
 
God bless you, Wortmonger... and your dancing banana too.

I pretty much always make a starter so I was thinking of pitching into my BK as I pumped wort to the fermenter. It makes me feel warm and fuzzy to think the only time I'd need to break the seal on my fermenter would be for cleaning. I also always harvest my yeast and the process you described makes perfect sense and is as easy if not easier than what I'm doing now.

I'm slightly torn about cutting the dip tube. Is it a hassle just to dump the first running of trub and junk and just transfer clear beer when the trub stops or would I run into clogged tubes or some other nastiness? Right now I'm contemplating going from primary to secondary (in large part to free up fermenter space) and then to corney so I'd have another opportunity to crash and clarify.

I'm going to go about the process of getting some gear together, in particular a few taps that I can take apart and mess with, and I'm sure I'll be needing some help putting them together again and whatnot.

Now, to obsessively scour craigslist for sankes...
 
Don't cut the dip tube. I am thinking something as simple as a piece of plastic drilled and attached to the end will get you up and off the trub in the keg. I cut mine so I can't talk about how much trub would come out without being cut. I have none to speak of most of the time. Most of mine comes at the tale end.
 
Ok - I'm gettin g closer to living the dream and I've got to make some modifications to the couplers.

What I'm thinking is having a "fill" coupler that I can simply pump cool wort from the BK to the keg, having "airlock" couplers, and having an unmodified coupler that I can use for moving still fermented beer out of the keg.

Visualizing this, it appears to me that if I put a valve on beer port of the "fill" coupler and take out the check valve from the tailpiece/gas-in port I can fill by venting the contents of the keg through the tailpiece and then attach an airlock to the tailpiece and close the valve and presto - airlock.

Any problems with that plan? Is there anything I need to do to ball-check in the beer port? Any other tips or suggestions?


Gordie
 
Would it just be easier to attach an airlock to the beer-port and tap the keg with the check valve still in? This would allow me to leave more couplings unmolested...
 
It is simple to take the check valves in and out. You can't attach an airlock to a beer-port on any tap, you have to have gas release on the gas-side. You want to remove the gas check valve so it is possible for gas to escape since it was designed to not allow anything back up the gas line from the CO2 regulator. You can use the same tap for everything and only need to buy another tap for keg to keg transfer under pressure. When filling the fermenter the tap should have the beer check valve removed (allowing wort to go down the dip tube filling the keg. You need the gas check valve removed when filling through the tap so air can escape as it is being pushed out from the incoming beer. You can have an airlock on at this time if you want, but I wouldn't suggest it as it isn't necessary with all the air that will be coming out of the keg. When you are full, untap and add the beer check valve back to the tap also adding your air lock to the gas side now and re-tap the keg. When your beer is done and you want to transfer, simply untap and swap your air lock for a CO2 gas line. Re-tap and start your transfer into a keg with a tap configuration like you had going into your fermenter the first time.
 
When filling the fermenter the tap should have the beer check valve removed (allowing wort to go down the dip tube filling the keg. You need the gas check valve removed when filling through the tap so air can escape as it is being pushed out from the incoming beer. You can have an airlock on at this time if you want, but I wouldn't suggest it as it isn't necessary with all the air that will be coming out of the keg. When you are full, untap and add the beer check valve back to the tap also adding your air lock to the gas side now and re-tap the keg. When your beer is done and you want to transfer, simply untap and swap your air lock for a CO2 gas line. Re-tap and start your transfer into a keg with a tap configuration like you had going into your fermenter the first time.

All makes sense. :)

Quick question - when fermenting in the "airlock configuration" the gas check valve is removed and an airlock attached and the beer check valve is returned to the beer port. Should I also cap the beer port? I'm wondering if fermentation pressure wouldn't start pushing fluid up the spear.

Gordie
 
WortMonger how do you keep your kegs sealed ?
do you use the stander keeper rings ? i have a hell of a time getting them back on right ?
is a major hasle and i dont do it that much only when i want to put 15 in one keg vs 3
 
Tip 'o the hat to Yuri for this one:

"I found a neat new trick to Sanke keg reassembly. If you're having trouble with those damn spiral snap rings, try a regular internal snap ring (stainless, of course). The McMaster part number is 91580A246. It still takes a little effort to get it seated correctly, but it's not nearly as difficult as the spiral ring can be."

They're about $4.95 each.
 
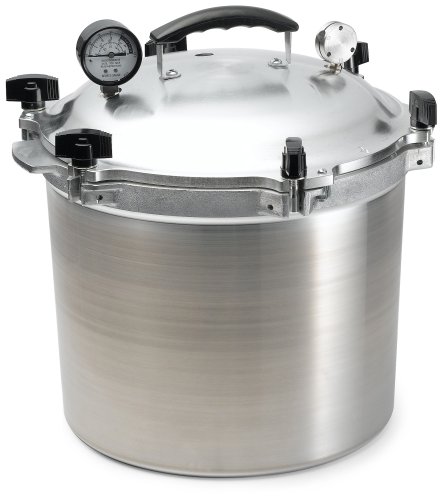
btw if you drilled a hole in the top of your keg and added a ball valve, and then added a vent pipe and presser weight from an all american pressure cooker you could easly and safely ferment at 5psi 10psi or 15 psi see photo and links. I just thought of this, sorry if it has been said before

41hC%2BsFPoBL._SL500_.jpg

presser regulator weight
vent pipe
 
Brewing Clamper said:
This thread came at a perfect time! I'm trying to do the same, I just removed the stem from my sanke and cleaned it out...

Don't you just love this forum for it having the uncanny ability to do that for ya ;)? The keg wasn't so hard to take apart was it?:rockin:

Gordie said:
Quick question - when fermenting in the "airlock configuration" the gas check valve is removed and an airlock attached and the beer check valve is returned to the beer port. Should I also cap the beer port? I'm wondering if fermentation pressure wouldn't start pushing fluid up the spear.
Gordie, the pressure will want to push the beer out of the spear so you will want the beer-out port capped or able to be shut off. I like to use a clean penny and a o-ring to cap mine off until a couple of days into fermentation with the spunding valve attached with the gas-in check valve removed of course, lol. I leave the beer check valve in the tap so all I have to do is untap and swap the plug for a spigot to pull my gravity and tasting samples. If you were using an airlock and fermenting completely as normal then the spigot would be unnecessary but the plug and beer check valve should be left as said. The beer check valve just keeps anything that came out of the keg, out of the keg.

clayton_ross said:
WortMonger how do you keep your kegs sealed ?
do you use the stander keeper rings ? i have a hell of a time getting them back on right ?
is a major hasle and i dont do it that much only when i want to put 15 in one keg vs 3
I do use the standard spiral snap ring as it is called. I have seen Yuri's thread and agree the C style inside snap rings would be easier if they really don't affect the tap any (I am buying and trying some when I remember because I love the idea, but have never tried them so can't say). I have no problems with the regular rings though. It takes practice and learning how to put them back in for easier removal the next time. You have to line up the end of the snap ring a little past and really close to the key-way that allows you access to the ring. If you do this, the next time you stick your little screw driver into and behind the ring it will pop right out where you can then slide the screw driver under and around popping the ring right out. Very, very easy once you get it down. Also, every keg is different. They will all fit and seal differently, some much more difficult than others. Another tip, be very careful putting the rings back in. I gently separate the ring in my fingers and configure it (from experience) for easy future removal. I start one end and immediately, and gently, squeeze the ring into the recess holder letting the ring "want" to go in as you slowly rotate squeezing the ring into place. Sometimes I have to hold down in front of where I am squeezing, but those are the stubborn kegs or the ones with chewed up snap rings (hence the warning about gentleness).

Oh, and Clayton... I had the same idea about a pressure canner weight being cheaper than a spunding valve. It doesn't give you the flexibility vs. the cost. Those weights and fittings are expensive for pressure cookers, but it would definitely work that is for sure.
 
I've got a bubblewrap pocket duct taped to the side of the corney's I use for secondary and stick the temp probe in there. I'm planning the same process for the sankes.

Gordie
 
I just tape my probe to the side of the keg as well. Simple and effective. I will say that propping your keg up on something to allow airspace underneath is better too. I use two 2X4's in the bottom of the chest freezer and they work great for keeping the keg underside clean from spill overs when pulling samples.
 
Back
Top