• Please visit and share your knowledge at our sister communities:
  • If you have not, please join our official Homebrewing Facebook Group!

    Homebrewing Facebook Group

RO brand recommendation

Homebrew Talk

Help Support Homebrew Talk:

This site may earn a commission from merchant affiliate links, including eBay, Amazon, and others.
Thanks for confirming. I wonder why this company was distributing these filters without a seal on the end.
Those types of filters usually have the gasket on top. They are not always glued, it is just a rubber disk pressed into a groove. Sometimes it will fall off when you are taking the plastic film off a new filter.
 
You're misunderstanding how that filter works. The liquid does pass through it. The open bottom you are seeing is where the water comes in, the top with the gasket is where the water leaves to the next stage. The gasket at top is to seal the separation between the clean and dirty. This is an axial flow filter, meaning the water flows along the axis of the cylinder. It is not a radial filter like the sediment filter or the carbon block, where the water flows in radially from the outer cylinder wall toward the center of the cylinder.
Gotcha, so said another way, the water does not permeate through the sides, it comes in through the center in the direction of the end with the rubber gasket?
 
Makes complete sense. You can see the filter media through the bottom and the sides of the filter is a plastic/non-permeable material. Thanks!
 
I recommend getting a larger tank. Mine is 9 gallons US. I can fill my 10-gallon brewing system (20 gallon boil kettle) in one day if I need to.
 
I recommend getting a larger tank. Mine is 9 gallons US. I can fill my 10-gallon brewing system (20 gallon boil kettle) in one day if I need to.
Too large for my purposes. I originally purchased RO specifically for brewing, but it has since turned into my only source of water for drinking, brewing, coffee, cooking, etc. With that said, my RO system is in my kitchen, and do not have the need or space for 10g.

From a "prepping for brew day" perspective, sure, a huge tank would be ideal, but I can work with a smaller tank. What I do is fill an old 5g kettle that came with a home brew kit I got from northern brewer in 2016, let the RO tank re-fill over 1-2 hours, rinse and repeat until I hit my volume. I prep everything the day before brew day so I have plenty of time.
 
fwiw, my typical batch needs around 20 gallons of water (strike plus fly sparge) and my 100 gpd system can crank that out in ~5 hours and never draw from the "4 gallon" pressure tank which only serves its dedicated faucet.

Cheers!
 
fwiw, my typical batch needs around 20 gallons of water (strike plus fly sparge) and my 100 gpd system can crank that out in ~5 hours and never draw from the "4 gallon" pressure tank which only serves its dedicated faucet.

Cheers!
Same. I tee off at the "permeate in" line on my permeate pump to feed by buckets with float valves or for my keg of seltzer water.
 
A note for when you get a new system, or new filters: the carbon block needs to be flushed to purge the excess carbon particulates. This grit is normal, but it needs flushing out.

The important part: make sure you first disconnect the line leading from the carbon to the downstream filters. You don't want that carbon grit getting into the other filters.

After the grit has been purged (will take several minutes), reconnect and use normally.

Buckeye states that in their instructions, but don't forget that step.
Another good point. Many (most?) vendors don't bother telling people to do this.
 
A note for when you get a new system, or new filters: the carbon block needs to be flushed to purge the excess carbon particulates. This grit is normal, but it needs flushing out.

The important part: make sure you first disconnect the line leading from the carbon to the downstream filters. You don't want that carbon grit getting into the other filters.

After the grit has been purged (will take several minutes), reconnect and use normally.

Buckeye states that in their instructions, but don't forget that step.

I was surprised that the APEC kit does not advise you to flush the pre-filters. My $100 purewaterclub.com kit was equipped with a flush valve to make it super easy and they included instructions for how to do it. For the APEC kit, I plan to disconnect the line from pre-filter 3 going to the RO membrane and send that to a drain for 5 mins, then reconnected it to the RO membrane.
 
I was surprised that the APEC kit does not advise you to flush the pre-filters. My $100 purewaterclub.com kit was equipped with a flush valve to make it super easy and they included instructions for how to do it. For the APEC kit, I plan to disconnect the line from pre-filter 3 going to the RO membrane and send that to a drain for 5 mins, then reconnected it to the RO membrane.
Grab a tee and a valve to make this easy on yourself. Having to connect and disconnect that fitting every 6 months will wear stuff out and just increases risk.
 
Grab a tee and a valve to make this easy on yourself. Having to connect and disconnect that fitting every 6 months will wear stuff out and just increases risk.
I considered that, but it’s another opportunity/place for a leak.
 
I considered that, but it’s another opportunity/place for a leak.
A well made connection with retaining clips will be a much lower risk than a push to connect connection that is constantly cycled. This is your risk to assume, best of luck with whatever direction you choose.
 
I recommend adding an auto-flush valve if ones kit didn't include one from the start as they should help prolong membrane lifespan...

Cheers!
Without a valve you can still easily flush the pre-filters by detachiing the pre-filter #3 output line and putting it to drain for X minutes and when done, reconnect to RO membrane in. The only downside to adding a valve, is it's more connections in the mix and additional risk for leaks.
 
Your definition of "easy" does not compute here ;)

Besides, you may not realize the full functionality of an auto-flush valve, as it is actually incorporated during RO production: every hour this valve flushes the input side of the membrane housing to remove the build-up of minerals stopped by the membrane, which in turn raises the rate of production along with extending membrane lifespan...

Cheers!
 
Last edited:
Your definition of "easy" does not compute here ;)

Besides, you may not realize the full functionality of an auto-flush valve, as it is actually incorporated during RO production: every 18 minutes this valve flushes the input side of the membrane housing to remove the build-up of minerals stopped by the membrane, which in turn raises the rate of production along with extending membrane lifespan...

Cheers!
Oh, yes, we’re talking about two different things here. What you reference, yes. I do want that for the long term. What I am talking about is just for flushing brand new pre-filters prior to letting the water reach the RO membrane.
 
What people are trying to tell you is that if you repeatedly remove and reinsert tubing into a quick connect fitting... the chances it will start leaking is high. The stainless steel "teeth" inside the fitting that bite onto the tube do a tiny bit of damage to the tube every time you insert/remove the tube from the fitting.

If you install a little bypass (tee and micro ball valve), your chances of getting a leak are much, much lower.

In some cases, such as where you plan to hook the system up, use it, and then unhook it and store it, this will also be an issue. See our Coupling Assembly for a high quality work around. https://www.buckeyehydro.com/coupling-assembly/

Russ
Yes, I have noticed the end of the tubing that goes into the push connect fitting does get beat up over time. Though, I had no experience with leaks as a result of this, and if they did get excessively bad looking, you could always snip off 1-cm at the end.

So 2 things are under consideration:
1. Pre-filter flush valve to allow flushing the pre-filters at filter change time without disconnecting any tubing.
2. RO membrane flush valve to remove excess waste water from the dirty side of the membrane. How do these work? Should this be flushed at a certain interval?
  • Think I found it: https://www.bulkreefsupply.com/membrane-flush-valve.html
  • Reverse Osmosis membrane flush/flow restrictor valves increase the flow to the membrane by bypassing the flow restrictor when the valve is opened. This helps flush deposits and significantly increases the usable life of the RO membrane. The Membrane Flush/Flow restrictor valve is an all in one flow restrictor equipped with a flush valve for easy worry free use. Keeping the flush and flow restrictor in a single package keeps fitting count down which means less chance for possible leaks or failures down the line. BulkReefSupply.com recommends flushing the membrane before and after each use for a few seconds, or every few weeks for a few minutes as part of regular reverse osmosis system maintenance. When the handle on the valve is “in line” the valve is bypassing the flow restrictor and is in “flush mode,” if the handle is perpendicular to the valve then the unit is ready for normal use.
 
Last edited:
A manual valve bypassing the restrictor will never provide the full benefit of an automatic flush valve...

https://www.buckeyehydro.com/auto-flush-valves
My understanding is that the automatic flush valve is tubed into the system the same way as the manual flush valve.
The only differences are that the automatic flush valve requires power and it will automatically flush upon "energizing" and every hour of use (I assume that this means continuous use).
 
Last edited:
My understanding is that the automatic flush valve is tubed into the system the same way as the manual flush valve.
The only differences are that the automatic flush valve requires power and it will automatically flush upon "energizing" and every hour of use (I assume that this means continuous use).

Yes, of course, it's plumbed "the same" kinda/sorta, but in use there's a significant difference between a manual valve and an AFV - unless one wants to operate a manual valve hourly ;)

Cheers!
 
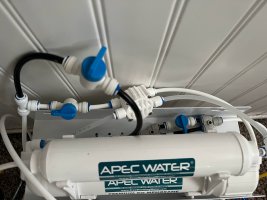
I ended up ordering all of the fittings, tubing and ball valves that I need to add both a pre-filter and RO housing flush.
 
Here it is, I can now flush the pre-filters and RO waste water from the RO housing without disconnecting anything.
IMG_2231.jpg
 
Last edited:
Back
Top