• Please visit and share your knowledge at our sister communities:
  • If you have not, please join our official Homebrewing Facebook Group!

    Homebrewing Facebook Group

RIMS; how hot & what flow rate?

Homebrew Talk

Help Support Homebrew Talk:

This site may earn a commission from merchant affiliate links, including eBay, Amazon, and others.
Thanks Barry! I agree with Rootsman, Very good info. I’m awaiting my 2nd sensor and the 1650 is close to 50% of my 3500! I haven’t made a 20 gal since last year so I should have some shorter periods on my 5 &10 gal batches. I can limit the output of 160 easily enough. Appreciate you taking time to respond! If you ever get to Kentucky, I‘ll buy you a beer!

cheers, KY Dan
 
cheers, KY Dan

My pleasure! I have spent 9 years studying brewing, you know videos, books and articles. Of all the hobbies I've ever had this one is king. I really enjoy sharing the techniques I've learned. You might be interested in some of my other long rants, check them out.

Starship SN10 in 5 mins, have a good one.
 
I brewed a Belgium tripel recipe yesterday with 20% of wheat/oat, this was the same recipe that scorched/burned my element last time. I succeeded to brew without scorching this time 😀 so thanks again BarryBrews for your support.
I didn’t do the protein rest at lower temperature this time and slowed down my flow rate to 3L/min (0,8Gallon/min). I found out that due to this slower flow rate the PID controller was telling my element to use less power and was turning my element off more often. I think this helps a lot in preventing scorching. Will try higher flow rate next time to see the effect.
at 3l/min my temperature difference of the rims outlet and kettle was 2 degrees celsius (35,6F). I used my kettle temperature as mash temperature and used a 2 degrees higher set point on my RIMS. Temperature was very constant.
@BarryBrews do you also use your inlet/kettle temperature as your actual mash temperature and use a higer setpoint at the controller?

cheers,
Ruud
 
Last edited:
I didn’t do the protein rest at lower temperature this time
I avoid buying grains that haven't been sufficiently modified during the malting process, hence never need to do a protein rest to break down the rest of the grain kernel.
Another great tip, since you are using wheat and oats and probably (I suspect) are using rice hulls as a filtration aid is to pre-wash the rice hulls in hot water and dry them before use. You said what? Before you use rice hulls next time, mix a proportional amount of the rice hulls and hot water and give it a taste! I've tried many source of rice hulls all with the same awful rice tea flavor. I washed rice hulls for a couple of brews and decided it was too much work. My mash tun has a false bottom and I use a brew bag and at 3 gallons/minute recirculation never have had a problem with a stuck mash. I do mostly NEIPA brews with 47% wheat and 6% oats. By the way, I brew 12 gallon batches to end up with 10 gallons in two kegs. And because of my clear wort approach the losses require starting with 20 gallons of strike water. tmi?

@BarryBrews do you also use your inlet/kettle temperature as your actual mash temperature and use a higer setpoint at the controller?
Sorry to go on ad nauseam, but it's a process specific answer.

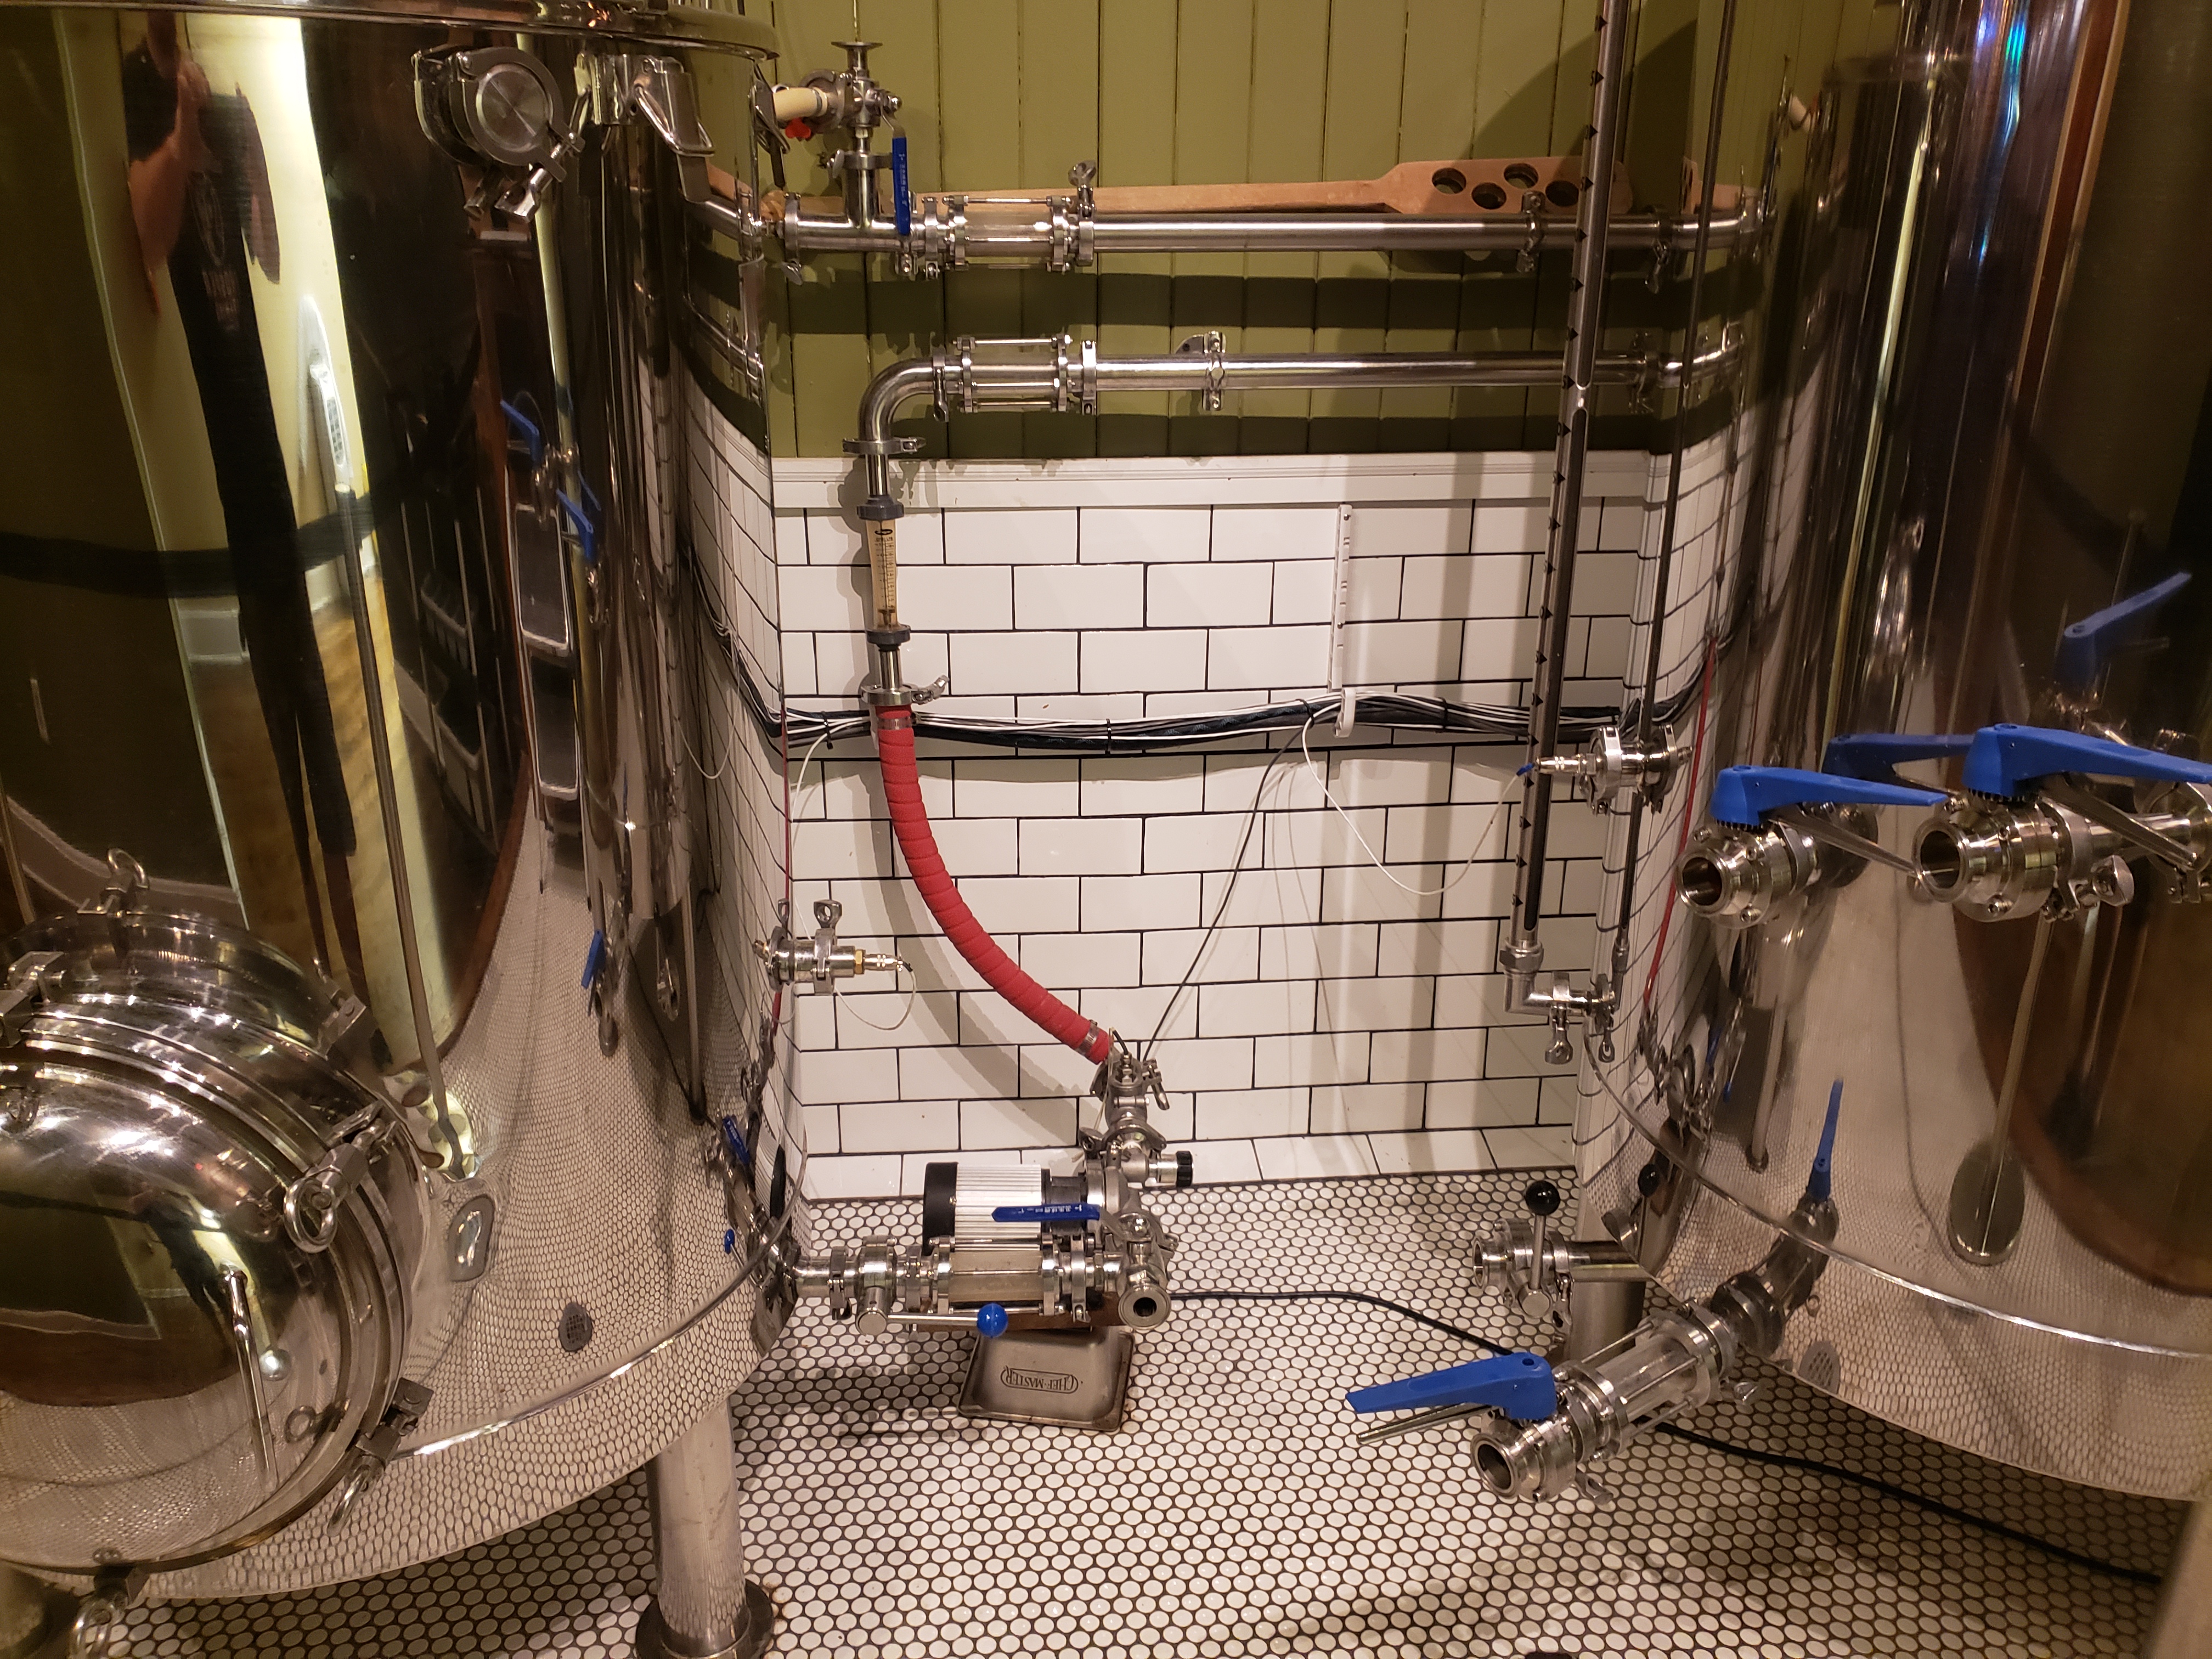
I only monitor the RIMS tube input and output temperatures. See my attached photos. There are no temperature probes poking out into my kettles! The probes would just get in the way.
BrewCart-Nov2020.jpgBarryBrew Process Flow Diagram21.jpg

First (step 1) heat the strike water with both elements at full power and recirculate at full pump speed through the RIMS tube and the boil kettle (BK), while monitoring the RIMS inlet probe (you don't have one, yet?) for the strike temperature progress and the outlet temperature just showing the RIMS heat addition. Next (step 2) with the grist in a brew bag sitting on a false bottom move the pump/RIMS, (think of the pump and RIMS as one unit), outlet tube to the outlet (bottom valve) of the mash tun and under let (2(?) gallons(7.6L)/minute) the strike water and stir the grist if you wish. Next (step 3) move pump/RIMS inlet to the mash tun outlet and the pump/RIMS outlet to the mash tun return. I recirculate during the mashing process at 3(11.4L) gallons/minute, but that's kettle size depend as is the under letting rate in the previous step. While recirculating set the pump/RIMS output with your PID to maybe one degree above your desired mash temperature or higher if you wish to ramp the mash temperature up, but don't ever exceed the safe amylase temperatures. If you initially stirred your mash tun equilibrium will be reached fairly quickly. Remember that the pump/RIMS inlet probe is measuring the actual mash temperature. Your PID should maintain the temperature just fine at this point. You might have noticed I use simple barb connections which affords easy configuration changes. See the process flow diagram attached and notice the copy on my BK. I also use a custom brewsmith worksheet to get through the brew day without mistakes, fingers crossed. Next (step 4), after the mash process, pump your clear wort from the mash tun outlet to the BK return whirlpool port at a rate at which you can maintain a pump/RIMS output temperature of ~175F (79C)for mash out. For me it's about 1(3.8L) gallon/minute. Then connect your pump/RIMS inlet to the BK outlet so both elements can now bring the wort to a boil more quickly. Remember to turn the RIMS element off at ~190F (88C) to avoid scorching (I actually take my RIMS to ~205F(96C) without problems). I do a half gallon RO rinse of the pump/RIMS into the boil kettle before turning off the pump. Add the slow trickle from the mash tun by hand to the BK for up to 30 minutes into a 90 minute boil.

The main take away of this process is that the pump and RIMS are always connected throughout the whole brew day allowing for all the necessary temperature measurements and for the RIMS tube to do more than just control the mash temperature. Step 5 in the process flow diagram is self-explanatory.

Now a point of contention here is I use 2 wireless BBQ probes to monitor the input and output temperatures of the RIMS tube and 2 separate voltage regulators to control the RIMS element and the BK element independently. To perform this procedure outlined above you would connect the RIMS PID probe to the RIMS tube outlet and the BK PID probe to the RIMS tube inlet. So, during the mashing process you'll be measuring the mash temperature with your BK PID probe. ABSOLUTELY not a problem until you accidentally turn on the BK element in an empty BK!

Succes!
 
Of course when you make temp changes you can target a higher RIMS output temp to accellerate the ramp time. This is similar to what happens in a direct fire recirculating mash tun. You may be trying to go 145 to 155 but the wort being pulled from the bottom surface of the kettle may be 180F for a couple seconds before it is filtered down through the grain to give up its heat. On the Brew Commander or any other programmable controller, that might look like 145F for 25 minutes. 170F for 10 minutes. 155 for 30 minutes. The 170F for 10 minutes is by no means going to have the mash resting at that temp, it's just setting the RIMS output to that temp to transfer more heat.

This is not my experience with direct fire mash tun (overshooting to that extreme level). I control the flame on/off based on temperature in the recirculation line just after the pump. To do a step from 150 to 160 I tell the controller to go to 160 and the flame turns on. When the wort pulled from the false bottom in the recirculation line hits 160 the flame turns off. I run a low flame and aim for high flow and will generally not overshoot in the recirculation line by more than about 1.5F...I may see the temp in the line reach 161.5 a few seconds after the flame turned off but never see even 162. At beginning of the step I will tend to get fairly long burn times followed by short flame off times and this will reverse as I get close to the target.

I guess there could be a small amount of wort in direct contact with the bottom of the vessel that is being heated above target. But wouldn't this be exactly the same situation as the wort that is in direct contact with the RIMS element?
 
Long story short, step mashing with a HERMS or RIMS system is tedious and unrealistic if a 10F ramp takes an hour.
My 1650 watt RIMS tube flowing at 3 gallons/minute heats 20 gallons with 36 pounds of grain in my mash tun 15 F in 45 minutes. I mash 145F to 160F almost all the time. The inlet and outlet temperatures of the RIMS tube measure a difference of only 3.5 F. Very amylase friendly.
Plan to upgrade my RIMS to a 2250 watt element, just waiting for an email from my supplier when he is restocked, hehe. Thank you for all your great work!
 
Thanks for your answer @BarryBrews, very interesting!
I do not have a temperature sensor at the inlet of the rims. I agree with you that this would be the coldest temperature of the kettle, on the moment I am using my kettle probe temp as the lowest temperature. So I should use this temperature as my maisch setpoint for now. Temp difference was about 2,5 degrees celsius so I should set my setpoint 2,5 degrees higher In my situation right?
It seems that I should try much higer flow rates next time. Im using a 15 gallon Blichmann kettle and Blichmann mash screen on the bottom. Does anyone have experience with maximum flow rates of these mash screens and kettle size?

cheers,
Ruud
 
Im using a 15 gallon Blichmann kettle and Blichmann mash screen on the bottom. Does anyone have experience with maximum flow rates of these mash screens and kettle size?
First, if don't mind a little math, the flow is limited by the surface area of your mash tun and the depth of the grain. In a more practical view, 3 gallons/minute, 23 inch diameter kettle and 40 pounds of grain works great for me. For you the pounds per square inch is about the (0.1#/sq in) same but your kettle is half the area hence the equivalent flow would be 1.5 gallons per minute.
Second, use a nylon brew bag with your false bottom! It dramatically improves wort clarity, and prevents stuck mashes. And in my opinion, brew bags make mash tun cleanup much easier.
MashReturn.jpg
 
First, if don't mind a little math, the flow is limited by the surface area of your mash tun and the depth of the grain. In a more practical view, 3 gallons/minute, 23 inch diameter kettle and 40 pounds of grain works great for me. For you the pounds per square inch is about the (0.1#/sq in) same but your kettle is half the area hence the equivalent flow would be 1.5 gallons per minute.
Second, use a nylon brew bag with your false bottom! It dramatically improves wort clarity, and prevents stuck mashes. And in my opinion, brew bags make mash tun cleanup much easier.
View attachment 722578
Is that the 400 micron bag from brewinabag.com? I agree a bag helps a lot with cleaning the mash tun but my wilser bag which used to work fine seems to have gotten less permeable over time and now causes stuck mash. I've retired it and am back to mucking out the tun with a scoop.
 
Nylon mesh does indeed tighten with use. When I was using hop bags the oldest ones simply stopped draining and had to be tossed...

Cheers!
 
If you mash at a temperature well below gelatinization temperature you will always risk scorching as even with a well established grain bed you'll have a lot of non-gelatinized particles flowing through the tube. Those are quite sticky and will tend to stick to the heating element and cause scorching.
There is really no point in performing a protein rest since all malt you can buy today will be well modified. The only undermodified malt you can get today is actually unmalted cereal. If you're using a large portion of unmalted adjuncts you should consider doing a separate cereal mash instead of mashing in at a low temperature in your RIMS system as such mashing will be the most prone to scorching as unmalted cereal has an even higher gelatinization temperature.
 
Is that the 400 micron bag from brewinabag.com?
Yes, it's the 400 micron size from brewinabag.com. Guess I've been lucky, 27 brews has left the bag well stained but never a stuck mash. Keep in mind my mash tun is 23 inches in diameter and there is a false bottom.
After dumping the grist I clean the bag using the leaf blower to remove the fine pieces then Dawn clean and thoroughly rinse. No build up going on.
 
So My take on the rims is this... I use the longest, lowest watt density heating elements I can and use a relatively lower flow rate than most. At home this means I recirculate throught a 40" long rims with a 36" long cartridge heater thats 1800w... I recirculate with a 24v dc pump at 1.5-2 gpm and I consistently get between 88 and 91% brewhouse efficiency this way (depending on adjuncts used or not). My rims element surface doesnt have to heat up much more if any higher than the desired mash temp..

I use this same principle at my brewpub where I brew on a 3bbl rims system I made using 2 rims elements and a 6ft long "U" shaped rims mounted horizontally so it fully fills and drains without air or liquid pockets. I use brocontrol there to limit my ULWD 6500w longer (24" maybe?) straight hot water style element to 75% max output ON TOP of my regualr pid control... I also have a 30" long 2200w cartridge "booster" element wired into this rims to help and ensure consistent temps before the temp probe mounted at the rims exit.

We brewed a orange/honey cream ale yesterday and achieved a 92% mash efficiency after sparging.
I recirculate my 3bbl rims at between 3-5 gpm pulling through a 30" diameter false bottom depending on the consistency and size of grainbill.
I do not like to push flow to the max as My experience shows it compacts the grain bed and causes channeling and REDUCES my mash efficiency.

on all my rims setups the elements stay relatively clean with only a minor light almost clear color Gelatin buildup depending on grainbill that wipes off with a damp cloth. Theres no burning or discolored "cooked" protiens on my elements surface and denaturing is not an issue... I think of it as performance of a rims with safety of a herms in this configuration... (I also use flow meters and flow switches to prevent any scorching or localized boiling in the rims. We do sometimes stepmash and we find regardless of modified grains that it makes a difference.

BTW rims and stepmashing with RYE do not go well together! It was the one and only time I experienced scortching at the brewpub and we did have to dump the mash we stepmash with other adjucts such as wheat and oats on a regular basis with no problems.

here are a couple photos, one showing the mash temps and ramping rates of a large mash (It took almost 15 mins for temps to stabilize to rims at 4gpm) and another 15 mins to mash in. you would think that after 30mins much of the conversion has already taken place before the rims reaches equilibrium in this case but its not really the case surprisingly since we still have a lot of control over hitting our numbers and beer body.
The other is an older pic of our rims which has changed a bit since this pic but you get the gist.
 

Attachments

  • 20190918_215515.jpg
    20190918_215515.jpg
    4.3 MB
  • 20191201_095149.jpg
    20191201_095149.jpg
    3.4 MB
Last edited:
So My take on the rims is this... I use the longest, lowest watt density heating elements I can and use a relatively lower flow rate than most. At home this means I recirculate throught a 40" long rims with a 36" long cartridge heater thats 1800w... I recirculate with a 24v dc pump at 1.5-2 gpm and I consistently get between 88 and 91% brewhouse efficiency this way (depending on adjuncts used or not). My rims element surface doesnt have to heat up much more if any higher than the desired mash temp..

I use this same principle at my brewpub where I brew on a 3bbl rims system I made using 2 rims elements and a 6ft long "U" shaped rims mounted horizontally so it fully fills and drains without air or liquid pockets. I use brocontrol there to limit my ULWD 6500w longer (24" maybe?) straight hot water style element to 75% max output ON TOP of my regualr pid control... I also have a 30" long 2200w cartridge "booster" element wired into this rims to help and ensure consistent temps before the temp probe mounted at the rims exit.

We brewed a orange/honey cream ale yesterday and achieved a 92% mash efficiency after sparging.
I recirculate my 3bbl rims at between 3-5 gpm pulling through a 30" diameter false bottom depending on the consistency and size of grainbill.
I do not like to push flow to the max as My experience shows it compacts the grain bed and causes channeling and REDUCES my mash efficiency.

on all my rims setups the elements stay relatively clean with only a minor light almost clear color Gelatin buildup depending on grainbill that wipes off with a damp cloth. Theres no burning or discolored "cooked" protiens on my elements surface and denaturing is not an issue... I think of it as performance of a rims with safety of a herms in this configuration... (I also use flow meters and flow switches to prevent any scorching or localized boiling in the rims. We do sometimes stepmash and we find regardless of modified grains that it makes a difference.

BTW rims and stepmashing with RYE do not go well together! It was the one and only time I experienced scortching at the brewpub and we did have to dump the mash we stepmash with other adjucts such as wheat and oats on a regular basis with no problems.

here are a couple photos, one showing the mash temps and ramping rates of a large mash (It took almost 15 mins for temps to stabilize to rims at 4gpm) and another 15 mins to mash in. you would think that after 30mins much of the conversion has already taken place before the rims reaches equilibrium in this case but its not really the case surprisingly since we still have a lot of control over hitting our numbers and beer body.
The other is an older pic of our rims which has changed a bit since this pic but you get the gist.
Thnx for the extra insight Augie! I’ve ran 2 batches thru with the rims since receiving the responses and I’m dialed in now. I’m using a 3500 watt ulwd element and backing up the power to about 50-60% using a flow rate between 1-4 gpm while setting the output at 160-170. Flow rate varying with mash tun output.

cheers, Kentucky Dan
 
Back
Top