Refrigerant Charging

Homebrew Talk - Beer, Wine, Mead, & Cider Brewing Discussion Forum

Help Support Homebrew Talk - Beer, Wine, Mead, & Cider Brewing Discussion Forum:

This site may earn a commission from merchant affiliate links, including eBay, Amazon, and others.

Nic0

Supporting Member
HBT Supporter
Joined
Dec 28, 2010
Messages
183
Reaction score
1
Location
Bartlesville
A guy at work had a minifridge that he didn't want anymore, and I got it for a pretty good price: FREE.

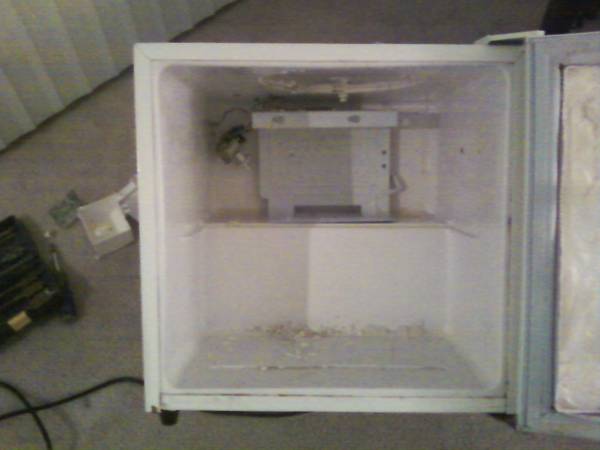
The carboy fits inside it, but with the airlock on, the "freezer shelf" in the top is in the way. The shelf has coils in it, which I assume is the case with most minifridges that have a freezer part in the top.

If I cut that coil to remove the shelf, I'm going to lose all the gas. I don't think there are fittings on this thing, unlike a car refrigerant system, that allows easy recharging. Has anyone had to cut coils and then patch it back up and recharge the system?

Maybe I can get away with carefully bending that shelf upwards in the middle to allow the neccesary headroom.

See photo:
Green elipse is where the coil enters/exits the fridge area from the back.
Red arrow points to the coil shelf that is causing my problem.
fridge.jpg


Thanks,

Nic
 
Why not put a carboy cap on instead of the airlock and run a tube down into a tub of water?

For that matter, I cover my carboy with just plain old sanitized foil and then stick a sanitized dial thermometer through it.

That might be a lot easier than modifying the refrigerator.
 
Why not put a carboy cap on instead of the airlock and run a tube down into a tub of water?

For that matter, I cover my carboy with just plain old sanitized foil and then stick a sanitized dial thermometer through it.

That might be a lot easier than modifying the refrigerator.

Genius!

I haven't done this before... carboy cap would be... what? And I assume I would need to sanitize that, the tube, the water in the tub (boil), and the tub... correct?
 
I can't quite tell from that pic, but if it's like the one I just did for a friend, the coil just had a couple of screw holding it in place. I took the screws out and bent the coil back against the back of the fridge. Just bend carefully so you don't kink the lines. I've got a few pics I'll dig up and post.
 
Here you go. This situation was a little different than yours, but as you can see moving the coil is no big deal. There was no way to fit the corny in without moving the coil and cutting the inside panel off the door on this one. The fridge was free and my buddy had just got his kegging setup, so I made it work for him. It actually works extremely well. It was so cold the next day he had to turn the thermostat down half way. The entire process took about 30 minutes.

1211102120.jpg


1211102211.jpg


1211102211b.jpg


1211102211c.jpg


1211102217.jpg
 
There is no inexpensive way to move that coil and there are no fittings like there is on car. To do this correctly would cost way more than the fridge is worth the other ideas posted seem to be the way to go.
 
I think rather than hacking this up, I'll just use a different airlock method vs the type i have in the picture. Or, maybe use a bucket instead of a carboy which saves quite a few inches on height.

This way when I'm not fermenting beer I can use it to keep other stuff cold....like completed beer. Or soft drinks. Or milk, which I can never have enough of.
 
What about a Vented Silicone Stopper?
image_463.jpg


Fits 3, 5, 6, and 6.5 gallon glass carboys and acts as both a stopper and an airlock. Its four vents and pliable seal allow CO2 to escape but prevents entry of oxygen and airborne contaiminants. No more suckback of liquid from the airlock as wort cools; great for extended fermentations where CO2 production is slight. Diameter is 1 1/2" at the top, 1 1/16" at the bottom.
 
I haven't used one for brewing yet... mainly because I use a blow off for primary and already have abunch of airlocks for secondary without your clearance issue...

And a lame answer is, they say it'll work! I've been tempted to use one on long fermentations where the concern for the solution in the air lock can dry up. It could help with the set it and forget it factor!
 
do this.

arrowhead water bottle cap
1" 90 degree elbow
1" ID soft flexible tubing

although in my picture I have 1-1/4" ID tubing and I'll be switching to 1" soft non-braided tubing
IMG_20101228_164833.jpg


-=Jason=-
 
do this.

arrowhead water bottle cap
1" 90 degree elbow
1" ID soft flexible tubing

although in my picture I have 1-1/4" ID tubing and I'll be switching to 1" soft non-braided tubing

-=Jason=-

Score.

What type of plastic is that elbow? Or does it really matter (safe enough to be called "food grade" ?)

And I assume you sanitize all of that before putting on the jug.
I also assume that considering the volume of that tubing, even if the beer volume shrank due to temp lowering, its volume would not decrease enough to have to worry about liquid flowing back up that pipe and into the beer.
 
Back
Top