You are using an out of date browser. It may not display this or other websites correctly.
You should upgrade or use an alternative browser.
You should upgrade or use an alternative browser.
Pneumatic Bottle Capper - Just...because.
- Thread starter -TH-
- Start date

Help Support Homebrew Talk:
This site may earn a commission from merchant affiliate
links, including eBay, Amazon, and others.
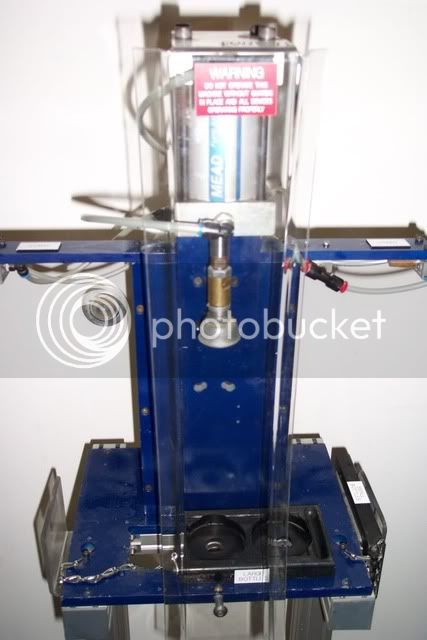
If anyone is interested in sending me the cyl, pedal, connectors, hoses, cap crimper piece, and one of their bottles, I'd be happy to trade for a completed frame assembly. I'm thinking out of Tig welded aluminum, but more like the phone booth style box with no door.
With the right regulator it would be easy to make this run off of a standard CO2 cylinder, so no air compressor required.
Anyone Interested?
With the right regulator it would be easy to make this run off of a standard CO2 cylinder, so no air compressor required.
Anyone Interested?
inexplorata
Active Member
Google found me this thread by accident. I am kicking it, because it is awesome.
starman
Well-Known Member
Oooooooh... 2000SNS-2.00 = stainless cylinder for $69. The thought of some 304 ss tube with this has me giddy. The only thing better than powered DIY homebrew project is a shiny powered DIY homebrew project.
gyropilot1
Well-Known Member
do you price your invention. I am looking to go neumatic also
Chuck P
Chuck P
gyropilot1
Well-Known Member
cad drawing dont work


$22.00 ($623.23 / Ounce)
AMZLMPKNTW Ball Lock Sample Faucet 30cm Reinforced Silicone Hose Secondary Fermentation Homebrew Kegging joyful
无为中南商贸有限公司


$44.99
$49.95
Craft A Brew - Mead Making Kit – Reusable Make Your Own Mead Kit – Yields 1 Gallon of Mead
Craft a Brew


$33.99 ($17.00 / Count)
$41.99 ($21.00 / Count)
2 Pack 1 Gallon Large Fermentation Jars with 3 Airlocks and 2 SCREW Lids(100% Airtight Heavy Duty Lid w Silicone) - Wide Mouth Glass Jars w Scale Mark - Pickle Jars for Sauerkraut, Sourdough Starter
Qianfenie Direct

$53.24
1pc Hose Barb/MFL 1.5" Tri Clamp to Ball Lock Post Liquid Gas Homebrew Kegging Fermentation Parts Brewer Hardware SUS304(Liquid Hose Barb)
yunchengshiyanhuqucuichendianzishangwuyouxiangongsi


$719.00
$799.00
EdgeStar KC2000TWIN Full Size Dual Tap Kegerator & Draft Beer Dispenser - Black
Amazon.com

$176.97
1pc Commercial Keg Manifold 2" Tri Clamp,Ball Lock Tapping Head,Pressure Gauge/Adjustable PRV for Kegging,Fermentation Control
hanhanbaihuoxiaoshoudian

$159.50 ($26.58 / Count)
3M High Flow Series System BREW120-MS, 5616001, For Brewed Coffee and Hot Tea, Valve-in-Head Design
Amazon.com


$53.24
1pc Hose Barb/MFL 1.5" Tri Clamp to Ball Lock Post Liquid Gas Homebrew Kegging Fermentation Parts Brewer Hardware SUS304(Liquid Hose Barb)
Guangshui Weilu You Trading Co., Ltd

$58.16
HUIZHUGS Brewing Equipment Keg Ball Lock Faucet 30cm Reinforced Silicone Hose Secondary Fermentation Homebrew Kegging Brewing Equipment
xiangshuizhenzhanglingfengshop


$10.99 ($31.16 / Ounce)
Hornindal Kveik Yeast for Homebrewing - Mead, Cider, Wine, Beer - 10g Packet - Saccharomyces Cerevisiae - Sold by Shadowhive.com
Shadowhive


$20.94
$29.99
The Brew Your Own Big Book of Clone Recipes: Featuring 300 Homebrew Recipes from Your Favorite Breweries
Amazon.com


![Craft A Brew - Safale BE-256 Yeast - Fermentis - Belgian Ale Dry Yeast - For Belgian & Strong Ales - Ingredients for Home Brewing - Beer Making Supplies - [3 Pack]](https://m.media-amazon.com/images/I/51bcKEwQmWL._SL500_.jpg)


$7.79 ($7.79 / Count)
Craft A Brew - LalBrew Voss™ - Kveik Ale Yeast - For Craft Lagers - Ingredients for Home Brewing - Beer Making Supplies - (1 Pack)
Craft a Brew
gyropilot1
Well-Known Member
also the nut welded is the mounit nut sold by the cylinder guys or something else
Hang Glider
Beer Drinker
the welded nut is the nut that comes with the air cylinder
Most folks that post here are sharing ideas for the benefit of all - not patented, even if it is a great idea and something that might sell. So - I don't think the original poster is looking to sell his invention, just share it - you are free to make your own.
You will have to do your homework - look on Google for the air cylinder, find a local welding shop that can look at the photo and weld up something. You probably have local folks that can powder-coat it for you too. You can find feet, endcaps and pneumatic hose at McMaster Carr, for example. You'll have to take some of your own bottles and figure the height, width, depth. I would start with the air cylinder and build around it.
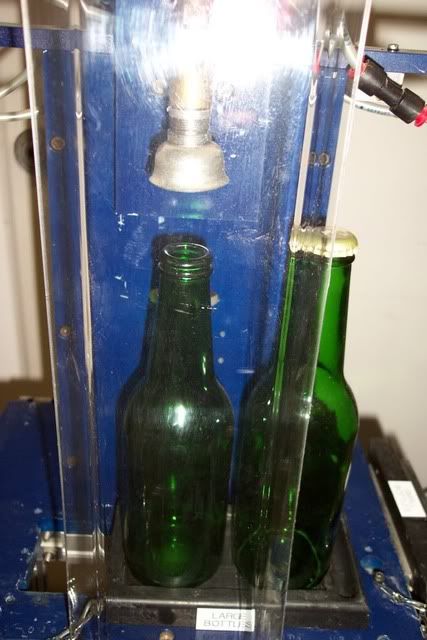
the bell that crimps the cap might be purchased, or you might sacrifice your hand capper -
Most folks that post here are sharing ideas for the benefit of all - not patented, even if it is a great idea and something that might sell. So - I don't think the original poster is looking to sell his invention, just share it - you are free to make your own.
You will have to do your homework - look on Google for the air cylinder, find a local welding shop that can look at the photo and weld up something. You probably have local folks that can powder-coat it for you too. You can find feet, endcaps and pneumatic hose at McMaster Carr, for example. You'll have to take some of your own bottles and figure the height, width, depth. I would start with the air cylinder and build around it.
the bell that crimps the cap might be purchased, or you might sacrifice your hand capper -
motorhead69
Well-Known Member
BiggieB400
Well-Known Member
- Joined
- Mar 6, 2009
- Messages
- 50
- Reaction score
- 3
I don't usually bottle beer, but if I did... I'd use a pneumatic capper!!
Nice work!!
Nice work!!
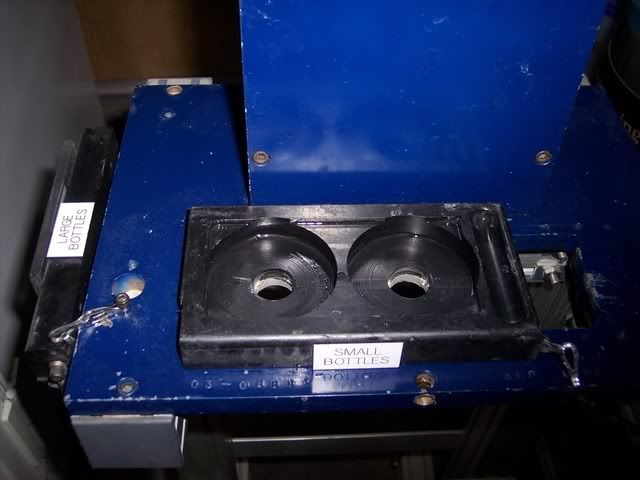
This got bumped up to the top again so I just found it. My comment that I don't think got mentioned would be directed at the locater block on the base. I wonder if a 'V' shaped piece of lexan would be good to locate a bottle instead of the circle. That way you could slide it against the V-stop and it would be in place instead of putting it into the circle. Just a thought. I'm loving this idea and saving it for later.
blip01
Well-Known Member
motorhead69 said:and now you can buy one at Williams
http://www.williamsbrewing.com/PNEUMATIC-CAPPER-P3067.aspx[/QUOTE
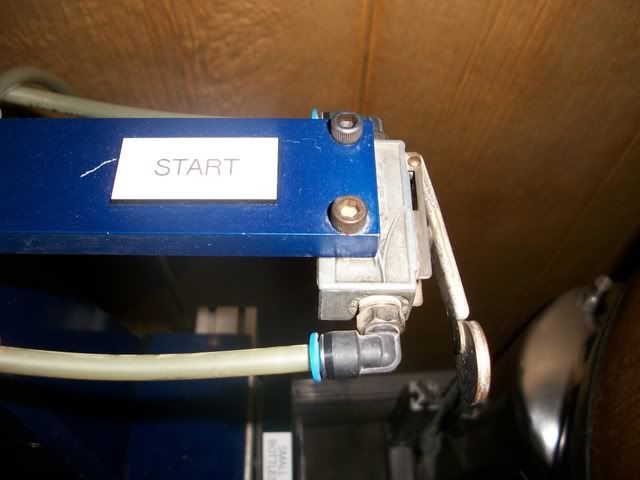
" This features dual air valves, so both green air button valves must be pressed at once to cap a bottle (which prevents an operators hand from getting crushed by the capper). "
A good feature I'd say.
OP
OP
-TH-
Well-Known Member
the welded nut is the nut that comes with the air cylinder
Most folks that post here are sharing ideas for the benefit of all - not patented, even if it is a great idea and something that might sell. So - I don't think the original poster is looking to sell his invention, just share it - you are free to make your own.
You will have to do your homework - look on Google for the air cylinder, find a local welding shop that can look at the photo and weld up something. You probably have local folks that can powder-coat it for you too. You can find feet, endcaps and pneumatic hose at McMaster Carr, for example. You'll have to take some of your own bottles and figure the height, width, depth. I would start with the air cylinder and build around it.
the bell that crimps the cap might be purchased, or you might sacrifice your hand capper -
Thank you for this ^^^
I couldn't have said it better myself.
For those looking for my CAD files, PM me with your email address and I will send them. The drawing doesn't have dimensions on it but everything is modeled to actual size (of course) so you can put dimensions on yourself if you want to. But really you are probably better off just getting a cylinder and building around it like Hangglider says.
Reaver, good idea with the v-stop - I like that!
Re: two hand control, I like to live dangerously with the foot pedal control. I've even let my 5 yo daughter operate the food pedal while I hold the bottles. Not a good idea really - she got me once and took a good chunk of skin out of my thumb.
Reaver, good idea with the v-stop - I like that!
I'm an Engineer by schooling and Mentality even if I'm just a controls tech for a pay check. I'm not ashamed to say I got a little excited seeing this project.
")
motorhead69 said:and now you can buy one at Williams
http://www.williamsbrewing.com/PNEUMATIC-CAPPER-P3067.aspx[/QUOTE
" This features dual air valves, so both green air button valves must be pressed at once to cap a bottle (which prevents an operators hand from getting crushed by the capper). "
A good feature I'd say.
They must be really proud of their equipment. Kind of pricey for my tastes.
ClaudiusB
Well-Known Member
motorhead69 said:and now you can buy one at Williams
http://www.williamsbrewing.com/PNEUMATIC-CAPPER-P3067.aspx[/QUOTE
" This features dual air valves, so both green air button valves must be pressed at once to cap a bottle (which prevents an operators hand from getting crushed by the capper). "
A good feature I'd say.
Nice looking .
My almost 16 year old antique capper has the same features, plus both buttons must be released after capping or a new cycle won't start.
Like an untie-tie-down.
Cheers,
ClaudiusB
@Claudius.... is that a 2 place bottle holder... you can put one in place and slide it under to cap, then pull the freshly capped one out and replace it while the machine is cycling? And then continue side to side.
Or is it for different size bottles 12's vs 22's?
Or is it for different size bottles 12's vs 22's?
ClaudiusB
Well-Known Member
Correct@Claudius.... is that a 2 place bottle holder... you can put one in place and slide it under to cap, then pull the freshly capped one out and replace it while the machine is cycling?
And then continue side to side.
Ideal two person capper, one loads-unloads the other runs the capper.
For different size bottles a second base is used.Or is it for different size bottles 12's vs 22's?
The base holders are stored on each side of the capper.
Cheers,
ClaudiusB
Clone:
Ran mine at 85 psi and it worked great for the 13 cases we did in 2.5 hours. No broken bottles. I am going to dial it down to 80 psi the next time we bottle as it is putting a little indent in the caps and see how that goes.


Ran mine at 85 psi and it worked great for the 13 cases we did in 2.5 hours. No broken bottles. I am going to dial it down to 80 psi the next time we bottle as it is putting a little indent in the caps and see how that goes.
Clone:
Ran mine at 85 psi and it worked great for the 13 cases we did in 2.5 hours. No broken bottles. I am going to dial it down to 80 psi the next time we bottle as it is putting a little indent in the caps and see how that goes.
Ran mine at 85 psi and it worked great for the 13 cases we did in 2.5 hours. No broken bottles. I am going to dial it down to 80 psi the next time we bottle as it is putting a little indent in the caps and see how that goes.
OP
OP
-TH-
Well-Known Member
clone:
Ran mine at 85 psi and it worked great for the 13 cases we did in 2.5 hours. No broken bottles. I am going to dial it down to 80 psi the next time we bottle as it is putting a little indent in the caps and see how that goes.
very nice!!!!
loud1
Well-Known Member
LHBS perhaps?
Northern Brewer has replacement 26.5mm bell for the colonna capper.
Cost me 3.99 + 7.99 Shipping to Missouri.
drkwoods
Well-Known Member
Just curious..what's about the minimum force to push the bell over the cap and seal the bottle? I know between 250-300 lbs works but would 200 or even 100 work? Just trying to dial in a cylinder here. Thanks
KPSquared
Well-Known Member
If someone has a basic fish scale you could figure it out. Hook it on the handle of the capper, pull down and see what the force required to put the cap on is, then use the calculations the OP used to figure out the force a hand capper is capable of.
Just a thought if anyone had some spare time.
Just a thought if anyone had some spare time.
loud1
Well-Known Member
So I finished my capper and ran a couple of bottles at 80 psi which should be around 251 lbf.
It seems to hesitate a bit too long so I'm going to turn it up to 85 psi and run it there.
As far as bottle failures, I used to work at AB in St. Louis part time, running fillers and such on the weekends. When a bottle failed on the crowner at anywhere between 800 and 1200 bottles per min. most of the time there was just a crunch with no flying glass, sometimes the glass would fly out but since it was a rotary crowner it was likely just centrifugal force flinging it outwards. These crowners were mechanically driven and designed to descend a set amount so they could exert tons of pressure in a very short amount of time on any misaligned bottle.
That being said, there is a very low chance of flying glass. Safety glasses would be a smart choice and gloves to handle broken glass if you feel inclined, I may even install a safety shield if my kids want to use it for bottling root beer, but it is a fairly safe machine if used with a bit of common sense.
Louis
Last edited by a moderator:
OP
OP
-TH-
Well-Known Member
^^^ Very nice job!
Wow beautiful work here, always fascinating stuff in the DIY. Great stuff.
loud1
Well-Known Member
^^^ Very nice job!
Thanks, built it totally out of scrap during a couple of lunch hours. The cylinder is a 2" dual acting heavy duty palmer w/a 3"stroke. I had to drill some holes in it veeery carefully to mount it, then I brazed the capping bell onto a 1 1/4" nut to thread onto the end of the shaft. I used your idea for alignment and used a giant forsner bit to bore a hole into a chunk of phenolic (that stuff is awsome! But it stinks when you cut it).
- Joined
- Dec 9, 2008
- Messages
- 558
- Reaction score
- 51
Similar threads
- Replies
- 23
- Views
- 1K
- Replies
- 1
- Views
- 2K
