Open ArdBir - definitive BIAB/RIMS controller arduino based

Homebrew Talk - Beer, Wine, Mead, & Cider Brewing Discussion Forum

Help Support Homebrew Talk - Beer, Wine, Mead, & Cider Brewing Discussion Forum:

This site may earn a commission from merchant affiliate links, including eBay, Amazon, and others.
https://github.com/terragady/ArdBir

I have those ones if you are interested

IMAG0773.jpg
 
Although I've partially switched to craftbeerpi I'll risk $6 on a board to finish this project out. How would you prefer payment?
 
yes I know your pain, I did the same after ordered everything for ArdBir, CraftBeerPi showed up :) but still I do not need WiFi or anything else and ArdBir is fine. Effect of both is same. There is also dutch software for ardbir which implements ESP module to have wifi capable controller, it is not realeased yet with wifi options but still already better then original ArdBir software which is no longer supported.

BTW I have also CraftBeerPi shield for RaspberryPi because current setup is just connecting relays to GPIOs which is not totally safe and thats why we are using additional PCBs for arduino as well in ArdBir (in theory you can also connect relays directly to Arduino pins without any PCB :)

Here is my shield https://github.com/terragady/CraftBeerPi
although its just prototype but should work fine :)
 
Do you have shields for CraftBeerPi for sale also? I definitely want one of your ArdBir boards. Saves me the trouble ordering through a PCB shop. Let me know how you'd like me to pay you.

jeff
 
No i do not have them yet printed as I was only testing craftbeerpi not using it for brewing so there was no rush. Raspberry is flashed with Kodi for TV now :)
If you have international transfers for free then this way is preferable, if not maybe paypal works for you?
 
Hi,

Im useing Joefarmer version on arduino nano and I have problems with temperature readings.
In my room is 23°C and on display is reading 48,50°C. I tryed to change DS18B20 and its the same :/

Does any have this problem to?
 
Hey,

I got my problem with my ardbir :(

https://youtu.be/72Qz2gnO0hw
https://youtu.be/zs-g5k-HPj4

Edit: SOLVED.

LCD soldered backwards :D

https://youtu.be/e3uGjVvaO08

I have the same problem, but the LCD is soldered as it should. Any idea what could be the problem?
LE: I had another PCB that i etched before starting the real build and i tryed it. It seems that my problem was from the PCB, probably a shortcircuit somewhere. Now it works fine. Need to put some buttons and the temperature sensor and relays to test it.

2016-06-09 00.45.39.jpg
 
Hi,

Im useing Joefarmer version on arduino nano and I have problems with temperature readings.
In my room is 23°C and on display is reading 48,50°C. I tryed to change DS18B20 and its the same :/

Does any have this problem to?

as i recall tbis issue may be due to the setting for the probe being set to outside the vessel as opposed to in it. check the settings for probe location.
 
as i recall tbis issue may be due to the setting for the probe being set to outside the vessel as opposed to in it. check the settings for probe location.

I did all settings with outside and inside option and its the same.
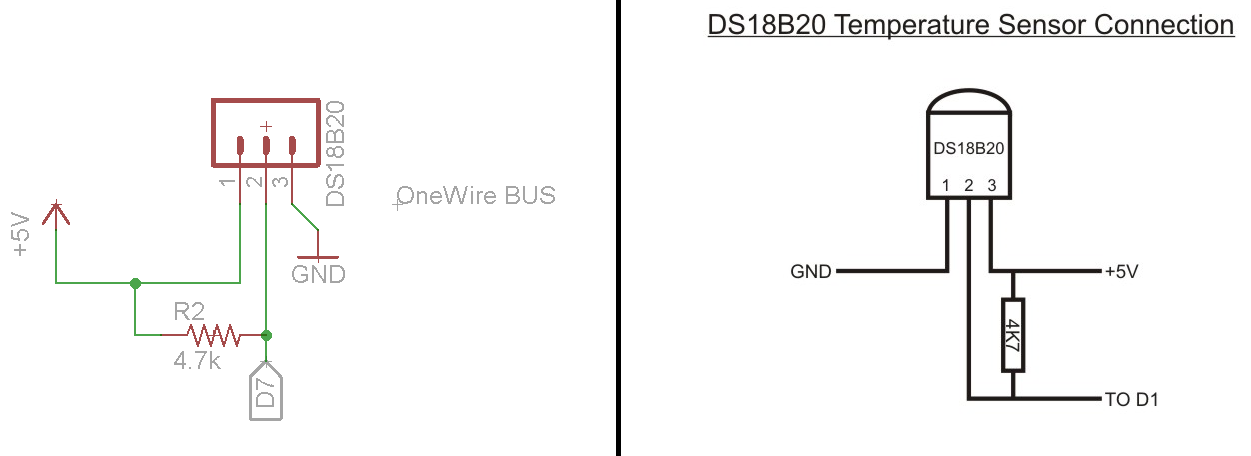
I looked schematic and interesting is sensor connection and I think the pins are not correct connected on Picture left side. I connected like on right side of the Picture.

DS18B20.png
 
If you're seeing any temps, then it's connected correctly. Calibrate by putting the probe in slushy ice water and then almost boiling water. Verify the readings against a known thermometer. If it's still off, you can use the compensation calibration found in the ardbir settings.
 
I am geting this error, it seems that the sketch is too big for my board. What can i do to reduce it size a little bit?
Arduino: 1.0.6 (Windows 7), Board: "Arduino Uno"
Binary sketch size: 33,614 bytes (of a 32,256 byte maximum)

processing.app.debug.RunnerException: Sketch too big; see http://www.arduino.cc/en/Guide/Troubleshooting#size for tips on reducing it.

at processing.app.Sketch.size(Sketch.java:1653)

at processing.app.Sketch.build(Sketch.java:1586)

at processing.app.Sketch.build(Sketch.java:1562)

at processing.app.Editor$DefaultRunHandler.run(Editor.java:1899)

at java.lang.Thread.run(Thread.java:619)

This was solved by simply installing the latest Arduino IDE. I wanted to use the ArdBir 2,8,3 because it had romanian language too.
 
What heating element will you use? The only bendable element that i found has only 3000W. Will this be enough for boiling 6-7 gallons of wort?
 
What heating element will you use? The only bendable element that i found has only 3000W. Will this be enough for boiling 6-7 gallons of wort?

I bought a 2000W element from BrewHardware.

https://www.brewhardware.com/product_p/element2000.htm

I've not boiled with it yet, but it did heat at the rate I expected. Seeing as the Grainfather is only 1600W and it boils (although not vigorously) the 2000W should be good. Keep in mind that an 2000W element needs about 18 Amps on a standard 120V.
 
I received my PCB from terragady yesterday. It does seem pretty nice and it's thick. Can't wait to solder my ArdBir up.
 
Ok. I can't recommend any stores in Romania, but these types of elements are used in a hot water heaters so they should be readily available at plumbing stores. Just make sure it's a stainless steel element. The grainfather is about 6 gal. For a 240V system you should be able to find a 4500 or 5500 W element.
 
I can find only elements that are formed to shape, no bend it yourself ones. In fact i have one 4500 and one 4000 w element for a planed herms sistem, but now i want to make a compact braumeister style system because i will move in a smaller apartment. For that i need an element that i can form it round to allow room for the malt pipe.

How much did you paid for a PCB and from where did you bought it? I made one but you never know when you will need another one. I guess it is one professionaly made.
 
Terragady: did you modify the code from the original ArdBir or Joefarmers version? I'm mainly thinking about pinouts for the various components.

Hi, I did only change pinout for buzzer from 8 to 10 if you are looking at original DanielXian ardbir settings, just change the number there :)

should look like this:
https://github.com/terragady/ArdBir/blob/master/PCB terragady.h

although I was playing a bit with the code but this was as I recall the only change, you can trace other pinouts from schemo on github :)

this might be helpful as well https://github.com/terragady/ArdBir/blob/master/post-14618-0-51226700-1465221833.jpg
 
Hi all. I am having troubles wiring my pump relay. It has three inputs and I have 2 wires from the arduino. I can get a green light when I turn the pump on the ardbir but cannot get the red led to turn on and cannot hear a click or anything. Plus no matter how I wire my pump I cannot make it go on. I am using a separate 12v power source for the pump.

Did you solved this problem yet? I have the same problem, i get a red light when i turn the pump on from the ardbir but i can't get the pump to start. Also, one more question, on the DanielXan's Board i have Pump and Pump On screw terminals, why is that? The same for Heater, two terminal. How should i wire them to work?
 
I have a relay for arduino, from china. I will provide a link/photo later when i get home.
LED? That's very neat, i was asking myself how could i install some leds lol. I believe there is no need for extra resistor for leds? Just connect them to the terminals?
 
yes you need resistors but this should be already covered on the board. Relay for arduino? You mean this board with relay with 3 inputs? People has problems with those. You need something like this only http://g01.a.alicdn.com/kf/HTB1vpUnIFXXXXbwXFXXq6xXFXXXa.jpg
Probably you have one with your board, you can resolder but pay attention if its 12v or 5v
or better a solid state relay for higher currents and voltages.
 
Yes, that one with 3 inputs and 3 outputs. If i desolder the relay how should i wire the pump and the shield to it?
A solid state relay for 220V is better, because i will buy a bigger pump, but for now i need to use the 12 v one for testing purpose.

2016-06-18 16.04.05.jpg
 
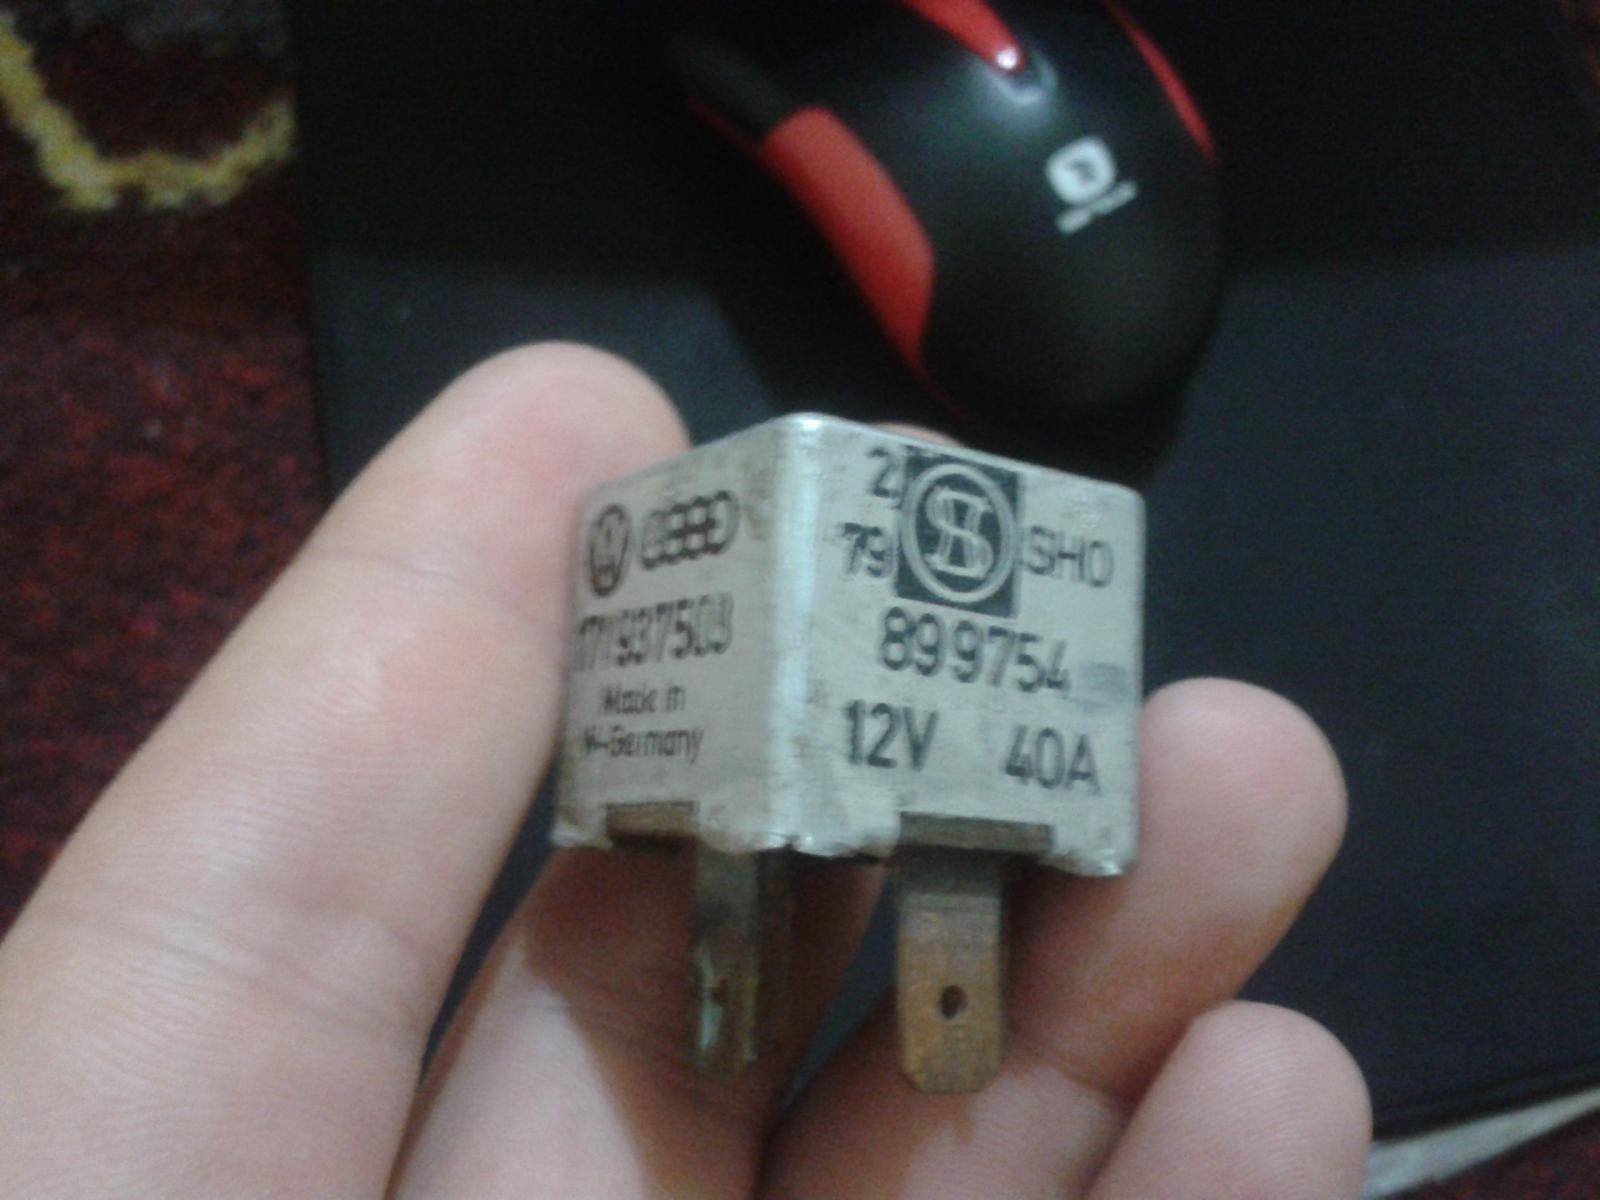
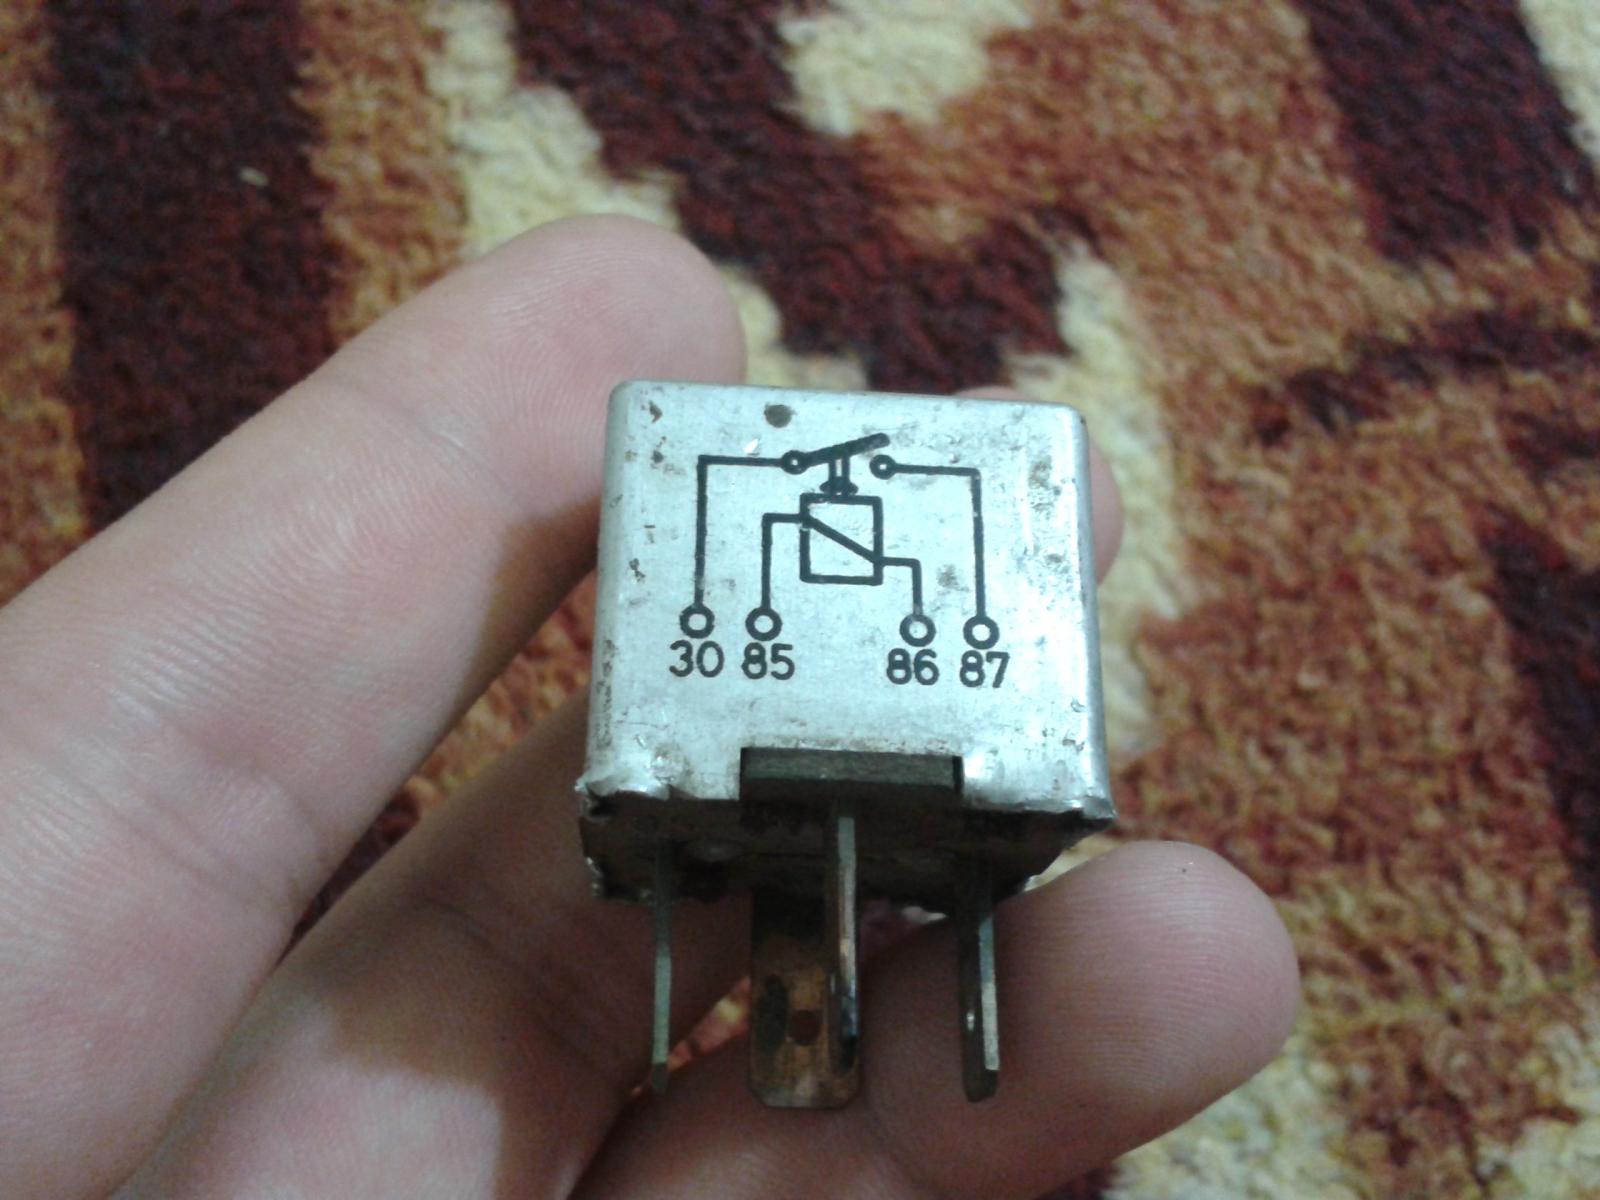
I found this relay on my very old car, probably from the headlight. Can this be used for a 12V pump? I have no idea how should be wired.
I am not yet sure if i will use a 12V or a 220V pump, but i want to know if i can use this car relay.

Also, would it be possible to include this auto-tune pid library in ardibir so you don't have to mess with setting the parameters yourself? https://github.com/br3ttb/Arduino-PID-AutoTune-Library

2016-06-22 17.48.52.jpg


2016-06-22 17.50.26.jpg
 
Measure with ohm tester across PINS 85,86 and 30,87 and if you get a reading that will be your coil (pin85,86) on the schematic. The other two will most likely be your positive and Negative connection from the output of the controller.
 
Yes, that one with 3 inputs and 3 outputs. If i desolder the relay how should i wire the pump and the shield to it?
A solid state relay for 220V is better, because i will buy a bigger pump, but for now i need to use the 12 v one for testing purpose.

Yes bionut sorry for the late reply. I am just messing with it now. It's what was said to me by others. The extra junk on the relay board is messing it up. Simply take the positive wire and attach it to the underside here. And viola, works

View attachment 1471129937884.jpg
 
Yes, that one with 3 inputs and 3 outputs. If i desolder the relay how should i wire the pump and the shield to it?
A solid state relay for 220V is better, because i will buy a bigger pump, but for now i need to use the 12 v one for testing purpose.

Yes bionut sorry for the late reply. I am just messing with it now. It's what was said to me by others. The extra junk on the relay board is messing it up. Simply take the positive wire and attach it to the underside here. And viola, works
 
Yes bionut sorry for the late reply. I am just messing with it now. It's what was said to me by others. The extra junk on the relay board is messing it up. Simply take the positive wire and attach it to the underside here. And viola, works

Can you reupload the image!
 
yes sorry, i changed the design and added reset output so I removed old gerber but didnt actually put new ones. Will do this when Im back home
 
Back
Top