Need some help... Auber panel just fried

Homebrew Talk - Beer, Wine, Mead, & Cider Brewing Discussion Forum

Help Support Homebrew Talk - Beer, Wine, Mead, & Cider Brewing Discussion Forum:

This site may earn a commission from merchant affiliate links, including eBay, Amazon, and others.

TheMadKing

Western Yankee Southerner and Brew Science Nerd
HBT Supporter
Joined
Jun 17, 2015
Messages
4,173
Reaction score
2,519
Location
Gainesville
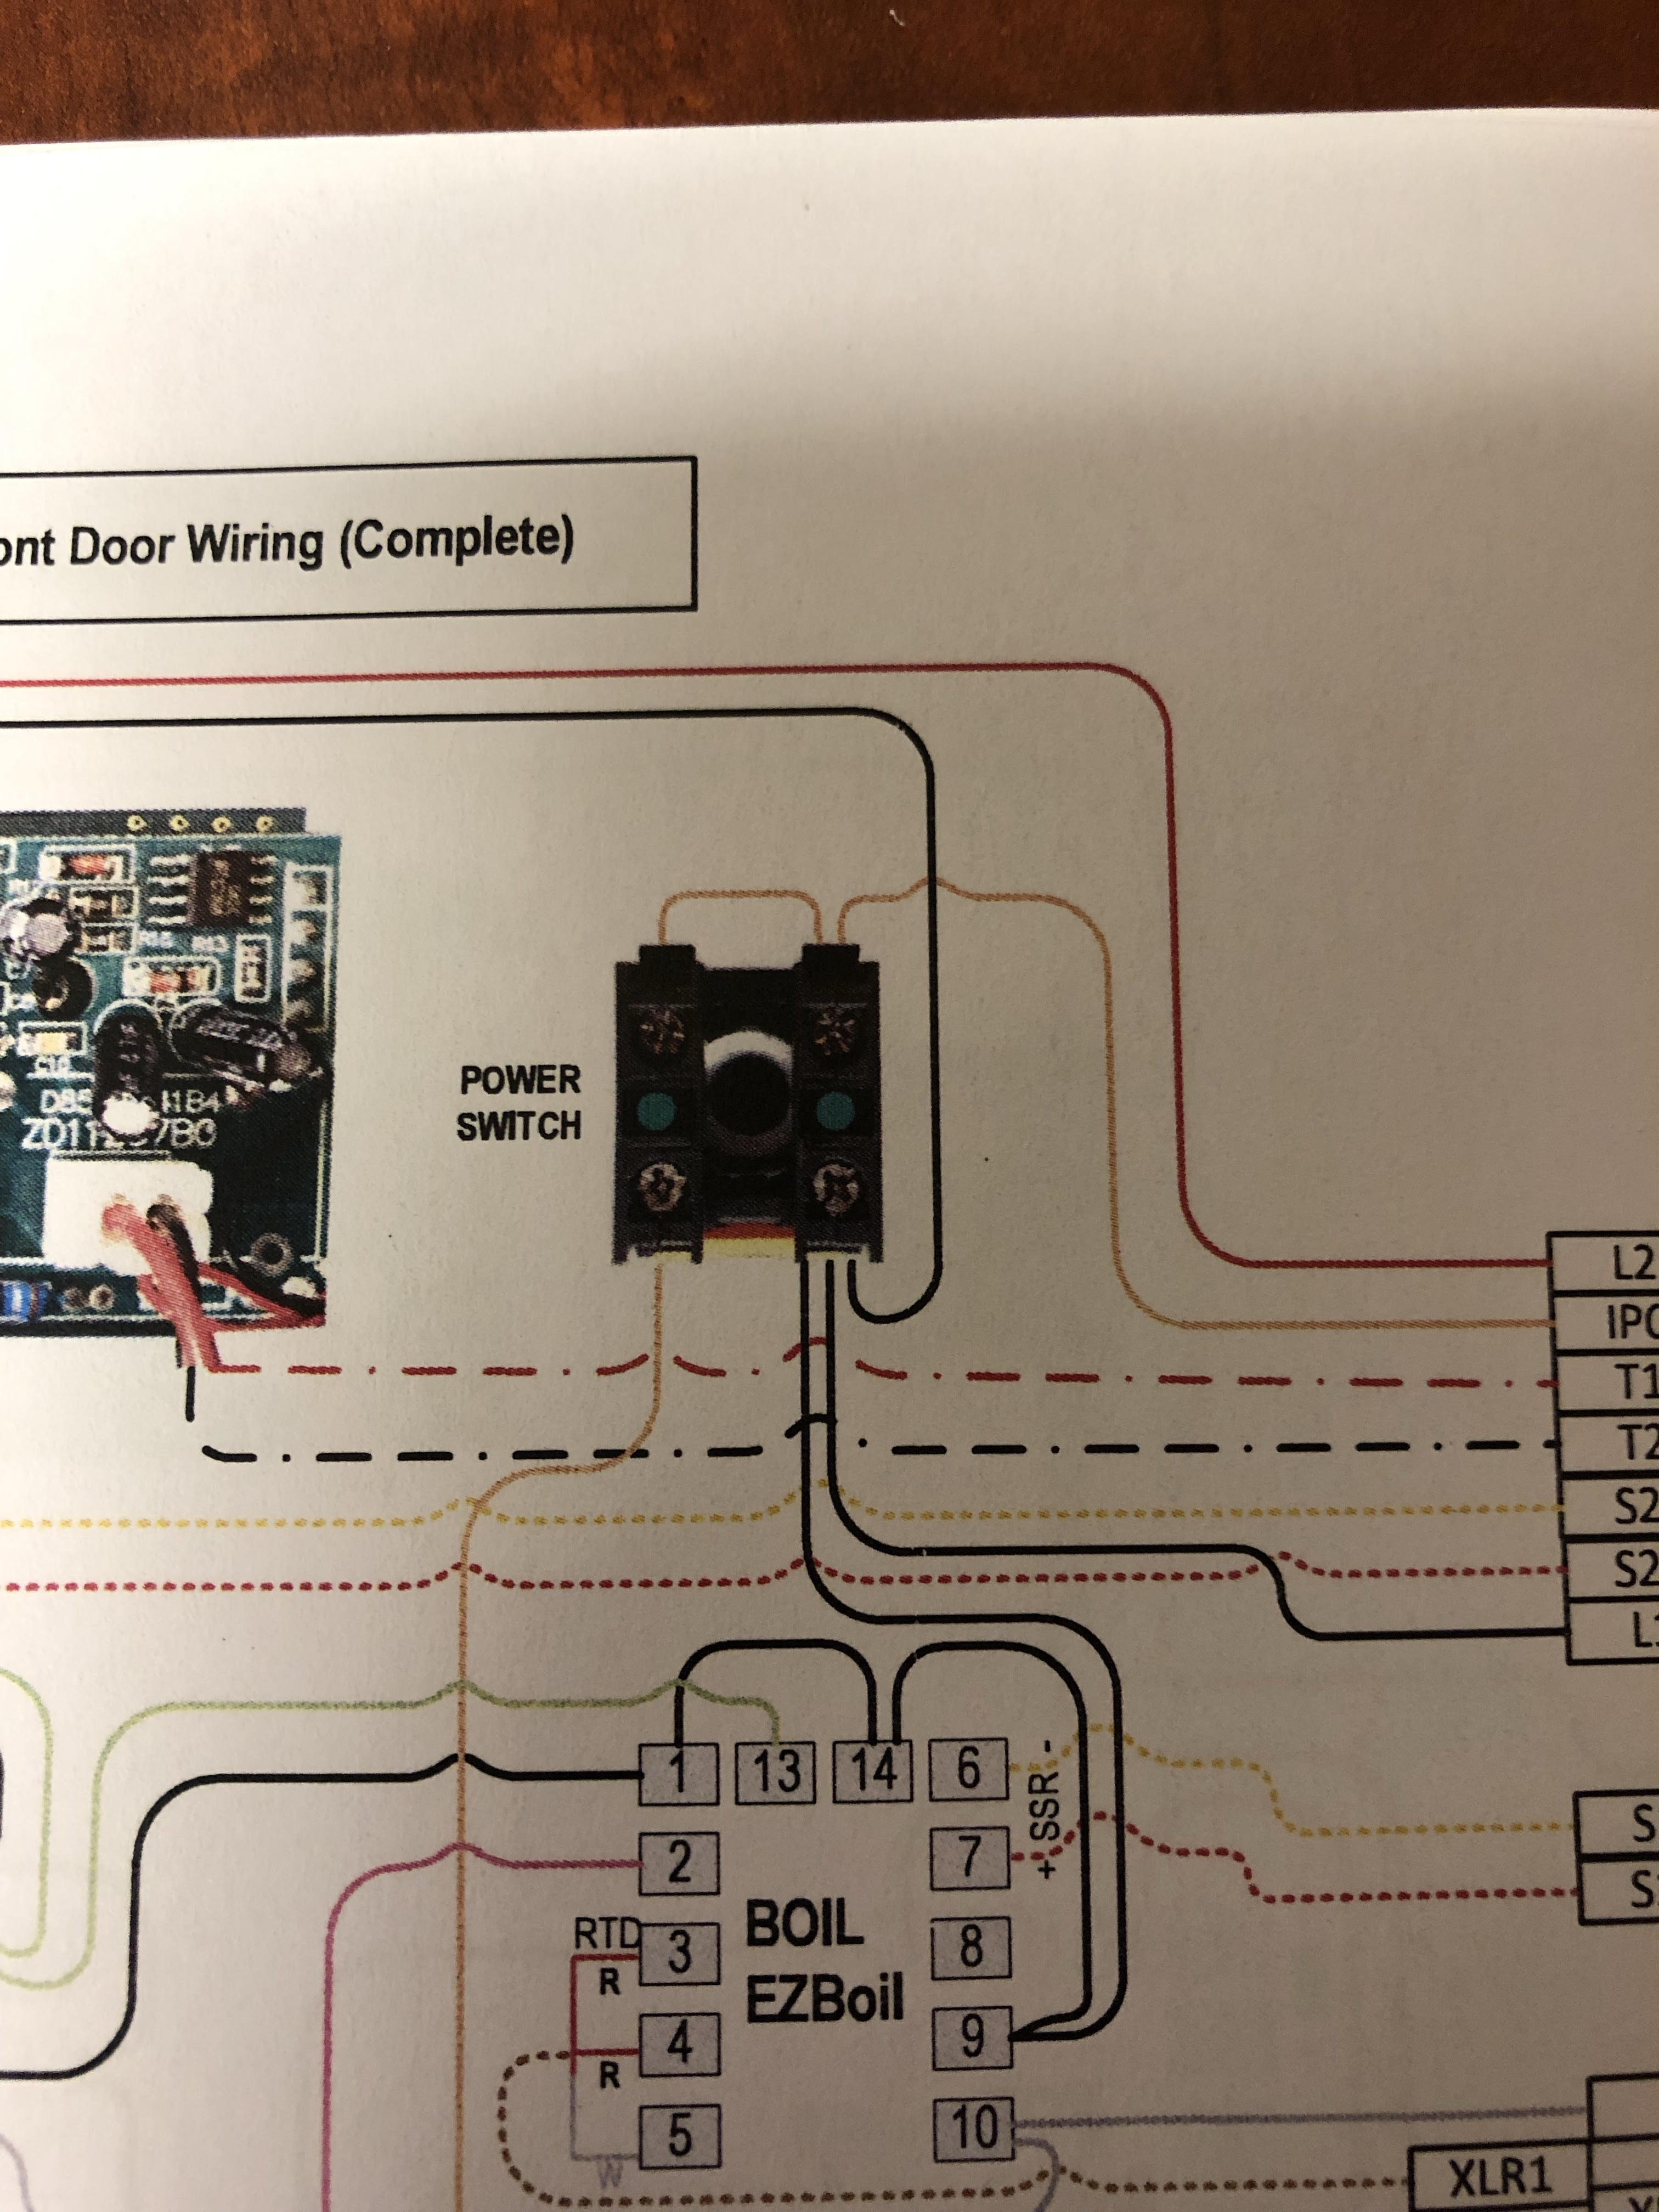
I just plugged in my Auber Brew Buddy panel for the first time to test it and the wire along the entire neutral circuit fried instantly before the GFCI breaker in my panel could even trip.

I don't even know where to start with trying to figure out what happened.

Is everything connected to that neutral line fried now? Did I just burn up $1000 panel?

Any advice appreciated.

IMG_7060.JPG

IMG_7056.JPG

IMG_7057.JPG

IMG_7058.JPG
 
I think I found the problem...

Auber's drawing is wrong and I didn't catch it until now

IMG_7069.JPG


They show the interlock circuit connecting to the neutral circuit in the lower right hand corner of the drawing

I just went back and checked the interlock troubleshooting page and the diagram is different...

IMG_7070.JPG


The interlock wire should have been connected to the stack on the other side of the switch
 
Thanks me too... I just emailed their customer service and explained what happened so we'll see what they say.

They screwed me over and wouldn’t make good on their mistakes. Hope your experience is better.
 
They screwed me over and wouldn’t make good on their mistakes. Hope your experience is better.

Crap... I hope they've improved and I'm not out $1000 for this damn thing. I asked them for a refund if I return it as-is and I'll just buy a replacement assembled by them.

If I have to repair it, I'll have to completely rewire the front panel at a minimum, and that's assuming none of the components are damaged.

I'm not sure I'd settle for having to pay more for an assembled version. How many hours do you have in this, only to discover that their wiring instructions were incorrect and fried a component?

I built this kit last summer https://www.auberins.com/index.php?main_page=product_info&cPath=86_88&products_id=672 and it's simpler than yours. Still, I had maybe 6 hours into assembling it, between triple checking wiring (my wiring diagram was correct), buying wire, and so on.

What's your time worth? I know there's a certain satisfaction to DIY, and judging by the pics you did a terrific job with it.

They ought to send you an assembled one in exchange, no extra money. That's IMHO.

I had about 20 hours into it, and repairs would take about another 8 or so.

I agree that this should not cost me anything, but I would also rather have a panel that works than have to buy a whole new one because I demanded too much.

So if I have to eat $200 to sweeten the deal for them, then that's far less than my time is worth.
 
Assuming you wired it exactly according to their drawings and instructions, and their drawing is, in-fact wrong, you should be out nothing.

How did you pay for it, and how long ago? If it is Auber's mistake and they won't repair or replace it, and you paid by credit card you may have some leverage for a refund from the CC company.

That is a last resort, though. Try to work things out amicably with Auber first.
 
Last edited:
Good luck. My Pid fried after 10 batches. So around a total of 40 hours on it. They wouldnt help with a replacement. Not to mention you cant understand a word they say with there deep Chinese accent.

I got a Mypin for half the price and its still going strong after many batches....good riddance Auberins. I wouldnt recommend them to anyone
 
Assuming you wired it exactly according to their drawings and instructions, and their drawing is, in-fact wrong, you should be out nothing.

How did you pay for it, and how long ago? If it is Auber's mistake and they won't repair or replace it, and you paid by credit card you may have some leverage for a refund from the CC company.

That is a last resort, though. Try to work things out amicably first with Auber.

I paid for it on my Amex so that's definitely a nuclear option if it comes to that. Hopefully they will want to resolve it though.
 
I paid for it on my Amex so that's definitely a nuclear option if it comes to that. Hopefully they will want to resolve it though.

Good luck. I had to go the dispute route before they’d even call me back. Worst customer service experience I’ve ever had anywhere.

I really hope more people that have negative experiences spread the word so that thieving company goes out of business.
 
Good luck. I had to go the dispute route before they’d even call me back. Worst customer service experience I’ve ever had anywhere.

I really hope more people that have negative experiences spread the word so that thieving company goes out of business.

They were quick to replace a defective contactor early in the process so I'm willing to give them the benefit of the doubt for now.
 
Update:

They answered my email first thing this morning and acknowledged that their drawing is wrong.

They have already shipped me replacement contactors and a replacement wire kit and a a corrected drawing.

However I told them that I'm not happy with that since I have no way to verify that all the other components are not damaged.

They replied

"sorry for the inconvenience. You will have to test the components by powering them up. We will replace the other components if you discover they are damaged."
 
@TheMadKing, it definitely sounds like they are taking care of you and are willing to replace anything else that was damaged. Obviously, you are not being compensated for your aggravation and time. Perhaps you could ask them for a partial refund to cover those two items. I'm surprised only now with your situation that they discovered the drawing was wrong.
 
@TheMadKing, it definitely sounds like they are taking care of you and are willing to replace anything else that was damaged. Obviously, you are not being compensated for your aggravation and time. Perhaps you could ask them for a partial refund to cover those two items. I'm surprised only now with your situation that they discovered the drawing was wrong.

Agreed,

I spoke to the owner on the phone and she was very apologetic and fully agreed to replace any parts that were damaged. She even offered to rewire it for me, but her lead time to be able to get to it was 2-4 weeks and I can get it done faster than that. So I would rather just do it myself than wait.

They have overall been very responsive. I'm frustrated at the lost time but They are making it right.
 
So does anyone have a procedure for testing EZboils?

I have access to a power supply, oscilloscope and a high end multimeter if needed

Or should I just wire this thing back up and test it by plugging it in again?
 
So does anyone have a procedure for testing EZboils?

I have access to a power supply, oscilloscope and a high end multimeter if needed

Or should I just wire this thing back up and test it by plugging it in again?

Do you have a reason to think the EZ Boil is bad?
IMO I suspect your other panel issues are due to the wiring error and not the EZ Boil. If you have doubts, you certainly can test it, and really don't need much more than a voltmeter.

Actually, just a quick power up with a stand-alone line cord w/plug connected to 9 and 10 of the ezboil will tell you if the unit is DOA or not. If the display lights up, its probably fine. Want to do more testing? Connect the temperature probe, input a setpoint just above ambient temp and see if the output light comes on.

If the output light comes on, it is calling for heat and that means the basic logic is functioning. You could go one step further and test the output hardware with a DC voltmeter. When the output light is on, you should measure DC voltage between the output terminals 6 and 7. The voltage should disappear when the output light goes out. Again, you can control the output light by changing the temperature setpoint above and below ambient temperature (temp probe needs to be connected and should display ambient on the controller.
 
Last edited:
Do you have a reason to think the EZ Boil is bad?
IMO I suspect your other panel issues are due to the wiring error and not the EZ Boil. If you have doubts, you certainly can test it, and really don't need much more than a voltmeter.

Actually, just a quick power up with a stand-alone line cord w/plug will tell you if the unit is DOA or not. If the display lights up its probably fine. Want to do more testing? Connect the temperature probe, input a setpoint just above ambient temp and see if the output light comes on.

If the output light comes on, it is calling for heat and that means the basic logic is functioning. You could go one step further and test the output hardware with a DC voltmeter. When the output light is on, you should measure positive DC voltage between the output terminal and common. The voltage should disappear when the output light goes out. Again, you can control the output light by changing the temperature setpoint above and below ambient temperature (temp probe needs to be connected and should display ambient on the controller.

Thanks!

I have no idea what was fried. But since it shorted a 30amp connection through the neutral line that is connected to the EZboils there's a chance they didn't make it.
 
The thing to wonder is if anything is isnt fried now did they get damaged shortening their lifespan getting screwed later.

I'd return everything and start from scratch
Why waste more of your time testing and troubleshooting their mistake just to make sure new equipment isnt damaged ...sucks
 
I don't have the diagram, and can't see what you are seeing in your panel. But it appears that at least part of the neutral buss wiring was shorted across one of the two switched hot connections.
The fried neutral wiring looks like it is small gauge control wire, and not a power connection. If it was inadvertently connected/ shorted to a hot connection protected by your main breaker, there was no chance for the breaker to clear the short before frying the neutral.

If that is the case, you may find that the wiring took the brunt of the damage leaving everything else pretty much alone. YMMV

Thanks, just to clarify, and reiterate from my earlier posts, I know exactly what happened and why, but I don't know if any of the hardware components are damaged because of it.

Your advice on testing the PIDs is appreciated though
 
The thing to wonder is if anything is isnt fried now did they get damaged shortening their lifespan getting screwed later.

I'd return everything and start from scratch
Why waste more of your time testing and troubleshooting their mistake just to make sure new equipment isnt damaged ...sucks

I've had that thought as well

The reason is because at this point I'm $1000 into this thing and I can fix it faster than they can. It's not a waste of my time to test the components in my view. The waste of my time is not having a panel that I can use to brew with.

So I'd rather get the panel working quickly than punish a vendor who made an honest mistake and is making the effort to make it right.
 
Your controller components and SSRs are likely just fine due to the nature of your fault. I'd replace all wiring and all breakers though. Circuit breakers that experience a dead short should always be replaced. This would include the main breaker in your panel too.
 
Your controller components and SSRs are likely just fine due to the nature of your fault. I'd replace all wiring and all breakers though. Circuit breakers that experience a dead short should always be replaced. This would include the main breaker in your panel too.

Well that sounds expensive... Isn't the whole point of a breaker to be reusable after a short instead of replacing it like a fuse?

That seems overly conservative to me.

My main panel breaker is a gfci and it's a $100 replacement.
 
Well that sounds expensive... Isn't the whole point of a breaker to be reusable after a short instead of replacing it like a fuse?

That seems overly conservative to me.

My main panel breaker is a gfci and it's a $100 replacement.

No that's not the point of a breaker. The purpose of a breaker is to protect wiring from being destroyed by interrupting a fault current.

There are 3 different types of fault currents a typical breaker is designed to handle
1. Simple over currents that are 1-5x rated. Think of this as you plugged in 2 toasters to the same circuit. So this is a low over current and often times it'll take a breaker up to an hour to trip depending upon the overload.

2. Instantanous over currents due to inductive (motor) loads. These are usually 5-20x rated current but last for a very short duration of time (typically under 500ms). The goal here is to pick a breaker with the appropriate trip curve so you don't get nuisance trips, but still maintain proper protection.

3. Short circuits. This is a complex scenario and the damage that can occur is often dependent upon what the upstream supply can deliver. It's not unreasonable to see 10-500kA of instantaneous current. You can vaporize wires when this happens. Google arc flash videos and you what can happen when improper over current protective devices are used. Basically a bomb.

#1 and #2 are no big deal for a breaker and it'll allow many, many trips and resets over its lifetime.

#3 is a different scenario and is often destructive to the breaker itself. In commercial/industrial settings its SOP to replace breakers after a dead short because they are only rated to interrupt 1 high current short.

So i'd be asking Auber to replace your main breaker too. I would seriously question whether it would be able to interrupt another short circuit again in the future.

Do you think that's still an issue even if the short went through 22awg wire that acted like a fuse?

Also witha gfci breaker can't I just rely on the test button to ensure that it's still functioning?
 
Do you think that's still an issue even if the short went through 22awg wire that acted like a fuse?

Also witha gfci breaker can't I just rely on the test button to ensure that it's still functioning?

I think the fact that it was 22 AWG that smoked due to the short is a significant factor when contemplating replacement of the breaker.

22 gauge wire with as little as 10 amps would smoke the insulation and possible burn through the conductor if nothing else cleared the short. (Not sure if yours burned though, or not?) In any case, the current that burned your small gauge control neutral may have been well below the trip rating of your panel breaker. If it were mine, I would not replace the breaker, but that is your decision.

Regarding the GFCI breaker test button, the button only simulates the current imbalance of a ground fault. It does not test the over current trip functionality of the breaker.
 
So I'm working on rebuilding this thing and Auber has struck again (I'm ready to ask for a full refund and wash my hands of their mess)

They sent me new drawings but there is a major difference in how the power L1 is wired in the new drawing vs the old drawing.

The new drawing shows three black power lines coming from the power input and connecting to a single terminal on the power switch. (photo 1)

The old drawing showed no power lines coming directly from the hot leg, and only a single black wire connecting from the power meter to a different terminal on the switch. (Photo 2)

I suspect that the new drawing is correct if I'm reading the circuit correctly, but I'd like to get a second opinion rather than trusting that I'm right.
 

Attachments

  • unnamed.jpg
    unnamed.jpg
    1 MB · Views: 54
  • unnamed-1.jpg
    unnamed-1.jpg
    3.2 MB · Views: 55
So I'm working on rebuilding this thing and Auber has struck again (I'm ready to ask for a full refund and wash my hands of their mess)

They sent me new drawings but there is a major difference in how the power L1 is wired in the new drawing vs the old drawing.

The new drawing shows three black power lines coming from the power input and connecting to a single terminal on the power switch. (photo 1)

The old drawing showed no power lines coming directly from the hot leg, and only a single black wire connecting from the power meter to a different terminal on the switch. (Photo 2)

I suspect that the new drawing is correct if I'm reading the circuit correctly, but I'd like to get a second opinion rather than trusting that I'm right.
So sorry to hear about you controller issues. I've followed your build progress as I've been building my controller at the same time. I will hopefully be firing mine up this or next weekend, but reading about your issue has really made me nervous. I've been reviewing all the work I've done several times now...

I looked at the auber controller, but ended up with an Electric Brewing Supply kit. Ryan has been exceptional to work with. If you end up returning your kit I would suggest checking them out. I ended up adding on volt and amp meters, and a 3rd pump to a 50a panel. They have kit pricing for those add-ons and include laser cutting extra holes in the stainless enclosure.

I wouldn't be concerned with the quality you'll get from ebrewsupply

I would never recommend Auber to anyone after this experience though. I wish I had just coughed up the cash for one of Kal's pre-wired panels.

I finally heard back from the owner and she confirmed that the new drawing is correct, which means that there was yet another mistake on their first drawing that just never manifested itself.

I finished wiring it up and it seems to be working. I seem to have an issue where both pump switches need to be on in order to fire the wort pump contactor which is really odd, but I can probably puzzle that one out if I stare at it long enough.
 
Last edited:
Sorry to bring up an old thread but I am having some issues with a similar panel. Have you had any other issues come up? Are you still using this panel?
I built a 50 amp herms panel and I’m getting frustrated, haven’t been able to keep it on for more than a few minutes. The first time I powered it up I had one of the pumps outputs connected to a lamp to verify it was working. While the lamp was on I was going through settings on the PID and suddenly I heard a thump (sound of the contactor turning off) and the lamp shut off. I killed power at the breaker, opened up the panel and was greeted by a puff of smoke.
Replaced the main power contactor which was fried, and the contactor for the pump. I tried starting the panel again, after a few minutes of running the pump the same thing happened.
 
Back
Top