You are using an out of date browser. It may not display this or other websites correctly.
You should upgrade or use an alternative browser.
You should upgrade or use an alternative browser.
Native ESP8266 BrewPi Firmware - WiFi BrewPi, no Arduino needed!
- Thread starter Thorrak
- Start date

Help Support Homebrew Talk:
This site may earn a commission from merchant affiliate
links, including eBay, Amazon, and others.
Interesting thing is when I install the standard version it install without issue.
Do you have a link to the ESP8266 you purchased?I am using all the stuff from your site but not quite sure how to tell what chip I am using (I am pretty illiterate when it comes to this stuff).
Interesting thing is when I install the standard version it install without issue.
I am not completely sure how to look that up ( I am pretty illiterate when it comes to this stuff).Which chip are you using?
I was able to flash the standard profile from the Fermentrack site, not sure if there is a work around to flash the low density version directly through the Pi.
I bought them through Amazon, no link directly to the vendorDo you have a link to the ESP8266 you purchased?
WEMOS D1 Mini V4.0.0 ESP8266 - Genuine LOLIN
That’s why - the 4.0.0 has issues with Spiffs/LittleFS partitions. I have a query out to the manufacturer, but alas - no response.I bought them through Amazon, no link directly to the vendor
WEMOS D1 Mini V4.0.0 ESP8266 - Genuine LOLIN
Try the “No Spiffs” version.
Trying it nowThat’s why - the 4.0.0 has issues with Spiffs/LittleFS partitions. I have a query out to the manufacturer, but alas - no response.
Try the “No Spiffs” version.


$28.98
Five Star - 6022b_ - Star San - 32 Ounce - High Foaming Sanitizer
Great Fermentations of Indiana


$159.99 ($26.66 / Count)
3M High Flow Series System BREW120-MS, 5616001, For Brewed Coffee and Hot Tea, Valve-in-Head Design
SpaceCityProviders


$176.97
1pc Commercial Keg Manifold 2" Tri Clamp,Ball Lock Tapping Head,Pressure Gauge/Adjustable PRV for Kegging,Fermentation Control
hanhanbaihuoxiaoshoudian


$53.24
1pc Hose Barb/MFL 1.5" Tri Clamp to Ball Lock Post Liquid Gas Homebrew Kegging Fermentation Parts Brewer Hardware SUS304(Liquid Hose Barb)
yunchengshiyanhuqucuichendianzishangwuyouxiangongsi


$719.00
$799.00
EdgeStar KC2000TWIN Full Size Dual Tap Kegerator & Draft Beer Dispenser - Black
Amazon.com


$7.79 ($7.79 / Count)
Craft A Brew - LalBrew Voss™ - Kveik Ale Yeast - For Craft Lagers - Ingredients for Home Brewing - Beer Making Supplies - (1 Pack)
Craft a Brew


$44.99
$49.95
Craft A Brew - Mead Making Kit – Reusable Make Your Own Mead Kit – Yields 1 Gallon of Mead
Craft a Brew


$33.99 ($17.00 / Count)
$41.99 ($21.00 / Count)
2 Pack 1 Gallon Large Fermentation Jars with 3 Airlocks and 2 SCREW Lids(100% Airtight Heavy Duty Lid w Silicone) - Wide Mouth Glass Jars w Scale Mark - Pickle Jars for Sauerkraut, Sourdough Starter
Qianfenie Direct


$53.24
1pc Hose Barb/MFL 1.5" Tri Clamp to Ball Lock Post Liquid Gas Homebrew Kegging Fermentation Parts Brewer Hardware SUS304(Gas MFL)
Guangshui Weilu You Trading Co., Ltd

$22.00 ($623.23 / Ounce)
AMZLMPKNTW Ball Lock Sample Faucet 30cm Reinforced Silicone Hose Secondary Fermentation Homebrew Kegging joyful
无为中南商贸有限公司

$76.92 ($2,179.04 / Ounce)
Brewing accessories 1.5" Tri Clamp to Ball Lock Post Liquid Gas Homebrew Kegging Fermentation Parts Brewer Hardware SUS304 Brewing accessories(Gas Hose Barb)
chuhanhandianzishangwu


![Craft A Brew - Safale S-04 Dry Yeast - Fermentis - English Ale Dry Yeast - For English and American Ales and Hard Apple Ciders - Ingredients for Home Brewing - Beer Making Supplies - [1 Pack]](https://m.media-amazon.com/images/I/41fVGNh6JfL._SL500_.jpg)
$6.95 ($17.38 / Ounce)
$7.47 ($18.68 / Ounce)
Craft A Brew - Safale S-04 Dry Yeast - Fermentis - English Ale Dry Yeast - For English and American Ales and Hard Apple Ciders - Ingredients for Home Brewing - Beer Making Supplies - [1 Pack]
Hobby Homebrew


$58.16
HUIZHUGS Brewing Equipment Keg Ball Lock Faucet 30cm Reinforced Silicone Hose Secondary Fermentation Homebrew Kegging Brewing Equipment
xiangshuizhenzhanglingfengshop

$479.00
$559.00
EdgeStar KC1000SS Craft Brew Kegerator for 1/6 Barrel and Cornelius Kegs
Amazon.com


$10.99 ($31.16 / Ounce)
Hornindal Kveik Yeast for Homebrewing - Mead, Cider, Wine, Beer - 10g Packet - Saccharomyces Cerevisiae - Sold by Shadowhive.com
Shadowhive


Looks like that was successful, appreciate the help.Trying it now
I was able to install the firmware to the controller but when I try to use the guided setup in Fermentrack it fails to find any wifi device to connect to. Any suggestions?That’s why - the 4.0.0 has issues with Spiffs/LittleFS partitions. I have a query out to the manufacturer, but alas - no response.
Try the “No Spiffs” version.
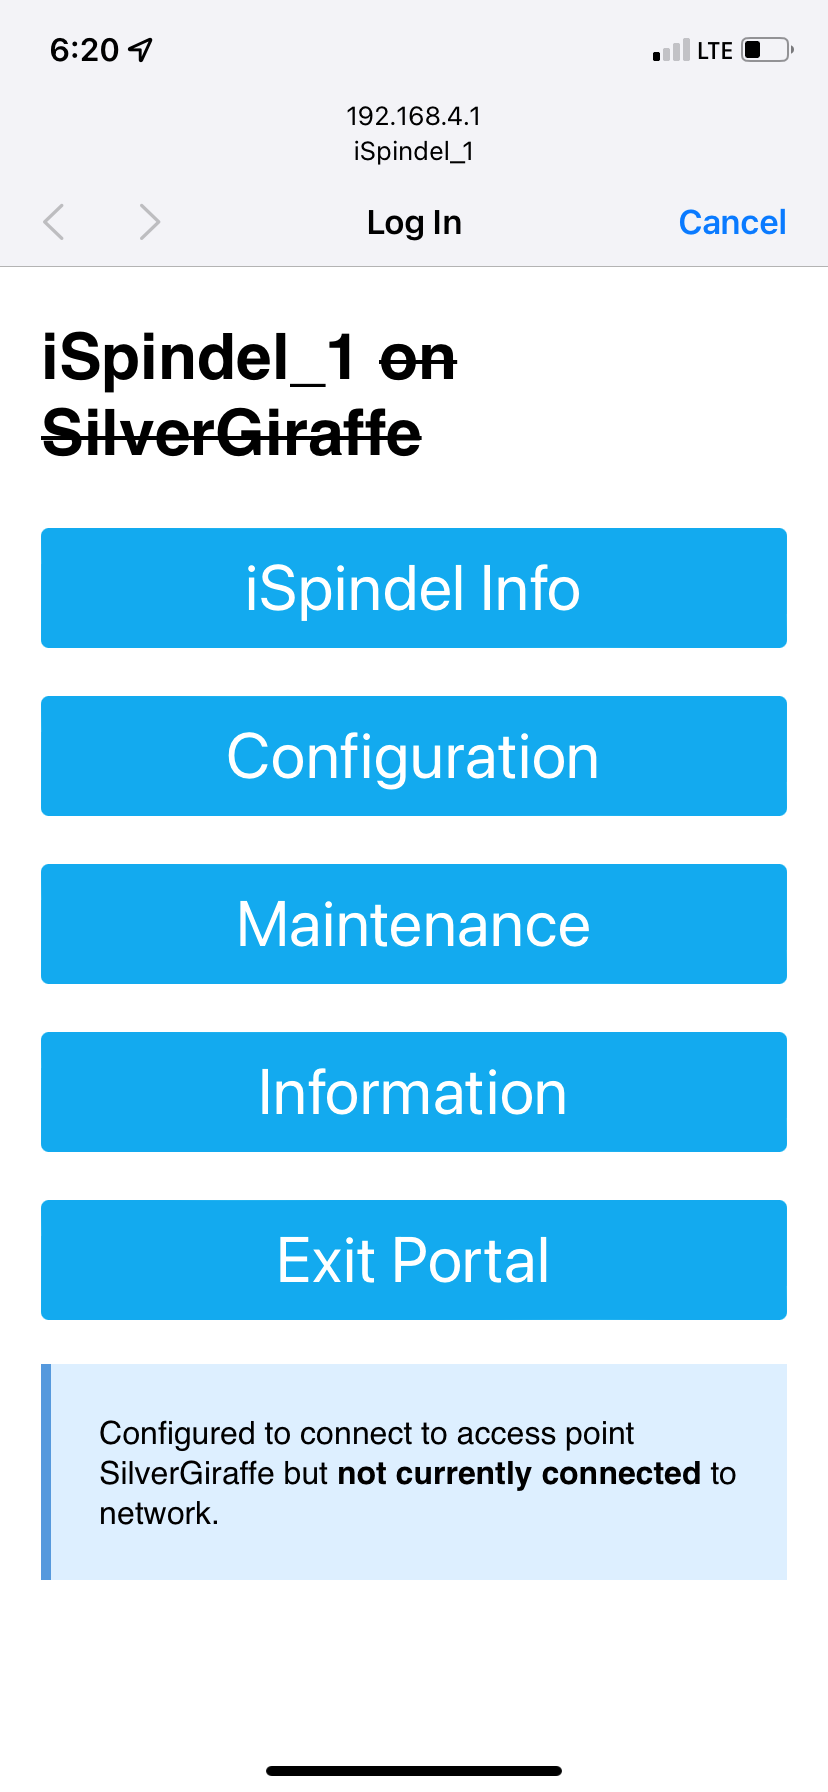
I have a couple of ISpindels which seem to working fine but cannot get them set up in fermentrack. I've tried several times. Is there some trick I'm missing with naming convention etc.
I've included the screenshots taken from my phone when connected locally to the device.

This is the same Ispindel but I tried it 3 different ways in the fermentrack setup. The PI (192.168.0.103) is on the 5G version of the same network?
I've included the screenshots taken from my phone when connected locally to the device.
This is the same Ispindel but I tried it 3 different ways in the fermentrack setup. The PI (192.168.0.103) is on the 5G version of the same network?
Attachments


Thorrak,I was able to install the firmware to the controller but when I try to use the guided setup in Fermentrack it fails to find any wifi device to connect to. Any suggestions?
How do I figure out the IP addresses for the controllers I set up via the firmware upload? Not sure how to resolve the problem. All the Youtube videos and documentation assume that the firmware installation are flawless. Any advise when they are not? Asking for those of us who are not programmers but want to use the setup you have created. Appreciate the feedback.
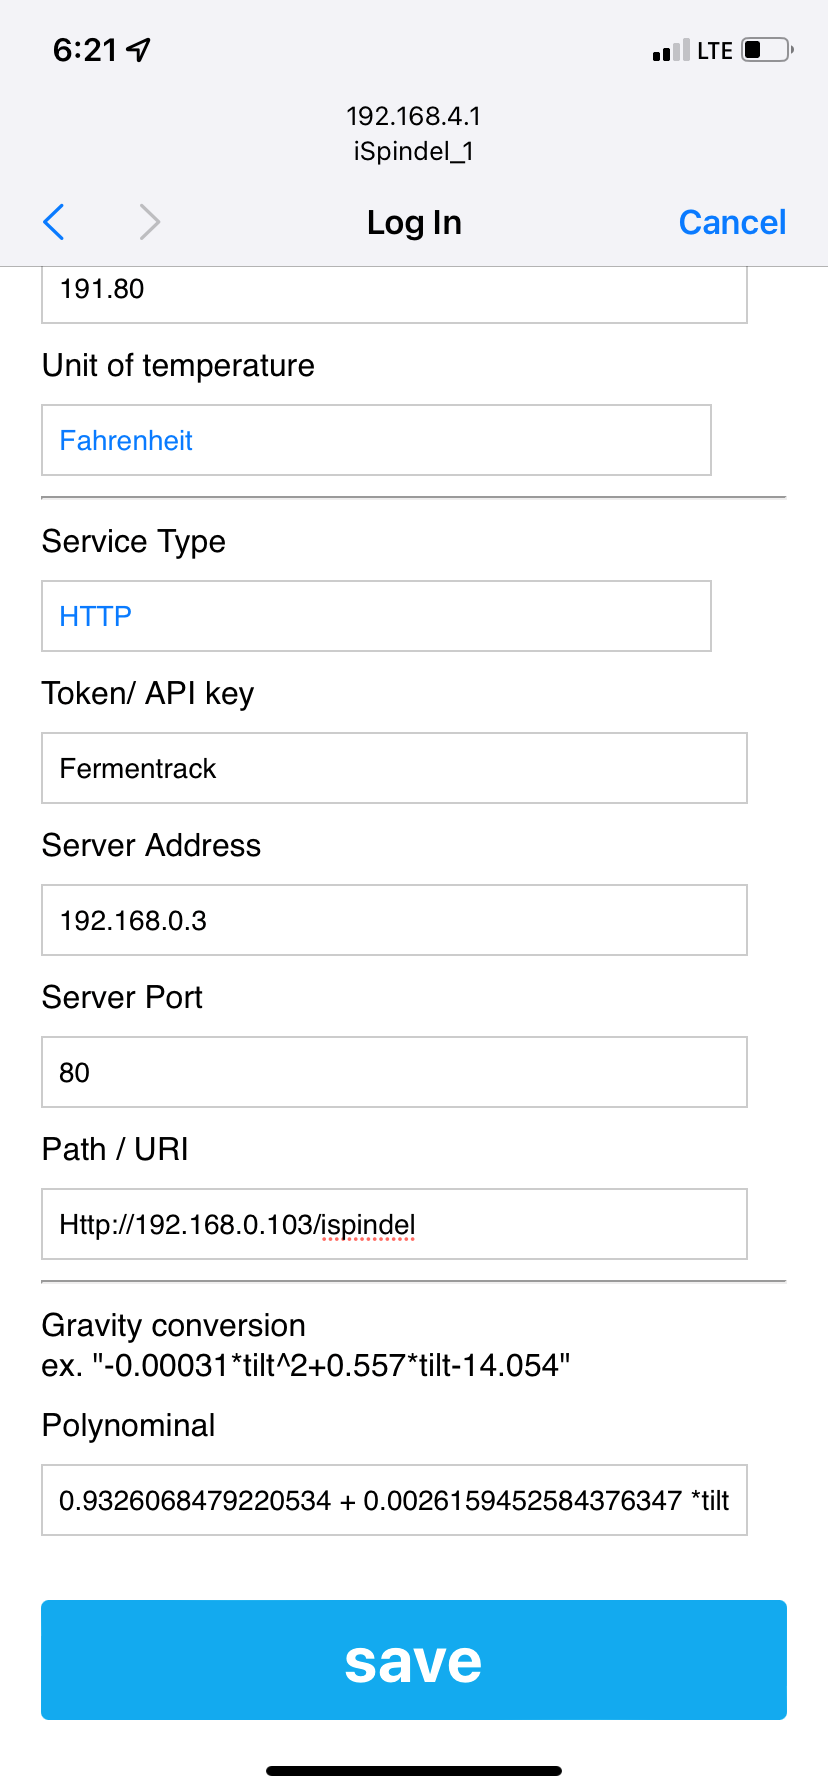
If your pi address is 192.168.0.103 then that is the server address. The last screenshots shows you have 192.168.0.3 configured.I have a couple of ISpindels which seem to working fine but cannot get them set up in fermentrack. I've tried several times. Is there some trick I'm missing with naming convention etc.
I've included the screenshots taken from my phone when connected locally to the device.
View attachment 773539
This is the same Ispindel but I tried it 3 different ways in the fermentrack setup. The PI (192.168.0.103) is on the 5G version of the same network?
Thanks Pers - Good spot it should have been 192.168.0.103 .Between trying to work out what the name should be and not giving the device enough time to update the Wi-Fi setting on the ESP-8266 i must have missed it. However I'm still not getting any kind of feedback to fermentrack still.If your pi address is 192.168.0.103 then that is the server address. The last screenshots shows you have 192.168.0.3 configured.

This is how I'm entering the name on device. I also have it set as iSpindel_1 as well on a different entry in fermentrack but no dice.
Again Thanks for the help.
I'm honestly not the right person for helping past the basics. Can't remember how I did mine with the names but try putting the exact name from the iSpindel config on both entries.Thanks Pers - Good spot it should have been 192.168.0.103 .Between trying to work out what the name should be and not giving the device enough time to update the Wi-Fi setting on the ESP-8266 i must have missed it. However I'm still not getting any kind of feedback to fermentrack still.
View attachment 773575
This is how I'm entering the name on device. I also have it set as iSpindel_1 as well on a different entry in fermentrack but no dice.
Again Thanks for the help.
Sorry but that's all I got. Someone else who knows the right answer will reply.
Thanks Pers - Good spot it should have been 192.168.0.103 .Between trying to work out what the name should be and not giving the device enough time to update the Wi-Fi setting on the ESP-8266 i must have missed it. However I'm still not getting any kind of feedback to fermentrack still.
View attachment 773575
This is how I'm entering the name on device. I also have it set as iSpindel_1 as well on a different entry in fermentrack but no dice.
Again Thanks for the help.
nhannath,
In you image the first line "Name" is whatever you want the iSpindel to show up as in Fermentrack, the last line "Name on device" must match what you named the iSpindel when you set it up (typically "iSpindel_000" or something to that effect), you can always power cycle the iSpindel and then look at the list of wifi devices on your laptop/desktop and it will show you the current name of the device.
In you image the first line "Name" is whatever you want the iSpindel to show up as in Fermentrack, the last line "Name on device" must match what you named the iSpindel when you set it up (typically "iSpindel_000" or something to that effect), you can always power cycle the iSpindel and then look at the list of wifi devices on your laptop/desktop and it will show you the current name of the device.
Hi! I have an calibrated ispindel, i use direct to brewfather. It sends the correct gravity value.
I want send the gravity to the brewpiless, but the values is absolute incorrect.
In gravity menu the ispindel is on, all other is off.
What can i doing, to the correct value?
Sorry for my bad english.
I want send the gravity to the brewpiless, but the values is absolute incorrect.
In gravity menu the ispindel is on, all other is off.
What can i doing, to the correct value?
Sorry for my bad english.
Hi! I have an calibrated ispindel, i use direct to brewfather. It sends the correct gravity value.
I want send the gravity to the brewpiless, but the values is absolute incorrect.
In gravity menu the ispindel is on, all other is off.
What can i doing, to the correct value?
Sorry for my bad english.
Can you create an offset in brewpiless to compensate back to the ispindel value? Or is there a correction adjustment in brewpiless that adjusts the value of the ispindel?
Looks like that was successful, appreciate the help.
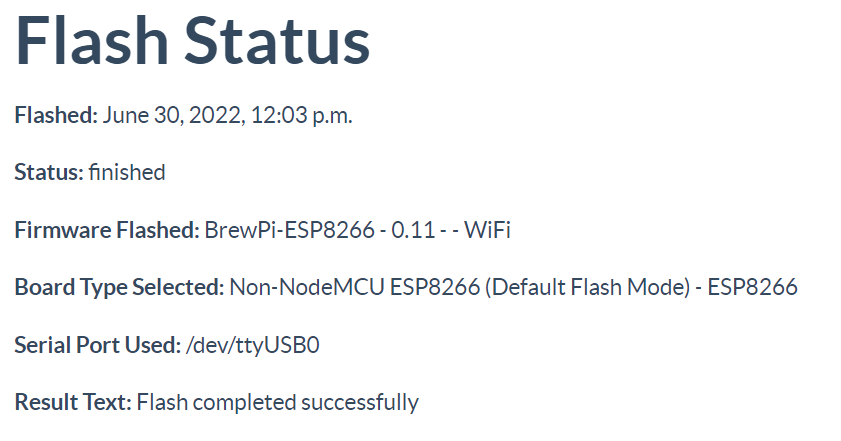
Glad to hear that worked. I had some time this morning, so I tried seeing if I could find a way to force-flash a SPIFFS partition onto the Lolin v4, but unfortunately there doesn't seem to be a solution yet. For now, "no spiffs" is the only option".
Thorrak,
How do I figure out the IP addresses for the controllers I set up via the firmware upload? Not sure how to resolve the problem. All the Youtube videos and documentation assume that the firmware installation are flawless. Any advise when they are not? Asking for those of us who are not programmers but want to use the setup you have created. Appreciate the feedback.
Not sure if you got this resolved, but when you (newly) flash the firmware and it initializes, you should see a WiFi hotspot spin up to which you can connect your phone or other device. Once connected to the hotspot, you should automatically get redirected to the configuration portal - if that's not happening automatically, try to go to http://192.168.4.1/ .
Once you've gone through the configuration portal then you should get the IP address on your home network printed to the LCD screen every time your controller reboots.
Hi! I have an calibrated ispindel, i use direct to brewfather. It sends the correct gravity value.
I want send the gravity to the brewpiless, but the values is absolute incorrect.
In gravity menu the ispindel is on, all other is off.
What can i doing, to the correct value?
Sorry for my bad english.
BrewPiLess is a different project available over here. This thread is for the BrewPi-ESP8266 firmware, which doesn't integrate with ispindel.
I also manage a project called Fementrack which does integrate with iSpindels -- if that's what you're looking for help with, the thread is over here.
I was able to resolve the issue of not seeing the Lolin v4 devices. Got them communicating and I can see them in Fermentrack. Still working though a few more items that I am not sure about, but I will keep plugging away and see if I can resolve them.Glad to hear that worked. I had some time this morning, so I tried seeing if I could find a way to force-flash a SPIFFS partition onto the Lolin v4, but unfortunately there doesn't seem to be a solution yet. For now, "no spiffs" is the only option".
Not sure if you got this resolved, but when you (newly) flash the firmware and it initializes, you should see a WiFi hotspot spin up to which you can connect your phone or other device. Once connected to the hotspot, you should automatically get redirected to the configuration portal - if that's not happening automatically, try to go to http://192.168.4.1/ .
Once you've gone through the configuration portal then you should get the IP address on your home network printed to the LCD screen every time your controller reboots.
BrewPiLess is a different project available over here. This thread is for the BrewPi-ESP8266 firmware, which doesn't integrate with ispindel.
I also manage a project called Fementrack which does integrate with iSpindels -- if that's what you're looking for help with, the thread is over here.
Can the fermentrack loging to brewfather?I also manage a project called Fementrack which does integrate with iSpindels -- if that's what you're looking for help with, the thread is over here.
Yes.Can the fermentrack loging to brewfather?
BrewCityBaller
Well-Known Member
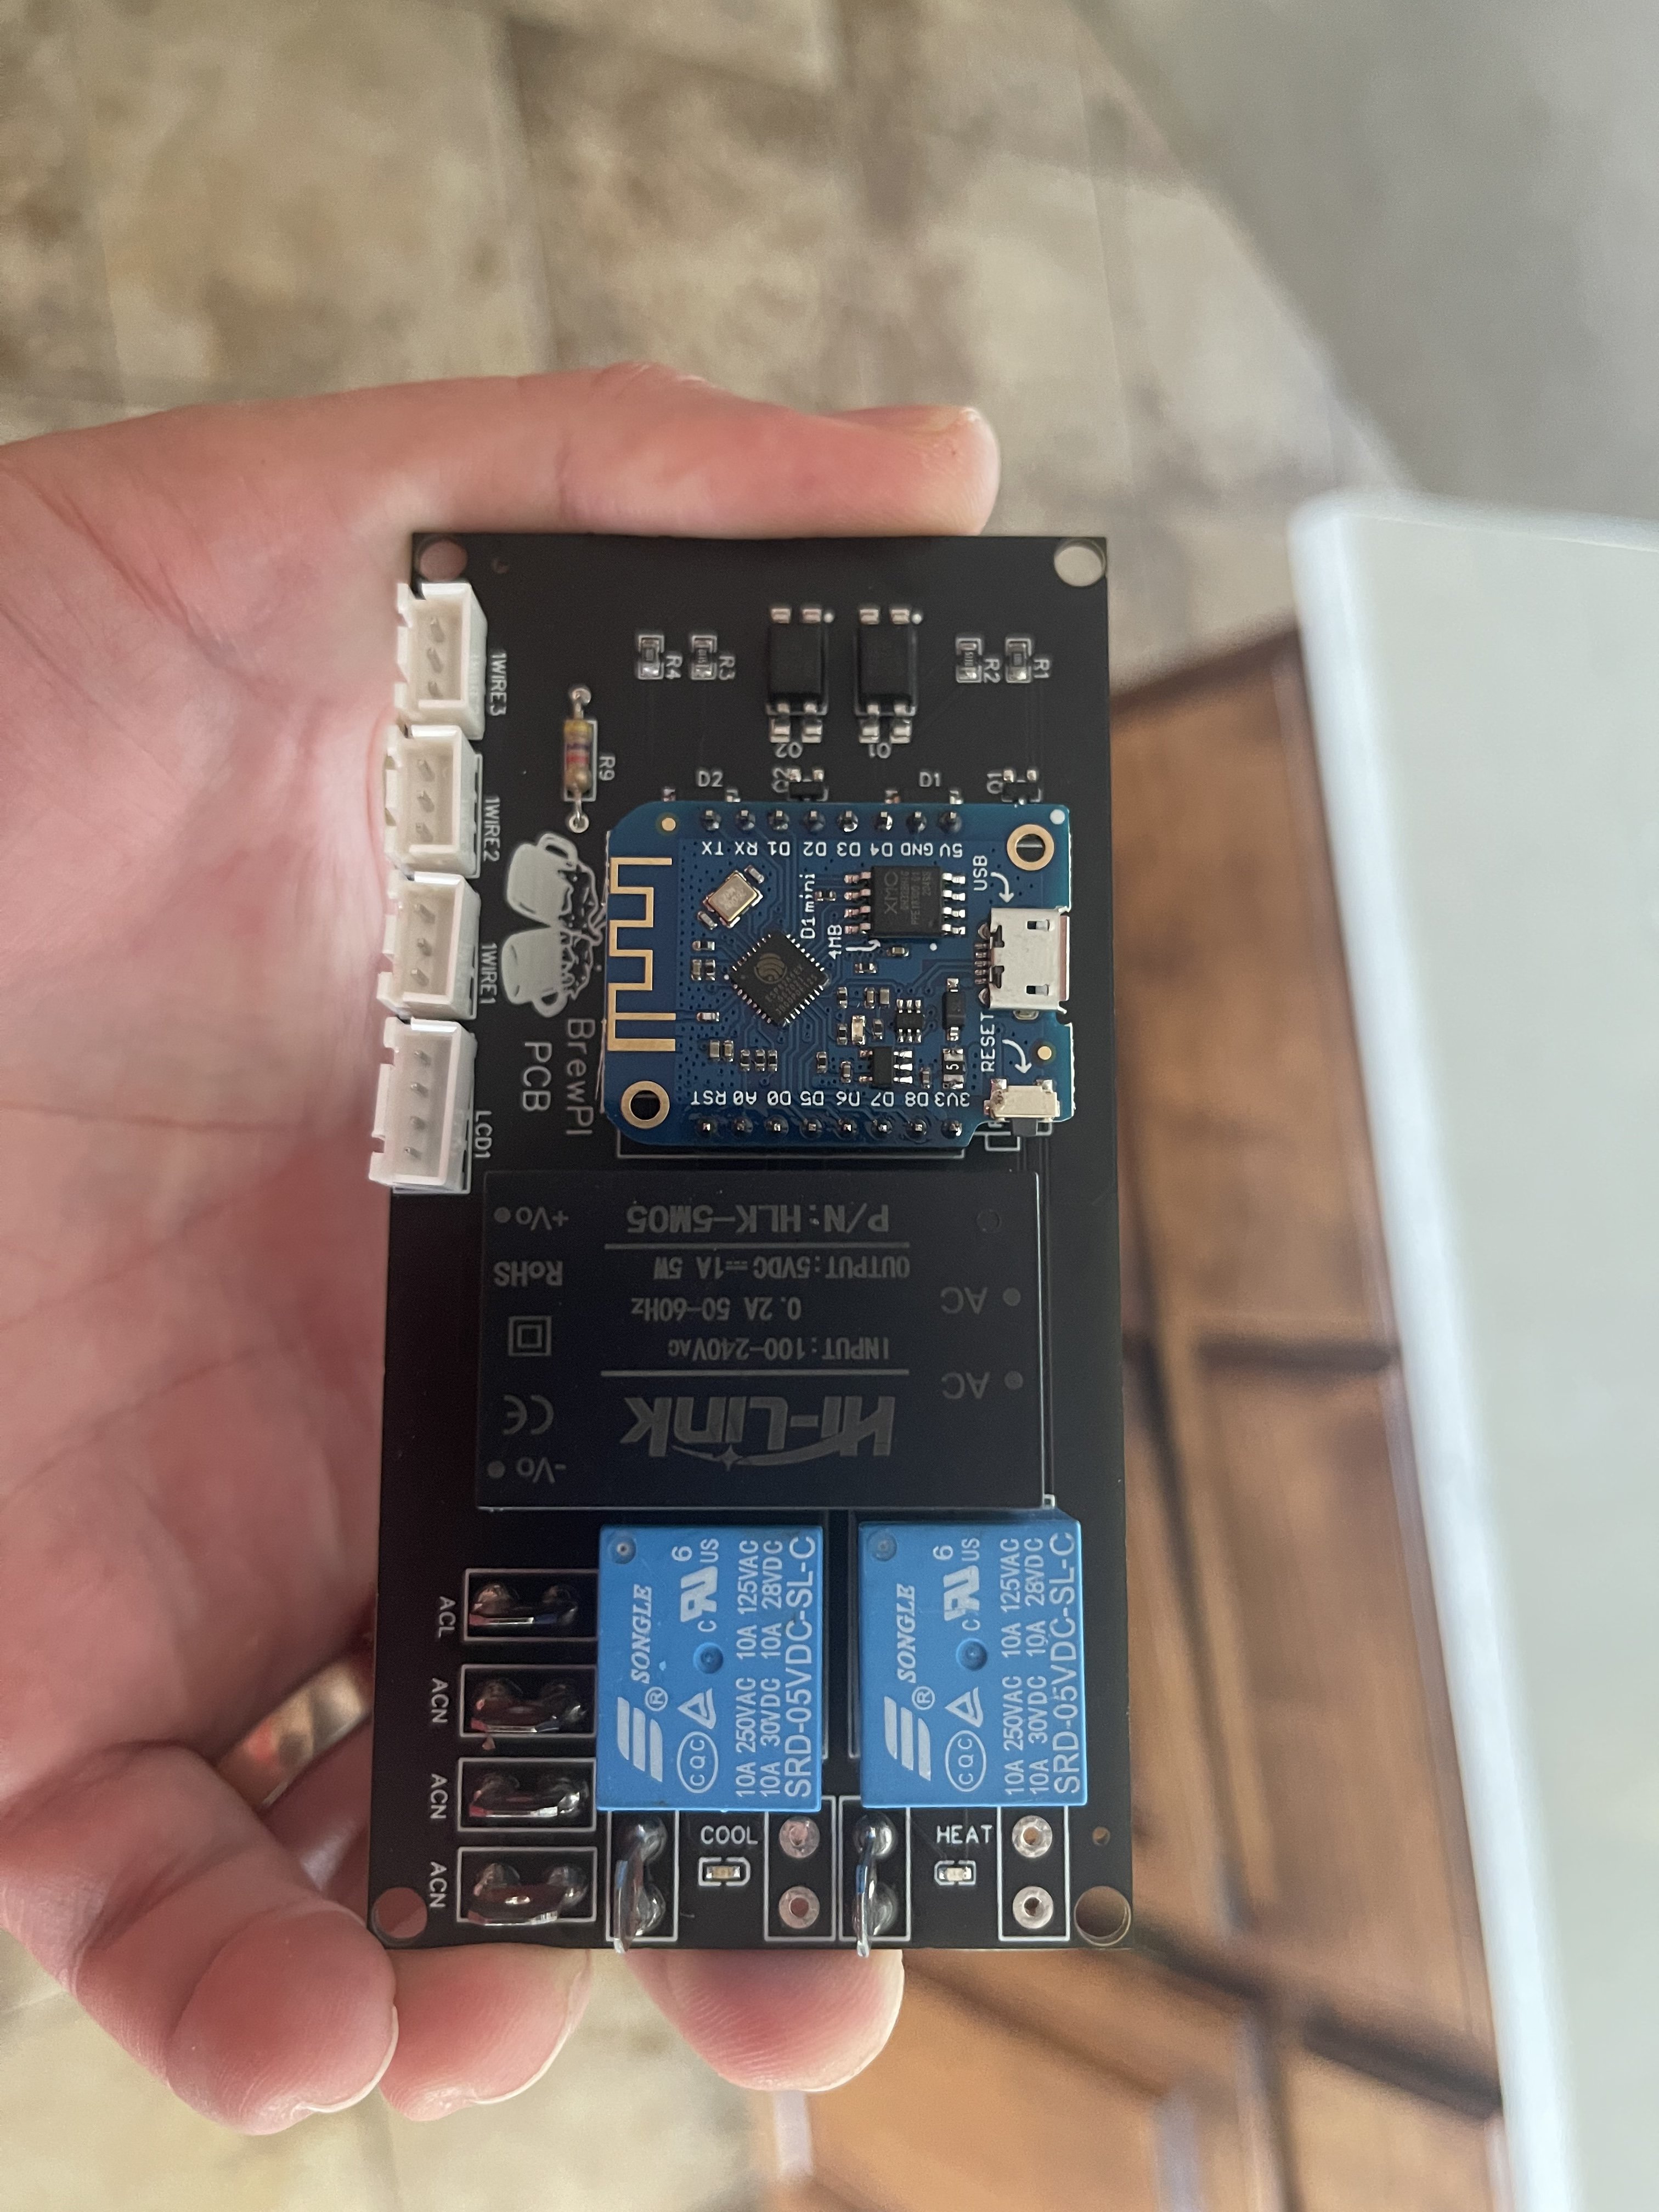
I picked up a LOLIN D1 Mini V4.0.0 ESP8266 and am planning to replace my Arduino BrewPi controller. However, I cannot for the life of me find a pinout/hook-up diagram for the temp sensor bus, heating and cooling pins.
Does anyone have a pinout or hook-up diagram for the most recent generation of ESP8266 boards?
Does anyone have a pinout or hook-up diagram for the most recent generation of ESP8266 boards?
I picked up a LOLIN D1 Mini V4.0.0 ESP8266 and am planning to replace my Arduino BrewPi controller. However, I cannot for the life of me find a pinout/hook-up diagram for the temp sensor bus, heating and cooling pins.
Does anyone have a pinout or hook-up diagram for the most recent generation of ESP8266 boards?
The pinout for the D1 Mini v4.0.0 is the same as the pinout for the earlier D1 minis in the series (and is the footprint I designed all my PCBs around)
One thing I will note - I DO NOT recommend the v4.0.0 boards if you can avoid them -- they have a bug with the flash that prevents being able to flash a SPIFFS/LittleFS partition. If you already have one, you can use it by using the "no spiffs" firmware that I've released, but I recommend against them if they can be avoided. I've messaged the manufacturer multiple times, but there is no response.
https://www.wemos.cc/en/latest/d1/d1_mini.htmlThe pinout for the D1 Mini v4.0.0 is the same as the pinout for the earlier D1 minis in the series (and is the footprint I designed all my PCBs around)
One thing I will note - I DO NOT recommend the v4.0.0 boards if you can avoid them -- they have a bug with the flash that prevents being able to flash a SPIFFS/LittleFS partition. If you already have one, you can use it by using the "no spiffs" firmware that I've released, but I recommend against them if they can be avoided. I've messaged the manufacturer multiple times, but there is no response.
Ah - hm. @BrewCityBaller - Is the issue that I refer to all the pins by their NodeMCU number (e.g. D0, D1, D2) and the Lolin v4.0.0 has replaced that with the actual ESP pin numbers?
If so, here's a map of what all the pins are linked to (and what they're called on both boards).
BrewCityBaller
Well-Known Member
Ah - hm. @BrewCityBaller - Is the issue that I refer to all the pins by their NodeMCU number (e.g. D0, D1, D2) and the Lolin v4.0.0 has replaced that with the actual ESP pin numbers?
If so, here's a map of what all the pins are linked to (and what they're called on both boards).
Yes, this was the largest issue. All of this feedback was very helpful though. Thank you!
BrewCityBaller
Well-Known Member
BrewCityBaller
Well-Known Member
One last question: I got everything working and so I got ambitious and installed a physical i2c LCD screen. The screen works and displays the correct information, but it does not update. It displays whatever information was on there at startup. Any idea why this might be the case?
Nope. Never seen that before. Am I correct to assume that you are properly level-shifting the I2C pins?One last question: I got everything working and so I got ambitious and installed a physical i2c LCD screen. The screen works and displays the correct information, but it does not update. It displays whatever information was on there at startup. Any idea why this might be the case?
BrewCityBaller
Well-Known Member
Nope. Never seen that before. Am I correct to assume that you are properly level-shifting the I2C pins?
Hmmm I haven't exercised my EE degree in a while. Like a pull-up/down resistor? If so, no. I have the LCD hooked-up like this pic:
Edit: This is not correct, as I noted below, I am mixing 3.3V and 5V. I will grab a level shifter.
Attachments

Last edited:
BrewCityBaller
Well-Known Member
Ahhh thought more about it. No. I have the LCD connected to 5V Vin and the I2C pins are getting 3.3V signal. Is that what you mean?Nope. Never seen that before. Am I correct to assume that you are properly level-shifting the I2C pins?
Yesterday I released BrewFlasher 1.3.0 for Windows and Mac OS on GitHub. This release adds support for the ESP32-S2 chipset and the latest esptool.
With the release of BrewFlasher support for this chipset, I also posted v14 BrewPi firmware for the ESP32-S2 to GitHub and BrewFlasher. My intent is for this firmware to allow the LoLin S2 Mini to serve as a drop-in, pin-compatible replacement for existing ESP8266 BrewPi builds. The WiFi version of this firmware integrates the Kasa WiFi switch support from the ESP32 firmware, in addition to getting the other benefits of the more modern platform.
For users that prefer serial (wired) connections between their Fermentrack/BrewPi-Remix builds and their controllers, there is a copy of the serial firmware for the ESP32-S2 as well, though this adds no additional features/support beyond those available on the ESP8266 (D1 Mini).
Ahhh thought more about it. No. I have the LCD connected to 5V Vin and the I2C pins are getting 3.3V signal. Is that what you mean?
Yep, exactly. You need a level shifter to get (reliable) use of the I2C backpacks. There are bidirectional level shifters available that can easily provide this -- my PCB designs either integrate one of these "backpack" boards, or - in the case of the SMD design - integrate the hardware on the PCB itself.
Since brewpi was the first project to get me into small electronics I thought it would be fun to come back to and revamp my builds. So I’ve been working on a custom pcb that could make making a brewpi pretty easy for some people. It’s got a 5v power supply. Extra neutral spots to clean up wiring. And is opto isolated. I’m thinking I’ll add a level shifter for the display cause I didn’t think about it cause my old one didn’t have it and works okay but I suppose it’s asking for trouble. and I think I’ll use the s2 mini instead since you added that support. Making a 3D printed case for it all. Any other things that would be helpful on a pcb or any glaring problems?
Attachments
You and I had a similar idea, I think.Since brewpi was the first project to get me into small electronics I thought it would be fun to come back to and revamp my builds. So I’ve been working on a custom pcb that could make making a brewpi pretty easy for some people. It’s got a 5v power supply. Extra neutral spots to clean up wiring. And is opto isolated. I’m thinking I’ll add a level shifter for the display cause I didn’t think about it cause my old one didn’t have it and works okay but I suppose it’s asking for trouble. and I think I’ll use the s2 mini instead since you added that support. Making a 3D printed case for it all. Any other things that would be helpful on a pcb or any glaring problems?
") I haven’t finished/posted my design for this yet, but the two things I added - both for circuit protection - were fuses on the AC lines and a varistor for the same. I also am using a 2A supply rather than 1A, but my design targets the ESP32.
I haven’t finished/posted my design for this yet, but the two things I added - both for circuit protection - were fuses on the AC lines and a varistor for the same. I also am using a 2A supply rather than 1A, but my design targets the ESP32. I strongly recommend targeting the S2 over the ESP8266, but of course from a PCB perspective the two devices are pin-compatible, so there’s nothing to “target” that would change the design.
At some point I may make use of the extra row of pins to add TFT support to the S2, but at that point you might as well go to the full ESP32
Hahaha awesome great minds think alike. Yeah I’ve been using the s2 mini in tons of projects I like them a lot. I would love to collaborate on this i have used the s2 in other pcbs I had to draw a custom component on easyeda. Once I did that they have been easy to add to pcbs. I just tweaked my design and added logic level shifter to the circuit for the display. I figured I might as well add it onto my pcb since only two channels need shifted I have the commercial ones but those take up space would be another component to buy and all have four channels lol. Plus it’s just a couple resistors and mofset. Here’s the sketch so far. Also I purchased some of these displays to play with OLED displays based on the SSD1306. Im wondering what the feezibility of adding support for these would be as they seem pretty cool.You and I had a similar idea, I think.
I strongly recommend targeting the S2 over the ESP8266, but of course from a PCB perspective the two devices are pin-compatible, so there’s nothing to “target” that would change the design.
At some point I may make use of the extra row of pins to add TFT support to the S2, but at that point you might as well go to the full ESP32
Attachments

Last edited:
Similar threads
- Replies
- 10
- Views
- 2K
- Replies
- 3
- Views
- 2K
- Replies
- 7
- Views
- 2K
