• Please visit and share your knowledge at our sister communities:
  • If you have not, please join our official Homebrewing Facebook Group!

    Homebrewing Facebook Group

Native ESP8266 BrewPi Firmware - WiFi BrewPi, no Arduino needed!

Homebrew Talk

Help Support Homebrew Talk:

This site may earn a commission from merchant affiliate links, including eBay, Amazon, and others.
I’m excited to share that BrewPi-ESP v16 has just entered beta! This release marks a major step forward, as - relative to v15d - it replaces BrewPi-Script with a brand-new REST interface for easier communication with Fermentrack 2. You’ll also find a multilingual on-device web interface, eSPI screen support, and reenabled Inkbird/Tilt Bluetooth sensor support (ideal for “solder free” builds).

For those of you already using v16-alpha5, this beta adds an optional setting to toggle display resets when switching a pin-based relay, plus an extended cache time for OneWire temperature readings. It’s a small but crucial bump in stability and ease-of-use as we move toward the full release.

This is available now on BrewFlasher and BrewFlasher Web. If you’d like the full details, check out the GitHub release notes. Feel free to post any questions, issues, or feedback—your input helps as I move this forward towards full release!
 
After reading this first post in 2016, and others, I get that we need an esp 8266, flash it with Brewflasher, and use our computer screen to see the Fermentrack2 in action?
No need for Arduino and no need for a Raspberry Pi?
Sorry, if these are dumb questions, but I am a bit confused here
 
After reading this first post in 2016, and others, I get that we need an esp 8266, flash it with Brewflasher, and use our computer screen to see the Fermentrack2 in action?
No need for Arduino and no need for a Raspberry Pi?
Sorry, if these are dumb questions, but I am a bit confused here
Wow - 100 pages later! Definitely a lot of content in there - and a lot of stale content as the project has evolved. Here’s a quick summary:

The traditional BrewPi consisted of:
  • An Arduino
  • Hooked up to a Raspberry Pi
  • With a USB cable, so that it could then communicate over Serial
  • …to a software program called BrewPi-Script
  • …which then communicated with a web interface (BrewPi-www) which also ran on that same raspberry pi.

This project - BrewPi-ESP - originally just replaced the Arduino with an ESP8266.

Thing is - the ESP8266 can connect to WiFi, so the next step was to then replace the USB cable. The ESP8266 would communicate with BrewPi-script over WiFi which would then communicate with the web interface.

At this point, though, you’re meddling with a lot of things under the hood - and trying to make them work with BrewPi-www is painful. To make this easier, I built (legacy) Fermentrack. With Fermentrack your stack looks like this:
  • An ESP8266
  • Hooked up to WiFi
  • …to a software program called BrewPi-Script, running on a Raspberry Pi
  • …which then communicated with a web interface (Fermentrack) which also ran on that same raspberry pi.
Cleaner! Also, you can have your Pi sitting in the living room, while the ESP8266 (and your fermenter!) is in your basement/garage. Improvements!

The problem, though, is that the central communications app - BrewPi-Script - wasn’t designed for this. It was always meant to run on a local Raspberry Pi. It was never designed to be particularly secure. All reasonable design decisions - but decisions that dictate local deployment, meaning you need your own computer/Pi on your own network to make it all work.

That’s what these changes do. The v16 firmware removes that BrewPi-Script expectation, and adds a new web-based communication protocol. Fermentrack 2 implements that web-based communication protocol, meaning it doesn’t need to live on your network. It can run anywhere - including in the cloud, as Fermentrack.net.

So now - if you want it - your stack looks like this:

  • An ESP8266 (or ESP32 or ESP32-S2 - there are options now!)
  • Hooked up to WiFi
  • …which then communicated with a web interface (Fermentrack 2) which can run in the cloud
You’ve eliminated the local Raspberry Pi requirement, removed a source of failure in BrewPi-script, and simplified your overall build.

To use this, you only need to do what you described: Flash an ESP32 with the BrewPi-ESP v16 firmware using BrewFlasher, create an account on Fermentrack.net, and link the two together.
 
Last edited:
@Thorrak
NOW, that explains IT !
One last question - Why is the ESP32 a good bit more expensive than even 3 of the ESP8266 bundle on Amazon? ($19/esp32 and 3-esp8266/$14)
Thanks for the full explanation - I just could not follow this thread and know what I was to do if I wanted to go with this. LOL
 
@Thorrak
NOW, that explains IT !
One last question - Why is the ESP32 a good bit more expensive than even 3 of the ESP8266 bundle on Amazon? ($19/esp32 and 3-esp8266/$14)
Thanks for the full explanation - I just could not follow this thread and know what I was to do if I wanted to go with this. LOL

I mean, you can get 3x ESP32 for $16 if you look hard enough... ;)

Honestly, that's a great question. The ESP32 is newer/more powerful, but honestly if I was to guess, it all comes back to how people have historically thought about - and therefore priced - these boards. The ESP8266 is an incredibly capable chip, yet back when this project started it was generally valued more as a bolt-on WiFi radio than a capable chip in its own right. Even though the ESP8266 had more flash & more RAM, people still would hook it up to an Arduino rather than try to run code on it directly. That's actually why this project got started -- I saw tutorials doing just this and thought "Why?"

By contrast, the ESP32 has always been its own "thing". If all you want is a WiFi radio, you go with a cheaper chip -- you choose the ESP32 because you want it at the core of what you're building.

With the above said, however, if you look at the pricing of the actual microchips, an ESP8266 module costs $1.35 in bulk while an ESP32 module costs $2.87 in bulk (this is the cost to the manufacturer of what you buy on Amazon, mind you). Manufacturers are getting far more profit on a $19 ESP32 than a 3-for-$14 ESP8266.


With regards to the BrewPi-ESP project, however, my recommendation is to buy an ESP32 - HOWEVER-AND THIS IS VERY IMPORTANT! You do NOT want an ESP32-S3, ESP32-S2, ESP32-C3, etc. Espressif did a horrible job naming things, and these are all vastly different modules from the base "WROOM" ESP32.

My recommendation is still to go with the ones direct from Lolin via AliExpress - either the base D32 or the D32 Pro. The de minimis exception is still in effect until early May, so there is still time to get these imported.
 
@Thorrak ,
Your last 2 posts, 3963/3966 explained everything about this Project (almost for me :rolleyes:)
HBT is awesome that there are so many talented Bloggers that are willing to share, for free, their knowledge, to help the rest of us make great beer and such "things" related !
Thanks for taking time to respond so quickly !
 

New Case Design for "All-in-One" PCB​


Back in early December I released a new PCB design which combines the PSU, Relays, and controller, all onto one board, rather than remaining as discrete components within a build. At the time I released it, I had been working on a case design, but hadn't yet managed to get it to the point where I felt it was ready for public consumption. After several revisions, it's finally at the point where it's ready to release

With that said, I am proud to release the latest addition to my case designs - the "All-in-One" PCB Case Base. This design - available on both Printables and GitHub provides an easy way to tie together the components of a complete BrewPi build - including the PCB, power inlet/outlet, and display. This design is the first I am releasing which swaps the use of captive screws for heat set inserts, greatly simplifying the build - and reducing the number of case protrusions.

To make things even easier, I also pulled together a video showing how everything comes together. That video is available on YouTube here:


New "Discrete Component" & Sensor Box Case Design​

Building on my success with heat set inserts, I have also redesigned both the "Discrete Component" PCB case and Sensor Box designs to swap many of the nuts for heat set inserts:
If you already have a case which you like/works for you, there's no reason to switch, but I recommend these for new builds.

As noted, all three of these designs replace many of the nuts that were previously used for assembly with heat set inserts. I have chosen to standardize around a single heat set insert, which takes an M3 screw, is 6mm long, and requires a hole of 4.2mm.

New BrewPi Case Lid Designs​

In addition to revisions to the case design, I have also released revised case lid designs for additional screen types. Supported screen types (lid configurations) include:
  • LCD2004 - 20x4 character display
  • LoLin 2.4" TFT - Lolin's display, which is intended to be used with the D32 Pro controller
  • 2.8" "Generic" TFT - A 320x240 TFT running on an ILI9341
  • 3.2" "Generic" TFT - A 320x240 TFT running on an ILI9341
Design files are again available on Printables and GitHub (use the link above for the appropriate base case type - the lids are included in there).
 
@Thorrak

I'm looking to get rid of my old Pi/Arduino setup that's hanging on my wall and I've put together a solderless setup with an ESP32 and some Inkbird sensors and TPLink outlets. I'm running a test with my chest freezer and a pitcher of water, but the beer temperature stays 0.8 degrees Fahrenheit above the set temperature. I can set the temperature lower to compensate, but I was wondering if you could help me figure out the cause. Maybe it's the relatively small volume of water? Maybe I need to position the Inkbird somewhere other than the inside wall of the freezer?

I have about a gallon of water in the pitcher, and the Inkbird probe is inserted into a long thermowell that typically sits in my 60L Speidel fermenter. I can send you information on my configuration if it'll help.

Thanks.

What temperature are you trying to cool to? How long has it been avoiding hitting your setpoint?

If the inkbird is DIRECTLY against the wall of your freezer that might be an issue - that typically is where the coils run, so it's possible that it's getting some strange temperature fluctuations that would cause issues. If you can set it on the "hump" that might work better.

I'm assuming that you're using a TH2-Plus or similar that has both the on-device sensor and the probe? A gallon of water should be plenty of thermal mass for it to control - so long as the thermowell/probe are fully submersed
It's an IBS-TH1 Plus. I've been trying to hit 34F because it's my cold crash temperature and I like to keep things cold to avoid mold growth. The sensor has been magnetically slapped against the wall of the freezer, but I'll try moving it to the hump. The thermowell and probe have definitely been completely submerged.

Thanks for your assistance and all the work you've put into this project. It's greatly appreciated.
 
Ah - that's why. You need to change the minimum temperature setting in control constants. The lowest that it's allowed to be set by default is 33.8 if I recall correctly, which means that neither the fridge or beer temperature are allowed to be set below that. If the fridge isn't allowed to get colder than that, it's going to be very hard to get your beer down there. (Additionally, if the coils are behind the Inkbird, these problems would compound, as the coils would make the controller think that the fridge temp is lower than the air away from the wall actually is)
 
I've already set it down to 20, because it used to be x + 0.8 degrees when I had it set higher. Tomorrow I'll set it to 68F, add a full fermenter, and move the sensor to the hump.
 
fwiw, and just in case, in the Advanced Settings page there is a Control Setting (top pane) and a Control Constant (bottom pane) that together govern "Fridge Temp". The latter is a constraint on the former, which is a setting. It's easy to mistake one for the other...

Cheers!
 
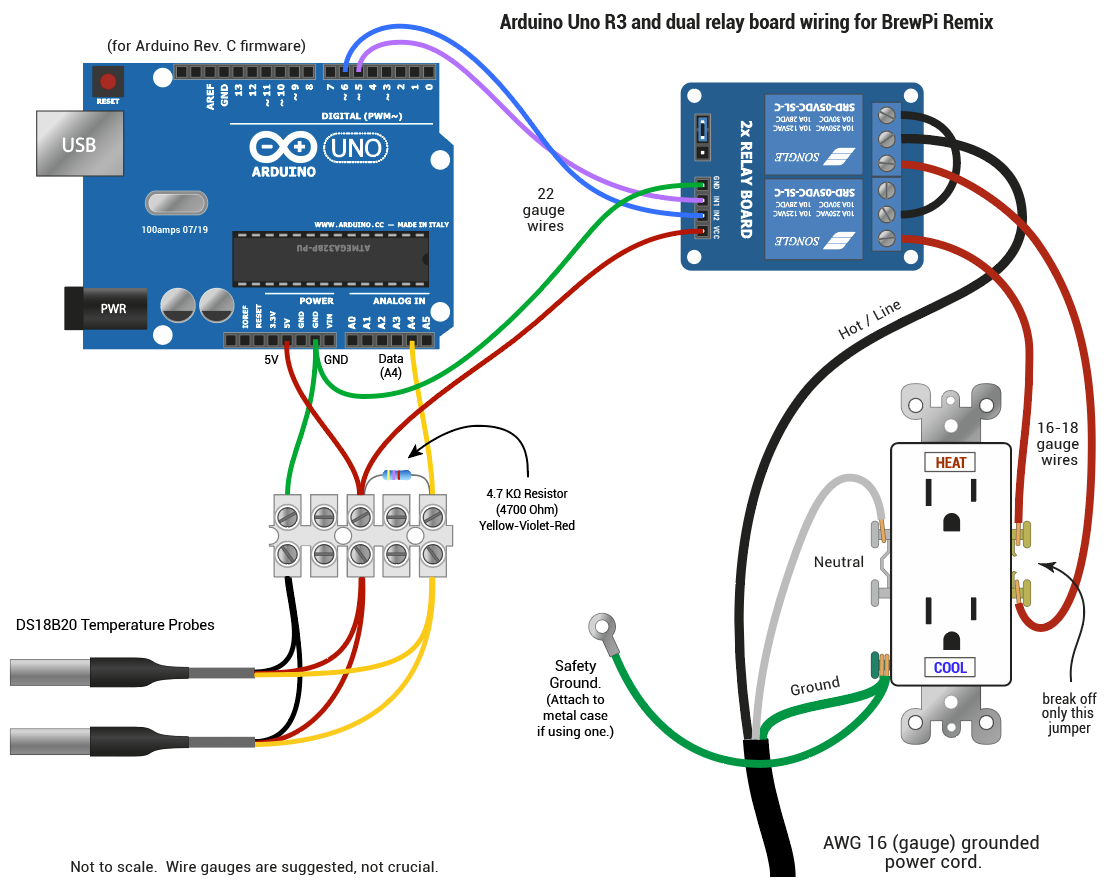
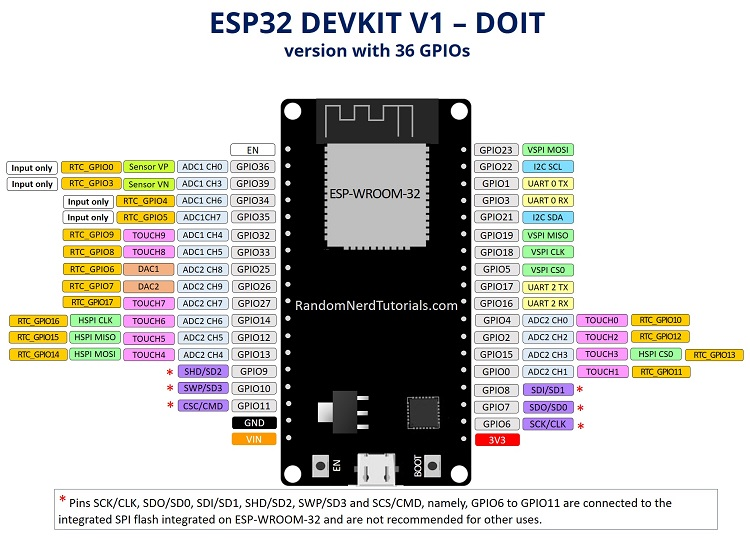
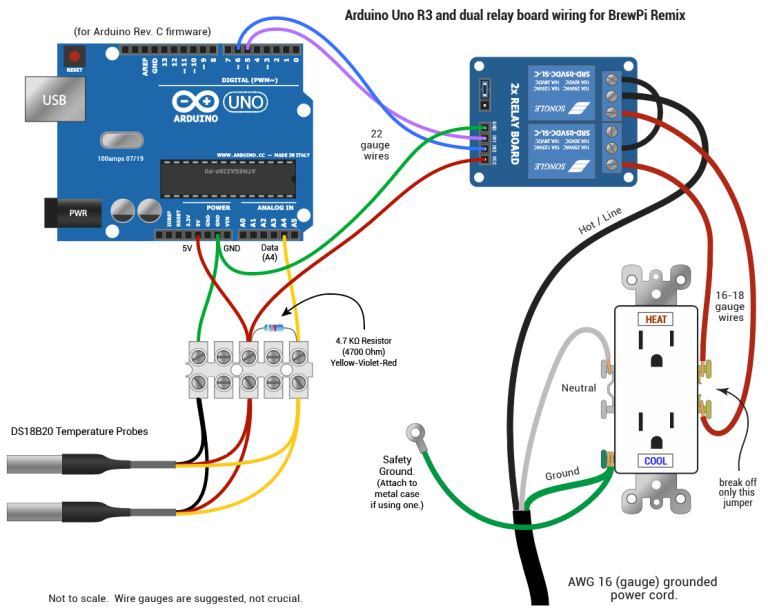
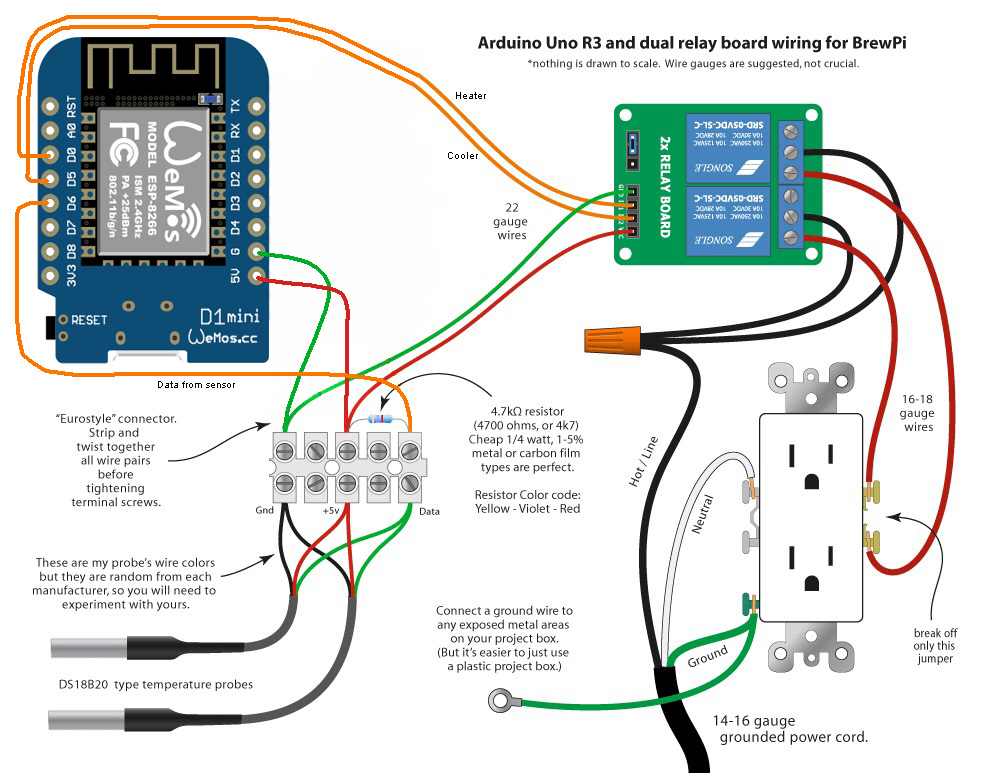
@Thorrak, great project and thank you for all the work you have put into it! I currently am running a "traditional" headless BrewPi setup with Arduino and RPi interconnected. However, I really like the Fermentrack interface and ability to check-in/modify remotely. I assume I need to move the wires currently connected to my Arduino to the ESP32 board? If so, which pins specifically on the ESP32? Also, I do not see a 5V pin on the ESP32, can I use the 3.3V pin instead? Do you have a quickie guide/pinout similar to what was shown in the BrewPi setup docs:

1745109740757.png


1745109971983.png
 
@Thorrak, great project and thank you for all the work you have put into it! I currently am running a "traditional" headless BrewPi setup with Arduino and RPi interconnected. However, I really like the Fermentrack interface and ability to check-in/modify remotely. I assume I need to move the wires currently connected to my Arduino to the ESP32 board? If so, which pins specifically on the ESP32? Also, I do not see a 5V pin on the ESP32, can I use the 3.3V pin instead? Do you have a quickie guide/pinout similar to what was shown in the BrewPi setup docs:

View attachment 873694

View attachment 873695
I actually don’t know if there is a diagram like that - there might be one buried in the thread, but the differences between controller boards means that unfortunately there isn’t a straightforward physical pin layout to reference. Fortunately, for a headless build the differences are pretty straightforward.

The pins you’re concerned with are these:
  • 25 - Heat - Arduino pin 6 (Maybe 5?)
  • 26 - Cool - Arduino pin 5 (Maybe 6?)
  • 13 - OneWire Data - Arduino pin A4
A full pinout can be found here: https://github.com/thorrak/brewpi-esp8266/tree/v16?tab=readme-ov-file#esp32 — but all of the other pins are ones you likely aren’t concerned with (screens, mostly).

GND is still GND. 5V is VIN for the controller that you show (technically, it’s whatever the voltage on the USB power is, but that’s typically 5V). You might be able to get away with 3.3v for powering the OneWire sensors - but if you can use the 5V that’s typically better. The only real wiring change you might want to make is for the relay board.

On the relay board, you will need to swap the wire going to VCC for +3.3v. Additionally, you probably currently have a jumper going between “VCC” and “JD-VCC”. You will likely want to remove that jumper, and add a wire going from the “JD-VCC” pin (very important - JD-VCC!!) to +5v. With these changes, you will have 3v3 signaling logic switching the relays off and on, but actually power the relays themselves off +5v, which many require.


With all the above said… have you been stalking my GitHub? My project all day today has been the Arduino-to-Fermentrack 2 bridge. Moving to an ESP32 still gets you a lot of benefit - including potentially eliminating the Raspberry Pi! - but it’s not going to be a strict requirement for Fermentrack 2/Fermentrack.net soon (hopefully)!
 
Awesome, I think that guidance will get me there, will take a deeper look tomorrow. Or, should I wait for the Arduino to FT.net work you're doing now given the remote capability is what I am truly after and already have the system running?
 
That's why I'm working on it - it becomes your choice at that point! ;)

The advantages to switching to an ESP32 are the removal of the need for a Raspberry Pi (if connecting to the BrewPi is the only thing you're using it for!), and the addition of a number of new features such as large screens, bluetooth temperature sensors, Tilt integration, and on-device controls. It's the device I target for new builds, and as such is where any new features that might get added will be found.

On the other hand, as you noted, the advantage of the Arduino is that you already have it built and sitting in your brewery -- which is abolutely not something to discount. If you don't care about any of those new features right now, then there's no requirement to upgrade right now. You can always come back and swap the controllers out at a future point.

The Serial-to-Fermentrack work is reasonably far along, but at the moment I don’t have an Arduino shield with temperature sensors, so it’s at least a week away from completion (depending on shipping!). Temperature sensors work perfectly with a serial ESP32-S2, so I’m not expecting any issues, but I’ve found one Arduino-specific bug, so there’s always a chance for more. Alpha testers are always welcome, but you’d have to both disconnect your BrewPi from BPR/Fermentrack and hook it to a dev copy of Fermentrack 2, so it’s not for the faint of heart.
 
I moved forward on replacing my Arduino/RPi with the ESP32 and FT.net. For some reason, it is not seeing the OneWire temperature sensor. I re-checked all the connections and pinouts and don't see anything wrong. Also, I am getting 5V to the OneWire sensors and they are grounded. Could the 4.7k resistor from the old setup be causing any issues. Any other things I should try?

1745350775904.png
 
If you are powering the one wire sensors with 5V, then 4.7k should still be correct. (You can always try using 3.3v to power the sensors as well - I have had some that needed that to work).

There shouldn’t be any difference as far as the wiring goes - just double check the resistor is pulling up to the VCC level you are powering the sensors from (5V or 3.3v, if you decide to try that)
 
Hmmm. Here's a read back of my connections, please see if you see something wrong in the transplant:

ESP32
pin 25 - Heat (was Arduino pin 6), connects to IN2 on relay
pin 26 - Cool (was Arduino pin 5), connects to IN1 on relay
pin 13 - connects to OneWire data (was Arduino pin A4)
GND - duplexed to GND pin on relay switch and GND on OneWire
VIN (5V) - duplexed to JD-VCC and power on OneWire
3.3V - connects to VCC on relay board

The relays power up when I turn it on (both indicator lights come up), but then both go off after a few seconds
 
I ended up reverting back to BPR with Arduino and RPi as I brewed today and needed the control :) . I'll wait for the bridge you are working on to get remote capability
 
Hmmm. Here's a read back of my connections, please see if you see something wrong in the transplant:

ESP32
pin 25 - Heat (was Arduino pin 6), connects to IN2 on relay
pin 26 - Cool (was Arduino pin 5), connects to IN1 on relay
pin 13 - connects to OneWire data (was Arduino pin A4)
GND - duplexed to GND pin on relay switch and GND on OneWire
VIN (5V) - duplexed to JD-VCC and power on OneWire
3.3V - connects to VCC on relay board

The relays power up when I turn it on (both indicator lights come up), but then both go off after a few seconds

That sounds reasonable to me, so long as you have the 4.7k resistor jumping Pin 13 to VIN (5V). It should work just fine, but there is always the possibility that - since there is a difference in the libraries in use - some sensors might not. There is a wiring test firmware -- but unfortunately, it assumes you have a screen connected.

The relays do power on when the controller is first powered up -- one of the changes that was made is to directly set the input pins as such rather than leave them floating. For inverted relay pins (which the Sainsmart-style 2 channel relay boards are) this has the effect of toggling them on (briefly) at boot.

I ended up reverting back to BPR with Arduino and RPi as I brewed today and needed the control :) . I'll wait for the bridge you are working on to get remote capability

Nothing wrong with that! If you have a spare SD card, it should be easy to play with the bridge functionality once it's available. My new Arduino "test shields" are ordered, and should hopefully arrive later this week -- I'm guessing we're pretty close to at least a public alpha after that.
 
Hey guys. Thanks for this awesome project.

So it has been 4 years since I last brewed, and now with the kids older I am getting ready to brew again. I was checking my hardware and my original brewpi with esp8266 and legacy fermentrack works perfectly. I am thinking about upgrading to fermentrack 2 to get the benefits of remote access to the data, should I bother to change my whole assembly to a ESP32 or the ESP8266 is enough?
 
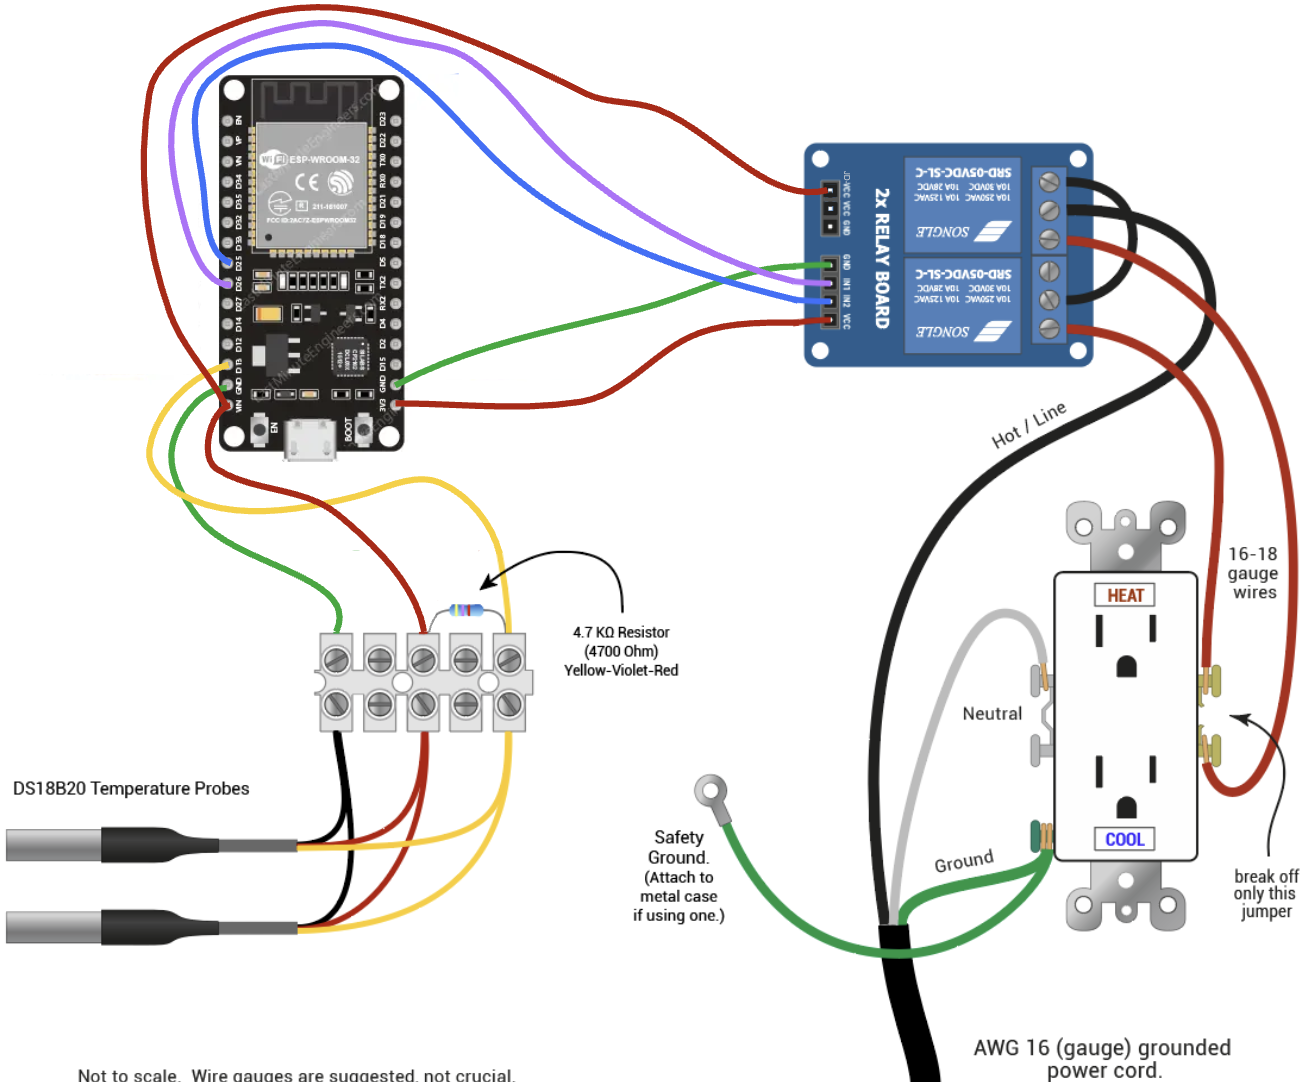
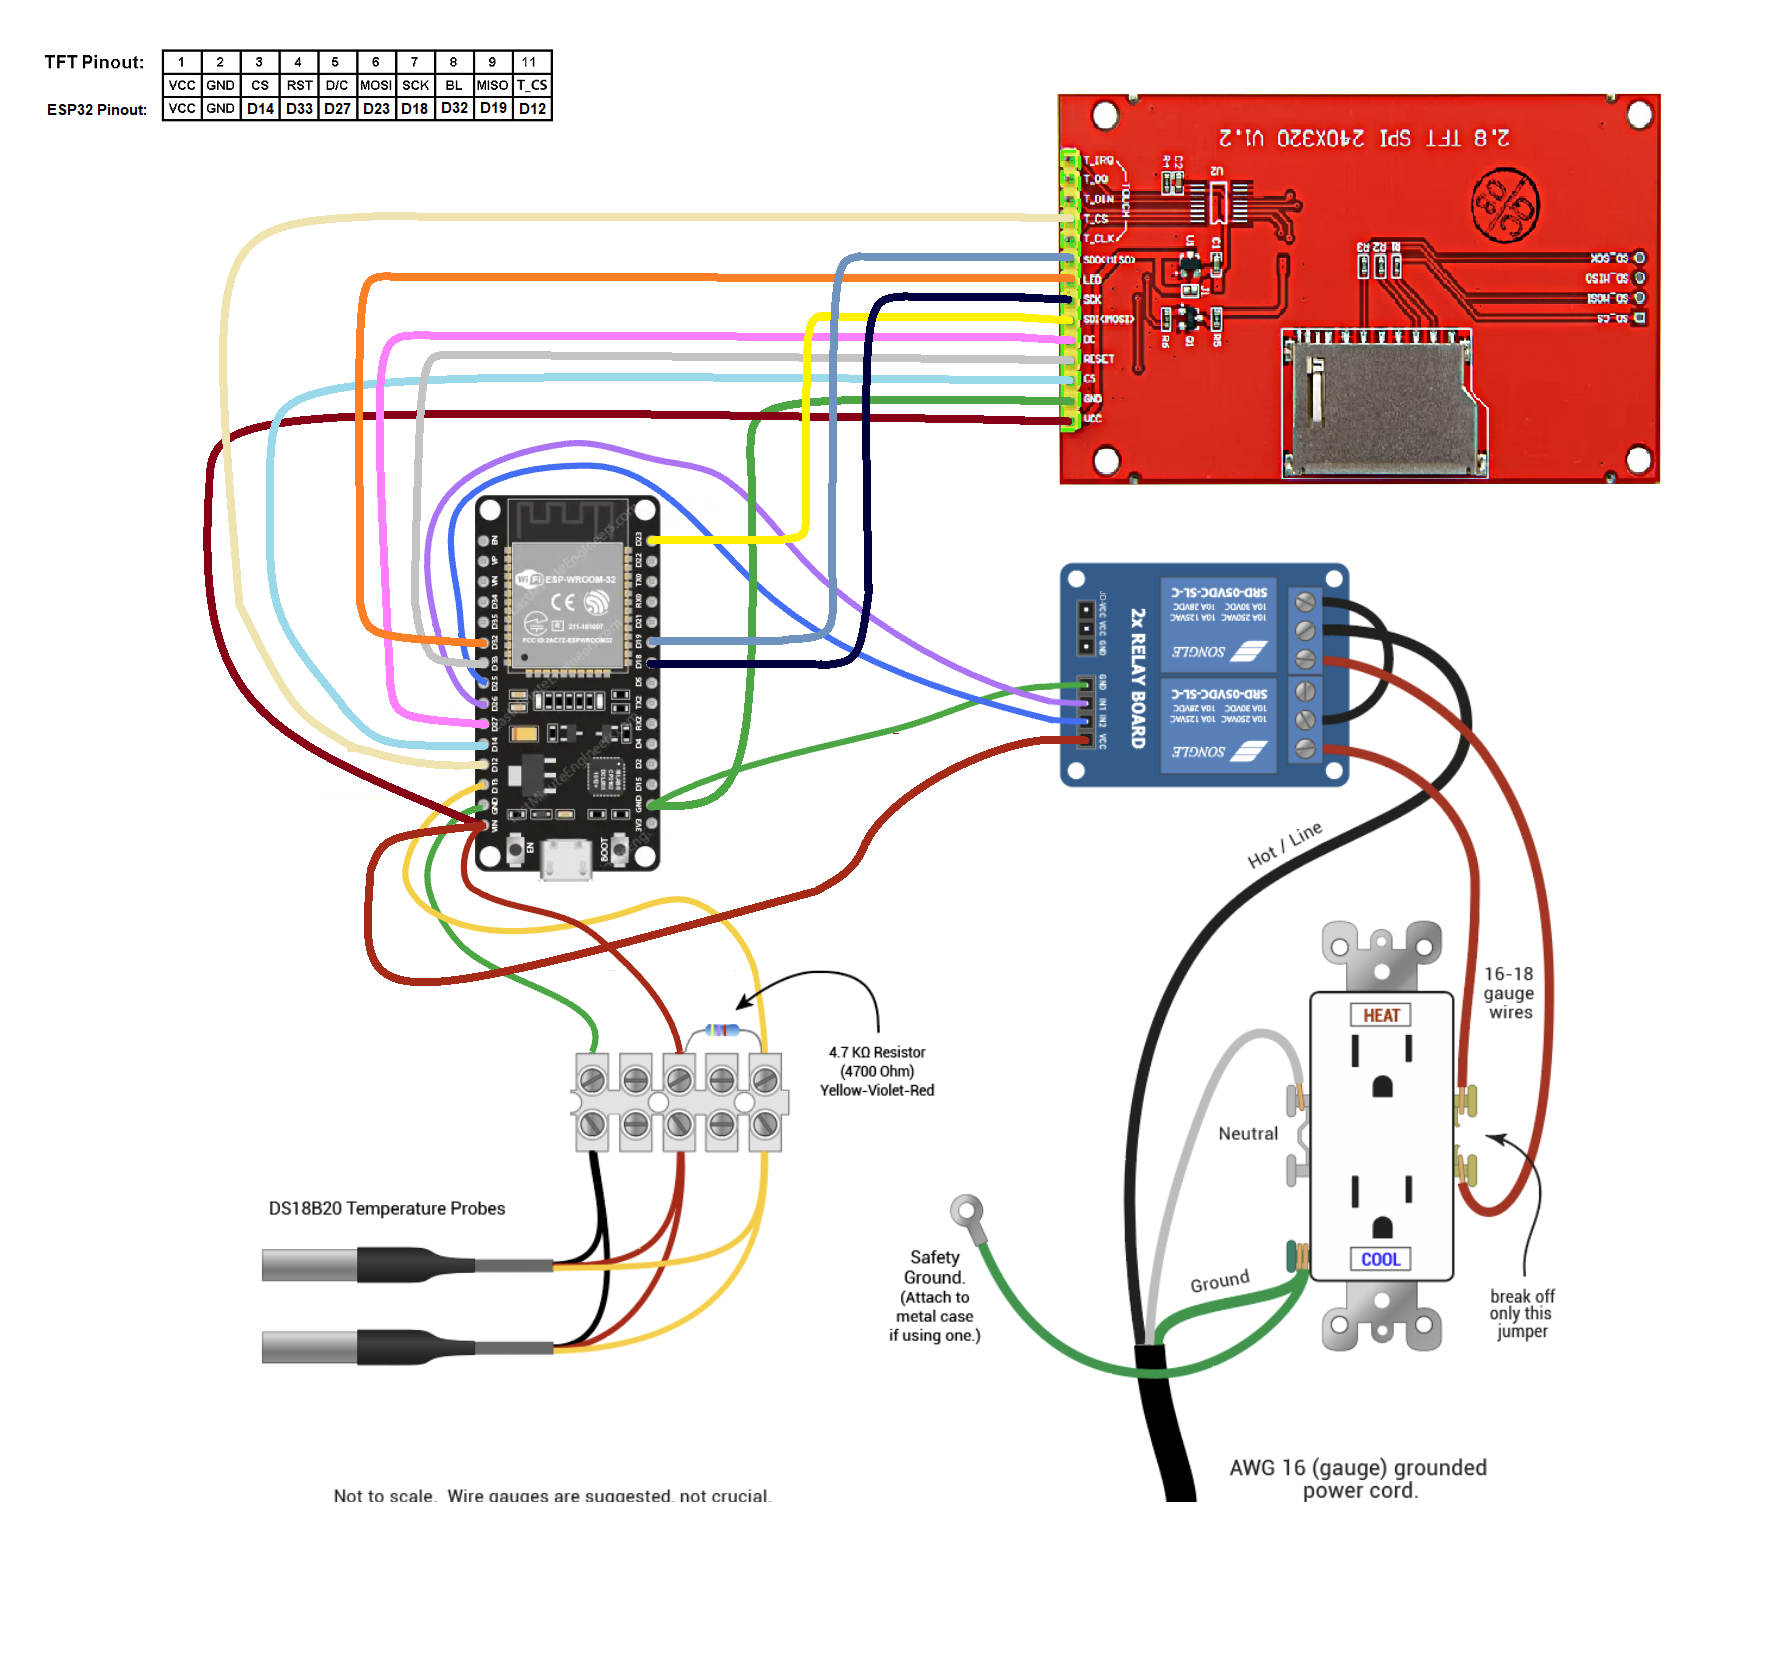
I have one with the TFT connected:
View attachment 874372
One issue I see with this one - the dark red wire you show going from "VCC" on the lower pin of the relay board to "VIN" on the controller should actually go to "3v3" on the controller, and a separate wire should go from "JD-VCC" on the relay board to "VIN". It might work fine like this, but you could end up where the relay won't toggle.
 
Hey guys. Thanks for this awesome project.

So it has been 4 years since I last brewed, and now with the kids older I am getting ready to brew again. I was checking my hardware and my original brewpi with esp8266 and legacy fermentrack works perfectly. I am thinking about upgrading to fermentrack 2 to get the benefits of remote access to the data, should I bother to change my whole assembly to a ESP32 or the ESP8266 is enough?

If you're happy with the setup you have, keep it -- just upgrade to the v16 firmware.

If you want to get Bluetooth sensor support, Kasa WiFi switch support, etc. then upgrade -- but you can always upgrade later.
 
Since there have been a few questions about this lately, I went ahead and drafted a more comprehensive blog post on the different controller options (ESP8266 vs. ESP32-S2 vs. ESP32).

The TL;DR is basically what I posted in response to @g_wood -- If you already have a build, keep it until you see a feature you want, and then upgrade. If you're starting fresh, go with an ESP32.
 
One issue I see with this one - the dark red wire you show going from "VCC" on the lower pin of the relay board to "VIN" on the controller should actually go to "3v3" on the controller, and a separate wire should go from "JD-VCC" on the relay board to "VIN". It might work fine like this, but you could end up where the relay won't toggle.
Yeah I thought about that too but I've been working like this for years and never had a problem.
And you know what they say: if it ain't broke don't fix it 😉
 
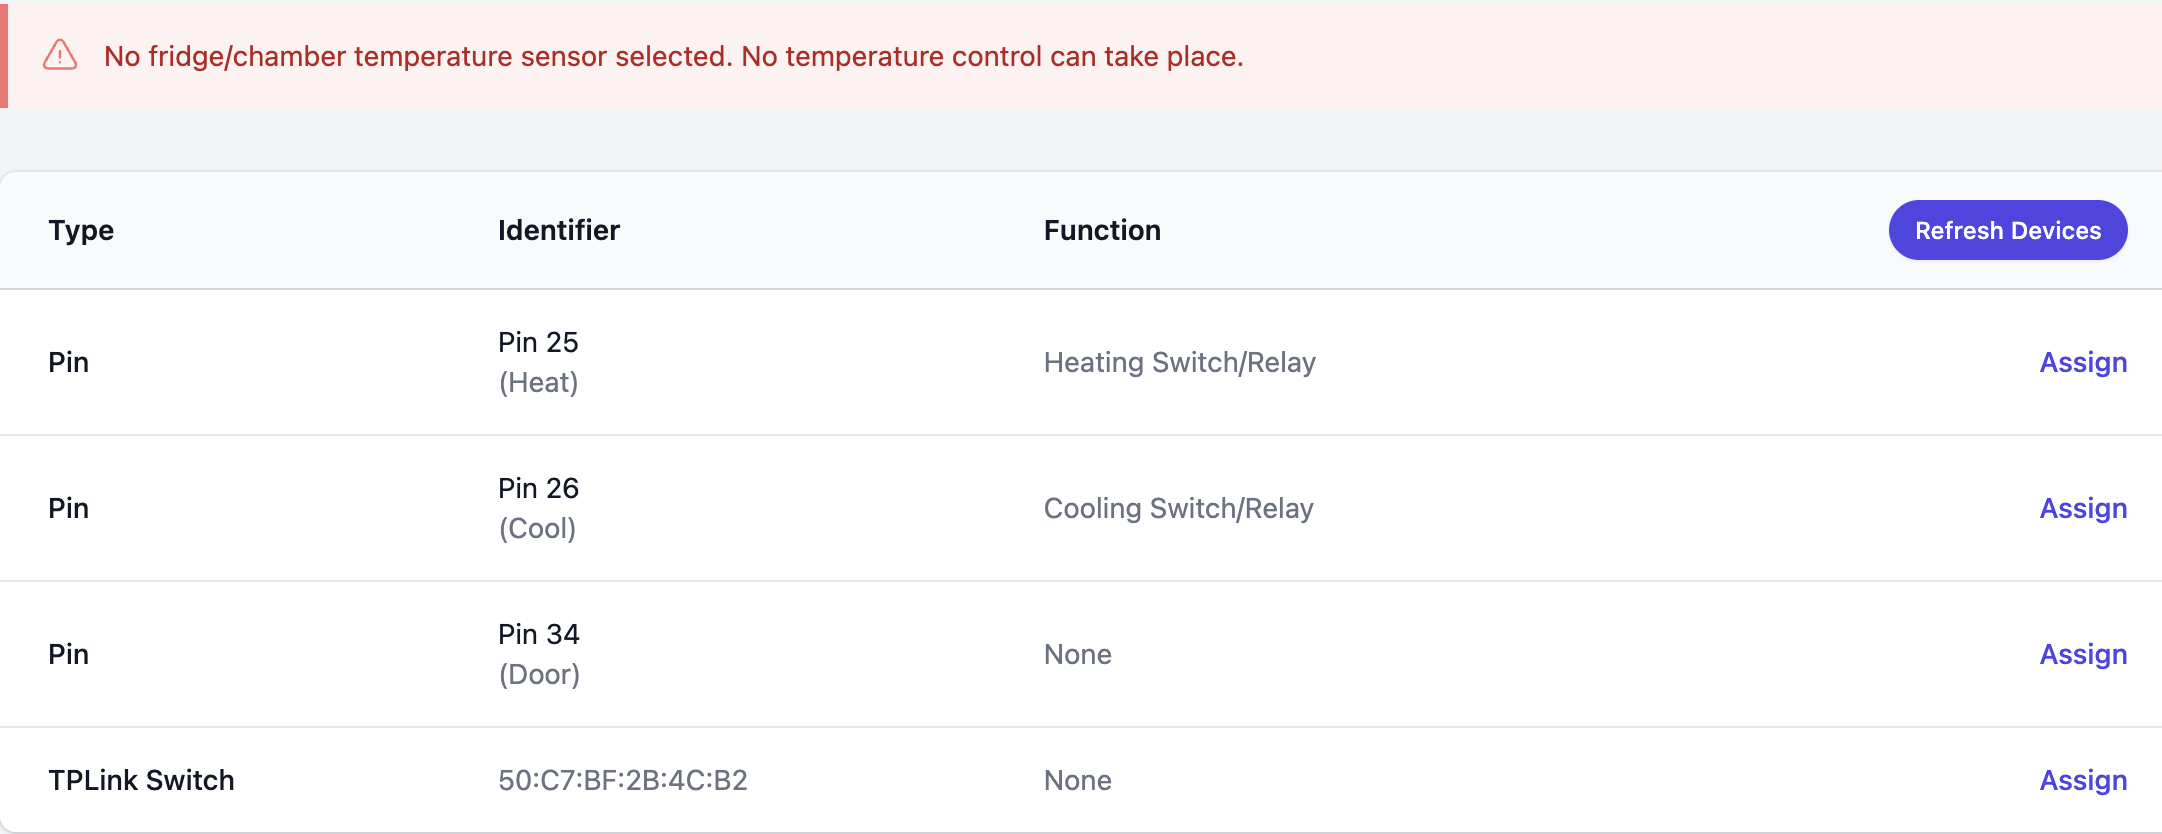
I am having trouble accessing the controller's web interface. I am using a ESP8266 Wemos D1 Mini chip and brewflasher.

I can sucessfully flash the controller - v16-beta1 - wifi version, baud rate 115200. I can access the wifi configuration page, and the controller can connect to my wifi. After that is hard to access the web interface. It keeps loading the page, sometimes I can see the webpage but it seems very slow. I have succesfully connected it to fermentrack 2, however.

Is this expected, to have a slow connection with the controller? Not sure if this impacts the connection of the controller to fermentrack.

That’s not too surprising, unfortunately. The ESP8266 doesn’t have all that much processing power under the hood, and the way that I pull the web interface from the device hits it with a number of requests all at once. If your browser caches some of the files you might notice subsequent hits are faster, but that’s very situational.

The nice thing is that from a temperature control perspective you’re fine. The slowness should only occur when loading webpages - all of the temperature control algorithms (and data sending!) are synchronous.

So, I connected it to Fermentrack 2, configured the pins and sensors and it looks like to be working perfectly. Thanks!

Two more questions

1 - the v16 version will not work with a OLED screen, right?
2 - Is it possible yet to connect Fermentrack 2 to Brewfather?
 
That's why I'm working on it - it becomes your choice at that point! ;)

The advantages to switching to an ESP32 are the removal of the need for a Raspberry Pi (if connecting to the BrewPi is the only thing you're using it for!), and the addition of a number of new features such as large screens, bluetooth temperature sensors, Tilt integration, and on-device controls. It's the device I target for new builds, and as such is where any new features that might get added will be found.

On the other hand, as you noted, the advantage of the Arduino is that you already have it built and sitting in your brewery -- which is abolutely not something to discount. If you don't care about any of those new features right now, then there's no requirement to upgrade right now. You can always come back and swap the controllers out at a future point.

The Serial-to-Fermentrack work is reasonably far along, but at the moment I don’t have an Arduino shield with temperature sensors, so it’s at least a week away from completion (depending on shipping!). Temperature sensors work perfectly with a serial ESP32-S2, so I’m not expecting any issues, but I’ve found one Arduino-specific bug, so there’s always a chance for more. Alpha testers are always welcome, but you’d have to both disconnect your BrewPi from BPR/Fermentrack and hook it to a dev copy of Fermentrack 2, so it’s not for the faint of heart.
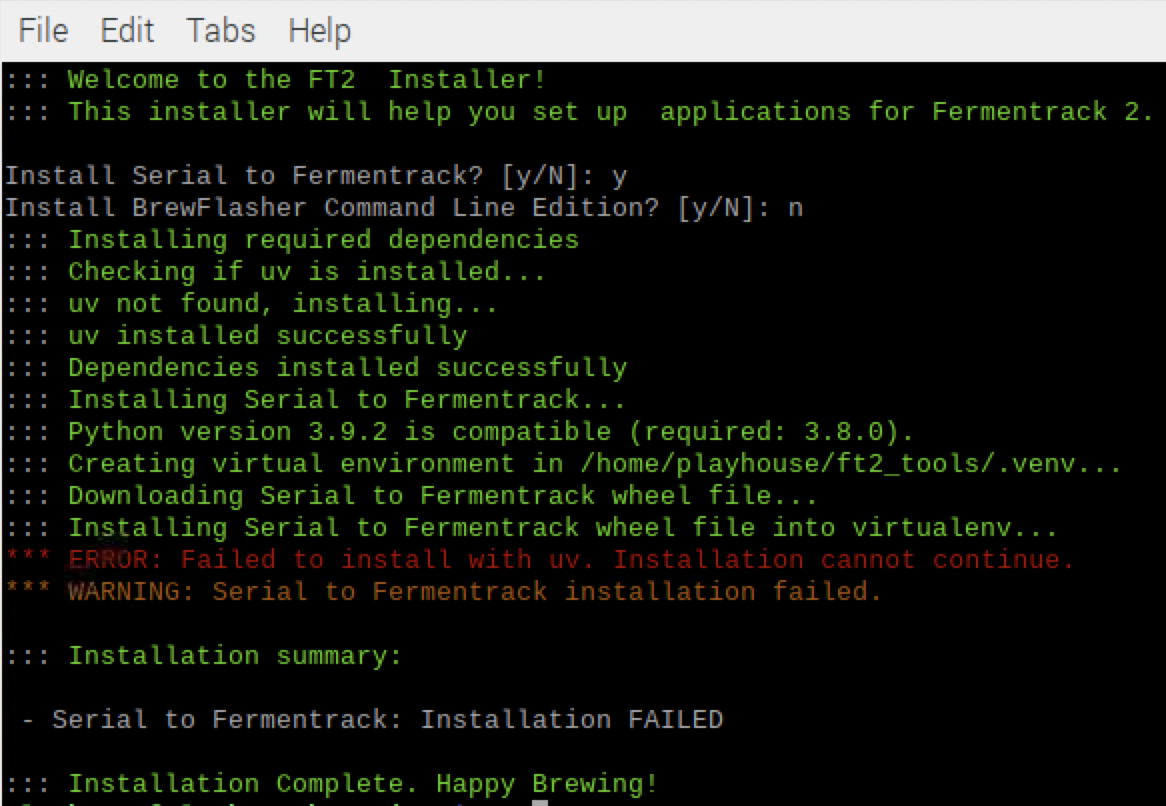
I installed the 'Fermentrack 2 Arduino (Serial) Support' following this page on your site. However, when I run the installer, it fails when installing the Serial to Fermentrack wheel file into virtualenv. Is there a permissions issue I need to consider? When I re-run the installer, it keeps saying uv is not installed even though it looks like it was in previous runs of the installer. Maybe it is the Python version check you are running (should be 3.1.1 instead of 3.11? The installer says greater than 3.8.0 is compatible?) Here's a screen shot followed by relevant log file section:

1746472215322.png


::: [38;5;76mInstalling Serial to Fermentrack wheel file into virtualenv...(B[m
× No solution found when resolving dependencies:
╰─▶ Because the current Python version (3.9.2) does not satisfy Python>=3.11
and serial-to-fermentrack==0.0.1 depends on Python>=3.11, we can
conclude that serial-to-fermentrack==0.0.1 cannot be used.
And because only serial-to-fermentrack==0.0.1 is available and you
require serial-to-fermentrack, we can conclude that your requirements
are unsatisfiable.
 
Last edited:
So, I connected it to Fermentrack 2, configured the pins and sensors and it looks like to be working perfectly. Thanks!

Two more questions

1 - the v16 version will not work with a OLED screen, right?
2 - Is it possible yet to connect Fermentrack 2 to Brewfather?

Awesome - glad to hear it!

1. Correct: Unfortunately there is no OLED screen support.
2. Not yet. "External push" support (ie. Brewfather) is coming, but after gravity sensor support


I installed the 'Fermentrack 2 Arduino (Serial) Support' following this page on your site. However, when I run the installer, it fails when installing the Serial to Fermentrack wheel file into virtualenv. Is there a permissions issue I need to consider? When I re-run the installer, it keeps saying uv is not installed even though it looks like it was in previous runs of the installer. Maybe it is the Python version check you are running (should be 3.1.1 instead of 3.11? The installer says greater than 3.8.0 is compatible?) Here's a screen shot followed by relevant log file section:

View attachment 874830

::: [38;5;76mInstalling Serial to Fermentrack wheel file into virtualenv...(B[m
× No solution found when resolving dependencies:
╰─▶ Because the current Python version (3.9.2) does not satisfy Python>=3.11
and serial-to-fermentrack==0.0.1 depends on Python>=3.11, we can
conclude that serial-to-fermentrack==0.0.1 cannot be used.
And because only serial-to-fermentrack==0.0.1 is available and you
require serial-to-fermentrack, we can conclude that your requirements
are unsatisfiable.

Heh. That's on me -- I had the minimum version set incorrectly in both the install script (it should be 3.9, not 3.8) and in the wheel (it should be 3.9, not 3.11). This script should work on both Bullseye and Bookworm (which ship with 3.9 and 3.11 respectively) - not just Bookworm.

Try now.
 
Awesome - glad to hear it!

1. Correct: Unfortunately there is no OLED screen support.
2. Not yet. "External push" support (ie. Brewfather) is coming, but after gravity sensor support


Heh. That's on me -- I had the minimum version set incorrectly in both the install script (it should be 3.9, not 3.8) and in the wheel (it should be 3.9, not 3.11). This script should work on both Bullseye and Bookworm (which ship with 3.9 and 3.11 respectively) - not just Bookworm.

Try now.
That worked, thanks for the quick update.
 
Hmmm, configuring does not seem to be working right (do I need to literally connect the Arduino to my computer over serial versus doing it over WiFi?). I was able to configure the Fermentrack.net connection, I then tried to configure the device remotely and got this first question, not sure where the list of devices comes from, I don't see any data that matches what Fermentrack.net 'sees':

[?] Select a device to configure or go back:
> /dev/ttyACM0 - ttyACM0 (Location: 1-1:1.0) [Not Configured]
/dev/ttyAMA0 - ttyAMA0 [NOT CONFIGURABLE - No Location]

Wasn't sure which one to use, but I assumed the first given the 'Not Configured' message. Got the following (I am currently running BPR to control a fermentation which is where the garbage responses are coming from I assume?):

Connecting to device...
Requesting firmware version...
Device responded with:
Invalid response - retrying in 2 seconds...
Requesting firmware version...
Device responded with: :"ode Beer Const. ","Beer 69.7 67.0 �F","Fride5. 4. F""oln o 0m5]
Invalid response - retrying in 2 seconds...
Requesting firmware version...
Device responded with:
Response does not start with 'N:' - not a BrewPi device.

ERROR: This device did not respond to the version info command, and therefore does not appear to be a working BrewPi connected via Serial.

Only working BrewPi devices can be configured.
Configuration cancelled.
Correct -- You can't have this set up at the same time as it's configured to work with BrewPi Remix (or legacy Fermentrack, for that matter). You might be able to sneak a configuration in if you're fast enough, but I wouldn't recommend it, as at best you'll encounter weird connection drops (and at worst you'll lose the ability to control your ferment from within BPR until you delete the FT2 tools configuration).
 
Back
Top