
So, Ive been a long time reader and learner, but I dont post very often. I have finally started to upgrade my system from its previous coleman cooler, 10 gal aluminum stove top boil kettle, to an all stainless, going to be all electric, 20 gal setup.
On my last 2 brew days, I have been working on some IPA recipes. First day, I didnt use a hop bag, on the second, I did. Both ended up with quantities of hop debris and break material in the fermenter that I was not happy with. So I was determined to figure out some way to reduce and possibly eliminate these problems from my next setup.
Going off of what I have seen on this awesome site, and some of the results people have been getting from their versions of a hop stopper, I decided to build mine own, with hopefully some beneficial changes/upgrades...
First, the list of parts:
Side stainless and weldless pick up tube from bargainfittings.com
http://greatbargain.net/opencart/index.php?route=product/product&path=44_35_46&product_id=94
Mesh screen - part number 9241T432 from Mcmaster.com
Stainless wire - part number 8860K11 from Mcmaster.com
Stainless Steel hose clamp


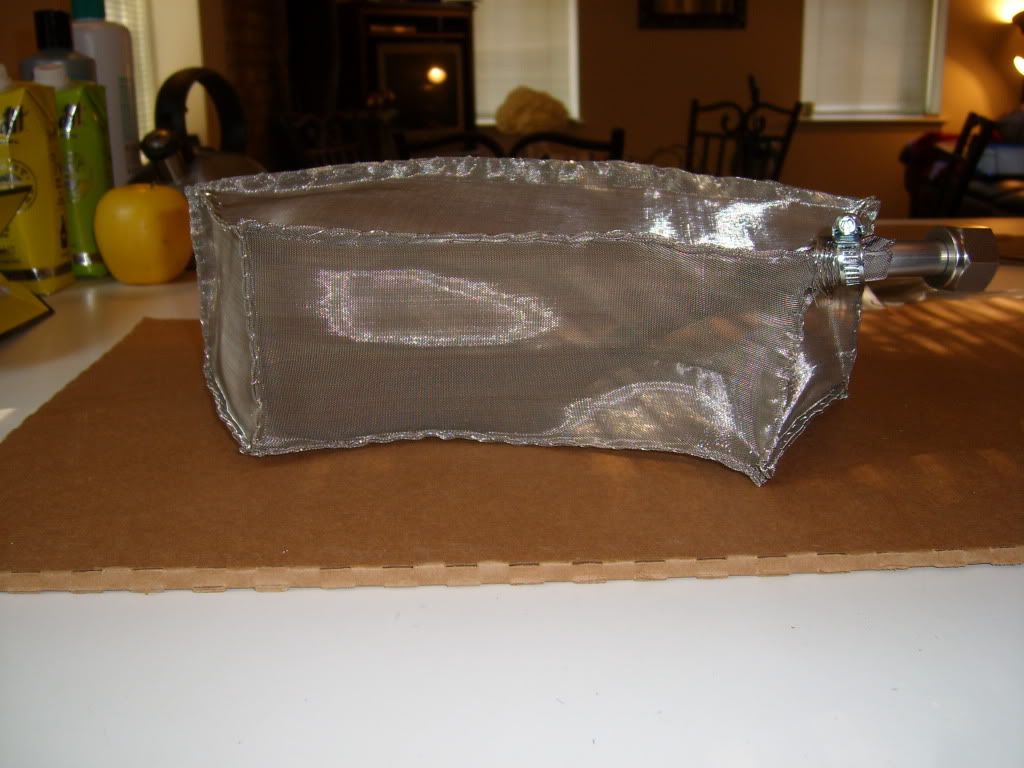
Now you will notice that the shape of the blocker is different than most, but the pancake shaped ones, to me, seem like they would:
1. be completely covered with hops when brewing an IPA or some recipe with a large hop load. Meaning the only way to filter the wort will be through the hops then through the stopper, causing a suction/plugging of the hop stopper when using a pump.
2. be useless if you like to whirlpool. If you whirlpool with the pancake shaped ones, you will end up with the hop/break material pyramid right on your blocker, kind of losing some of the point of whirlpooling.
I made the blocker as large as possible based on the amount of screen I got from Mcmaster. The screen ended up at almost 4 inches tall. With 2 inches of hop sludge and break material on the floor of the boil kettle at the end of a boil, would still leave me a 2 inch window all around the top to easily draw in the wort. The curved shape should also allow for a better flow when I turn the pump on and vigorously whirlpool for 20 or so minutes. Since its almost a box as well, the structure is pretty strong and rigid and it does not need to be reinforced.
This did take a while to make, and stitching through those tiny holes was frustrating, painful, and so time consuming. But I think that its going to turn out to be worth it!
I have a few more things to button up on the setup and I should be putting this to work very soon for some real world results. Until then, thanks for reading!
On my last 2 brew days, I have been working on some IPA recipes. First day, I didnt use a hop bag, on the second, I did. Both ended up with quantities of hop debris and break material in the fermenter that I was not happy with. So I was determined to figure out some way to reduce and possibly eliminate these problems from my next setup.
Going off of what I have seen on this awesome site, and some of the results people have been getting from their versions of a hop stopper, I decided to build mine own, with hopefully some beneficial changes/upgrades...
First, the list of parts:
Side stainless and weldless pick up tube from bargainfittings.com
http://greatbargain.net/opencart/index.php?route=product/product&path=44_35_46&product_id=94
Mesh screen - part number 9241T432 from Mcmaster.com
Stainless wire - part number 8860K11 from Mcmaster.com
Stainless Steel hose clamp
Now you will notice that the shape of the blocker is different than most, but the pancake shaped ones, to me, seem like they would:
1. be completely covered with hops when brewing an IPA or some recipe with a large hop load. Meaning the only way to filter the wort will be through the hops then through the stopper, causing a suction/plugging of the hop stopper when using a pump.
2. be useless if you like to whirlpool. If you whirlpool with the pancake shaped ones, you will end up with the hop/break material pyramid right on your blocker, kind of losing some of the point of whirlpooling.
I made the blocker as large as possible based on the amount of screen I got from Mcmaster. The screen ended up at almost 4 inches tall. With 2 inches of hop sludge and break material on the floor of the boil kettle at the end of a boil, would still leave me a 2 inch window all around the top to easily draw in the wort. The curved shape should also allow for a better flow when I turn the pump on and vigorously whirlpool for 20 or so minutes. Since its almost a box as well, the structure is pretty strong and rigid and it does not need to be reinforced.
This did take a while to make, and stitching through those tiny holes was frustrating, painful, and so time consuming. But I think that its going to turn out to be worth it!
I have a few more things to button up on the setup and I should be putting this to work very soon for some real world results. Until then, thanks for reading!
 ... Im in the process of moving, and with this being my first electric setup, I am still working out the last wiring and control issues. As soon as I have some findings, I will definitely be updating this thread!


