My Weldless Build Using Strut

Homebrew Talk - Beer, Wine, Mead, & Cider Brewing Discussion Forum

Help Support Homebrew Talk - Beer, Wine, Mead, & Cider Brewing Discussion Forum:

This site may earn a commission from merchant affiliate links, including eBay, Amazon, and others.
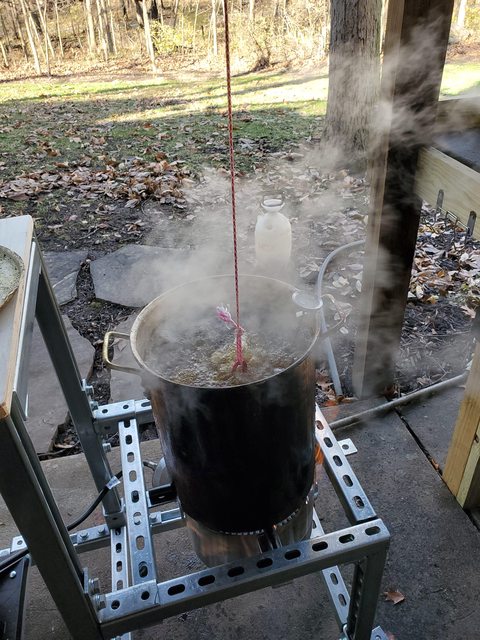
Here are some pics from the opening brew night on the rig. Real happy with the direct fired mash. With these burners I was worried they would create too much heat even on the lowest setting. Not so. When the temp hit 150 I would kick on the burners as low as I could keep it, and with a good recirc flow, it would take about 5 mins for it to get up to 154. Nice even temp rise. Otherwise, pretty uneventful. Next up is the Honeywell 8200 gas valve with standing pilot so I can actually use the output from my Auber controller.

View attachment 81389

View attachment 81390

View attachment 81391

Sorry for the thread revival, but what kind of tubing is that? Silicon, PVC, etc? Always curious about the tubing with the liner marks on it and what the difference is. If I recall its harder, I'm looking for something to put at the end of my counter-flow chiller as currently I have nothing but a male threading right off the the chiller. I think adding tubing will help with flow and increase cooling impact.
 
Mine is aluminum and I've never had a problem even with two Blichmann burners on full.

19601367_1902996939942569_6741070863227129063_n.jpg


The Blichmann legs are just bolted onto angle pieces, which in turn are bolted to the strut. It has never felt anything but rock solid, even with 2 batches going at once.

19598536_1903000456608884_985673621423110799_n.jpg


It's light enough that I've even lifted it into a utility sink to clean off the baked-in grime of a thousand gallons of wort-boiling.
I know I’m super late to this thread but I am unable to see your pictures..... could you please repost them as I am building an aluminum brew stand as well. Just about to weight and heat test it tomorrow.
 
In case anyone is looking to build one of these in the San Diego area, I have one that I am looking to sell. The stand is great, but I’m selling all my equipment since I don’t have time to brew anymore. It is a 2 burner setup with the big 100k btu burners, heavy duty casters, and propane lines/valves. It is basically brand new, I only got to use it a couple times. Originally ~$400 of parts in selling for $200.

Pics at https://www.homebrewtalk.com/forum/threads/selling-all-my-gear.675754/
 
So i was at menards this morning and looked at the strut. My store has galv and the 'permagreen' kind. What's anybody's experience with the green?

The unistrut site talks about an electro acrylic process. Sounds kinda like what I'd call powder coat.

I plan to make a 1.5 or 2 tier small stand. But I wonder if the green would be better for flame and zinc flu concerns?
 
This is the type (although bought from a supply house) that we use at work.
the coating will not hold up to the heat. It will bubble and melt. It is not a high heat coating. just one to protect from corrosion.
I guess I found my answer. Probably not what I want to use!
 
Any advice on how to best de-burr the strut edges after cutting? A metal file? Sanding drum? Thx!
 
Last edited:
I'm looking to build one of these. I'm eyeing the hellfire burners while I'm at it. I plan to di a two tier with one burner. Mounted under the lower tier

Do I need the one with legs or the one that goes with the blichmann stand?
 
Last edited:
The standard Hellfire burner includes squat legs virtually identical to the predecessor Floor burner (which used a bg14 element).

1597725674976.png


The outer edges of the four legs have pre-drilled holes that could be exploited for mounting in a stand. Eg: I welded mounting tabs to the underside of this frame and ran bolts through them and the burner "legs"...

P9030043.JPG


P9030048.JPG


This setup provides plenty of shielding and spacing to the frame such that if its powdercoated or high-temp painted it will survive unscathed...

Cheers!
 
The outer edges of the four legs have pre-drilled holes that could be exploited for mounting in a stand. Eg: I welded mounting tabs to the underside of this frame and ran bolts through them and the burner "legs"...
you can check out my build for a mounting variation: i put L-brackets on those side-holes before mounting them which allowed me some wiggle room. i also went diagonal (45*), instead of day_trippr's square (90*) mount. lots of possibilities. i'm really happy with my hellfires.
 
Last edited:
Sounds like the standard one should be fine.

My birthday is in a few weeks. Maybe a good birthday present for myself! :yes:
 
Maybe some folks could chime in to see if my idea will fly. I just bought my strut, brackets, bolts, and nuts for my brew stand, and I want to make sure my setup is legit before I build the stand. I have two 16 gallon kegs converted to a HLT and a BK and a chest cooler for my mash tun with input in lid for fly sparging.
I want to fill the HLT, get it up to temp, and do a slow, continuous fly sparge pumping from HTL to top of mash tun then draining back into the HLT by gravity. I will keep the temp controlled in the HLT with a valve controller (like the Honeywell mention by gifty) on the propane line feeding the burner. After mash, pump wort from HLT over to BK and boil with 2nd burner. Then get another batch going while the first one is boiling, having the 2nd batch ready for boil after first is done. Shooting for 10 gal per batch.
 
I want to fill the HLT, get it up to temp, and do a slow, continuous fly sparge pumping from HTL to top of mash tun then draining back into the HLT by gravity.
fyi what you are describing there isn't continuous fly sparging. that's a recirculating mash, a sort of a RIMS. as you recirculate, the sugars will become homogenized through the mash.

fly-sparge = pouring "new" (clean) water over the top and draining into the boil kettle - single pass-through, no return to the mash-tun.
sweetcell thanks for the input.
I'm not good with all the terminology yet, but do you see this method working, or is there a fundamental flaw in what I'm trying to do? Would it be better to just do a slow fly sparge over 90 minutes?
 
do you see this method working, or is there a fundamental flaw in what I'm trying to do? Would it be better to just do a slow fly sparge over 90 minutes?
yes, this should work... however, i have a few questions so i can better understand what you're planning :)

once you have your hot water and grain mixed into your cooler, why not just leave it alone and let the mash rest for 30 to 60 minutes? your chest cooler should keep temperature relatively stable, no? or have you experienced major heat loss, so you need the ability to add heat?

i myself do something similar, except that my mash-tun is a stainless kettle wrapped with insulation (Reflectix). when my temps drop more than 4 degrees below my target, i turn on the flame under my MT and recirculate by pulling warmed wort out via the false bottom and dumping it on top (where the wort is cooler). i don't have a controller, i just do it manually... i've gotten very comfortable with my system and i can control the temps by varying how big the flame is and how fast i recirculate.

sounds like you're looking to do the same thing, but instead of heating in the mash tun you're moving some wort to "secondary mash-tun", heating it there, then returning it to the MT. this is essentially a RIMS (link 1, link 2). as long as your controller can maintain temps your system should work just fine. suggestion: put your temp probe after the heat - i.e. between the heating kettle and the MT. set that temp to be a few degrees higher than your desired mash temp. if you want to mash at 150, i would set it at 152.

using you HLT as the heating vessel will work great as long as you don't intend to sparge (AKA full volume mashing). if you do want to sparge, you'll need to use a different vessel for heating - the boil kettle would be ideal for this. so while you're recirculating your mash between MT and BK, you can heat your sparge water in the HLT.
Thank you again. I guess I could just mash in the cooler, but I thought recirculating slowly through the HLT may get better conversion of the grains. Guess I'll use a lot more propane that way than I would just mashing in the cooler.
I appreciate your ideas on how to do this. I just want to have the best set-up planned that makes the best use of the HLT, BK and the chest cooler mash tun I have, before I put the brew stand together.
I'm a little unclear why sparging would have to be done between the BK and the MT and not from full volume of the HLT to cooler to BK over a 90 minute period? (I'm a newb at all this, yet I try to be creative; dangerous combo! that's why I'm staying away from electricity:))
 
I'm a little unclear why sparging would have to be done between the BK and the MT and not from full volume of the HLT to cooler to BK over a 90 minute period? (I'm a newb at all this, yet I try to be creative; dangerous combo! that's why I'm staying away from electricity:))
i wonder if we're mixing up several different techniques/approaches here...

first off, do you plan to do full-volume mashing? AKA you start with all your water in the mash tun. once the mash is complete, you drain all of the wort to the BK and start the boil. single step, no sparging involved.

alternately, and this is the more traditional approach, you do a partial-volume mash. you add, say, 60% of your water (typically between 1.25 and 1.5 quarts per pound of grain), mash with that, then you either (a) remove the wort, refill with 40% sparge water, mix & rest, the drain to BK (AKA batch sparging); or (b) you slowly start draining the wort from the bottom while slowly filling fresh warm sparge water at the top, so that the fresh water slowly descends through the mash and pushes out the sugars (fly-sparging).

so in my previous post, i assumed you were doing a partial-volume mash - and thus would need heated sparge water at the end of the mash. if you recirculated your mash through your HLT for heating, where would you heat your sparge water? my proposed solution was to use the BK instead for heating the mash. while you were recirculating between MT and BK, you could be heating your sparge water in the HLT. but if you're doing full-volume mashing, then yeah - the HLT will work because you don't need it for heating sparge water.

you could simplify your process by only using the cooler and not bothering to recirc. once you get the process dialed in it's really easy and predictable. software like BeerSmith makes calculating how much water and at what temp a breeze.
I‘m not sure I could fit 15 gallons in my cooler in two batches for mashing, so I was thinking about going the full volume route. Plus, with the propane controller, I could do rests as I get up to temp.
 
I‘m not sure I could fit 15 gallons in my cooler in two batches for mashing, so I was thinking about going the full volume route.
i'm sure it's all on me, but i'm confused :)

full-volume mashing requires a bigger MT than partial-volume. regardless of which approach you take, you'll be using the same volume of water - so the question is do you add it all at once thus requiring a bigger MT (full-volume); or will you split the water into primary mash and sparge water, adding them at different times, thus requiring a smaller MT?

regardless #2 of which approach you take: you add all your grain at the beginning.

therefore, i am confused by your statement: "not sure I could fit 15 gallons in my cooler in two batches for mashing." #1, there is no reason why you would need to split your mash into two batches. regardless of full- vs. partial-volume, you mash all your grains at once in a single mash...
 
Last edited:
i'm sure it's all on me, but i'm confused :)

full-volume mashing requires a bigger MT than partial-volume. regardless of which approach you take, you'll be using the same volume of water - so the question is do you add it all at once thus requiring a bigger MT (full-volume); or will you split the water into primary mash and sparge water, adding them at different times, thus requiring a smaller MT?

regardless #2 of which approach you take: you add all your grain at the beginning.

therefore, i am confused by your statement: "not sure I could fit 15 gallons in my cooler in two batches for mashing." #1, there is no reason why you would need to split your mash into two batched. regardless of full- vs. partial-volume, you mash all your grains at once in a single mash...
No problem. Since I don't understand all the terms yet, I'm sure I'm not communicating very effectively. What I meant by the mash cooler being too small was that after I fill it with grain and strike water and let it mash for 90 minutes, after I empty that into the BK, I don't think filling the cooler again with sparge water and after 20 minutes emptying that into the BK would give me a full 15 gallons. Of course, I could just do another sparge until I reach my intended volume, or I could just fly sparge, but then I'm still adding more time and more steps to the brew. If I did the full volume method I was thinking of originally, I would slowly recirculate a full 15 gal HLT through the mash cooler (in through the lid, through the grain bed and out the bottom spout, then gravity fed back into the HLT) After the 90 minute recirculating mash is finished, I pump it over to the BK to boil, and then refill the HLT and start heating while I clean the mash cooler out and get it ready for new grain and new water from the HLT when it's up to temp. The HLT burner will have the temp controller so I can stop the heat for rests to activate other enzymes as I work my way up to the 153F alpha and beta amylase optimal enzymatic temps.
 
What I meant by the mash cooler being too small was that after I fill it with grain and strike water and let it mash for 90 minutes, after I empty that into the BK, I don't think filling the cooler again with sparge water and after 20 minutes emptying that into the BK would give me a full 15 gallons.
ah ha. between the above and the quoted passage below, i finally understand what your proposed process is. first thing that comes to mind, and this likely isn't very helpful, is just get a bigger cooler. but assuming you want to stick with your smaller cooler, only:

If I did the full volume method I was thinking of originally, I would slowly recirculate a full 15 gal HLT through the mash cooler (in through the lid, through the grain bed and out the bottom spout, then gravity fed back into the HLT) After the 90 minute recirculating mash is finished, I pump it over to the BK to boil, and then refill the HLT and start heating while I clean the mash cooler out and get it ready for new grain and new water from the HLT when it's up to temp. The HLT burner will have the temp controller so I can stop the heat for rests to activate other enzymes as I work my way up to the 153F alpha and beta amylase optimal enzymatic temps.
this should work. the one concern i have is about the initial temp equalization at mash-in, due to the fact that so much of your mash liquor will be external to the mash tun. it's a solvable problem, tho.
 
ah ha. between the above and the quoted passage below, i finally understand what your proposed process is. first thing that comes to mind, and this likely isn't very helpful, is just get a bigger cooler. but assuming you want to stick with your smaller cooler, only:


this should work. the one concern i have is about the initial temp equalization at mash-in, due to the fact that so much of your mash liquor will be external to the mash tun. it's a solvable problem, tho.
I plan on solving the temp issue by first getting the HLT to the desired temp with the propane controller, and have separate thermometer in the top half inch of the grain bed. I will slowly increase temp in the HLT until the grainbed is at the ideal temp while everything is recirculating.

So the final brew stand design will be identical to gifty’s with the addition of a shelf 24” high (on the side of the stand that has the propane controller on the burner) to set the mash cooler on so that gravity can refill the HLT while the pump slowly trickles wort back up into the top of the cooler.
 
I used my rig to fry my turkey on Thanksgiving. I've had it done for about two months now. Need to get another couple batches brewed before it gets real cold. :ghostly:

o81lS9ol.jpg
 
I plan on solving the temp issue by first getting the HLT to the desired temp with the propane controller, and have separate thermometer in the top half inch of the grain bed. I will slowly increase temp in the HLT until the grainbed is at the ideal temp while everything is recirculating.
took me a while, but i've finally figured out the issue i have with having so much of your mash liquor sitting in the HLT: in order to heat up the mash, you will need to infuse water/wort that is warmer than your target temp. if you want your mash at 154*F, you'll need to add 158*F water/wort from the HTL (hypothetical numbers). and that liquor is going to oscillate around 158, going a bit under and a bit over. if you added 154*F to the mash, it would tend towards 154 but wouldn't ever achieve that temp. so your grains will be at one temp in the mash while the majority of the liquor will be at a different, higher temp in the HLT.

(standard RIMS systems only heat a small portion of the liquor (ex: whatever is inside the RIMS tube), so while there is a differential it's limits to a very small percentage of the mash liquor.)

is this a major issue? probably not. with modern-day, hyper-modified malts that temp differential won't make much of a difference and conversion will happen just as easily at 154 as it will at 158.
 
I built my stand in 2013.

I just reworked my stand to add a 3rd jet burner.

Strut is getting crazy expensive. I had to add a few SS pieces and some SS parts. I think the total for the upgrade was pretty close to what I originally paid in 2013.

x16fji5c.jpeg
 
For anyone who is thinking about building one of these, I am selling my 2 burner setup for half what it cost several years back (San Diego area). Attached is a pic and here is my for sale post: For Sale - 10g System (together or part out) - San Diego CA

I'm not sure if this sort of cross post is allowed, but I am doing so because I would have appreciated it when I was trying to find all the parts to do this myself. If this isn't allowed, please let me know and I will delete this. Sorry in advance!
 

Attachments

  • Brew Stand.jpg
    Brew Stand.jpg
    2.1 MB · Views: 27
It's been a while since this thread has seen any new activity, but I thought I would show off my just completed build. I've read this entire thread multiple times and there are so many good ideas that I "borrowed". The cost of materials have certainly increased since this thread first started - the best price I could find for 12-gauge Superstrut was $44 for a 10' stick at HD. Those of you thinking of getting into this, the previous place where everyone purchased their strut fittings seems to not exist any more, but I found this place: Fittings | Discount Strut Accessories , which had surprisingly good customer service. I picked up the bolts and washers though from Amazon. As described in this thread, I made my own burner mounts by cutting and bending 14-gauge flat bar and drilling holes in my burner wind screens (I also chopped off their legs and tops). All the cuts for everything were made with my reciprocating saw (sawzall), which worked just fine (I stressed a lot about whether I should rent a chop saw or not, but it wasn't necessary). I haven't burned it in yet to get rid of some of the galvanized coating, but I just mounted my RIMS tube (not shown) yesterday (directly to the front of the stand to the right of the MT in the middle). The pumps are held to the strut by 3" superstrut pipe straps. I'll update with another pic when everything is running, probably next week.

IMG_1169.jpeg
 
Looking awesome!! My build, as part of the original post back in 2012, is still going strong. I don't brew as much as I used to, but usually get it going in the cooler months. I've adapted mine to use a recirculating infusion heat setup for mashing (smaller BG12 burner), and then a larger jet burner to get the boil going quicker. Tweaked it over the last 10 years to get it just about where I want it. Love my Spike 15gal mash tun. The false bottom / dip tube setup is awesome. One of the best upgrades in the last 10 years for sure.
 
Thanks! It's great to see months of obsession more or less finalized. I was also doing a direct-fired recirculating mash for years, but very recently switched to a RIMS tube setup (using Bobby's kit from BrewHardware). So only 2 burners now. Thanks again for starting out this post, it has amazing legs.
 
A Milwaukee bandsaw is the best investment for any fabrication work. Just out of curiosity, why 3 kettles, why not get a 55 Gallons stainless barrel, a stand and jet burner. I made stirring system with a wheelchair motor a couple pillow blocks and a friend who is a fabricator. Attached is a pic of one for my 20 gallon/ 100 litre kettle.

I used triclamps on my stills, but since I use all silicone hose, I can run the supply line from kettle to the fermentor in a loop with the kettle boiling water and it pretty much ills everything after 20 min. T
 

Attachments

  • fb0ab980-0597-4e42-b9c6-d00b2e5ada94.jpg
    fb0ab980-0597-4e42-b9c6-d00b2e5ada94.jpg
    97.4 KB · Views: 0
  • b5978ab4-fc1b-4ee0-a9b6-b83299939f8b.jpg
    b5978ab4-fc1b-4ee0-a9b6-b83299939f8b.jpg
    90.7 KB · Views: 0
  • fcdb91d0-69e3-4879-9e8a-82e9371f4f10.jpg
    fcdb91d0-69e3-4879-9e8a-82e9371f4f10.jpg
    104 KB · Views: 0
Last edited:
I already had the Sawzall for other projects around the place. A bandsaw definitely would have been easier, but not on my to-buy list.

I like the 3 kettle setup so that I have one for the hot liquor tank, one for the mash tun, and another for the boil kettle. It matches how I think about my brew day. My batch sizes are normally 5-6 gallons with the possibility to do 10 if I want. I've recently upgraded my setup with 3-way valves so that I don't have any messy hose changes.

IMG_1194.jpeg
 
You are a purist. I hope to go all grain someday. I am overseas and it is far more efficient to use DME than whole grain. Now I understand . Your setup is perfect for your method. You also have a lot of free space to plumb and work. I have to move the stove out of the kitchen for brew day. One of the issues I face is my location prohibits alcohol. It is extremely expensive so the operation is of necessity almost as much as hobby. As I use a modified chest freezer as a kegerator, one of the nice things is I lock it and have a wireless relay connected to the liquid line to be able to remotely shut off the flow if I see some guest are getting carried away .

When you have beer in a dry country sometimes it is hard to get rid of guests.

I have resorted to a remote control relay behind the breaker panel that connects Line to Ground via a 50 Watt 1 K resistor ( 250 ma) . That trips the main GFCI / ELCB breaker of the whole first floor (Important equipment is on a UPS) So if the beer flow shutdown doesn't do the trick , the darkness will. I just do not like to be rude. Even if there is a wanna be electrician in the crowd,,, He can reset the breaker...I just trip it from the key fob in my pocket every time he does.
 

Attachments

  • go away.JPG
    go away.JPG
    50.2 KB · Views: 0
Yes, a couple of years ago we moved into this new house with lots of space available in the garage to use for brewing. It's quite a luxury. Sounds like you're brewing under pretty challenging conditions. Fortunate that you can even get your hands on DME, hops, yeast, etc. Really clever how you've set up your beer kill switch. Your friends must think you have really unstable wiring in your place :) Cheers!
 
Back
Top