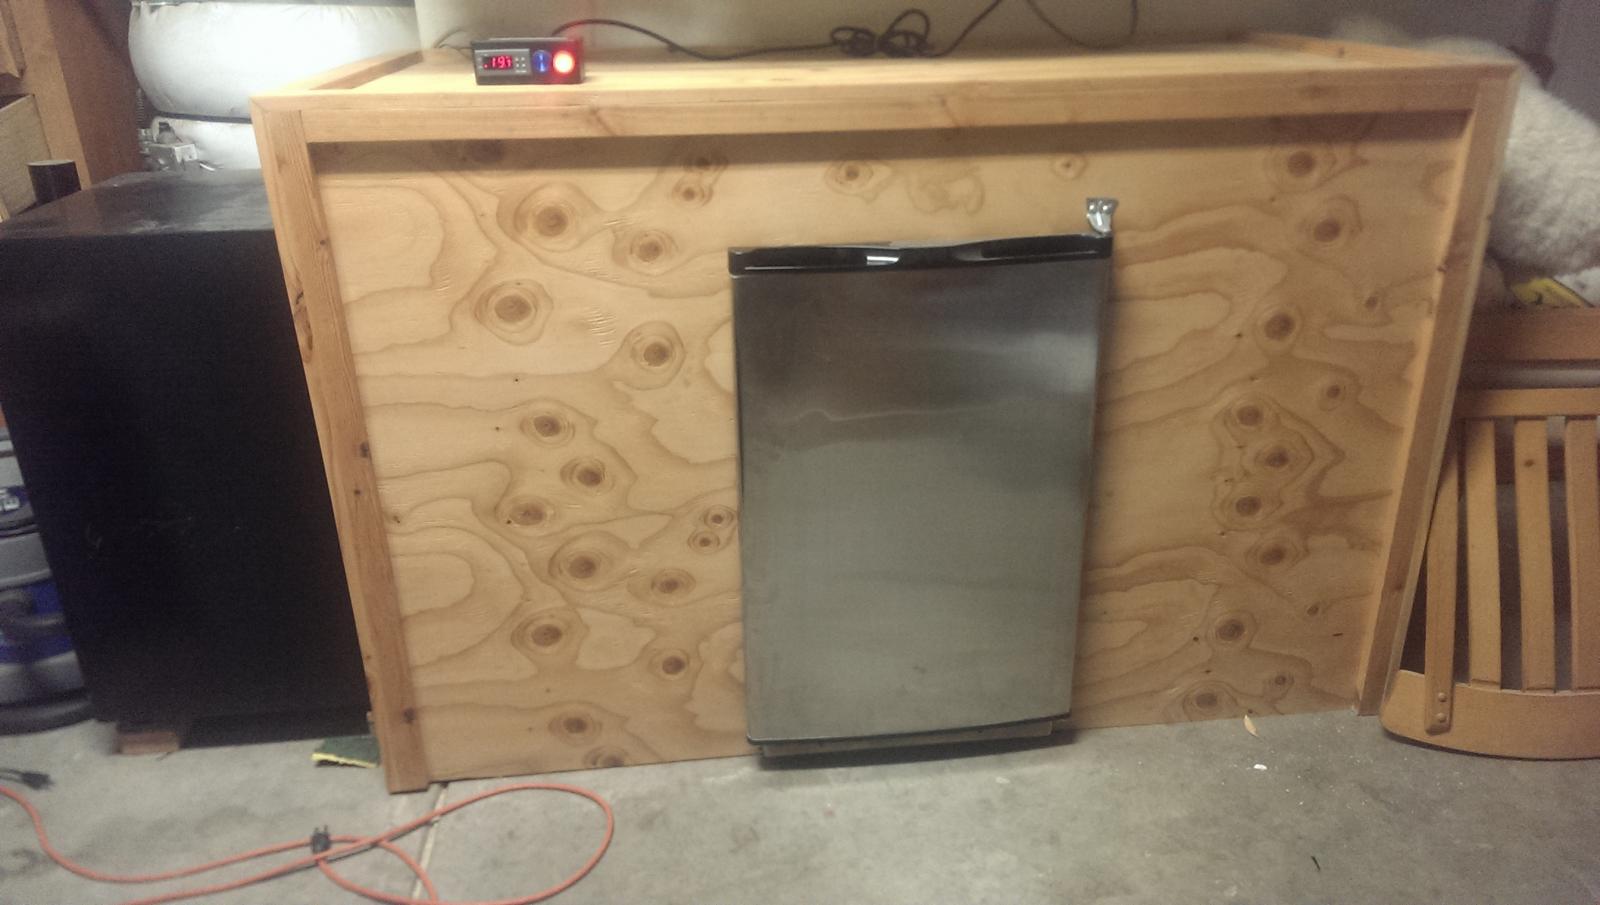
My Mini Fridge to Fermentation Chamber Build

Homebrew Talk - Beer, Wine, Mead, & Cider Brewing Discussion Forum

Help Support Homebrew Talk - Beer, Wine, Mead, & Cider Brewing Discussion Forum:

This site may earn a commission from merchant affiliate links, including eBay, Amazon, and others.
6 degrees outside this morning and the ferm chamber is holding a steady 68 degrees with no problems. My garage is pretty close to freezing but the little buddy heater is working great in the chamber.

Have run probably 300 gallons of beer through the ferm chamber now and have had zero problems. Set it and walk away. Still the best thing I've ever built.
 
Happiness is 30 gallons of beer fermenting away under full temp control.

IMG_20130223_163638_zpsf2037f40.jpg
 
I just build my own chamber based off (read: stolen from) this design and it is working out great! Thanks for the inspiration and ideas...

I went with the STC-1000 for a controler. Also, I was limited in terms of space to the width of my closet, but I can still ferment 15 gallons no problem (plenty for me), plus I've got room for a 2L starter on a stir plate (which is controled via one of the switches on top of the box the controler is mounted to) and could maybe squeeze in one 5 gallon keg for aging if needed. I live in Houston so temperature control is a must, and this design works perfect for me. Thanks again for the idea!!

photo.jpg


image2.jpg
 
Lookin good. My garage hit 98 last week with the heat wave and the chamber held 68 with no problems. Been going strong for about 2 years now in extreme cold and hot conditions. :ban:
 
I need to get on building one of these.... Right after I build my keezer (freezer was delivered today)!
 
Great build! I have a quick question, have you ever been able to maintain lagering temperature?

Thanks for sharing!

I haven't done lagers yet but I've done several ales at 58 to 60 degrees. Haven't tried it in the heat of summer though, I think it would work but would make the fridge compressor work way too hard. I have another fridge in my garage that I cold crash and lager in and I can lager in kegs in my keezer if I have to also.
 
great thread thank you for sharing it. I may not sell my diy kegerator after I finish my keezer now... I may have to make something very similar to this.
 
After reading this I found a minifridge on craigslist . Is there a wiring schematic stashed away somewhere for hooking up the minifans and outlet ?

Very cool build !
 
I found a love controller wiring diagram here on HBT somewhere that shows how to wire the controller to the outlets so that there is a hot and cold side output. As for the computer fans I just wired them in parallel to a cell phone charger. The charge is 12V and 500mA. The higher the Amp rating the faster the fans will turn. Just depends on how much air you want to move.

Also, I should mention that the chamber is still going strong after over 2 years of continual use. No problems at all with the fridge or heater. Very happy with it.
 
I haven't made a lager yet, but I have fermented at 60 degrees multiple times. Should be able to do 50 no problem during all but the summer months. Of course, just getting the wort down to a pitchable temp in summer is a challenge.
 
It took me forever to figure out that the whole setup wasn't one big refrigerator. I couldn't figure out how why it was so long and why the door was positioned so strangely. Now that I've figured it out, I might have to do one in my basement.

The setup looks nice, but if I can't make mine look that nice, I might try putting some sliding doors the whole length of my work bench to cover the door and the brewing supplies. Probably not necessary given how messy the basement is in general, but I think it would look nice.

Thanks for sharing!
 
I would suggest you spend the time and effort to make it look as nice and functional as possible. If you can line the inside with paneling or something somewhat water proof it will just make clean up that much easier if there is a blow out or spill and if you brew a lot there will be both. If you can do a good job mounting a door then it will function perfectly for a long time and you wont have to mess with it. Mine is still just as good as when it was new.

Good luck on your build.
 
Maybe this is a stupid question, but I'm gonna ask anyway. With your carboys being essentially at floor level, how do you get the beer into the secondary vessel without picking up the primary and elevating it on a table or something? Doesn't that disturb the junk at the bottom, and lead to some of that stuff getting into the secondary?
 
I almost never secondary, but I do lift the carboys up on top of the work bench to keg the beer after primary. I keg my beers anywhere from 7 days to a few months in primary and I always get a little yeast and trub in my kegs. This is only an issue if you move your kegs around a lot. My kegs go in my 5 tap keezer and pretty much sit in the same place until they are empty. Any trub that makes it into the kegs will fall out of suspension and smash down on the bottom of the keg. You will always get a few cloudy pours at first but most of the beer will be crystal clear until the last glass which will normally contain some trub. To combat this and keep my beer lines clean I have bent all my dip tubes in my kegs over to the side of the keg and up a little so that I leave that last cloudy glass of gunk in the keg. When my kegs blow you get a little extra foam and that's all....no gunk in your glass or in your lines. I haven't cleaned my beer lines for 2 years.
 
Thanks for posting your build! I will be attempting something similar here this fall. Nice to know it works well where we live. I'm getting a bit tired of tossing frozen water bottles into my swamp cooler a few times a day. It's been a hot one this year.
 
Cool man, nice to hear from a local. Let me know if you have any questions as you work on your build. Best way to get started is to buy a mini fridge off craiglist and then dive right in. Make it up as you go and give yourself plenty of time. Good luck!
 
Ok, I'll bite... Can you lager in it?😜

I'm getting ready to build one like this and want to be able to lager soon.
 
My guess is no. I have a backup ferm chamber made using a 4.3 cf GE mini-fridge. It holds 3 6 gal carboys and will hold below 50°F in the summer.
My larger chamber holds 6 6 gal carboys w/ about the same efficiency.
I invested in a (free) 7cf chest freezer for lager fermenting & have added (free) a 14 cf fridge for lagering and cold crashing.
 
Thanks to this thread I was able to build my own chamber and it's working great so far. It did turn out a little big but at least I can still park in the garage so I'm fine with it being a beast. I bet I could fit 6 carboys in it with room for a couple kegs to condition. Thanks for the inspiration chumpsteak!

IMAG0888.jpg


IMAG0891.jpg
 
I built a chamber with two stc controllers 1 mini fridge for the lager side and a fan drawing from lager side for the ale side but I'm having an issue with keeping the temps down on both sides any ideas guys
 
I built a chamber with two stc controllers 1 mini fridge for the lager side and a fan drawing from lager side for the ale side but I'm having an issue with keeping the temps down on both sides any ideas guys

Not sure without seeing your design madcook, but maybe its an insulation thing. Also, did you put fans in the mini fridge to blow the cold air around?
 
This may have been covered already, if so, sorry in advance. Just my $.02 for those running their chambers in hot climates. Try putting a regular floor fan behind fridge to help remove excess heat. refrigerators are engineered to run with ambient air temps at 72 degrees, so when running above this temp refrigerant pressure is increased and this increases saturation temps thus reducing the cooling efects. The heat you are feeling is form the condenser coil and since it is in a hot environment it can not remove heat properly, causing compressor to run hotter and this will shorten the compressors life.

If I was in that situation, I would put a service valve on the suction line and decrease the pressure thus allowing the compressor to run cooler as well as lowering the overall temps that would be able to be achieved. If you know an a/c tech that is willing to throw their labor in for free and you just pay for parts and materials they can easily perform this for you. The materials needed would be about 10 bucks.
 
I got the Love TSS2-2100 controller wired in and a couple more fans running now and the chamber seems to be doing very well. I have a bucket of water in there now and I'm able to keep it at a pretty constant 66 degrees with the compressor only kicking on a couple times an hour. It's 95 outside here today and at least 85 in my garage so I feel pretty good about how it's performing. Just need to figure out the best settings for the love to keep the compressor from running too much, but it's able to completely cool down between runnings, so it's probably ok right now. Will update with pics of how I mount the controller soon.

What R rating did you chose for your foam board to help hold temperatures in check for the summer?
 
This may have been covered already, if so, sorry in advance. Just my $.02 for those running their chambers in hot climates. Try putting a regular floor fan behind fridge to help remove excess heat. refrigerators are engineered to run with ambient air temps at 72 degrees, so when running above this temp refrigerant pressure is increased and this increases saturation temps thus reducing the cooling efects. The heat you are feeling is form the condenser coil and since it is in a hot environment it can not remove heat properly, causing compressor to run hotter and this will shorten the compressors life.

The fan blowing on the compressor is a good idea. Mine certainly gets smokin hot in the summer when the fridge is running a lot. Have made it through 3 summers so far with no issues though, so not sure how hard it is on the compressor. I make sure to set the love controller to allow 15 minutes between cycles so hopefully the compressor cools down some in between.
 
What R rating did you chose for your foam board to help hold temperatures in check for the summer?

I didn't pay attention to the R rating, I just got the thickest foam they had at Home Depot which was about 2 inch.

You can see in one of the first pictures I posted though that there is a stamp on some of the foam that appears to say R-10.

I think the key with the foam is to make sure all the seams are calked and taped to keep the chamber as airtight as possible. It's a big area for the fridge to cool and without all the seams sealed you'll be letting heat in faster than you are cooling. I think fans blowing across the top of the fridge or wherever the cooling coils are is also very important to both reduce condensation and blow the cool air around.
 

Latest posts

Back
Top