• Please visit and share your knowledge at our sister communities:
  • If you have not, please join our official Homebrewing Facebook Group!

    Homebrewing Facebook Group

My horrible, yet functional, brew sculpture

Homebrew Talk

Help Support Homebrew Talk:

This site may earn a commission from merchant affiliate links, including eBay, Amazon, and others.

pompeiisneaks

Why that human mask?
HBT Supporter
Joined
Jan 7, 2009
Messages
886
Reaction score
53
Location
Redmond
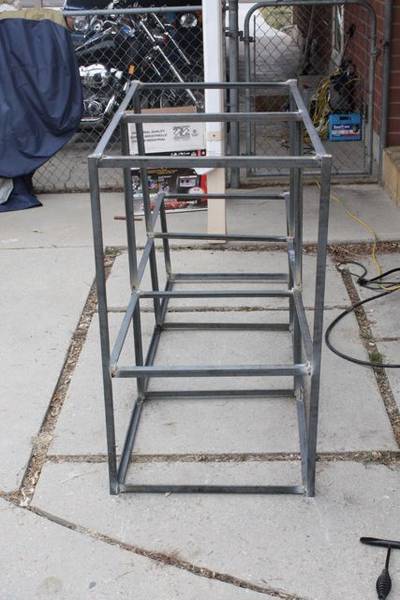
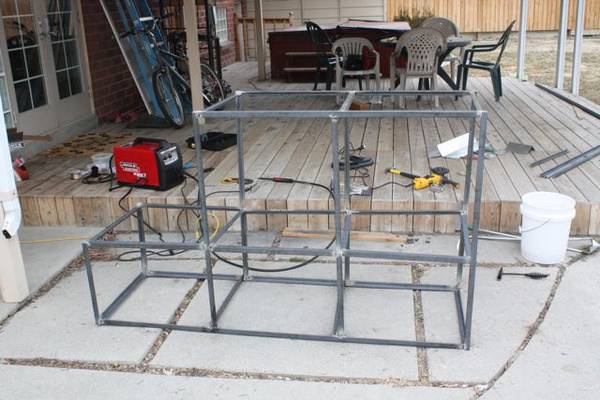
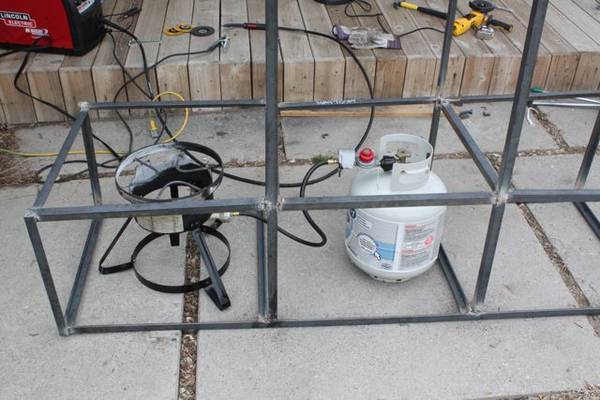
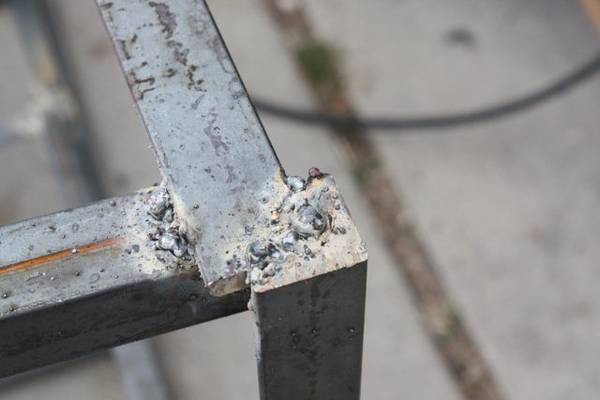
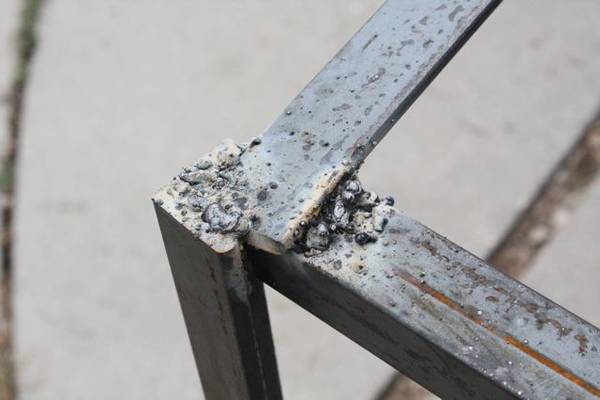
I bought me some 1x1x1/4" angle iron and a welder, and decided to see if I could pull it off... I did so, albeit horribly. :) It holds all my weight though, and I weigh 230 lbs, so thats looking pretty positive. All the images are in the gallery, so I'll be linking from there, but take a look:

IMG_0580.jpg

IMG_05811.jpg

IMG_05821.jpg


I think its 3 images per post, so I'll put up another few in an update
 
Wow, did a bird poop on your brewstand or is this your first time welding? ;)

Seriously, thats better than I could have done. I suck at welding. Good on you for DIY.
 
Did you use the hammer at all to chip away at those welds? I'm no welder and have only laid down a handfull of beads myself, but I wouldn't trust those.
Is the whole thing level/straight?

It is still better than my non-existent one though. A+ for effort :D
 
I've got the chicken head hammer and have been hitting them... A few broke away, and I had to retry ;) its "mostly level/straight" :) It looks to me like even though there's a slight irregularity to it, its very strong/stable. I banged around on all the welds... I need to clean it up still. I'll take the angle grinder to it tonite to clean up a bit. I also still need to weld on the keg support areas on top, but want my kegs to arrive (should all get here this week) before I size them. That way I know how big to make their platforms... Just big enough for them to overlap a bit...

Thanks for the comments... Yes its my "first welding" since high school, which was over 20 yrs ago :p. I vaguely remember how it all worked, and by the time I was almost done, I was finally getting some good beads out of it.

The other good thing, is that now, I have a welder, and can fix it if it doesn't work well :)
 
I had a structural engineering professor that was fond of saying, "even a sh#!y weld will take the design load...once" I remember as a kid the basketball goal's rim at the end of the street broke one time. Of course one of the nice neighborhood dad's had a welder and came down with his ladder to fix it. And fix it he did, until after a few hundred times being impacted and vibrated by shots and of course it broke the first time we played. After several more attempts at fixing it, he eventually replaced the rim with a new one.

I'm not an expert, but from the photos you posted it doesn't look like you've actually bonded the metal. It also doesn't look like you preped the weld sites very well either. My guess is that with repeated loading you are going to start seeing joints come undone. I'd be careful. You get an A for effort though. I'm not trying to be harsh, but I don't want you to end up many gallons of boiling wort being dumped on you crotch level. And God forbid if you have any kids around.

Next time be sure to clean the weld areas thoroughly to remove any possible oils and oxides. You can do this by sanding the area down to pristine bare metal. Also, you need to preheat the weld area to ensure proper bonding. The strength of a weld is from the two individual pieces bonding together, not from using the weld stick as glue.

Also, with using such small angles you're not going to get very much moment resistence at the individual joints. Racking forces are probably the weaklink of this structure. You could vastly improve on that by adding a few cross braces to take the moment loads off of the joints.

Here's a link about basic welding practices: http://www.wikihow.com/Arc-Weld
 
I think your brewery name should be "Scalded to Death Brewing".:D
Good luck with it though.:mug:
 
Only until you filled it with water.:eek:

ahh c'mion WW, no need to bash. He tried and and always go back and redo it.
I also recommend giving it another go after good cleaning up now that you're starting to get the hang of it again after being off for 20 yrs. No shame here, we just don't want to see you losing beer or especially scalding yourself. Give a few practice welds on scrap until it's 100%, then attack the structure welds.
 
I've had enough recommendations both here and in the chat area that I think I'll be redoing some of the welds. Thanks for the constructive criticism, I know it holds a lot of weight, I weigh 230 lbs and stood on it and had no problems, and its not a system that will have a lot of impact on it, its static load. That being said, I'd rather be safe than sorry. I did civil engineering in college, but I'm also a computer geek now. I understand the concepts of load balance and load transfer, I debated putting in some angles to transfer the load off to the base, but ultimately, For the low impact static load on this, it either will, or won't hold, and I'm pretty sure it will at this point. Again, to be safe, I'm going to do a bit more rewelding of the ugliest ones I did at first, but the other areas I got nice big hot red blobs between the jointing areas and they were glowing for a bit after done, so I know those got done right. They're still not as pretty as what I've seen a lot of real welders do, but they're getting into the right ball park. I wanted to basically give a few people some giggles like Biermunchers keg I saw ;)
 
ahh c'mion WW, no need to bash. He tried and and always go back and redo it.

That's not a bash, it's fear for a fellow brewer. Those welds don't look to strong to me. I suck at welding, that's why I bought a pre built stand. Also if all of the kegs are near full that's a lot more than 230lbs. Be safe.

Oops, I just noticed the bk sits on the burner and not the stand. That makes me feel a little better!
 
Good luck, and be sure to keep us updated. I'm curious to see the finished product in action.

Also, one more thought...you could really improve on the connections with some gussets.
 
Well it won't be much more than 230 lbs, water is about 8 lbs per gallon, and i probably won't have a lot more than 30 gallons on the rig at a time, that and the about 30 lbs per keg, should get to around 390, and I had my niece on there w/ me... w/ her weight its actually about 300... don't get me wrong, I still agree it needs some more work. Partly why I posted the pics here... and now that I've had a few more indications that I should add some angular support, I think I'll throw in a few of those too. I'll post more pics after I get further along w/ it.

Thanks for all the help! ;)
 
Wow you need to get BierMuncher to make you a keggle to put on top that thing!

Any rig is a good rig if it makes brewing easier though, good start.

Edit: Ok so Revvy beat me to it, but in my defense I spent like 10 minutes looking for the picture and ya know, doing actual work, before giving up and hitting the post button...
 
1) crank up the heat
2) take your time


Get into a comfortable position so that you can slowly and calmly swirl your way down the joint.
Overlap swirls and go slow enough to make a puddle of melted base metal and filler rod.
The puddle will flow towards the arc/heat. So swirl from one side across the joint the opposite side and back again.
This bridges the gap by flowing metal accross the pieces.

The pictured welds are cold & lack penetration (read "weak"), so your 110V welder is probably close to maxed out for the thickness of the metal.

For me, I would grind the welds flush, pre-heat the area with a propane torch and turn the wire speed down as low you can go to still maintain an arc.

Also, if you can add inert gas equipment to your welder you'll have a much cleaner and consistent result. Flux core wire is messy. You'll want to run a mix of 80% argon and 20% CO2 for carbon steel.

GOOD LUCK!
 
I think you should reweld it. One thing you should always do is grind off the mill slag from the area you are welding thats that gray stuff you see on the outside of the metal its very hard to get a good weld with that on there.
Sirfizzle gave you some good advice...make sure your looking at the puddle not just watching the sparks fly you want to see the two pieces melt together before you start moving.
You need to have one hand on the trigger of course and the other hand close to the nozzle for support try to keep the torch about a 1/4 inch from your work.
Practice on some scrape.

Good luck Pat.
 
My new welder is a MIG welder, but I've not yet paid for the extra tank and the gas... I may do so soon, but not yet sure... I'm debating it... Meanwhile I'll try the other suggestions. I appreciate the help!
 
You've got a lot of good suggestions, and I'll agree. The metal needs to be CLEAN or you will get that bubbled up pile of metal on top of the area rather than IN the metal. Also make sure your ground clamp is hooked up to a clean part. I did laugh as I found someone who welds worse than me, and I'm in the process of building a stand, too.
cheers
-Ben
 
I just redid some of the ugly ones, ground it down back to as close as bare metal as I could, and it was all fully filled in... my beads just looked horrible. I rewelded after cleaning and got much nicer looking beads though. Thanks all for the suggestions/help!
 
I applaud your effort.

Try to bend some of the welds you made and see where they break. Your weld, like a glue joint should be stronger than the materials they are joining. Post some pics of the breaks and someone may be able to give more advice.

IMHO, you would rather break the weld on purpose in an effort to make it better than have 6 and a half gallons of boiling wort go down your pants if one fails.
 
Its gonna look like bird shart until you get some shielding gas. 75/25 would be a good gas. Always weld on the hot side not the cold side. Make sure you dont have paint ,rust or grease in the way and stay out of the wind. Most of welding is fitting and layout work, anybody can glue it togetherwith a little practice. I had to rant a little because my dad used to do it to me,but he was a real welder.
 
One more thing, 120 volt welders make good anchors. A big welder can do small work, but a small welder cant do big work.
 
well Im using angle iron, I "cant" bend it... it doesn't really move much. Pole. That doesn't help me since I own a 120 volt welder, and can't realistically take it back... BUT... I'm not doing big welding really... or so I would consider... I'm doing small joints on a 1"x1"x1/4" angle iron structure. But that could be my inexperience speaking. BTW, after I redid welds, my brother and I both stood up on top w/ our hands on something in case we fell ;) I'm 230 as mentioned, hes 240 and w/ us rocking it back and forth, etc its holding up great... didn't even feel like it wanted to tip over w/ us rocking... SOOOO I hope I'm good at this point. I'll be really careful the first little while, making sure it seems okay and will be very carful around it until I've used it a few times, just to be sure.... Thanks again for all the positive feedback!
 
One more thing, 120 volt welders make good anchors. A big welder can do small work, but a small welder cant do big work.

I am sure we'd all like to have big, expensive welders. But 120v machines are perfectly acceptable for building brewing systems where the steel is usually 1/8" or less.

I have a Lincoln 140c (120v) and it works great on the 2"x2"x.12 tubing I am using.

BrewDevil%20Build%20025.jpg


BrewDevil%20Build%20046.jpg


BrewDevil%20Build%20052.jpg


I definitely agree with the statement about preparation though. Almost anything DIY is all about the prep.

Michael
 
It would be helpfull to break one of the welds and take a picture, so that some of the "Welders" here can analyse your settings on your Mig Welder.

If you are using a flux core for your mig rather than gas, you may have the settings wrong on your MIG for the best weld.

It appears that you have "JUMP" welds going on, where it's just a huge pop and then no follow on (basically a "Tack" weld)

A Tack weld isn't going to hold under continued stress.

If you break one, take a picture, post it, and then provide the settings on your Mig. I'm sure a Welder here can help you with your settings so as to get better "Penetration" and then can work on a nice "Bead".

It does take some practice and knowledge of the settings required. Once you get the arch, the feeder and Amperage must be right for the thickness of the metal you are welding. That way the pool stays liquid and the feed rate of the line/flux is such that it doesn't jump your arc or run too slowly as to cut off your arc. When you get the amp and feed rate right, it's much easier to make nice welds. A little help is a wonderfull thing.
 
I was beating the sh!t out of it last nite and can't get any of them to break... I'd have to cut one... which I don't really want to do. I did grind some of the worst ones down to see what the joints looked like and they basically looked like solid metal under my ugliness... w/ the exception of a few bits w/o anything (small bits not big ones) So I then cleaned up w/ a wire brush after using the angle grinder... and soldered them again... getting much better looking welds... Nothing like yours datamike, but still way better. If I do end up breaking any, I'll take a photo. A few broke during the assembly stages and I rewelded even better, and now those won't break... I hope it works out well for me now :p
 
Back
Top