You are using an out of date browser. It may not display this or other websites correctly.
You should upgrade or use an alternative browser.
You should upgrade or use an alternative browser.
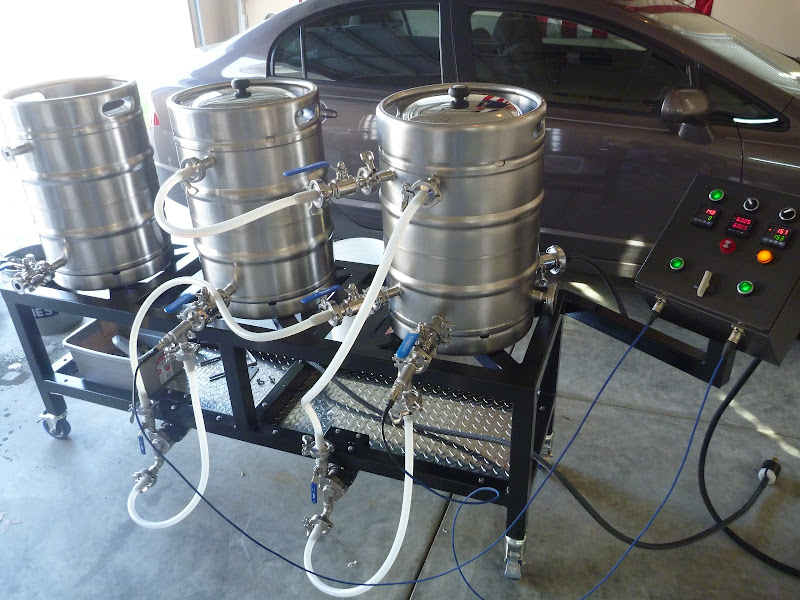
My E-HERMS Build - LOTS OF PICS
- Thread starter canyonbrewer
- Start date

Help Support Homebrew Talk:
This site may earn a commission from merchant affiliate
links, including eBay, Amazon, and others.
wilserbrewer
BIAB Expert Tailor
Could it be that I am just losing 4 degrees in transfer? Do you think that having grain in the MT will allow the MT to hold a closer diff to the HLT?
Sounds likely IMO, I would guess that circulating water is much more prone to cooling in the MT than a mash.
canyonbrewer
Well-Known Member
I really like the some what simplified design From kals The electric brewery. have you drawn up any plans? this is definitely something i want to build my self.
Thanks!!! No plans...but happy to answer any specific questions.
- Joined
- Dec 9, 2008
- Messages
- 558
- Reaction score
- 51
Would you mind breaking down the parts you used for the ports where the temp sensors are placed?
Thanks!
Thanks!


$58.16
HUIZHUGS Brewing Equipment Keg Ball Lock Faucet 30cm Reinforced Silicone Hose Secondary Fermentation Homebrew Kegging Brewing Equipment
xiangshuizhenzhanglingfengshop


$22.00 ($623.23 / Ounce)
AMZLMPKNTW Ball Lock Sample Faucet 30cm Reinforced Silicone Hose Secondary Fermentation Homebrew Kegging joyful
无为中南商贸有限公司
![Craft A Brew - Safale BE-256 Yeast - Fermentis - Belgian Ale Dry Yeast - For Belgian & Strong Ales - Ingredients for Home Brewing - Beer Making Supplies - [3 Pack]](https://m.media-amazon.com/images/I/51bcKEwQmWL._SL500_.jpg)

$33.99 ($17.00 / Count)
$41.99 ($21.00 / Count)
2 Pack 1 Gallon Large Fermentation Jars with 3 Airlocks and 2 SCREW Lids(100% Airtight Heavy Duty Lid w Silicone) - Wide Mouth Glass Jars w Scale Mark - Pickle Jars for Sauerkraut, Sourdough Starter
Qianfenie Direct


$7.79 ($7.79 / Count)
Craft A Brew - LalBrew Voss™ - Kveik Ale Yeast - For Craft Lagers - Ingredients for Home Brewing - Beer Making Supplies - (1 Pack)
Craft a Brew

$176.97
1pc Commercial Keg Manifold 2" Tri Clamp,Ball Lock Tapping Head,Pressure Gauge/Adjustable PRV for Kegging,Fermentation Control
hanhanbaihuoxiaoshoudian


$20.94
$29.99
The Brew Your Own Big Book of Clone Recipes: Featuring 300 Homebrew Recipes from Your Favorite Breweries
Amazon.com


$44.99
$49.95
Craft A Brew - Mead Making Kit – Reusable Make Your Own Mead Kit – Yields 1 Gallon of Mead
Craft a Brew


$53.24
1pc Hose Barb/MFL 1.5" Tri Clamp to Ball Lock Post Liquid Gas Homebrew Kegging Fermentation Parts Brewer Hardware SUS304(Liquid Hose Barb)
yunchengshiyanhuqucuichendianzishangwuyouxiangongsi


$53.24
1pc Hose Barb/MFL 1.5" Tri Clamp to Ball Lock Post Liquid Gas Homebrew Kegging Fermentation Parts Brewer Hardware SUS304(Liquid Hose Barb)
Guangshui Weilu You Trading Co., Ltd


$479.00
$559.00
EdgeStar KC1000SS Craft Brew Kegerator for 1/6 Barrel and Cornelius Kegs
Amazon.com

$172.35
2 Inch Tri Clamp Keg Manifold With Ball Lock Posts, Pressure Gauge, PRV (0-30 PSI) – Homebrew, Fermentation, Kegging System
wuhanshijiayangzhiyimaoyiyouxiangongsi


$10.99 ($31.16 / Ounce)
Hornindal Kveik Yeast for Homebrewing - Mead, Cider, Wine, Beer - 10g Packet - Saccharomyces Cerevisiae - Sold by Shadowhive.com
Shadowhive
canyonbrewer
Well-Known Member
Would you mind breaking down the parts you used for the ports where the temp sensors are placed?
Thanks!
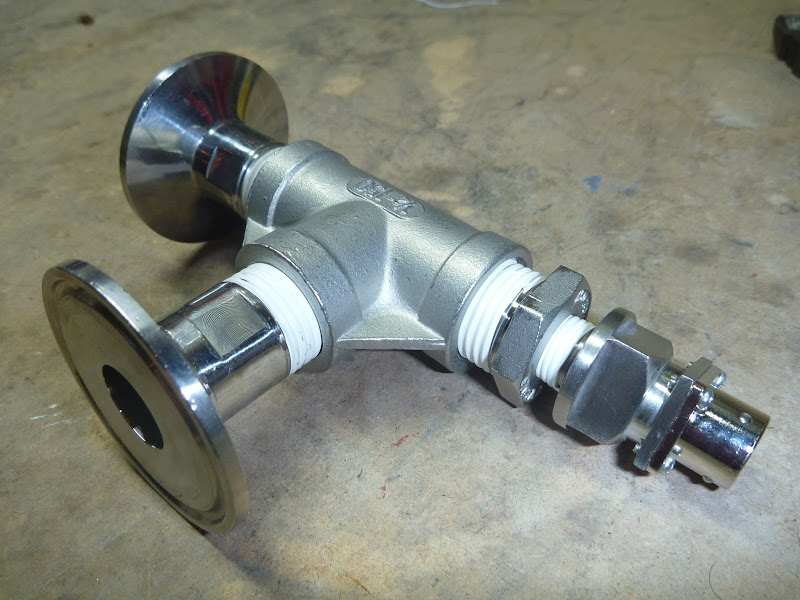
Sure! They are basically the exact same as Kal's. Using a standard 1/2" NPT Tee fitting with a 1/2" X 1/4" bushing. Also using TC x NPT adapters for liquid connections.
Here are some pics:
Here is the whole removable assembly - good for cleaning
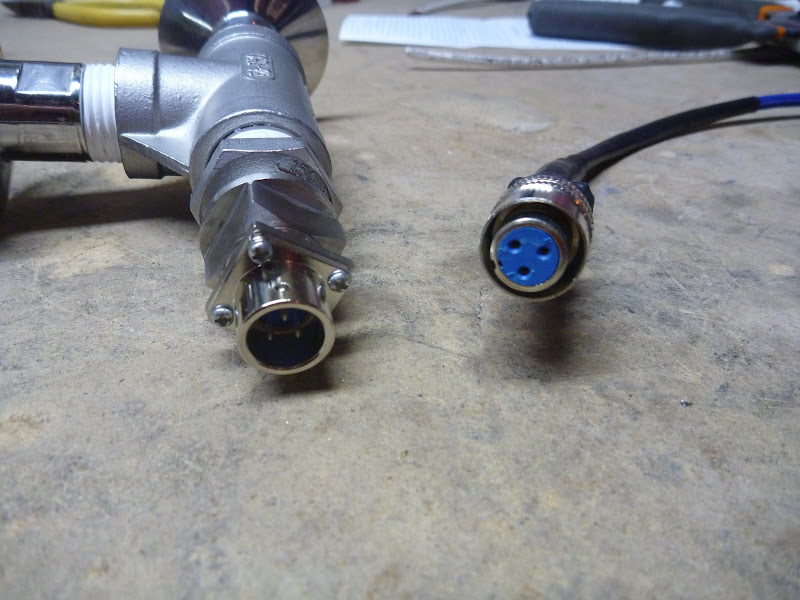
this shows how the probes connect to the tee - i have no idea what that electrical connector is called - it's the standard one that comes with the Auber RTDs
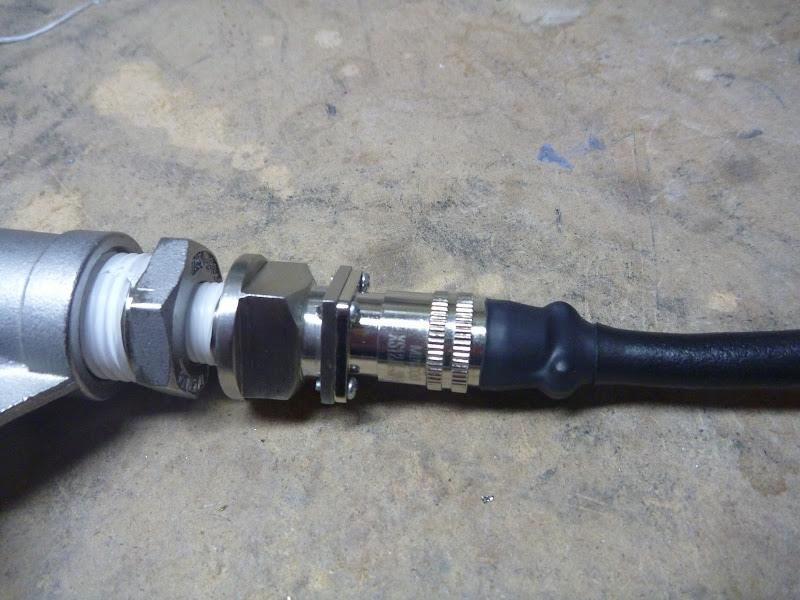
here it is plugged in
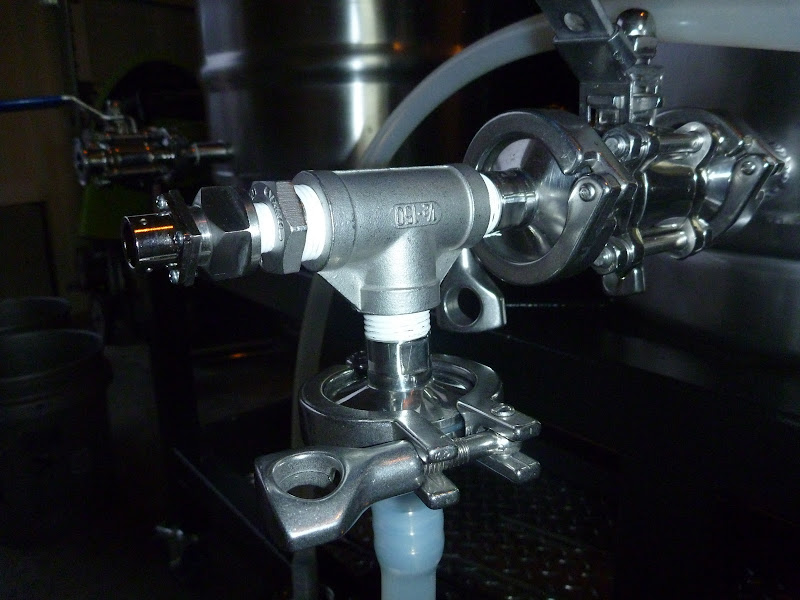
here it is installed on my rig/kettle output. The tee also allows the hose to connect straight down and avoid kinking.
hope this helps!
canyonbrewer
Well-Known Member
You brew on it yet?
brewing this weekend. 10 g of ed's haus pale ale
i'll post some pics or something
brewing this weekend. 10 g of ed's haus pale ale
i'll post some pics or something
looking forward to the pics
canyonbrewer
Well-Known Member
Same hear.
Did brew 10g of edworts last weekend. Got 94% mash efficiency....way more than i expected. Pitched at 1.063. Ha. Used notty and it was the most viloent ferm i have ever had. Had to switch to blowoff for the first time.
Sorry guys pics coming soon.
canyonbrewer
Well-Known Member
would you be able to give a control panel parts list? i'm trying to make mine similar just having trouble figuring out what parts to cut from Kals design.
remember that only 1 pid controls 1 element out receptacle. I phsyically unlplug the HLT/HERMS element after the mash, and then plug in the boil element. same pid controls HLT temp and Boil.
this is just from memory:
2 Auber 2352 PIDS- one controls the element, other just for monitoring - you could get away with only one.
1 Auber ASL-51 timer
2 30 DPDT contactors - one for main power in, one for power to element
1 40 amp auber ssr and external heatsink
1 L14-30r flush receptacle - for main power in
1 L9-30r flush receptacle - for element out power - you can probably
2 flush mount xlr receptacles - for temp probes
3 green illuminated switches 22mm - 1 for main power (controls power in relay) and 2 for pumps
2 non-illuminated selector switches 22mm - 1 controls alarm, 1 controls power to element via the element relay
1 110v pilot alarm - wired to sound from any source, either of the 2 PIDs or timer
1 240v yellow pilot light - wired to let me know when element is actually getting power (both relay is engaged and PID is sending signal)
all the parts came from mcmaster, pioneerbreaker, and auber
ahave
Well-Known Member
Impressive build!
I noticed you mounted your herms coil as high as possible on the HLT keg wall. Was there a reason for this?
I noticed you mounted your herms coil as high as possible on the HLT keg wall. Was there a reason for this?
kickrjason
Well-Known Member
Subscribed
canyonbrewer
Well-Known Member
Impressive build!
I noticed you mounted your herms coil as high as possible on the HLT keg wall. Was there a reason for this?
wanted to keep enough clearance for the element and pickup tube below.
the coild doesn't rest on anything. it is held up completely by the swagelok fittings and it's own strength
canyonbrewer
Well-Known Member
ok - here are some pics of the first brew last weekend. My beginner buddies came over and decided to brew an extract batch in the driveway, so I spent my spare time helping them, and didn't get as many pics or enought focus time with my brew.
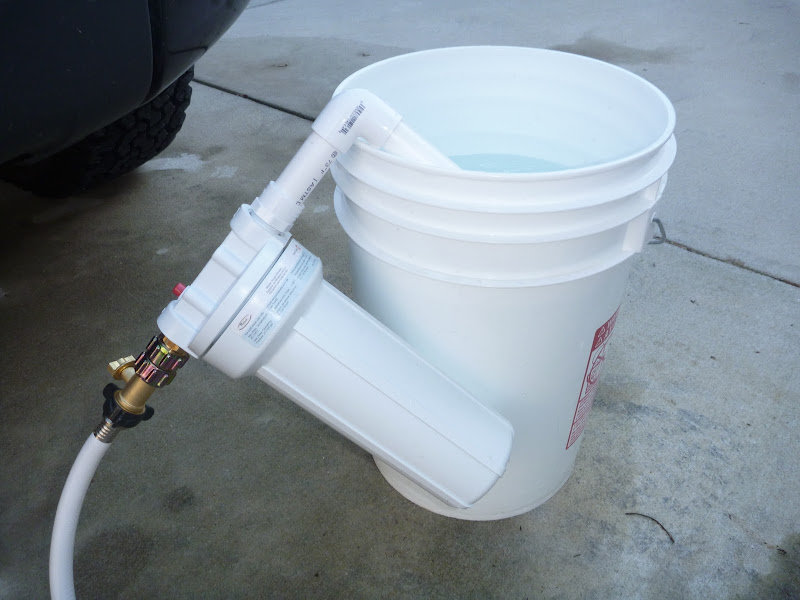
filtering brew water. I use an potable water hose and filter with flow less than 1 gallon per minute. It was my first time with this filter, and there was noticably less chorine smell/taste to the water.
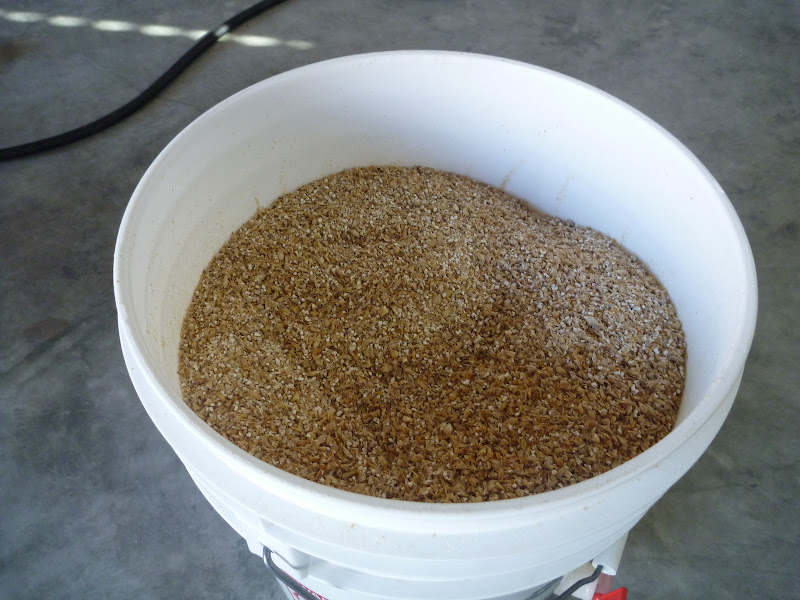
21 lbs of the goods - turns out too much - my efficency was 94% - way more than I expected on the first run.
heating up HLT and Mash Water - i start with the HLT full and my strike water already in the MT recirculating. This works well, and I don't have to top off my HLT for sparge.
just mashed in - recirc started back up.
starting sparge - you can see the grain has settled nicely into a filter bed - also, no fancy sparge aparatus for me. Just a silicone hose. clamp won't be needed next time - turns out I need an street elbow on the inside of the mash return to coax the hose to coil
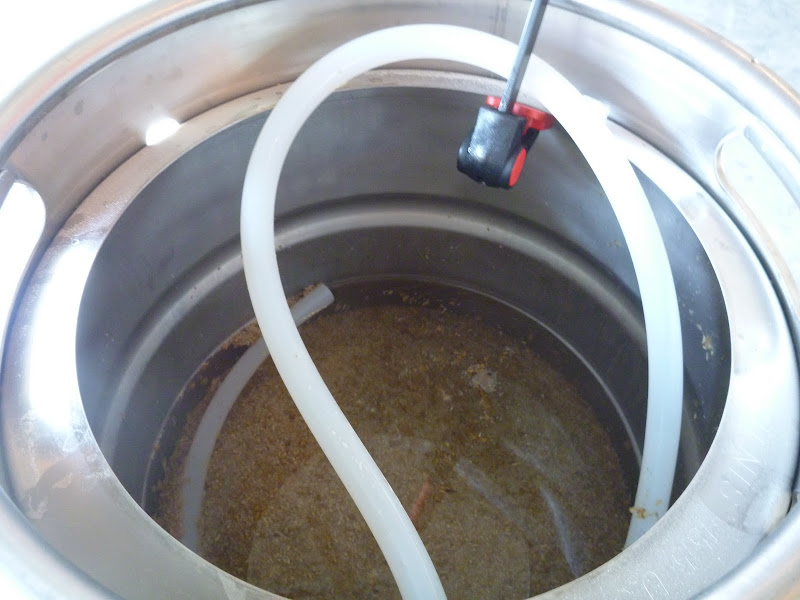
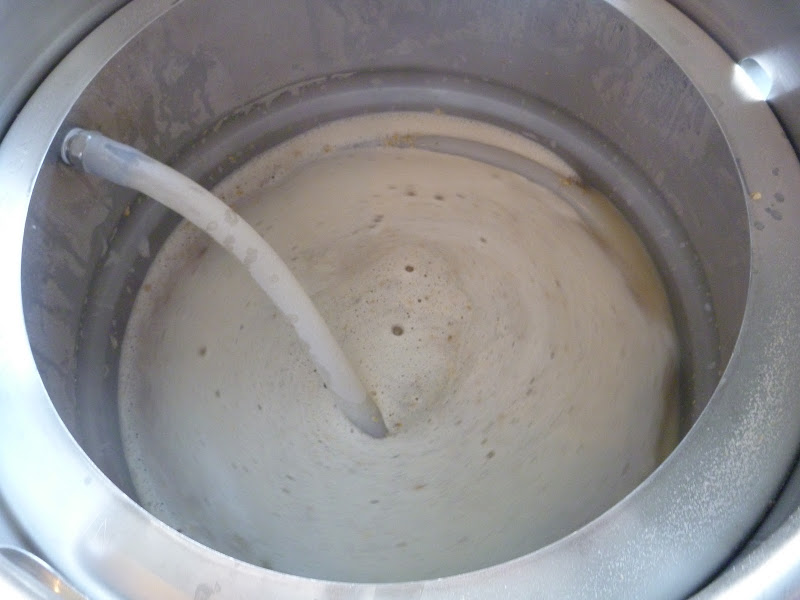
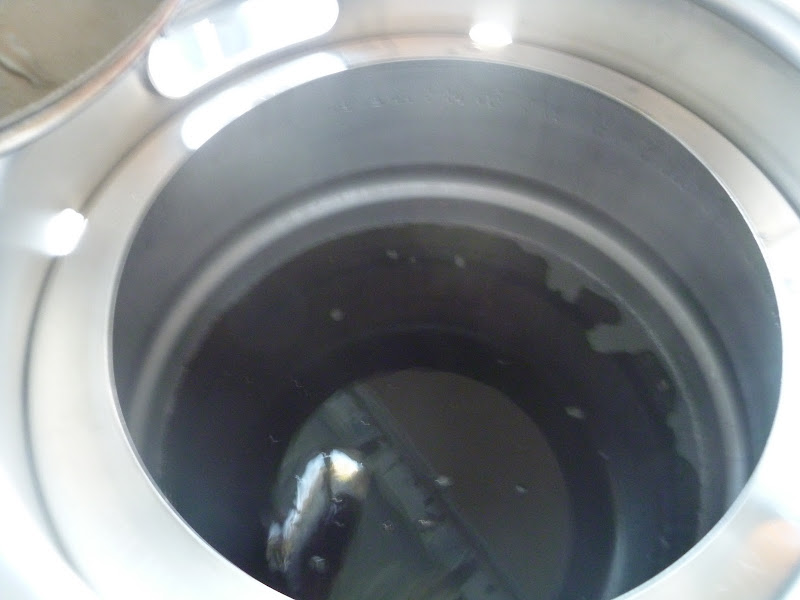
sweet sweet wort
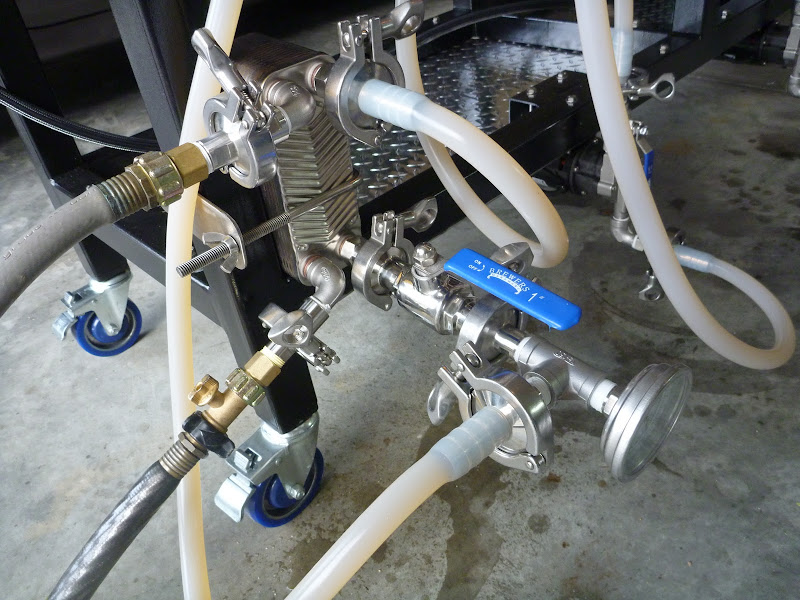
my chilling setup. I am not happy with this mess of hoses - gonna figure something cleaner out before next brew
ground water was 58 degrees. I was able to chill into fermenters at 60 degrees after a little bit of re-circ. Probably took 8 minutes total.
carboy in the freezer - pitched notty at 1.063

here is a video of the beginning of fermentation:
[ame=http://www.youtube.com/watch?v=PSV4iHu58HU&context=C30c8b11ADOEgsToPDskLfhVFaooAjjFJEzAFSAW0p]Active Fermentation - YouTube[/ame]
filtering brew water. I use an potable water hose and filter with flow less than 1 gallon per minute. It was my first time with this filter, and there was noticably less chorine smell/taste to the water.
21 lbs of the goods - turns out too much - my efficency was 94% - way more than I expected on the first run.
heating up HLT and Mash Water - i start with the HLT full and my strike water already in the MT recirculating. This works well, and I don't have to top off my HLT for sparge.
just mashed in - recirc started back up.
starting sparge - you can see the grain has settled nicely into a filter bed - also, no fancy sparge aparatus for me. Just a silicone hose. clamp won't be needed next time - turns out I need an street elbow on the inside of the mash return to coax the hose to coil
sweet sweet wort
my chilling setup. I am not happy with this mess of hoses - gonna figure something cleaner out before next brew
ground water was 58 degrees. I was able to chill into fermenters at 60 degrees after a little bit of re-circ. Probably took 8 minutes total.
carboy in the freezer - pitched notty at 1.063
here is a video of the beginning of fermentation:
[ame=http://www.youtube.com/watch?v=PSV4iHu58HU&context=C30c8b11ADOEgsToPDskLfhVFaooAjjFJEzAFSAW0p]Active Fermentation - YouTube[/ame]
21 lbs of the goods - turns out too much - my efficency was 94% - way more than I expected on the first run.
oh wow
I think if you added more elbows onto the plate chiller it would be a little bit more clean.
cyclogenesis
Well-Known Member
Lots of triclover bling!
Nice
Nice
SeanGC
Well-Known Member
So this might seem like a dumb question or it might have even been answered before but I know you mentioned that you are using one element and are just switching from the HLT to the BK when needed. When you are sparging into the BK what is preventing the wort from escaping through the element hole? I can see the element in the HLT as you are recirculating in the pictures so what is blocking the BK hole? Or do you simply move the element into the BK before sparging? (which would be hard to maintain your HLT sparge temps)
rsklhm10
Well-Known Member
So this might seem like a dumb question or it might have even been answered before but I know you mentioned that you are using one element and are just switching from the HLT to the BK when needed. When you are sparging into the BK what is preventing the wort from escaping through the element hole? I can see the element in the HLT as you are recirculating in the pictures so what is blocking the BK hole? Or do you simply move the element into the BK before sparging? (which would be hard to maintain your HLT sparge temps)
What he meant by that is he has an element mounted in both the HLT and BK, but only has on 'element receptacle' in the back of the control panel using a single PID. Thus, when he wants to run the BK, he has to unplug the HLT element from the panel and plug in the BK element. He does not actually switch the element into the BK from the HLT.
ahave
Well-Known Member
canyonbrewer said:wanted to keep enough clearance for the element and pickup tube below.
the coild doesn't rest on anything. it is held up completely by the swagelok fittings and it's own strength
I am looking to make a similar electric herms HLT out of a ss immersion cooler. Is it possible to mount it lower and still keep clearances for the element? I understand that a 50 ft coil probably doesn't need to entirely submerged for decent heat exchange, but it would help. Is there room to lower the coil or is it pretty much on top of the element now?
Are you happy with the current setup? Would you design anything differently for the herms tank?
SeanGC
Well-Known Member
What he meant by that is he has an element mounted in both the HLT and BK, but only has on 'element receptacle' in the back of the control panel using a single PID. Thus, when he wants to run the BK, he has to unplug the HLT element from the panel and plug in the BK element. He does not actually switch the element into the BK from the HLT.
Ahhh ok makes sense. Thanks for clearing that up.
P.s. amazing and inspiring build.
jpalarchio
Well-Known Member
i really liked the idea of the element adapter, and I also have alot of 1.5" TC in my brewery. It's well built, affordable, and I don't have to worry about leaks or building an enclosure, etc.
I'm going the same route with a welded ferrule and the element adapter from Brewers Hardware.
I was curious how you handled the grounding?
My adapter is on order and I understand there's a ground lug inside it. Any grounding to the kettle? I assume if there's a gasket between the ferrule and adapter, there's no ground continuity there. Maybe don't use a gasket since you're not looking for a leak tight connection there anyhow?
canyonbrewer
Well-Known Member
I'm going the same route with a welded ferrule and the element adapter from Brewers Hardware.
I was curious how you handled the grounding?
My adapter is on order and I understand there's a ground lug inside it. Any grounding to the kettle? I assume if there's a gasket between the ferrule and adapter, there's no ground continuity there. Maybe don't use a gasket since you're not looking for a leak tight connection there anyhow?
I use the grounding lug inside the adapter. Even with a gasket, the tri clover clamp creates continuity to the kettle.
canyonbrewer
Well-Known Member
What he meant by that is he has an element mounted in both the HLT and BK, but only has on 'element receptacle' in the back of the control panel using a single PID. Thus, when he wants to run the BK, he has to unplug the HLT element from the panel and plug in the BK element. He does not actually switch the element into the BK from the HLT.
Thanks rsklhm! You are exactly correct!
canyonbrewer
Well-Known Member
I am looking to make a similar electric herms HLT out of a ss immersion cooler. Is it possible to mount it lower and still keep clearances for the element? I understand that a 50 ft coil probably doesn't need to entirely submerged for decent heat exchange, but it would help. Is there room to lower the coil or is it pretty much on top of the element now?
Are you happy with the current setup? Would you design anything differently for the herms tank?
There is probably a little room to go lower, but my coil is completely submerged during the entire mash.
I think Maybe the coil is wound a little too tight and perfectly in the vertical plane. The coils touch each other, and if it were looser vertically, maybe more water could get in between and be more efficient.
Overall very happy with the rig. Will probably learn more as time goes on.
SeanGC
Well-Known Member
Will this fitting fit on the OD of the SS IC coil?
Swagelok Male Elbow, 1/2 in. Tube x 1/2 NPT SS-810-2-8 on eBay!
Swagelok Male Elbow, 1/2 in. Tube x 1/2 NPT SS-810-2-8 on eBay!
jpalarchio
Well-Known Member
I use the grounding lug inside the adapter. Even with a gasket, the tri clover clamp creates continuity to the kettle.
Of course! Makes sense; forgot about the clamp. Thanks for the common sense input.
Looking forward to getting my element adapter; the pictures of it look great.
Similar threads
- Replies
- 10
- Views
- 3K
- Replies
- 2
- Views
- 916
- Replies
- 6
- Views
- 1K
