You are using an out of date browser. It may not display this or other websites correctly.
You should upgrade or use an alternative browser.
You should upgrade or use an alternative browser.
My coleman 70 quart extreme copper mash tun
- Thread starter kyle0226
- Start date

Help Support Homebrew Talk:
This site may earn a commission from merchant affiliate
links, including eBay, Amazon, and others.


ayupbrewing
Well-Known Member
- Joined
- Nov 26, 2012
- Messages
- 150
- Reaction score
- 13
Yes, it will rest on the top edge too. I have another set of those four pipe pieces that rest on the edge cut a little longer and swap them out if i'm doing a larger batch or higher alcohol beer with bigger grain bill.
I would drill less holes in the sparge arm than I did though. I have found that I have to have the sparge water flow rate coming from my hot water tank quite fast to get water coming through all holes at once, this results in about a 20 minute sparge instead of the recommended 30-45 minute sparge and an apparent drop in efficiency due to all the sugars not been rinsed thouroghly - although I have not seen an appreciable difference in efficiency, but im only a few batches into it. For now I just slow the flow rate down and deal with water only coming out of say 70% of the holes, I figured that the aim of this part is really to just keep an inch or so of water above the grain bed and it doesnt really matter which holes the water comes out from. I will re drill new pipe when I can be bothered...
As for the connectors, I think I used 1/2 silicone tubing (only size that fits through the outlet in the cooler nice and snug) which on the inside goes onto the brass male barbed adapter (no clamp required as its a nice tight fit) which fits into a female CPVC adapter and then a short piece of the CPVC piping is shown in my pic 3 which connects to the manifold on the piece thats shown sticking up in pic 4 (which is show upside down to demonstrate the holes in the manifold). On the outside the silicon tubing just goes on to a barbed in-line valve shown in pic 2.
Hope that helps...! Check us out on FB
https://www.facebook.com/pages/Ayup-Brewing-Co/103052406532647?ref=hl
ayupbrewing
Well-Known Member
- Joined
- Nov 26, 2012
- Messages
- 150
- Reaction score
- 13
I see at least 10 right angles...
I see at least 10 right angles...
I was poking fun at my first solder job. The closet I got to a right angle is about 89 degrees. The worst being about 75 degrees.
HollisBT
Well-Known Member
So, for the guys who have this set up, I have a few questions...
First off, what would you say is your mash tun deadspace? Ie, how much wort are you leaving behind at the end of your sparge? I would have to imagine that it leaves more than my current 10 gallon round tun...
Secondly, when it comes to sparging, how would you propose to set up something like a blichman auto-sparge? I had planned on incorporating that into my tun, and I am really interested in building my new tun out of an xtreme cooler, just not sure how well it would work coming out of the hose and not hitting a round tun...
Thanks for any help you can offer!
ayupbrewing
Well-Known Member
- Joined
- Nov 26, 2012
- Messages
- 150
- Reaction score
- 13
Not sure about your second question as I dont know what a Blichman auto sparge does and why a round tun would be criticial...
But on your first question, I would say no more than a 1/8G (1/2qt), sure you could squeeze more out of the grain but water absorbed by the grains is already factored in. I usually just sparge until I hit boil volume or until I hit a gravity of the wort coming out of 1.010.
But on your first question, I would say no more than a 1/8G (1/2qt), sure you could squeeze more out of the grain but water absorbed by the grains is already factored in. I usually just sparge until I hit boil volume or until I hit a gravity of the wort coming out of 1.010.


$172.35
2 Inch Tri Clamp Keg Manifold With Ball Lock Posts, Pressure Gauge, PRV (0-30 PSI) – Homebrew, Fermentation, Kegging System
wuhanshijiayangzhiyimaoyiyouxiangongsi


$22.00 ($623.23 / Ounce)
AMZLMPKNTW Ball Lock Sample Faucet 30cm Reinforced Silicone Hose Secondary Fermentation Homebrew Kegging joyful
无为中南商贸有限公司


$58.16
HUIZHUGS Brewing Equipment Keg Ball Lock Faucet 30cm Reinforced Silicone Hose Secondary Fermentation Homebrew Kegging Brewing Equipment
xiangshuizhenzhanglingfengshop


$53.24
1pc Hose Barb/MFL 1.5" Tri Clamp to Ball Lock Post Liquid Gas Homebrew Kegging Fermentation Parts Brewer Hardware SUS304(Gas MFL)
Guangshui Weilu You Trading Co., Ltd

![Craft A Brew - Safale S-04 Dry Yeast - Fermentis - English Ale Dry Yeast - For English and American Ales and Hard Apple Ciders - Ingredients for Home Brewing - Beer Making Supplies - [1 Pack]](https://m.media-amazon.com/images/I/41fVGNh6JfL._SL500_.jpg)
$6.95 ($17.38 / Ounce)
$7.47 ($18.68 / Ounce)
Craft A Brew - Safale S-04 Dry Yeast - Fermentis - English Ale Dry Yeast - For English and American Ales and Hard Apple Ciders - Ingredients for Home Brewing - Beer Making Supplies - [1 Pack]
Hobby Homebrew


$28.98
Five Star - 6022b_ - Star San - 32 Ounce - High Foaming Sanitizer
Great Fermentations of Indiana

$10.99 ($31.16 / Ounce)
Hornindal Kveik Yeast for Homebrewing - Mead, Cider, Wine, Beer - 10g Packet - Saccharomyces Cerevisiae - Sold by Shadowhive.com
Shadowhive


$53.24
1pc Hose Barb/MFL 1.5" Tri Clamp to Ball Lock Post Liquid Gas Homebrew Kegging Fermentation Parts Brewer Hardware SUS304(Gas MFL)
yunchengshiyanhuqucuichendianzishangwuyouxiangongsi

$7.79 ($7.79 / Count)
Craft A Brew - LalBrew Voss™ - Kveik Ale Yeast - For Craft Lagers - Ingredients for Home Brewing - Beer Making Supplies - (1 Pack)
Craft a Brew


$176.97
1pc Commercial Keg Manifold 2" Tri Clamp,Ball Lock Tapping Head,Pressure Gauge/Adjustable PRV for Kegging,Fermentation Control
hanhanbaihuoxiaoshoudian


$479.00
$559.00
EdgeStar KC1000SS Craft Brew Kegerator for 1/6 Barrel and Cornelius Kegs
Amazon.com

$20.94
$29.99
The Brew Your Own Big Book of Clone Recipes: Featuring 300 Homebrew Recipes from Your Favorite Breweries
Amazon.com


$39.22 ($39.22 / Count)
Brewer's Best Home Brew Beer Ingredient Kit - 5 Gallon (Mexican Cerveza)
Amazon.com


$33.99 ($17.00 / Count)
$41.99 ($21.00 / Count)
2 Pack 1 Gallon Large Fermentation Jars with 3 Airlocks and 2 SCREW Lids(100% Airtight Heavy Duty Lid w Silicone) - Wide Mouth Glass Jars w Scale Mark - Pickle Jars for Sauerkraut, Sourdough Starter
Qianfenie Direct


LuciferSam
Well-Known Member
- Joined
- May 25, 2013
- Messages
- 66
- Reaction score
- 0
Toneus or Kyle?
What parts, exactly, did you use to create your manifold???
What parts, exactly, did you use to create your manifold???
Toneus or Kyle?
What parts, exactly, did you use to create your manifold???
My general parts list is in post #16.
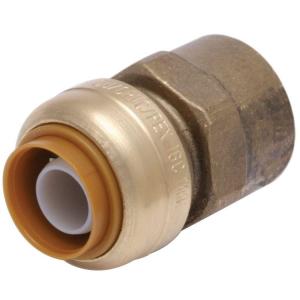
If you're not familiar with Shark fittings, they are quick push to connect plumbing fittings. They have a key that can be used to release the connection. Home Depot sells them. This particular part might be the right one for your settup, it might not. The important side is the sip to 1/2 copper. The other side is determined by what your value set up is.


http://www.homedepot.com/p/qv/202270500
LuciferSam
Well-Known Member
- Joined
- May 25, 2013
- Messages
- 66
- Reaction score
- 0
I don't have a valve setup yet??? Do I need a 2in long 1/2in nipple made of brass, stainless, galvanized??? Does my valve need to be stainless, brass?
Already failed once at Home Depot...
Sent from my iPhone using Home Brew
Already failed once at Home Depot...
Sent from my iPhone using Home Brew
I don't have a valve setup yet??? Do I need a 2in long 1/2in nipple made of brass, stainless, galvanized??? Does my valve need to be stainless, brass?
Already failed once at Home Depot...
Sent from my iPhone using Home Brew
It appears that I used a 1 1/2" long threaded on each end pipe. I also reused the cooler's plastic seal. looks a little dirty in the picture. Note the 4 washers needed for standing off the cooler. If I recall, those are SS washers, and I bought them at Fastenal because they are the only ones who sell SS with the correct inside diameter. The rest is brass or copper in my setup.
I've stood for many hours in that HD isle. I know what you're talking about, but that's why it's called DIY.

LuciferSam
Well-Known Member
- Joined
- May 25, 2013
- Messages
- 66
- Reaction score
- 0
Thanks for the info/ help I'll try this sometime next week when I can make time...
Sent from my iPhone using Home Brew
Sent from my iPhone using Home Brew
LuciferSam
Well-Known Member
- Joined
- May 25, 2013
- Messages
- 66
- Reaction score
- 0

Manifold is done and leak tested.
Should I put slits in the tubing or holes?
How far apart should the slits/ holes be and on the top or bottom?
If I sodder some parts is that safe for the beer?
Sent from my iPhone using Home Brew
Stealthcruiser
Well-Known Member
Most folks use slits in the tubing, facing the bottom of the cooler.
Yes you can solder, but only with lead free solder.
However, there is probably enough "inteference fit" on the fittings, so that you may need no solder.
Leave it where you can get it apart for thorough cleaning.
As for the slits, I think I read that .030-.032 is a good width.
1/2 inch apart should do nicely.
Envision the tubing in the sections when looking down the "bore" of the tubing, and keep the slits to the bottom third ideally, which would lessen the mash left behind when draining.
I like it!


LuciferSam
Well-Known Member
- Joined
- May 25, 2013
- Messages
- 66
- Reaction score
- 0
I was thinking of doing slits and holes to maintain more integrity of the structure of the pipe? I was also thinking of drilling some holes in the t's and 90's? Thoughts? Slits and holes facing down toward the bottom? Right?
Sent from my iPhone using Home Brew
Sent from my iPhone using Home Brew
LuciferSam,
If you limit the slit cut to less than half the diameter, the copper tubing should hold up pretty well. I believe I cut mine to 60-70% as seen on the cross-sectional drawing I'm providing. I actually created a jig to control the depth of the cut and the spacing between cuts.
As for drilling holes into the tees and elbows, that's up to you, most likely your probably going to do batch sparging, so there is nothing to gain by doing so.
The slits do face down when used.
I was thinking of doing slits and holes to maintain more integrity of the structure of the pipe? I was also thinking of drilling some holes in the t's and 90's? Thoughts? Slits and holes facing down toward the bottom? Right?
Sent from my iPhone using Home Brew
I've used this for years with a cpvc manifold. Just ordered a piece of perforated stainless steel from amazon for <$40 and have a braided SS line going to the same shutoff valve as everyone else. I recirculate now and these changes have increase my efficiency a full hundredth.
Disregard the beer siphon outer casing.

Disregard the beer siphon outer casing.
LuciferSam
Well-Known Member
- Joined
- May 25, 2013
- Messages
- 66
- Reaction score
- 0
Frechetn
How do you clean the inside of the 1/2 in copper after cutting slits?


Sent from my iPhone using Home Brew
How do you clean the inside of the 1/2 in copper after cutting slits?


Sent from my iPhone using Home Brew
Stealthcruiser
Well-Known Member
You can use something rigid, of the appropriate length and material, (think bicycle spoke material), some emery cloth folded over, so that only abrasive is showing, and a drill, spun not too fast, to de-burr the inside.
Crimp the spoke over the emry cloth with some pliers to hold it in place.
CAUTION: don't pull it out of the tube whilst it's spun up fast.
You'll be sayin' "Damn, that hurt my arms, and my fingers", and anything else close by!
Crimp the spoke over the emry cloth with some pliers to hold it in place.
CAUTION: don't pull it out of the tube whilst it's spun up fast.
You'll be sayin' "Damn, that hurt my arms, and my fingers", and anything else close by!
Frechetn
How do you clean the inside of the 1/2 in copper after cutting slits?
Sent from my iPhone using Home Brew
Nice Job LuciferSam. To remove the burrs, I used a rounded file through it several times. Check it then repeat if necessary.
LuciferSam
Well-Known Member
- Joined
- May 25, 2013
- Messages
- 66
- Reaction score
- 0
A few more questions...
Could I get a straining bag to put the grains in big enough to fit in/out of the cooler for easy discard? Or is this stupid since the manifold will be straining my grain?
How often should I stir?
How many times should I crush my grain?
Is there a link to a DIY thermometer install on this cooler?
What is the purpose of the manifold on the lid of the cooler ???
Sent from my iPhone using Home Brew
LuciferSam
Well-Known Member
- Joined
- May 25, 2013
- Messages
- 66
- Reaction score
- 0
???
Sent from my iPhone using Home Brew
Sent from my iPhone using Home Brew
Hey LuciferSam,
Sorry I didn't get back earlier. Haven't been checking email lately.
Sorry I didn't get back earlier. Haven't been checking email lately.
- I would not use a mesh or straining bag for two reasons.
- The gain bed and manifold work together to act as a strainer.
- You run the risk of creating a stuck sparge.
- Stir the mash thoroughly, check the temp of the mash in several spots (see #4), once the proper temp is achieved, close the lid and allow it to mash until the conversion process is done. Following the conversion process you will then begin by recirculating the first few gallons of wort back into the mash/tun using a pitcher. This is to set the grain bed to allow you to extract that sweet wert. Once you no longer see particles of grain coming from the manifold, you drain the mash/tun into your brew kettle. Most likely you will need to repeat this again to achieve your boil volume and to rinse the remaining sugars from the mash.
Note: When recirculating, it's important to not disturb the grain bed. Try to disperse the wert evenly back into the mash/tun using the back side of a spoon/paddle.
- You should only need to crush the grain once. Your homebrew store should have a crusher that is set correctly. You only want to crack the grain open, not pulverize it.
- As for thermometer, you need to take temp measurements throughout the mash bed. No need to set it in one spot, since the idea is to ensure even temperature throughout the mash for the conversion process.
- The upper lid manifold is a sparging arm. It's not needed unless you attempting to do a continuous sparge.
A few more questions...
Could I get a straining bag to put the grains in big enough to fit in/out of the cooler for easy discard? Or is this stupid since the manifold will be straining my grain?
How often should I stir?
How many times should I crush my grain?
Is there a link to a DIY thermometer install on this cooler?
What is the purpose of the manifold on the lid of the cooler ???
Sent from my iPhone using Home Brew
LuciferSam
Well-Known Member
- Joined
- May 25, 2013
- Messages
- 66
- Reaction score
- 0
Thanks I will brew soon
Cheers
Sent from my iPhone using Home Brew
Cheers
Sent from my iPhone using Home Brew
I'm gearing up to do 15 gallon batch with maybe 35-40 lbs of gain. Is 70 quart big enough? Ive seen several threads on the topic, some say 70 quart is good, some say go with 100 quart cooler. What is your feeling? What size batches are you doing?
TIA
Scott
TIA
Scott
HausBrauerei_Harvey
Well-Known Member
Can someone here tell me how long it takes them to drain the full 70Qt mash tun with such a manifold? I have a 50Qt with a stainless braid, and since I upgraded to 12 gallon batches it takes me well over an hour to drain the tun after the mash.
If these manifolds work much faster I'll be making one when I upgrade to the 70qt cooler this weekend!
Thanks!
If these manifolds work much faster I'll be making one when I upgrade to the 70qt cooler this weekend!
Thanks!
revco
Well-Known Member
It takes me about maybe 20 minutes or so, give or take. Much faster with a pump, too, and the manifold handles that just fine on most beers. (Prolly wouldn't do it with a wheat unless I have plenty of rice hulls in the batch.) Overall, batch sparging, I spend maybe 45 minutes to an hour with three total drains of 15 gallons hot liquor, minus absorption and dead space. So yeah, much faster, I would say.
Hey guys. I'm looking into building my first mash tun in the near future. I work for an environmental drilling company and we have 1" CPVC pipes that have numerous .1" slits cut into it. Only problem is that the slits are cut on what would be the top and the bottom of the manifold and the smallest diameter I could get is 1". I'm thinking if I put in a false bottom and/or found a way to cover the top slits that would help, but is 1" diameter too big for a manifold?
Hey guys. I'm looking into building my first mash tun in the near future. I work for an environmental drilling company and we have 1" CPVC pipes that have numerous .1" slits cut into it. Only problem is that the slits are cut on what would be the top and the bottom of the manifold and the smallest diameter I could get is 1". I'm thinking if I put in a false bottom and/or found a way to cover the top slits that would help, but is 1" diameter too big for a manifold?
Yeah, I'd say 1" is too large. I use 1/2" in a similarly built but 52qt cooler. And you don't want the extra slots on the top, although they will plug up after lautering for a while.
The total cost for the 1/2" cpvc manifold was under $8. I'd say you need 1 more length of pipe, to cover the extra distance. All the turns remain the same. $11 will get it done. Plus a few hours of handywork.
False bottoms of any kind for a rectangular cooler are hard to come by and can't be had for $11.
Similar threads
- Replies
- 5
- Views
- 1K
- Replies
- 0
- Views
- 3K
- Replies
- 8
- Views
- 2K
- Replies
- 1
- Views
- 797
