
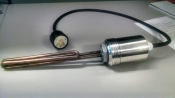
So I have been looking around for a housing for my dual 120v elements. I was originally going to use the PVC threaded coupler method, but I stumbled upon the sugar shakers and decided to go that route.
I didnt see an acutal build of one on here (but im sure there is) so I decided to put mine on here.
Materials:
Sugar Shakers from Amazon $9.98 Shipped for 2. Ive actually seen 2 packs as low as $6.68.
5' - 12/3 Bulk Power Cord from Lowes
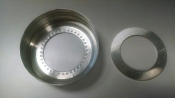
2 X Stainless Washer (I made these from scrap but you can get them at McMaster 96853A253)
2 x 1/2" Cable Gland (These were free and I had to do a small mod to them to fit my cord) I think P13.5 is the right code for the cable diameter I had (0.415" Dia approx)
Tube of Silicone
1" Stainless Lock Nut and Silicone O-Ring ( i got mine for $5-6 shipped)
Tools Needed:
Drill / bits (3/4 )
Hole Punch (I used the 1/2" and 1" Conduit Punches from a friend)
Assembly
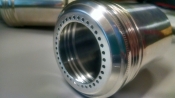
So really it was pretty easy. I drilled pilot holes at both ends of the shaker. Then I used the 1/2" punch on the bottom and the 1" Punch at the top.
Next I deburred the edges.
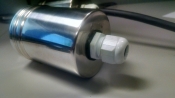
From here I installed the washer into the lid and siliconed it around the edge. This basically just held the washer insdide there and blocked the row of holes (pictures are below)
After the pics i did go back and put a small hole which will be on the bottom and put a bolt through the wall that I will use to ground.
Thats pretty much it.. short write up I just thought maybe someone else would want to check it out too.
I didnt see an acutal build of one on here (but im sure there is) so I decided to put mine on here.
Materials:
Sugar Shakers from Amazon $9.98 Shipped for 2. Ive actually seen 2 packs as low as $6.68.
5' - 12/3 Bulk Power Cord from Lowes
2 X Stainless Washer (I made these from scrap but you can get them at McMaster 96853A253)
2 x 1/2" Cable Gland (These were free and I had to do a small mod to them to fit my cord) I think P13.5 is the right code for the cable diameter I had (0.415" Dia approx)
Tube of Silicone
1" Stainless Lock Nut and Silicone O-Ring ( i got mine for $5-6 shipped)
Tools Needed:
Drill / bits (3/4 )
Hole Punch (I used the 1/2" and 1" Conduit Punches from a friend)
Assembly
So really it was pretty easy. I drilled pilot holes at both ends of the shaker. Then I used the 1/2" punch on the bottom and the 1" Punch at the top.
Next I deburred the edges.
From here I installed the washer into the lid and siliconed it around the edge. This basically just held the washer insdide there and blocked the row of holes (pictures are below)
After the pics i did go back and put a small hole which will be on the bottom and put a bolt through the wall that I will use to ground.
Thats pretty much it.. short write up I just thought maybe someone else would want to check it out too.
Last edited by a moderator:


![Craft A Brew - Safale S-04 Dry Yeast - Fermentis - English Ale Dry Yeast - For English and American Ales and Hard Apple Ciders - Ingredients for Home Brewing - Beer Making Supplies - [1 Pack]](https://m.media-amazon.com/images/I/41fVGNh6JfL._SL500_.jpg)


