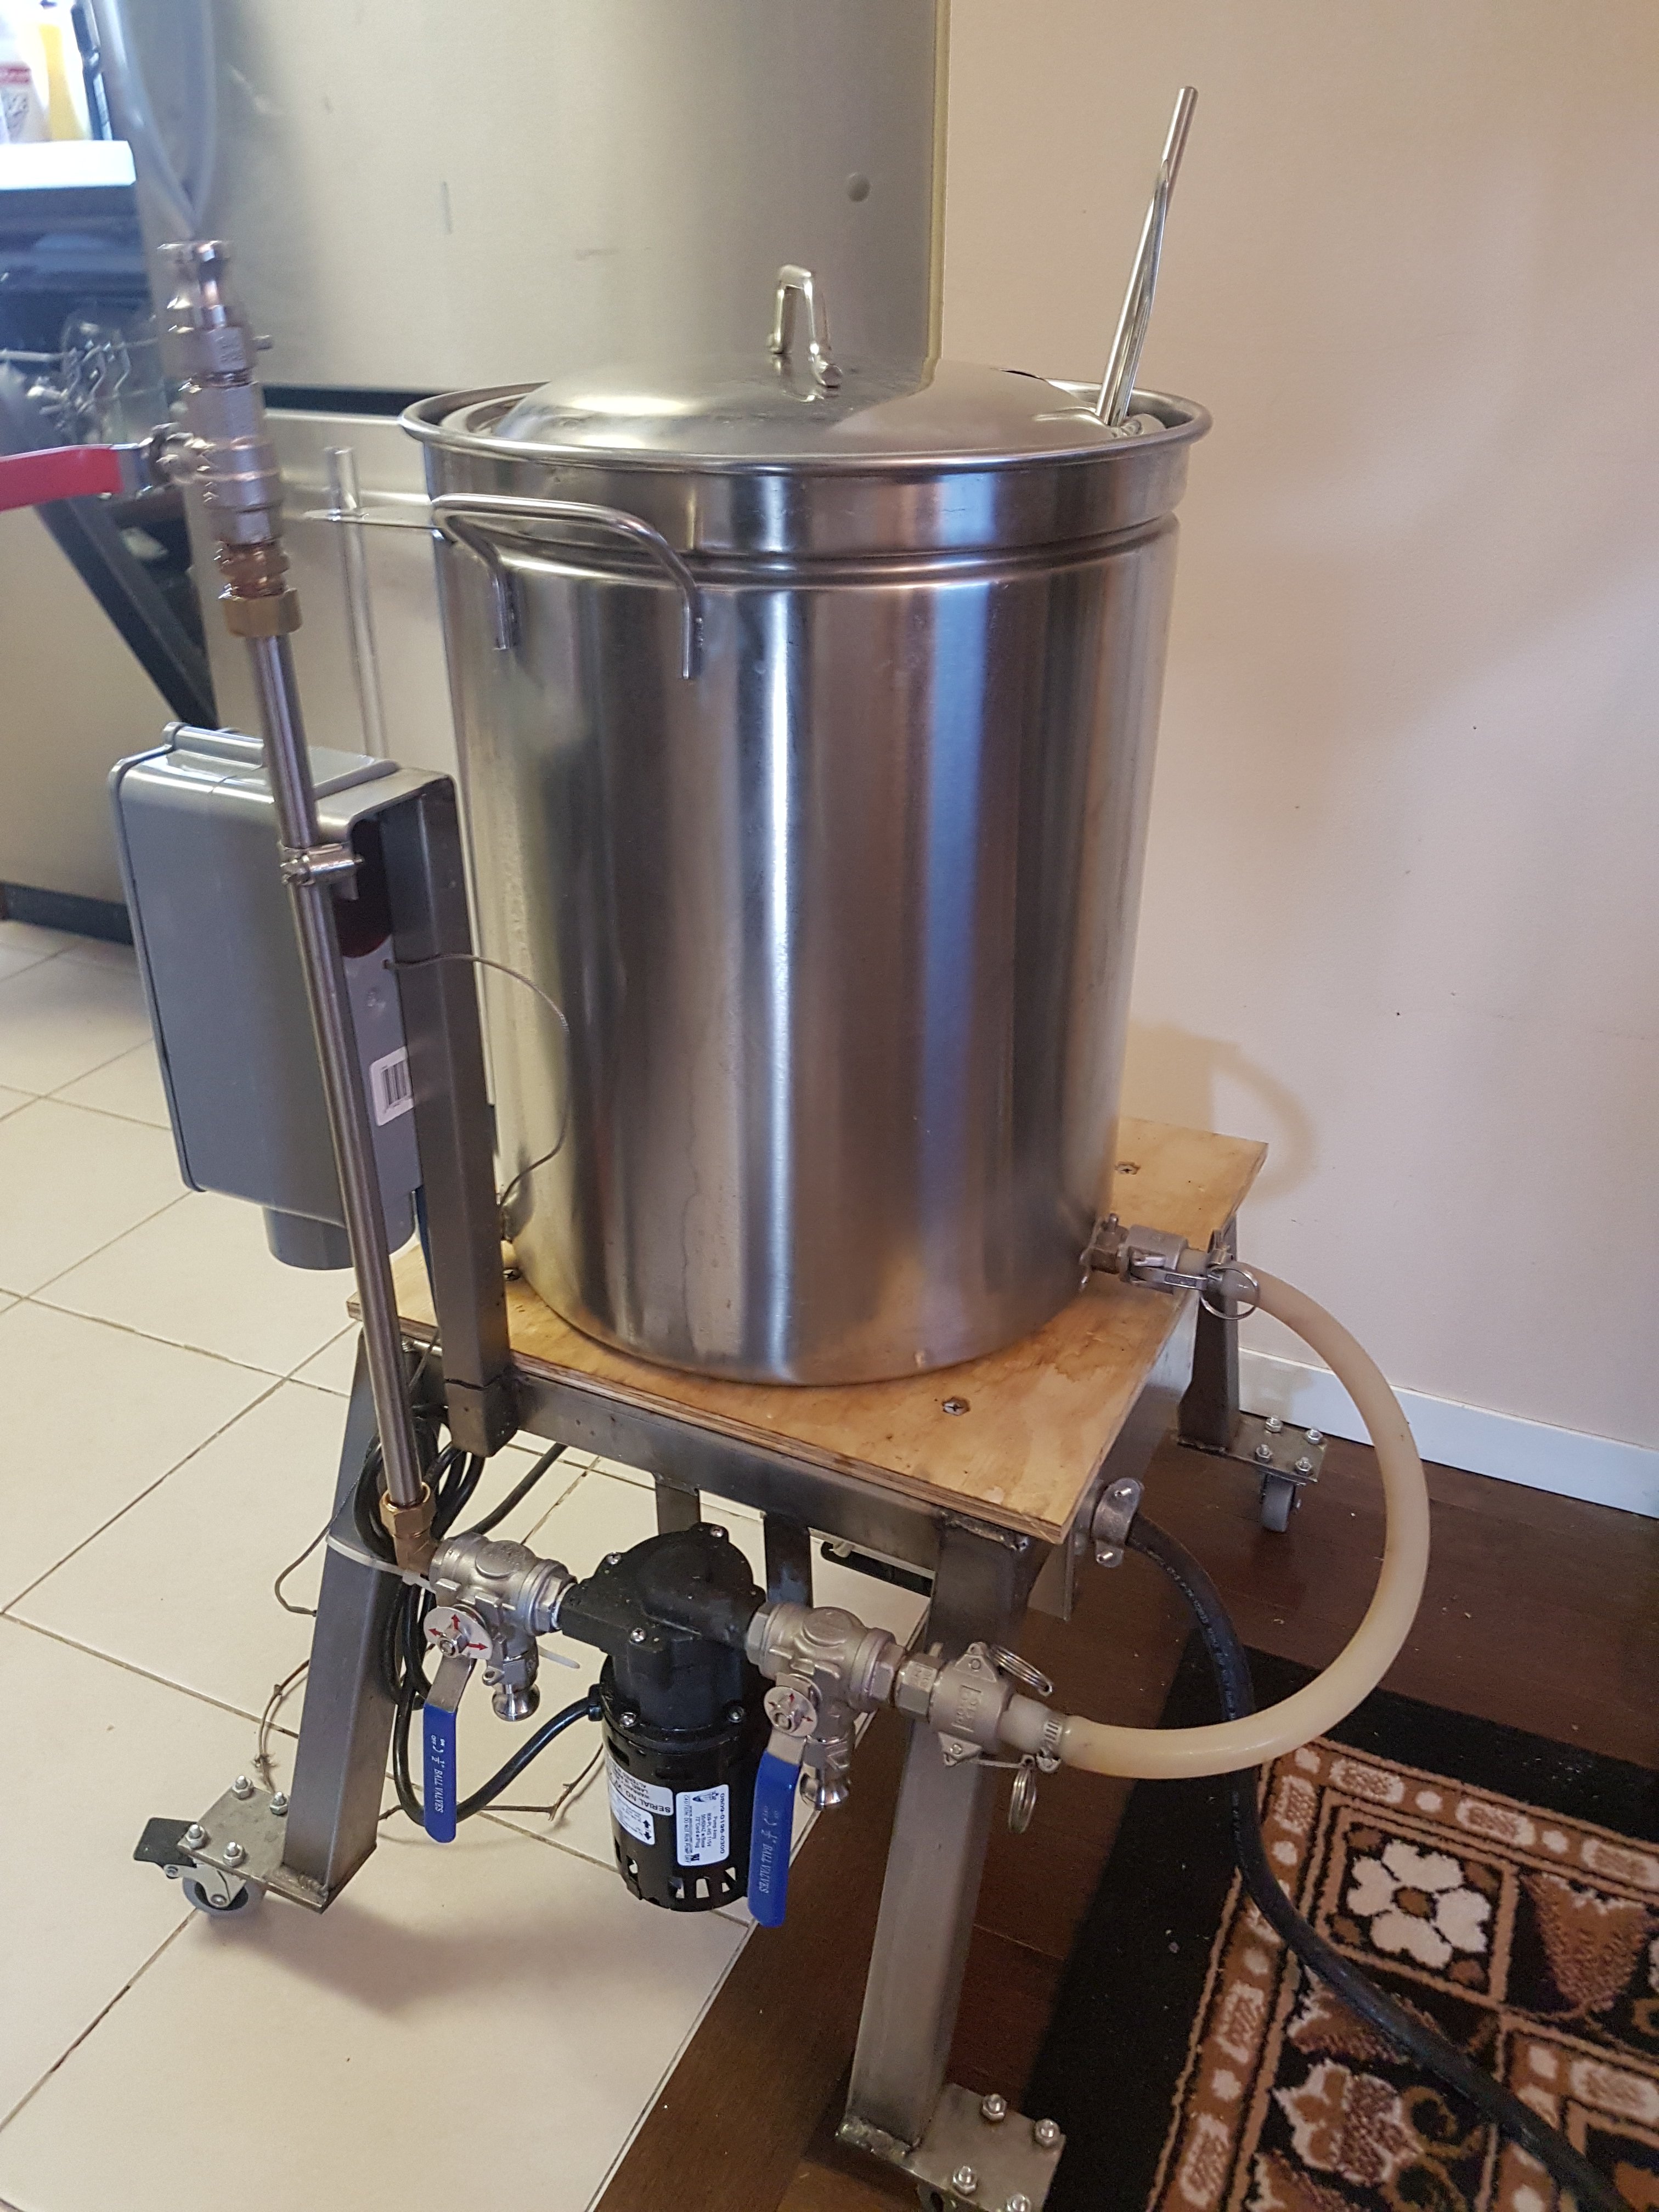
Meet Thing 1. A 5Kw Induction All In One...

Homebrew Talk - Beer, Wine, Mead, & Cider Brewing Discussion Forum

Help Support Homebrew Talk - Beer, Wine, Mead, & Cider Brewing Discussion Forum:

This site may earn a commission from merchant affiliate links, including eBay, Amazon, and others.
Here is the grain basket used in Thing1. I put a 12" false bottom in it. Or you could drill a thousand holes in the bottom of the grain basket if you wanted. Remember, it is SS, which is not easy to drill.

https://www.amazon.com/Brewers-Best-Brewing-Boiling-Stainless/dp/B01N12UOLY

Here is the kettle. It works with induction. You don't need the basket, but it is handy for BIAB, if you do that. It keeps the bag off the bottom of the kettle.

https://www.amazon.com/Bayou-Classic-1144-Stainless-Stockpot/dp/B000FTLY1K
 
Last edited:
So your basket doesn't have holes. And you are saying drilling them is difficult. Without holes that 'basket' (some people might call it a pot) meets the requirement towards a basket that it doesn't let the grain out, but it doesn't quite meet the requirement of letting the liquid drip through. Adding a false bottom doesn't change that. What am I missing?
 
So your basket doesn't have holes. And you are saying drilling them is difficult. Without holes that 'basket' (some people might call it a pot) meets the requirement towards a basket that it doesn't let the grain out, but it doesn't quite meet the requirement of letting the liquid drip through. Adding a false bottom doesn't change that. What am I missing?

Good question.

I drilled a single large hole (1/2") in the bottom of the grain bucket, under the false bottom. So the mash liquid goes from the grain, though the false bottom, through the hole in the bottom of the grain bucket to the bottom of the boil kettle, where it is heated. Then it is pumped to the top of the mash to repeat the cycle all over again.

I'd take a picture to show you, but everything is put away right now. I'll take one the next time I set it up.

Let me know if you need a set of detailed pictures to build one.
 
Aha, a single hole. That is indeed a lot less drilling. Do you have a link for a false bottom that fits the basket kettle you linked? (Not that I need it, since I already built something more complicated... but for future reference.)
 
It's this one or something like it. I plugged the center hole with a 1/2" NPT plug and NPT nut. Actually, I had a stand pipe in it for a while, but it wasn't necessary, so I removed it.

https://www.aliexpress.com/item/32510236088.html
I thought about cutting out 90% of the bottom of the bucket, but SS is hard to cut and I wouldn't really gain anything.

BTW, the grain bucket sits on 3 pieces of 1.5 x 1.5 x 1.5 aluminum tubing. Could use SS. The bucket has 4 5/16" bolts sticking out the side that it sits on when sparging. Those bolts sit on 4 pieces of SS rod that are soldered into the boil kettle. No clips to drop ! No ring to put in place while holding the grain bucket ! And you can lift with both hands - don't need a hoist ! What a concept !

To sparge, you lift the grain bucket up with the lifting bar and give it 1/8th turn so the side feet will engage with the soldered bars. It works really well and is very simple to build. And it does full sparges. The pump is free to pump sparge water if you want to do a traditional fly sparge.

The only other "construction" on the boil kettle is the drain valve and the sight glass. Both were done by soldering half a 1/2" coupler onto the kettle. Could use weldless fittings too.

One could cut slots in the bottom of the grain bucket with an angle grinder as well. But all it takes is a single hole for it to drain properly. Leaving the bottom of the bucket intact means it is easy to set on the blocks on the bottom of the boil kettle.

I scoop the bocks out at the start of the boil when I am stirring the wort. Takes about a minute to find them and lift them out. That leaves the entire bottom of the boil kettle completely free of obstruction. There are no filters or tube or elements anywhere to interfere with stirring or cleaning.

The entire frame is made from one 8 foot piece of 1.5" SS tubing. A welder could weld it up in a couple hours if the pieces were cut and prepped.
 
Last edited:
I'll provide pictures and assistance to anyone who wants to make up public drawings, materials list, wiring diagrams, etc.

Thing1 is the simplest, easiest to build brewing system around. Everything except the frame and the coil is off the shelf. I've looked at and brewed with a number of different systems and nothing works as well as Thing1.

Thing1 will convert to a 10-15 gallon system by building a second boil kettle and grain bucket. No changes will be needed for the frame, pump, coil, etc. Just set on a different set of vessels and start brewing.
 
For those not wanting to weld up a frame like I did for Thing1, the easiest way to build a "chassis" for an induction system would be to find a SS table that is not the least bit magnetic and put the coil under the surface and an induction friendly pot on top, on an insulator pad. Wala, invisible induction heating.

Or one could cut a circle out of the table top for the coil and place a piece of tempered glass over it and set the pot on top of the tempered glass.

You could have several coils heating pots on the same table top.

The induction driver board could be mounted in a box mounted to the under side of the table top. For those wanting a sub frame under the table top, solder or weld some SS bolts to it. And run 2 1x1" SS or aluminum tubes the length of the table, hanging down 3-6" as necessary to hold the driver box in the correct position. Pretty easy to do. Very little fabrication.
 
Last edited:
I did a brew last night. I took a few pictures to show the details of the grain basket while I was cleaning up.

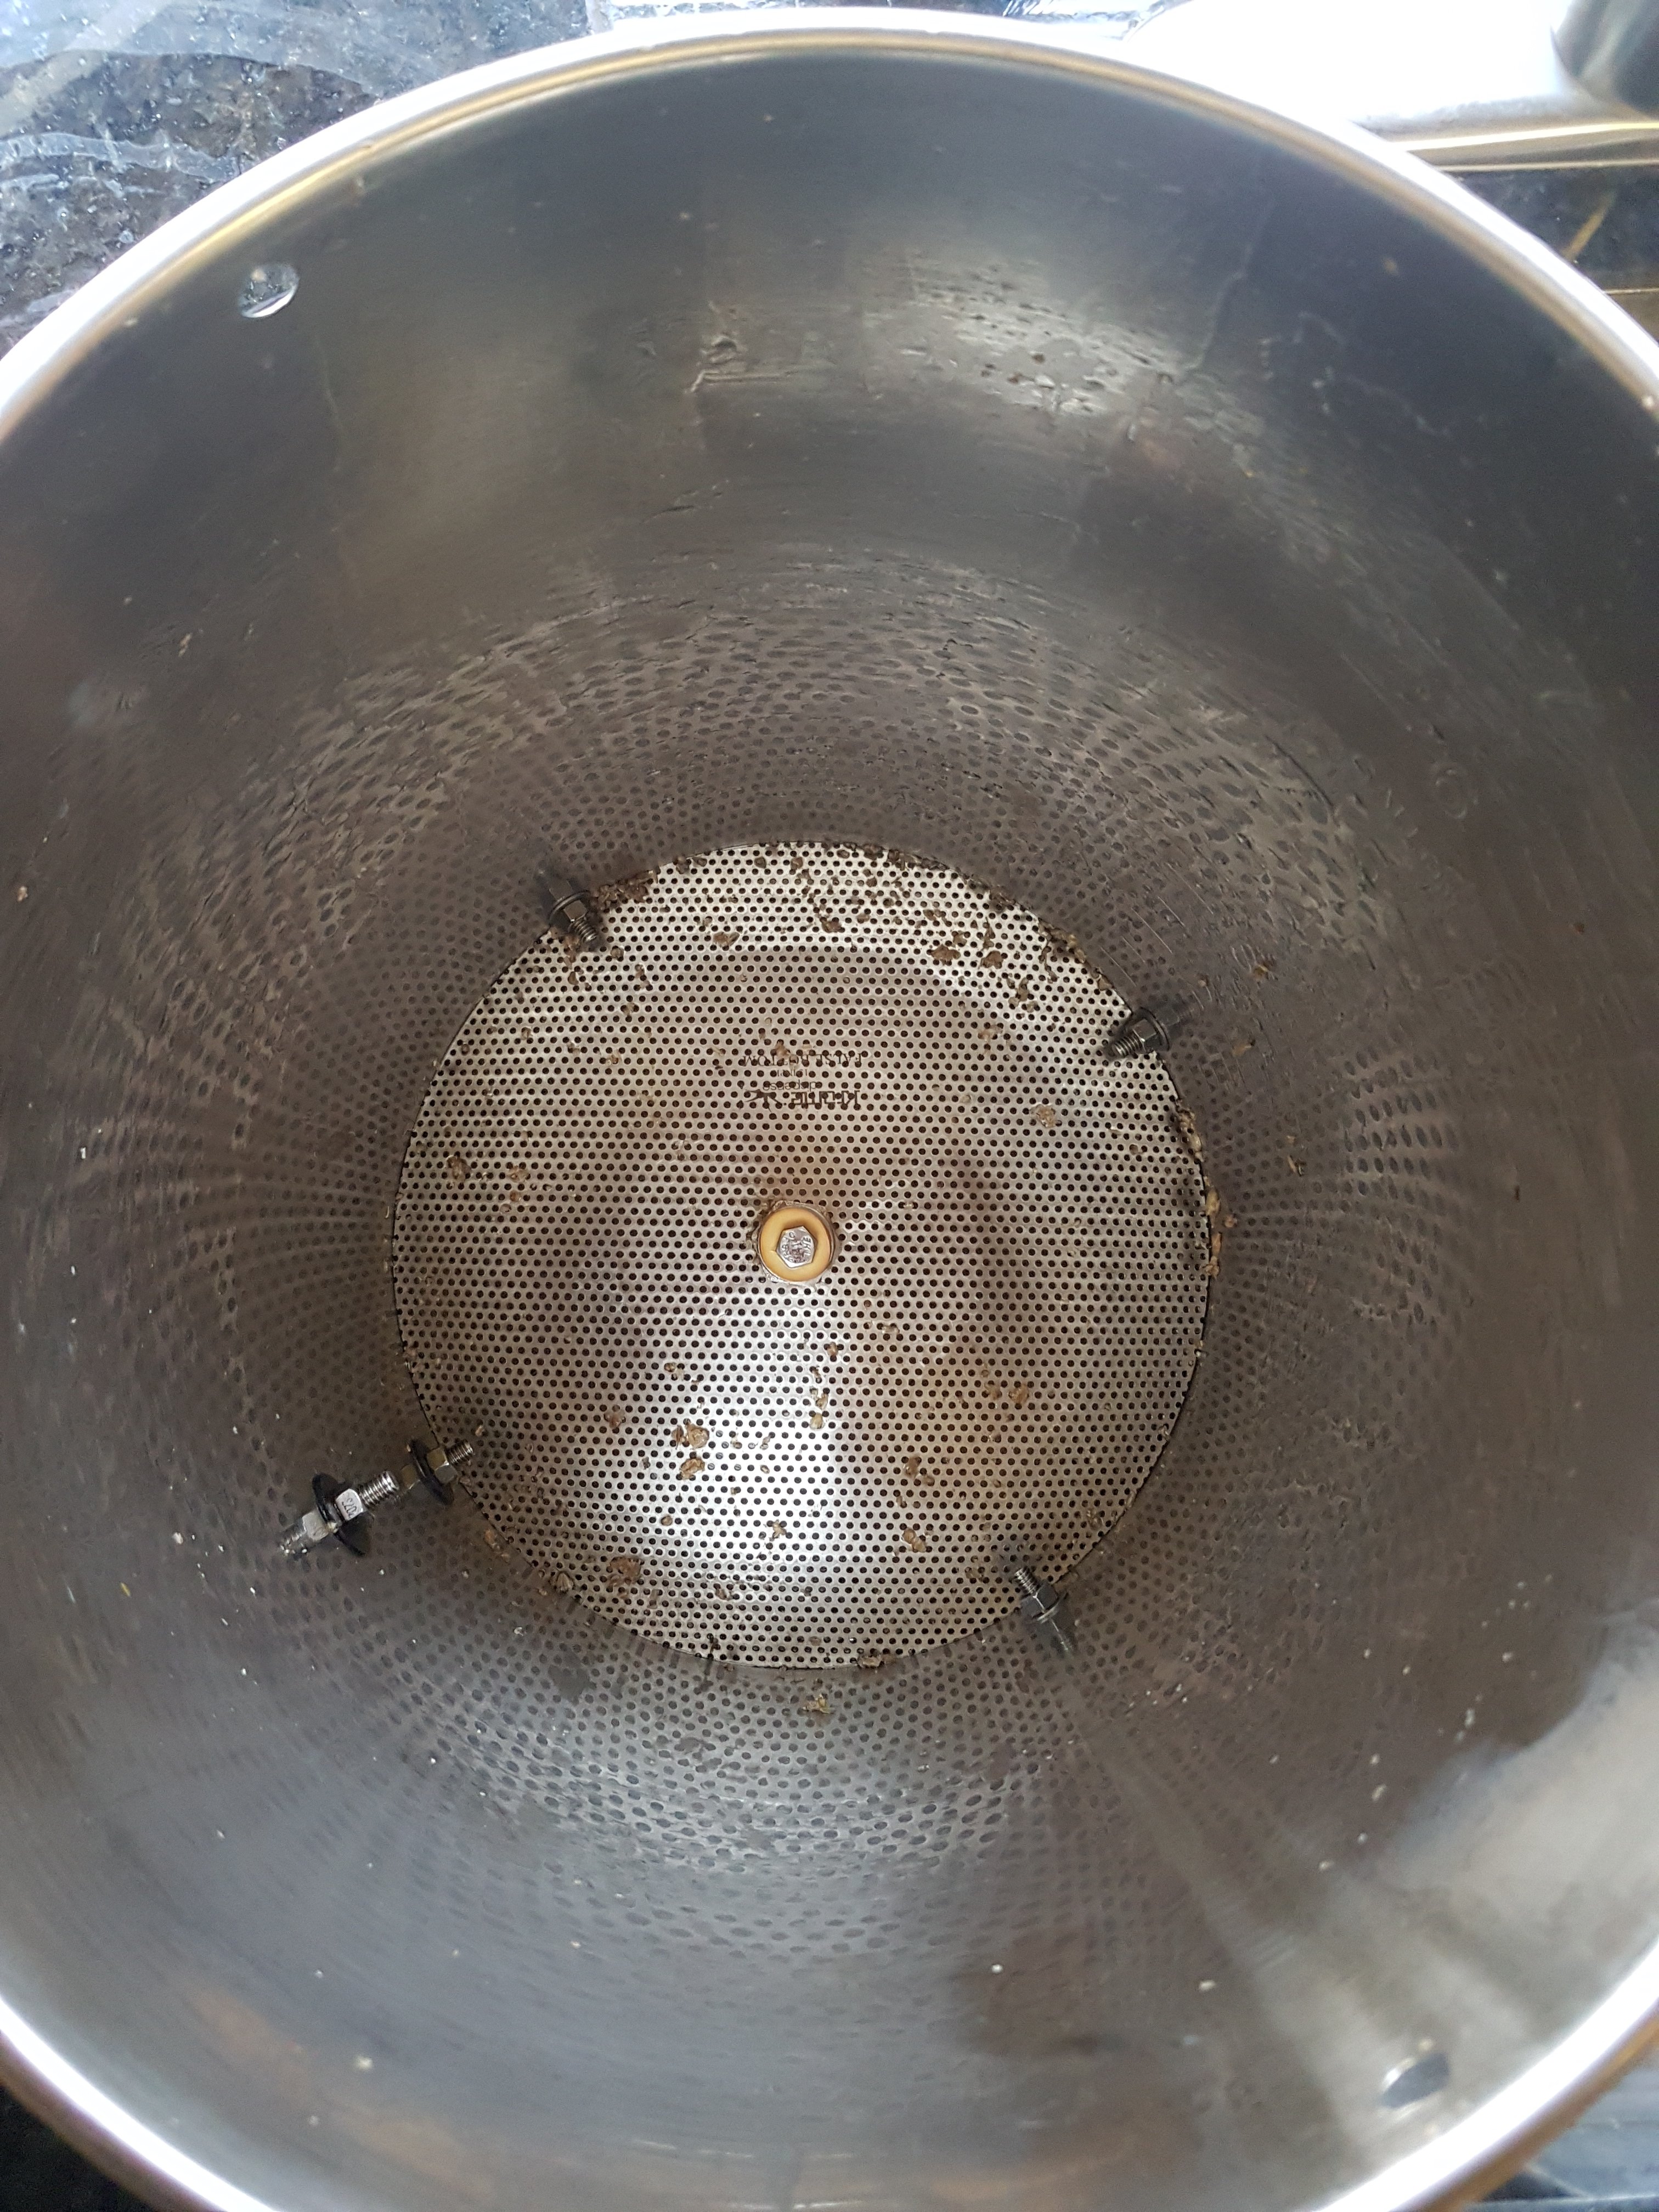
This is Thing1's grain basket. It's made from a cheap 8 gallon boil kettle with a false bottom inserted in it.

The plug in the center plugs the fitting the stand pipe used to screw into. I don't use the stand pipe anymore, no need, even when brewing with flaked oats.

The hole in the top of the grain bucket is for the rod that is used as a handle to pass through so it can be lifted into the sparge position.

This grain basket will comfortably mash up to 15 pounds of grain. If I need more grains than that, I will do a reiterative mash.

20210210_101236.jpg


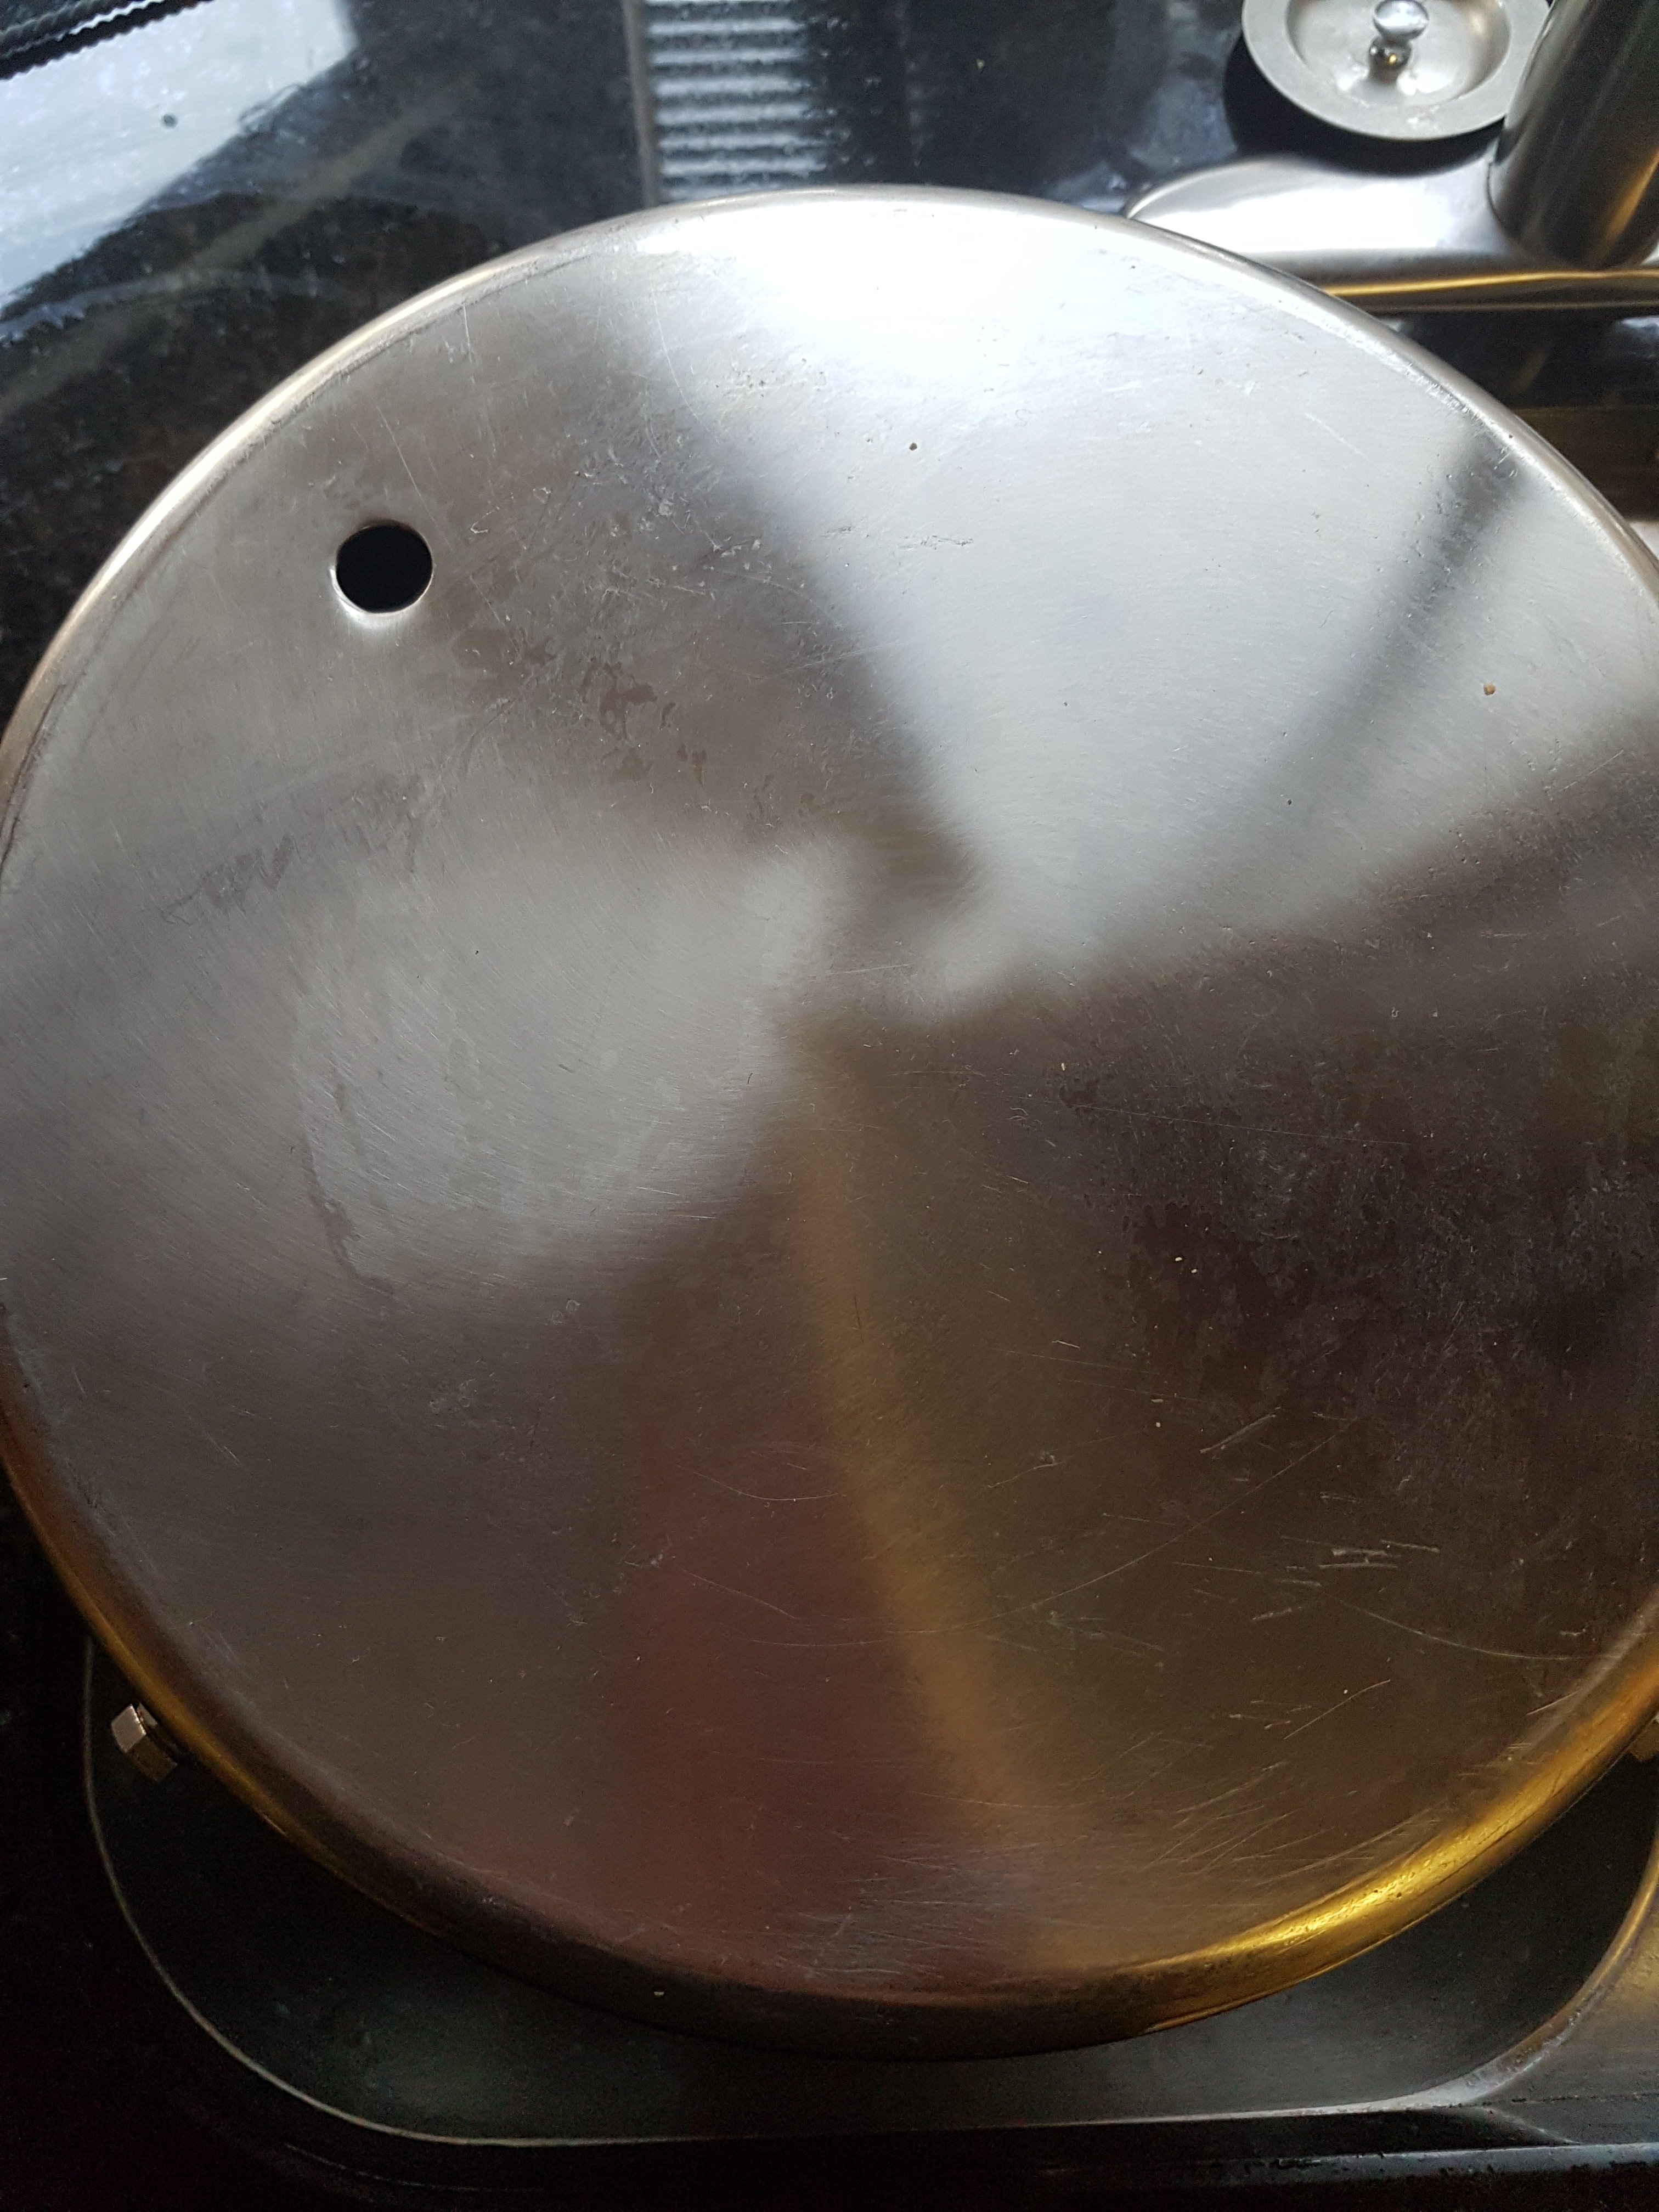
This is the underside of the grain basket. There is a single 1/2"ish hole drilled in it so that the mash liquid can drain out into the boil kettle while mashing and also while sparging. I should probably drill a second hole to allow faster draining, but it works OK as it is.

The grain basket is positioned so the drain hole is opposite of the pump outlet on the boil kettle. This means that the all the mash liquid has to cross the entire width of the bottom of the boil kettle, meaning there are no areas of unmoving mash liquid. This helps prevent localized hot spots and scorching.

20210210_101219.jpg


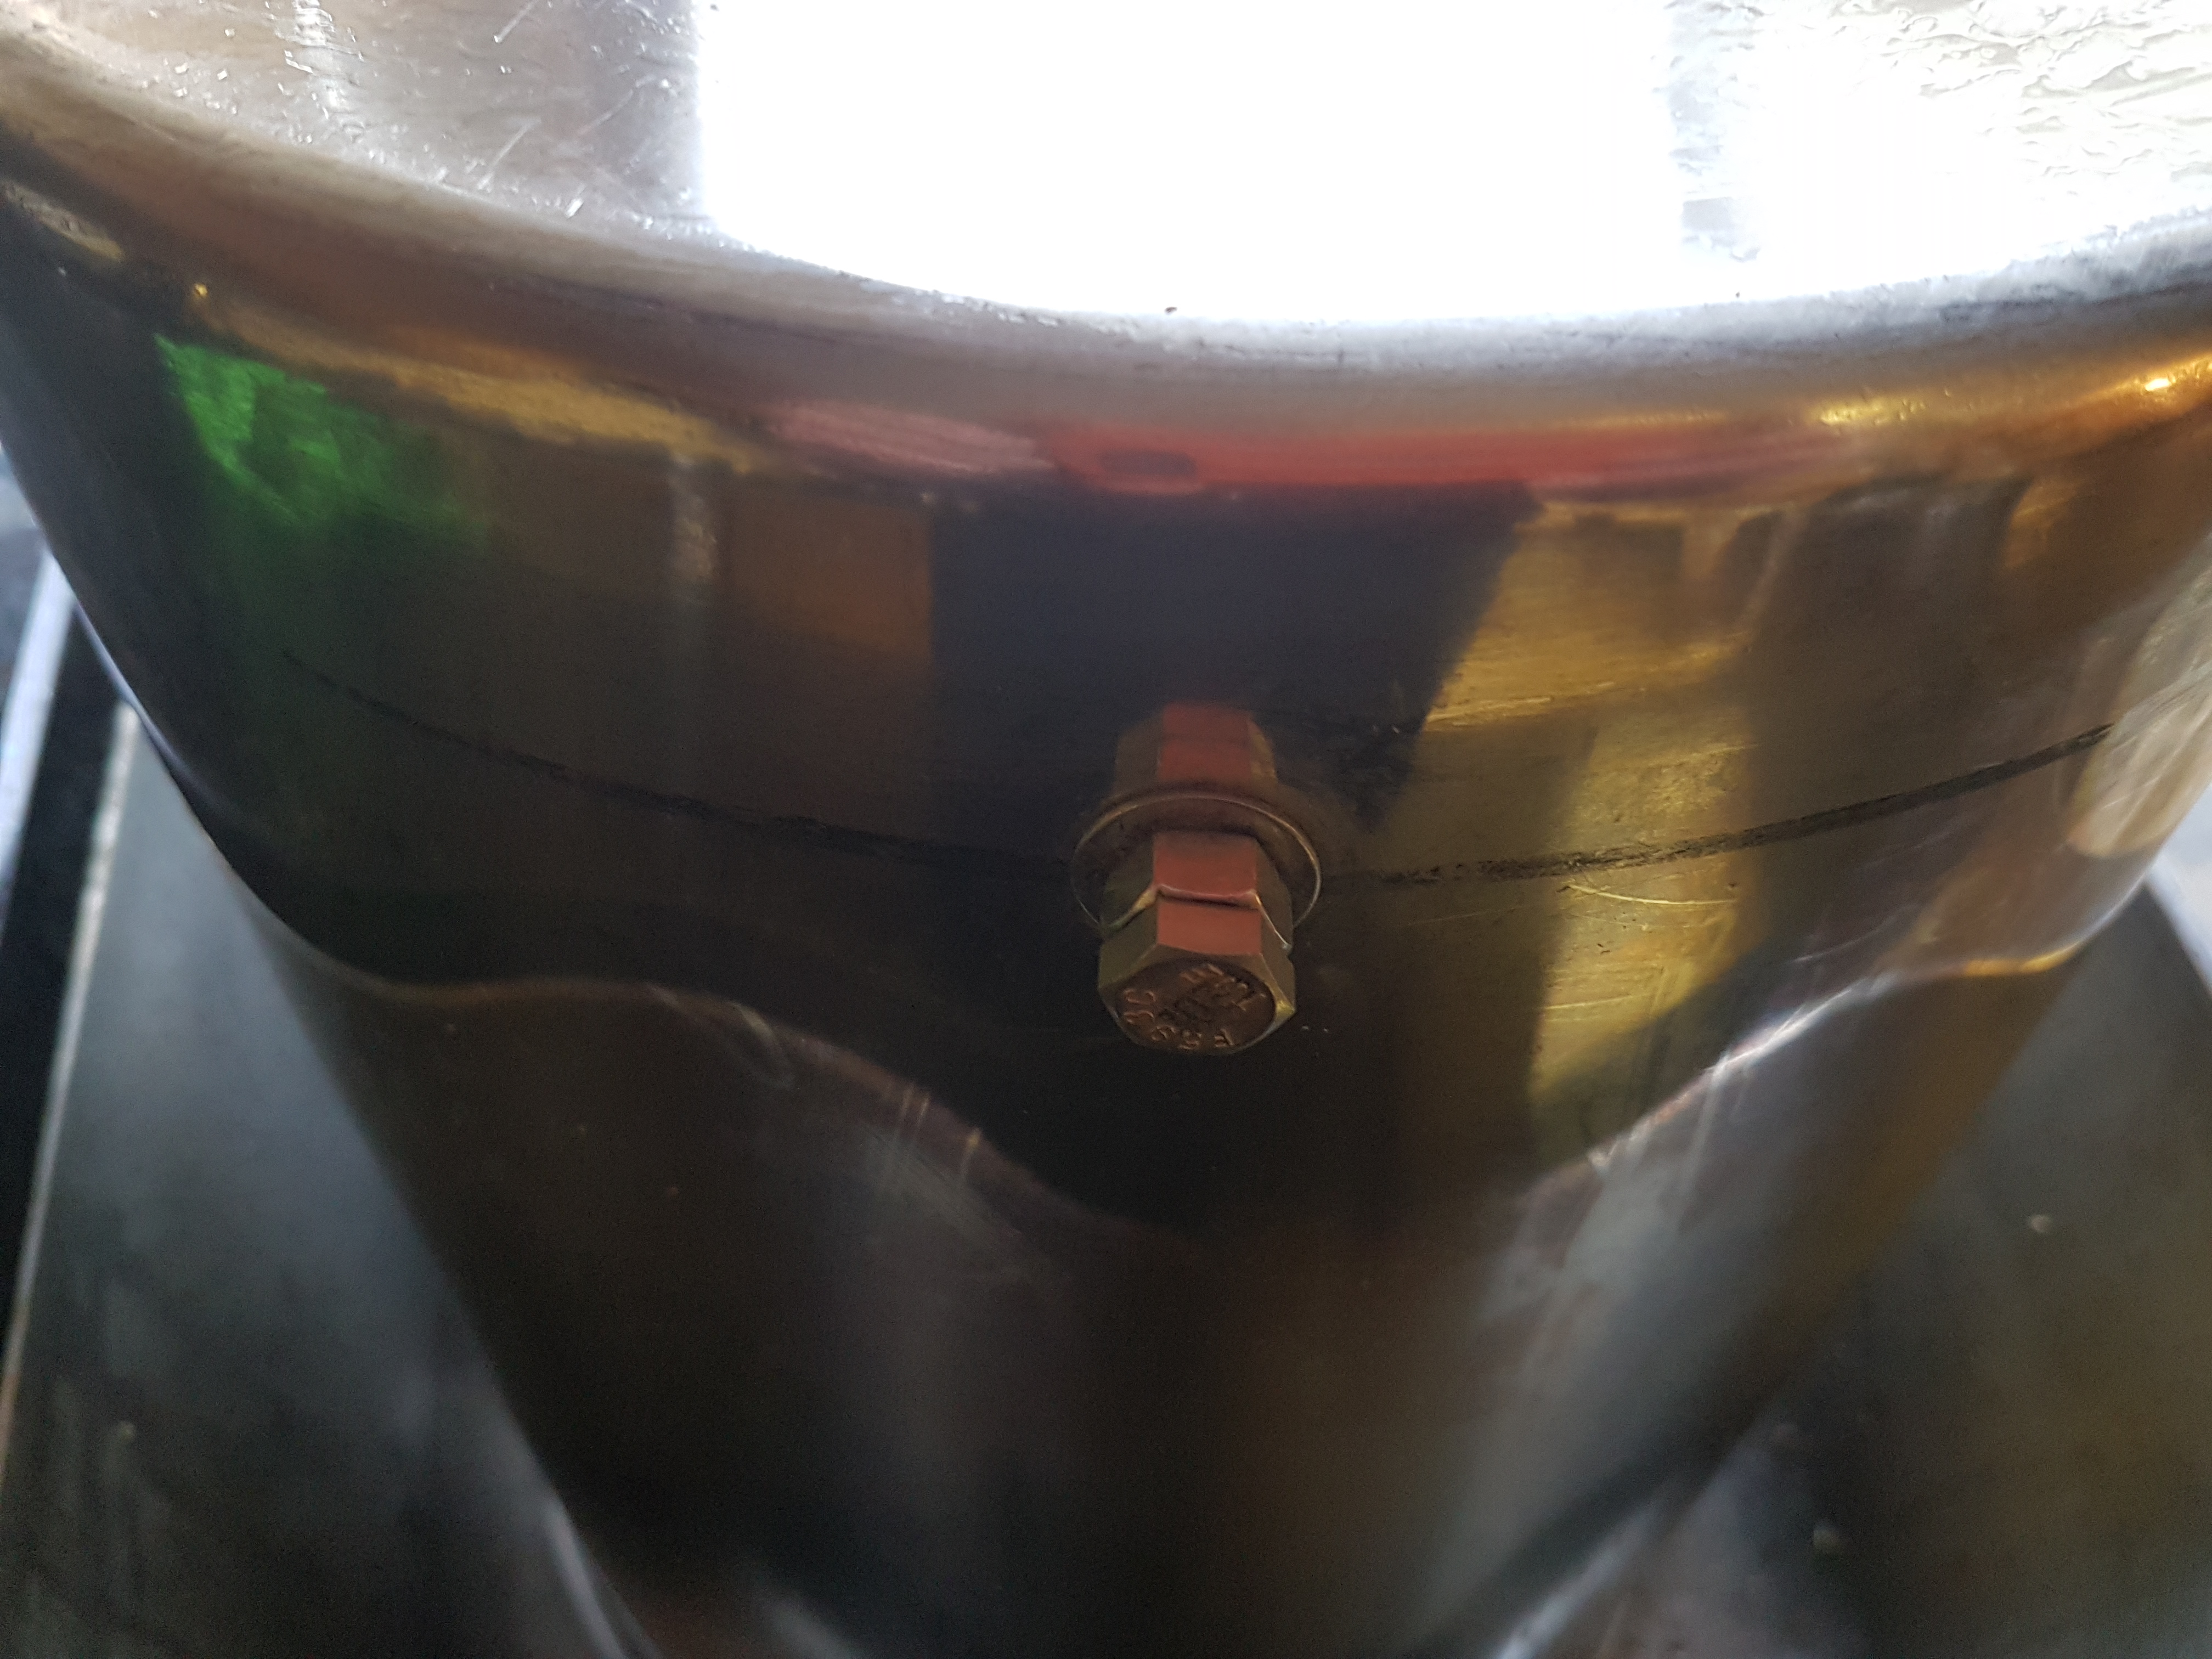
The grain basket has 4 SS bolts around the periphery. They are used to hold the grain basket up when sparging.


20210210_101405.jpg


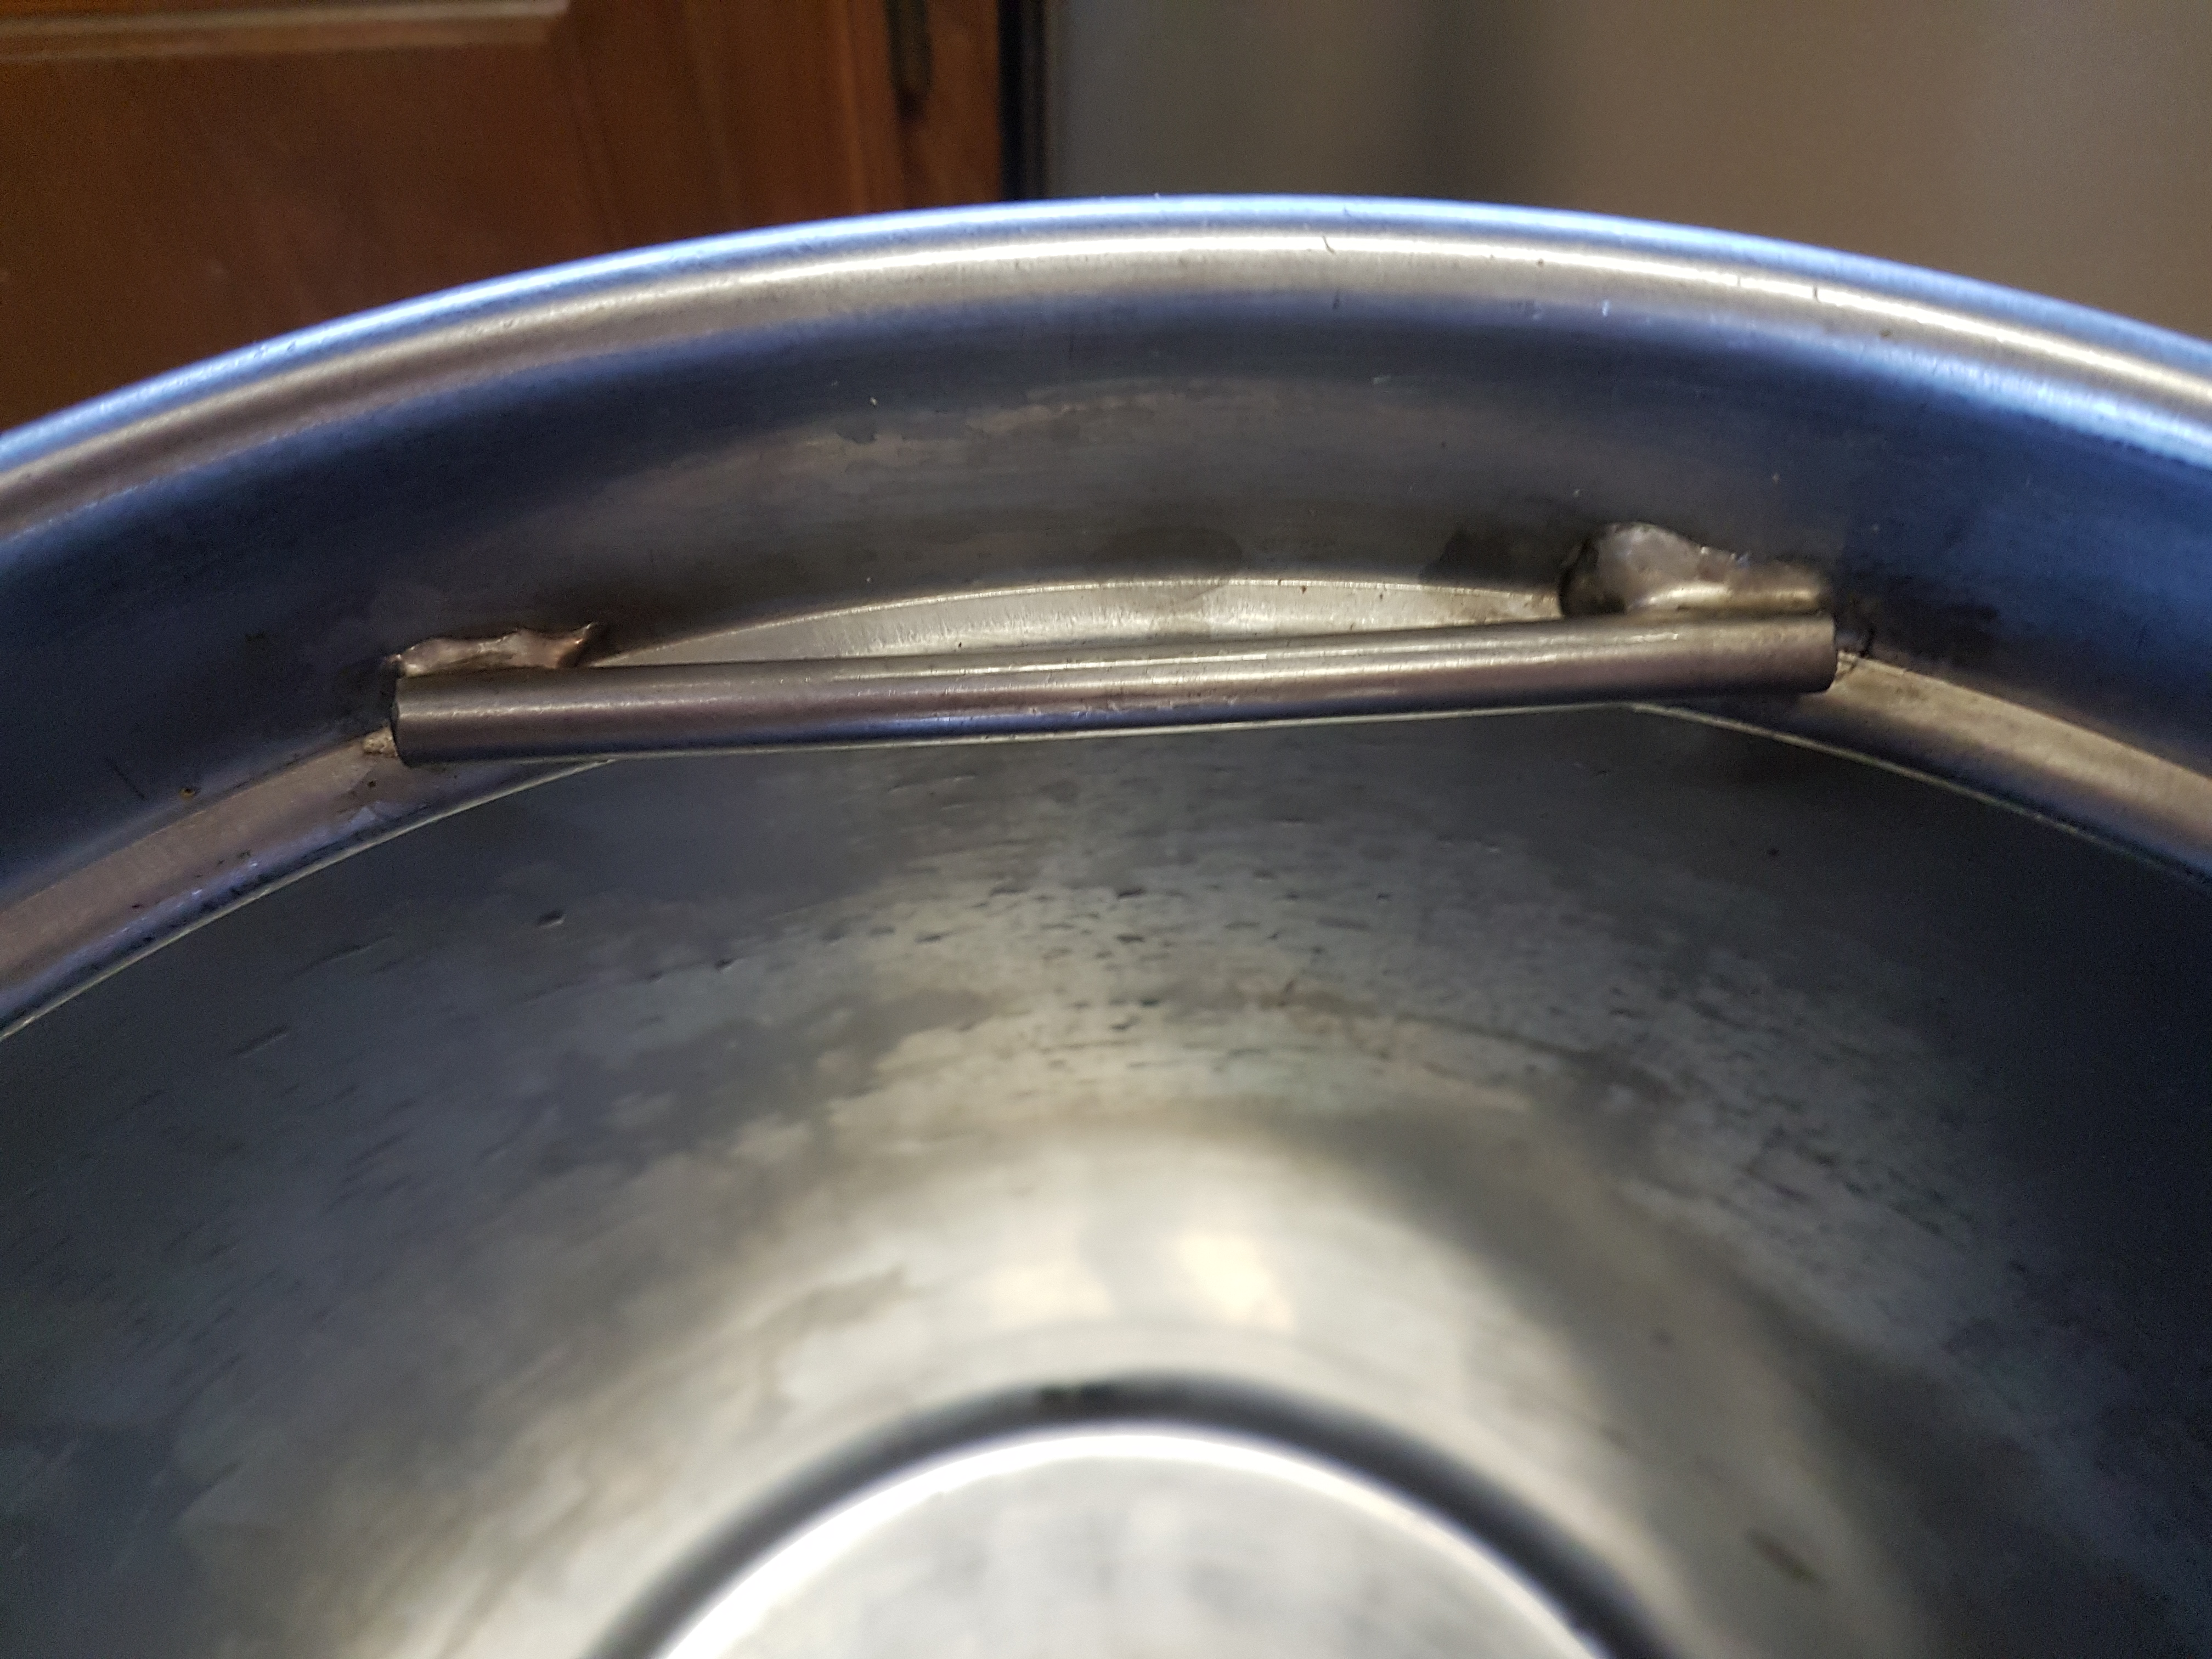
The boil kettle has 4 pieces of rod around the outside to serve as a surface for the 4 periphery bolts above to sit on when the grain bucket is in the sparge position. These were silver soldered on.

All in ones typically use a clip or a wire rod gizmo that has to be put in place as the grain basket is lifted up. Not so on Thing1. These rod pieces stay in place and require no fiddling when lifting the grain basket.

To put the grain basked into the sparge position, one needs only lift the grain basket up and turn it 45 degees so that the bolts like up with the rods.

The grain basket is very easy to lift because it is at the right height, the handle allows a good arm position and good control of rotating the basket.

20210210_101411.jpg


The grain basket sits on these 3 1.5" x 1.5" aluminum spacers. I fish them out of the boil kettle at the beginning of the boil with my brewing spoon. It is pretty easy once you've done it a couple times.

The grain basket could have been hung on some bolts like the ones used to hold it in the sparge position. I did this as a quick way to test things and liked it so much I kept them.

20210210_111422.jpg
 
Last edited:
I did a collaborative brew last night with a newbie brewer. This was her first brew ever. She selected a Lemondrop NEIPA, bought the ingredients and we brewed it.

We mashed at 152 and produced nearly 7 gallons at 1.053. We used 10 pounds of pale, 1.5 pounds of flaked oats and 1 pound of flaked barley. Total potential sugar in was (10 x 37 + 1.5 x 32 + 1 x 32) = 450 points. Total into the fermenter was a bit under 371 points. (7- gallons @1.053) Efficiency was a bit less than 82.4%

I attribute this efficiency to:
- stable mash bed temps
- proper mill setting/good grind
- 1 hour mashes with 30 minutes of circulation
- sparging until the wort is nearly at boil temp
- no loss of wort between the mash tun (grain bucket) and the boil kettle, like would be if one used hoses and a pump
- doing a real sparge, ie pouring 170F water over the grain bed and allowing it to rinse out the grains

The best part was how easy things were.

We filled the boil kettle (with grain basket in) with water and brought it up to strike temp. Had a snack and sampled our first beer while waiting.

We mashed in and put the lid on and let it sit for 20 minutes or so. Tasted another beer and discussed brewing while that was going on. Eventually gave it a stir and turned on the pump. Took a couple gravity readings.

When mashing was done, we lifted the grain basket up and sparged with the hot water. We watched it come to a boil so we could knock down the foam, but then we sampled more beers and a wine while waiting for the boil to complete.

Then we whirpooled some hops, chilled and pumped it into the fermenter. The yeast is working on it now.

It doesn't get any simpler than that.
 
I never picked up on your basket design to realize it is really a false bottom, not like the commercial versions.

The one hole is counter intuitive to me, but it obviously works.
 
I never picked up on your basket design to realize it is really a false bottom, not like the commercial versions.

That was just the easiest way to do it.

The one hole is counter intuitive to me, but it obviously works.

That hole is a bit restrictive at times like when you lift the grain basket out of the boil kettle to put it in the sparge position, or when you put the grain basket into the boil kettle and it already has 4-5 gallons of water in it the grain basket will float until the hole allows enough water in.

But the smaller hole might prevent the grain bed from being drained too quickly and getting hydraulically locked. And if you place the hole across from the pump pickup in the boil kettle, it forces the mash liquid to travel from the hole across the whole heated surface to get to the pump.

And I wasn't sure how everything would work when I built it so I only drilled 1 hole. :)
 
This is one of the weirdest setups I've ever seen!
Do you use a bag as well in the malt pipe?
How exactly does recirculation work?
What kinda pump?
What kind of pid are you using?
How much money are you into this thing for?
 
This is one of the weirdest setups I've ever seen!

Not sure what you would find wierd about it. It is a Grainfather on steroids.

Do you use a bag as well in the malt pipe?
No, why would I ?

What kinda pump?
Standard March. Any decent pump will work.

What kind of pid are you using?
JLD 612. Any PID will work.

How much money are you into this thing for?

- ~10 feet of 1.5" SS tubing
- 4 wheels
- ~500 feet of magnet wire
- 18 x 18 x 3/8" outdoor plywood
- 5 KW induction driver board. ~$150
- induction board enclosure - should be aluminum or SS
- March or Chugger pump
- 2 3 way valves
- plumbing: cam lock fittings, silicone hose, a piece of 5/8" SS tubing
- boil kettle (11 gallon, Bayou Classic part number 1044 ?)
- grain basket - cheap 8 gallon SS boil pot
- 12" false bottom
- PID
- 2 3 way switches
- 1 emergency electrical switch
- 2 SSRs, one for the pump, one for the induction driver
- electrical enclosure for PID and switches
- misc hardware

$500 ?

Thing1 has more than paid for itself in cost saved versus buying retail beer.

How exactly does recirculation work?

There is an outlet on the side of the boil kettle. It attaches to the pump inlet via camlocks and a pieces of hose. Goes through the pump and up the output pipe.

I added two 3 way valves so that the system can be easily emptied completely without even lifting the boil kettle. And one can use the pump to pump from another vessel on the inlet and/or pump to another vessel/device on the outlet. For example, if you wanted to put your chiller on the floor, you could use the outlet 3 way valve to send the hot wort to it.

Plumbing wise, it is a very versatile setup.

I love the vertical outlet tube because hoses drain without any drippage. And the flow control valve and pump on/off switch are right there. It is very quick and easy to run.


20210210_125649.jpg
 
Last edited:
What do you do about steam during boil?
This is basically a homemade spike solo/Unibrau with wireless touch controls, right?
I'm debating endlessly about going with a different eBIAB setup vs a spike solo. I have the HARDEST time deciding and I am definitely NOT an EE.
Nice work here, although I still don't get the "why" on going induction vs. an element in the wort.
 
What do you do about steam during boil?

I'm old school. It humidifies my house.

This is basically a homemade spike solo/Unibrau with wireless touch controls, right?

Yes, but it doesn't have the limitations that they do. Nor the cost. And it is portable, self contained, on wheels.

I used to run it with CraftBeerPi, but I don't anymore. It was OK. I prefer the manual control.

I'm debating endlessly about going with a different eBIAB setup vs a spike solo. I have the HARDEST time deciding and I am definitely NOT an EE.

The tapered grain basket on the Spike Solo is a TERRIBLE design. It basically creates stuck mashes. I wrote about that aspect of it in a thread here. Search my history.

Nice work here, although I still don't get the "why" on going induction vs. an element in the wort.

1) There is no element in the pot to hit while stiring, burn a hop bag on or clean.
2) No scorched wort ! Ever !
3) Minimal headspace below the grain basket.
4) Can use any boiler that I want as long as it is induction capable. Interchangeability.
5) Boil pot doesn't need to have a port in the side to put an element in. I can heat regular kitchen non brewing pots on it.
6) No extension cord sticking out the side of the pot.

"My friend" uses this unit for distilling. it will boil the heaviest rum worts and rum washes for hours with no stick on. Try that with an element.

My beers taste really smooth compared to my friend's. I'm wondering if some beers get carmelized by heating elements.

The beer we brewed last night has started fermentation.
20210210_132335.jpg
 
Last edited:
I recently brewed a 4 srm german pilsner in a kettle with a heating element. Bag on element.
I can assure you there's no scorching or caramelization.
Well, either way, I wish you happy brewdays.
I also have kids. My boy is older (5.5) and he likes coming downstairs to the basement where I brew and "helping". His attention span is short tho. I'm pretty much up and down while brewing. Wife usually makes lunch and I come up for that. Spring summer I always do all my yard WHILE I brew. I love reading about everyone's different setups and circumstances.
 
BTW, this is the complete system in storage mode. All the hardware I need to brew except my plate chiller is packaged up here, ready to roll into a closet and forget about. The unit is 20 inches wide with the kettle hose removed, so yes it does fit in most closets. Someone designed it that way.
 
Last edited:
I was thinking more like a Belgium quad @ 1.120.
I'd be amazed if someone could detect it in a beer like that or some big stout.
With today's ULWD elements being run on PIDs is scorching really an issue anymore?
So many people have switched to electric brewing with elements and I haven't read anything about issues with scorching.
 
I discovered this chain late. Very impressive! I am assembling my own, but with element. Didn't think about sourcing an induction unit.
 
I am late too. Thing 1 looks pretty sweet to me. I am a huge fan of induction and simplicity, although I prefer to avoid pumps and anything other than an immersion chiller. Now I need to go back to the beginning and have read...
 
although I prefer to avoid pumps
The only fluid that is moved manually when I brew is the sparge water that is hand ladled on top of the grain bed. 2-3 gallons of it, using a 2 quart pot as the ladle. All the other fluids either come out of the kitchen tap or are transferred by the pump.

One could run a hose from the sparge water kettle to Thing1's pump and pump the sparge water onto the mash, but it isn't worth it. It only takes a couple minutes to ladle the water from the stove top to the mash.

Fluid transfers during a brew session:
- rinse out brewing equipment (tap -> filter -> kettle, kettle-> pump-> kettle, kettle-> pump-> plate chiller-kettle, kettle-> pump-> kitchen sink drain)
- fill kettle with mash water (tap-> filter-> kettle)
- fill sparge water kettle on stove (tap-> filter -> kettle)
- recirculate mash (kettle-> pump -> top of mash)
- sparging, which is manual
- strain the wort (kettle-> pump-> grainbag in the kettle)
- sanitize the plate chiller (kettle->pump->plate chiller-> kettle)
- whirlpool (kettle -> pump-> plate chiller -> top of kettle)
- cool (kettle -> pump -> plate chiller -> fermenter)
- clean up (kettle-> pump -> plate chiller in reverse -> kettle)
- pump out (kettle -> kitchen sink drain)
 
Very nice indeed! Well thought out from my vantage point.

I have done some induction brewing on my 5 burner Bosch cooktop and the power and heat transfer is truly fantastic. I was concerned about weight on the glass and was given some stats, which I don't have on hand at the moment, that made me comfortable with 7 gallons on that big sheet of glass. I don't know if you are content or are still thinking about surfaces, but the glass that most of the big stove makers use is "Schott Ceran" which is a ceramic glass of some kind which I don't think is proprietary. I wonder if a glass shop might source it?

And regarding some of the discussion of efficiency, I wonder if increasing your water volume, like BIAB, might get your efficiency up? Although personally I don't get too worked up about that.

Great project! Thanks for sharing it!

:mug:
 
Very nice indeed! Well thought out from my vantage point.

Thanks !

I have done some induction brewing on my 5 burner Bosch cooktop and the power and heat transfer is truly fantastic. I was concerned about weight on the glass and was given some stats, which I don't have on hand at the moment, that made me comfortable with 7 gallons on that big sheet of glass.
There are usually some internal supports underneath the glass.

I don't know if you are content or are still thinking about surfaces, but the glass that most of the big stove makers use is "Schott Ceran" which is a ceramic glass of some kind which I don't think is proprietary. I wonder if a glass shop might source it?

Not that I am aware of. The only people that seem to use it are the radiant and induction stove top people. I thought about getting a used radiant stove top, but people told me it wouldn't be cuttable without breaking. I never did try though.

The plywood doesn't look great, but it works well. I should hunt down a recycled radiant stop top and see if it can be cut.

And regarding some of the discussion of efficiency, I wonder if increasing your water volume, like BIAB, might get your efficiency up?

~82% on our last brew session. I'm not complaining at all. I had some channeling going on for a bit. Now I put a performated pizza pan on top of the grain bed. That seems to really help.

Great project! Thanks for sharing it!
:mug:

My pleasure to give something back to the community.
 
Welp my third Grainfather melted it’s boiler plug. Busy doing the warranty thing and hoping they can send me the 220v NA version instead. Tired of the stupid 120v melting itself
...
Every time with this issue it’s been a full unit replacement. Plug to boiler is damage so whole thing is replaced. Also your warranty starts over from the new unit as well and I do in fact have that in writing from them.

And that is why you build an all in one instead of buying one. As well as several other issues.
 
Last edited:
Back
Top