Mash tun PID? Needed?

Homebrew Talk - Beer, Wine, Mead, & Cider Brewing Discussion Forum

Help Support Homebrew Talk - Beer, Wine, Mead, & Cider Brewing Discussion Forum:

This site may earn a commission from merchant affiliate links, including eBay, Amazon, and others.

SpentBrains

Well-Known Member
Joined
Jan 4, 2016
Messages
151
Reaction score
37
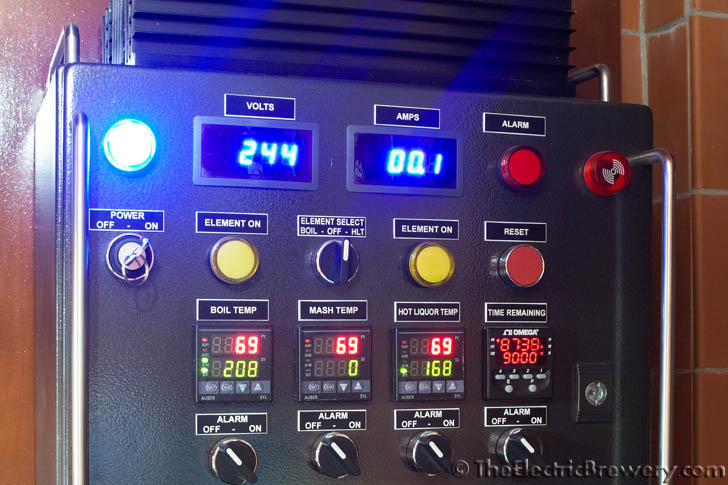
After looking at a lot of panels, I see many are equipped with a 3rd PID simply for the sake of being able to measure the mash temp.

I must not be understanding something correctly because I don't understand the point of a MT PID that doesn't drive an element.

Does anyone employ or see a problem with a rotary selector that can choose from as many temp probes as the builder would like to feed input to the HLT PID instead of a 3rd PID?

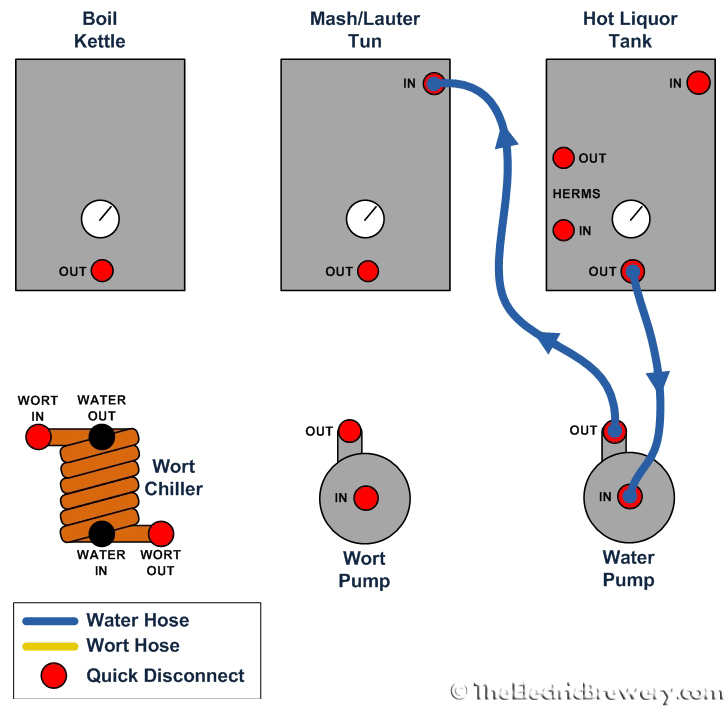
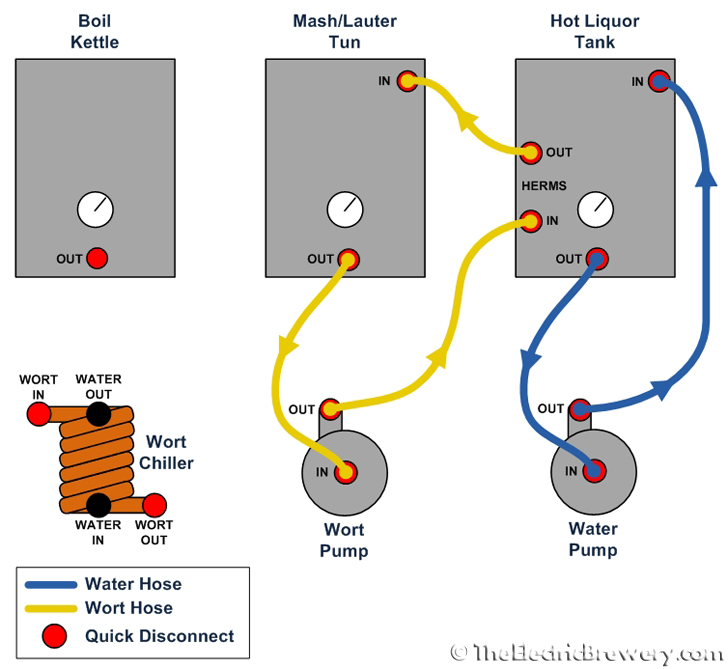
I'm thinking 3 total temp probes. One in the HLT, one at the HERMS coil return to the MT and one at the bottom of the MT so that temp drop through the mash could be calculated. Any of the 3 could be used as target data for the HLT's heater, but convention would be that while heating strike and or mashout water the brewer would select the HLT probe and while recirculating, the brewer would typically select the HERMs coil return to MT probe.
 
Are you using RTD'S or thermocouples for feedback? With tHermocouples, the main problem is that any alteration of the wire between the input screw terminals of the PID controller and the sensing junction(end) of the thermocouple will alter the properties and therefore the feedback will be off. now just imagine trying to obtain a good quality multi position switch capable of doing the task you described. Its just a lot faster and cheaper to use an extra pid and thermocouple. At least, that is what I think may have been decided.
 
You want to be able to display the mash tun outlet temp and RIMS/HERMS return temperatures simultaneously.

The PID which is running your mash heating element should be being driven by the probe at the outlet of your RIMS tube or from the outlet of your HERMS hex. So you can't switch that around whilst mashing.

Really in the overall budget of a full scale electric build, an extra PID and RTD don't add a whole lot of extra cost but the extra readout can be very useful.

Not the most cost effective way of doing it? Sure. Put a T in line with your mash outlet and add a dial thermometer. But having all the temps right in front of you in one place sure is concenient
 
Only if you want to pay $50+ for a function that could be more accurately satisfied with $18.

There is value in measuring the internal temp of the mash with a dial gauge with a 6" probe in my opinion.

I'd also measure the mash temp @ the MLT return.

It better takes into account all the losses. It would seem to reason that you are losing very little heat inside the tun in comparison to heat loss through the plumbing.
 
If I Remember Right The RTD Probe Shown Looks Longer Than In Life, After
Installing Into a Short ie; Swedgelok 1/4"NPT fitting You Will Have Aprox 1/4"-1/2" Of RTD Sensor Exposed, Otherwise Its a Good Working 3-Wire RTD.


well I am still putting together a parts list so I could go either way, RTD or thermocouples. I'll see what comes with the first PID I ordered last week when it comes

These are an option:

http://www.ebay.com/itm/RTD-Pt100-T...814116c&pid=100005&rk=3&rkt=6&sd=321878467059

Not really about costs so much as trying to reduce the size of the control panel
 
Pete and Cantrell

Thanks for your thoughts!

As to the concepts of being able to "simultaneously displaying various temps", my thinking was that you could get momentary readings from each input feed, by rotating through the selectable probes. Eventually of course, settling the selector on your HERMS return probe while mashing, or your BK probe while boiling.

For the few seconds that you'd be switching input that you'd normally want driving the PID, certainly there is enough thermal mass that you won't experience wild swings in mash temp via heat exchange. You could even turn off the elements for the few seconds it takes to measure. What typical temp differentials do you electric brewers see in a non-insulated keggle system on a cold windy outdoor brew day anyhow? My guess is it's only a few degrees top to bottom right?

Assuming 100% heat exchange efficiency by the time the wort leaves the coil, radiant heat loss can't be high enough to worry about, with nominal pump GPM, reasonable ambient temps and light wind... I don't like to be outside when it's windy anyhow.

Surely a wrap of insulation would knock it down to near nil. A guy could always fire insulate plumbing too if that's where the losses were from. Like the fire proof coating used on aircraft fuel lines which is a thermal insulator.

Cost savings is not what's driving my idea. You fellas have convinced me to install a key control and a start-up interlock, but I want a smaller panel with MULTI functioning components vs. a large wall mounted panel.

In fact here's another can of worms. Planning to split components between two panels now: A lower high load panel, mounted low on the brew stand frame that contains the SSRs, relays, heat sink, main power cord input feed, etc... and a second swing arm mounted upper panel, with the PID, power meters and switching controls, alarms and pump controls.

but, I'm still not 100% committed and haven't ordered much other than a PID, elements and weldable fittings yet.
 
well take a minute to peruse this link comparing rtd's and tc's.

http://ultra-nspi.com/information-central/rtd-termocouple-comparison/

this may be useful in making your final decision. The size factor wont be much of an issue.
I made two panels using common electrical control boxes having dimensions of 12" x 12" x
4" deep with hinged door. Believe me, with a 40 amp ssr, 40 va 24vac control transformer,
infinite switch, pid controller, it is utterly crammed in there. Space is a good thing.
 
well take a minute to peruse this link comparing rtd's and tc's.

O.K. Great. I think I'd seen that actually. So it looks like an overwhelming endorsement for RTDs, but is that the common concensus?

BTW, my ePack shipment from china came, so now I can mess around with the first PID I've ever owned, but I haven't committed to cutting any mount location holes just yet. My PIDs came with thermocouples.
 
I use rtd's they are easier to deal with when it comes to wiring them up since wire type and length doesnt effect them like a TC, I use a manual thermometer in the output of my mashtun... Theres no need to have a digital readout in your panel but if you do want it they make digital rtd readouts for under $20 shipped... I suggest getting the pt100 rtds with the quick disconnects at the probe end like auber or ebay sells here http://www.ebay.com/itm/RTD-PT100-T...984172?hash=item58d4e64a6c:g:UhcAAOSwuYVWpO9b The teflon cable is better than the cheap braided stainless cable. I have had 4 of the cheap probes develop shorts before upgrading the the probes linked above just over a year ago. They make cleanup soo much easier.
 
Pete and Cantrell

Thanks for your thoughts!

As to the concepts of being able to "simultaneously displaying various temps", my thinking was that you could get momentary readings from each input feed, by rotating through the selectable probes. Eventually of course, settling the selector on your HERMS return probe while mashing, or your BK probe while boiling.

For the few seconds that you'd be switching input that you'd normally want driving the PID, certainly there is enough thermal mass that you won't experience wild swings in mash temp via heat exchange. You could even turn off the elements for the few seconds it takes to measure. What typical temp differentials do you electric brewers see in a non-insulated keggle system on a cold windy outdoor brew day anyhow? My guess is it's only a few degrees top to bottom right?

Assuming 100% heat exchange efficiency by the time the wort leaves the coil, radiant heat loss can't be high enough to worry about, with nominal pump GPM, reasonable ambient temps and light wind... I don't like to be outside when it's windy anyhow.

Surely a wrap of insulation would knock it down to near nil. A guy could always fire insulate plumbing too if that's where the losses were from. Like the fire proof coating used on aircraft fuel lines which is a thermal insulator.

Cost savings is not what's driving my idea. You fellas have convinced me to install a key control and a start-up interlock, but I want a smaller panel with MULTI functioning components vs. a large wall mounted panel.

In fact here's another can of worms. Planning to split components between two panels now: A lower high load panel, mounted low on the brew stand frame that contains the SSRs, relays, heat sink, main power cord input feed, etc... and a second swing arm mounted upper panel, with the PID, power meters and switching controls, alarms and pump controls.

but, I'm still not 100% committed and haven't ordered much other than a PID, elements and weldable fittings yet.

You may want to try those RTD's through a selector switch first. Depending on resistance (if any) in that switch, it could influence how that signal is interpreted by the PID.

Just a thought before you start cutting holes in the panel.
 
I must not be understanding something correctly because I don't understand the point of a MT PID that doesn't drive an element.
I have a HERMS setup with 3 PIDs, one for each kettle. My mash PID doesn't control anything like you mentioned. It's useful because:

(1) It lets me know when my mash temp has been reached/stabilized. The HLT reaches the target temp before the mash. The mash always lags behind. How far behind depends on the amount of grain/water. Without a temp probe on the MLT output, I would have no idea when I've reached that temp. This way I know how long my entire grain bed's been at the target temp. Useful even for single infusion mashes followed by a mashout.

(2) It provides a backup.

IMG_6638.jpg


Does anyone employ or see a problem with a rotary selector that can choose from as many temp probes as the builder would like to feed input to the HLT PID instead of a 3rd PID?
Yes. temp probes always have errors associated with them. They're all different. You set an offset in the PID to compensate for this. So it needs to be (should be) a 1:1 ratio of PID to temp probe if you want accurate temps. Otherwise every time you switch between temp probes you'd need to go into the PID settings and change the offset value if you want to maximize accuracy. As an example, the offsets for my 3 RTD temp probes vary by 1-3 degrees. So I used a single PID but 3 temp probes, my display would sometimes be off by ~3 degrees unless I went into it and changed the settings every time I switched to a different probe (not really doable - that would be a royal pain).

A PID will also train itself to understand the behaviour of the system. It controls a heat source and looks at the results using the temp probe and then sets the P/I/D values accordingly. If you swap out the temp probe for a system vessel, the system is different and will behave differently and may require the PID to use different P/I/D values. You'd need to retrain the PID every time you switch if you expect the system to behave well. You can't train the PID every time you switch as you're in the middle of brewing (training requires the PID to fire the element, ramp up a bit, see the result - it can take 10-20 minutes or even longer - it's a one time thing to teach it the behaviour of your setup). That said, in many cases default P/I/D settings will work fine given how decoupled a brewing electric heating setup usually is. You may luck out and be able to hold accurate temps on multiple kettles without having to retrain. YMMV.

That said, if the HLT is the only "system" where temp is held (PID in auto mode) then it may be a non-issue. Many will only use the PID in manual mode for the boil. I use my boil kettle in both manual and auto so this would be an issue for me. Auto mode in the boil is really useful for getting up to ~208F and having an alarm go off. It avoids boil overs. I set the boil to 208F and when the alarm goes off I come back, switch to manual, and watch it/stir to avoid boilovers as I go to 212F (boil).

Auto mode in the boil is also useful for hop stands (think Heady Topper). I'll done this many times to hold a specific temp below boil after the boil for up to 90 mins to steep hops. You could argue that temp accuracy here isn't as critical as in the mash however.

... one [temp probe] at the HERMS coil return to the MT ...
If your system is well designed that temp probe will be useless as the temp of the HERMS coil output will always match the HLT temp. I used to have a probe there but it was useless as it always matched the HLT temp probe at the HLT output.

Kal
 
You may want to try those RTD's through a selector switch first. Depending on resistance (if any) in that switch, it could influence how that signal is interpreted by the PID.
It shouldn't. A switch should be zero resistance or very close. Less than a few feet of wiring. Compared to the resistance of the temp probe, whatever the switch/wiring adds will be negligible.

You set an offset in the PID anyway to compensate for any errors in the temp probe (they're all slightly different) and any circuitry between the PID and probe.

Kal
 
There is value in measuring the internal temp of the mash with a dial gauge with a 6" probe in my opinion.
In process control systems such as ours that involve fluid recirculating, temperature monitoring is usually done in the plumbing instead of in the kettle. This helps avoid temperature misreads due to stratification (layering).

So what I do is recirculate the mash hard/fast and measure at the mash output:

IMG_5215_2.jpg


This way whatever I measure I know is going to be the temp throughout the mash, not in one spot. My pumping fast (pump running 100%) heat loss isn't something that is measurable.

During my mash tests while I was designing my setup I used my NIST certified ThermaPen thermometer to measure various spots in the mash (kettle wall, center, top, bottom) and while ramping up in temp the closer the probe was placed to the kettle output, the cooler it was which is to be expected. When the HLT reached target temp, the mash would eventually follow. The same test with a probe placed throughout the mash showed that all locations matched the matched the kettle output probe (shown in pic above).

So by placing the mash probe at the MLT output, I know when the entire mash has reached my target temp. Anywhere else and that is not true.

Good luck!

Kal

Noted. The dial gauge into the mash was just a static reference to be used in addition to the MLT return RTD.

There are many ways to skin a cat so to speak but the closest delta/variance I could achieve (HLT vs MLT temp) in my system was at the MLT return. It typically never varies more than two degrees. I have a recirc pump on my HLT so stratifying is also not an issue.

The dial gauge in the MLT is there to just verify that the internal mash temp is close to the dial gauge on my HLT & the MLT return PID.

There should be very little heat loss in the thermal mass of the mash itself. Particularly when you consider that you have a steady stream of heated mash water running through it, perpetually reheating it.

Note; I'm running a single PID/SSR & one element at a time. I'm limited to 220v/20amp, one 4000 watt element.
 
It shouldn't. A switch should be zero resistance or very close. Less than a few feet of wiring. Compared to the resistance of the temp probe, whatever the switch/wiring adds will be negligible.

You set an offset in the PID anyway to compensate for any errors in the temp probe (they're all slightly different) and any circuitry between the PID and probe.

Kal

I agree that it shouldn't. I was just cautioning the approach before you verify it.
 
There are many ways to skin a cat so to speak but the closest delta/variance I could achieve (HLT vs MLT temp) in my system was at the MLT return. It typically never varies more than two degrees.
Sure since it's just after the exit of the HLT it'll be the closest. Just make sure to measure the actual mash and have that temperature be controlled (ie, actions taken based on what's measured there) as that's the temp that matters. I have a recirc pump on my HLT so stratifying is also not an issue.

I brew indoors so the ambient temp's always room room temp (not much heat loss out the sides like some would have in the winter), and I use good flow 3/4" front inlet pumps and a false bottom that doesn't impede flow when I run the pump 100%. The end result is less than 1 degree temp difference between the temp probe at the MLT output vs the one that the HLT output. I find this the easiest as I simply set my HLT to what I want the mash to be (no offset).

(Both probes calibrated with a NIST certified thermometer).

Kal

Hey Kal,

I'm in the final build stages of my eHERMS systems, so I probably won't make any design changes at this point unless I experience issues once I get up and running, but I'm having trouble understanding why having the element in your HLT/HERMS tank controlled by a probe at the HERMS coil exit is not the optimal setup. That's how I've designed mine. You mentioned that in a well designed system, that probe location is superfluous because it should always match the HLT temp, but isn't that assumption based on other factors, including recirculation rate and possible temp stratification in your HLT? I would think that measuring at the HERMS coil output would give you an accurate reading on the actual wort regardless of those factors, while relying on the HLT temp would open yourself up to variations if you ever changed the recirc rate, or for whatever reason you had temp stratification cooling or heating the wort just before the coil exit point.

I'm definitely a beginner at this stuff since I'm still building my system, so please help me understand if I'm missing something.

Thanks!
Dan
 
Sure since it's just after the exit of the HLT it'll be the closest. Just make sure to measure the actual mash and have that temperature be controlled (ie, actions taken based on what's measured there) as that's the temp that matters. I have a recirc pump on my HLT so stratifying is also not an issue.

I brew indoors so the ambient temp's always room room temp (not much heat loss out the sides like some would have in the winter), and I use good flow 3/4" front inlet pumps and a false bottom that doesn't impede flow when I run the pump 100%. The end result is less than 1 degree temp difference between the temp probe at the MLT output vs the one that the HLT output. I find this the easiest as I simply set my HLT to what I want the mash to be (no offset).

(Both probes calibrated with a NIST certified thermometer).

Kal

Nice!

Mine is in a detached garage. That is why I only have 20 amps. It works great for my needs but if I ever move, I WILL have 50 amps so I don't have to do everything in such an incremental way..
 
I'm having trouble understanding why having the element in your HLT/HERMS tank controlled by a probe at the HERMS coil exit is not the optimal setup. That's how I've designed mine.
Probably depends on your brewing process, but for me that wouldn't work. I wouldn't be able to heat up strike water in the HLT because nothing's recirculating through the HERMS coil (yet).

I first heat strike (and sparge) water like this:

BrewDay-STEP2-HeatStrikeWater.jpg


Then I transfer about half as strike water to the MLT:

BrewDay-STEP3-TransferStrikeWaterToMLT.jpg


Then I recirc a bit again for a few mins to get the MLT back to temp:

BrewDay-STEP4-Mash.jpg


Once back at temp (~10 mins) I stop only the mash pump and dough in/add my salts/measure ph/etc. This can take a good 30 mins sometimes, especially with a new recipe as I'm adding acids to get the pH right. Once all is good I turn the mash pump back on.

I find doing it your way to be more limiting / I couldn't do this (for my process).

It's further decoupled (2 separations) meaning you can't stop either pump including the MLT flow through the HERMS coil otherwise your temp will skyrocket as the HLT tries to compensate. Your way has to have both pumps running for it to work when in my process that's not needed.

With my method, when I turn off the mash pump (which pushes through the HERMS coil) the HLT water keeps recirculating and holds at the mash temp. Your way would see a drop in HLT temp because you'd have to turn off the HLT element since flow is stopped (otherwise it'll overheat). So when you start back up the HLT temp will be off (either below because you turned things off or really high because you forgot to turn things off). ;) For my process, your way is more 'finicky' (more work) and would be less accurate.

Of course, this is based on my process outlined here: http://www.theelectricbrewery.com/brew-day-step-by-step

Yours may be different. YMMV. Work through your process step by step before you build anything and make sure it's optimized/makes sense. I spent most of time on designing my process from start to end before I bought or built anything. I then built a system based on the optimized process I wanted to use (not the other way around).

relying on the HLT temp would open yourself up to variations if you ever changed the recirc rate
You don't ever want to change the recirc rate so it's a non-issue. You want to maximize heat transfer so you want the HERMS coil output to match the HLT temp. This means running both pumps 100% open.

Edit: Edited a few times for clarity - I was rambling... ;)

Kal
 
Probably depends on your brewing process, but for me that wouldn't work. I wouldn't be able to heat up strike water in the HLT because nothing's recirculating through the HERMS coil (yet).

I heat strike and sparge water originally like this:

BrewDay-STEP2-HeatStrikeWater.jpg


Then I transfer about half as strike water to the MLT:

BrewDay-STEP3-TransferStrikeWaterToMLT.jpg


Then I recirc a bit again to get the MLT back to temp, stop the mash pump and dough in, then turn the mash pump back on:

BrewDay-STEP4-Mash.jpg


I find doing it your way to be more limiting / I couldn't do what I do.

I don't like is how it's further decoupled meaning you can't stop the MLT flow through the HERMS coil otherwise your temp will skyrocket as the HLT tries to compensate.

Before I mash in, I recirc both pumps for a while to get the MLT back up to temp and then I turn off the mash pump (which pushes through the HERMS coil) but the HLT water keeps recirculating and holds at the mash temp. Your way would see a drop in HLT temp because you'd have to turn off the HLT element since flow is stopped (otherwise it'll overheat). So when you start back up it'll be off (either below because you turned things off or really high because you forgot to turn things off). ;) For my process, your way is more 'finicky' for my process.

Of course, this is based on my process outlined here: http://www.theelectricbrewery.com/brew-day-step-by-step

Yours may be different. YMMV. Work through your process step by step before you build anything and make sure it's optimized/makes sense. I spent most of time on designing my process from start to end before I bought or built anything. I then built a system based on the optimized process I wanted to use (not the other way around).


You don't ever want to change the recirc rate so it's a non-issue. You want to maximize heat transfer so you want the HERMS coil output to match the HLT temp. This means running both pumps 100% open.

Kal

Okay, yeah, after reading about your process, I can see why you prefer your probe location.

I plan on heating my strike water by recirculating through the HERMS coil, and I was also planning on continuing to recirculate while I mash in. Other than taking a bit more time to come to strike temp, do you see any issues with that approach?

If I ever did have to stop recirculating for any reason, you're right, I'd have to turn off the element in the HLT and have it come back up to temp after I started recirculating again. Hopefully that is a scenario that doesn't happen often, if at all. But you never know.

OP, sorry if I'm hijacking your thread. If this conversation isn't helpful in the context of the thread, I can take it to a PM.

Dan
 
Mine is in a detached garage. That is why I only have 20 amps. It works great for my needs but if I ever move, I WILL have 50 amps so I don't have to do everything in such an incremental way..
I only have 30 amps myself and it works great for how I like to brew/the batch sizes I make (12 gallons post boil). Cheers!

Kal
 
I was also planning on continuing to recirculate while I mash in. Other than taking a bit more time to come to strike temp, do you see any issues with that approach?
I imagine it would depend on how your feed back into the mash tun. I think most turn off the recirc while doing this to avoid stuck sparges, or just plain making a mess.

I use a silicone hose that sits on top of the grain bed. I move it out of the way before I mash in because I don't want it in the way / don't want to damage it / don't want to bury it:

IMG_7946.jpg


I use a simple hose because it's the simplest way / easiest to clean / doesn't affect efficiency. (Fancy sparge arms are useless on properly designed setups and only add cost / give you something extra to clean / something else that can get clogged. Both Blichmann and Sabco use the same simple silicone hose method).

Once mashed in it goes back in:

IMG_7972.jpg


You want something that doesn't overly disturb the grain bed and a simple hose works well.

Kal
 
I imagine it would depend on how your feed back into the mash tun. I think most turn off the recirc while doing this to avoid stuck sparges, or just plain making a mess.

I use a silicone hose that sits on top of the grain bed. I move it out of the way before I mash in because I don't want it in the way / don't want to damage it / don't want to bury it:

I use a simple hose because it's the simplest way / easiest to clean / doesn't affect efficiency. (Fancy sparge arms are useless on properly designed setups and only add cost / give you something extra to clean / something else that can get clogged. Both Blichmann and Sabco use the same simple silicone hose method).

Once mashed in it goes back in:

You want something that doesn't overly disturb the grain bed and a simple hose works well.

Kal

I'm using a Blichmann AutoSparge at the inlet back into my mash tun which has a silicone hose and a float ball on the end.

Again, I'm still not up and running, so I don't have any experience with my chosen design yet, but I was planning on just stirring around the hose during mash in, or using a clamp to keep it out of the way but still draining in. I guess I won't know for sure until I brew a couple batches.

Cool, you've been very helpful, thanks Kal.
 
Interesting discussion. I too and planning to build an HERMS set up and my thought process is much in line with 303Dan in that I intend to measure temp output at the HERMS coil exit to the MT. I feel there must be some thermal dynamics involved with the heat transfer from the HLT water vs. wort temp in the SS coil. Albeit the difference may be very minimal, at least this way you are getting a true reading of the wort temp and can adjust your HLT PID accordingly. This of course is assuming you are running at full 100% recirc throughout the entire mash process. Stopping and starting recirc at mash-in shouldn’t cause a drastic delta to be off-putting? Even if you under achieve your ideal mash temp. I would prefer to undershoot than overshoot. Once you start recirculating you should be able to recover and equalize temperature in a very short amount of time. During this phase I feel it would be a good point to pull a sample to test PH. This also assumes you manually stir your HLT to avoid heat layers or stratification whereas you are not constantly recirculating your HLT as Kal does.
 
Good luck on that first brew! (and sorry to the OP for the derail!)

Kal

Well Mr. Kal;

...for the record, I'd poured over every inch of your site, with a deep appreciation for your "tenacity" before starting this project. I learned more about the integration of electrical installation products from you than anywhere else in my life. Things like like strain reliefs, tie mounts, cable wraps, standoffs, NEMA sockets etc.. as examples. It's not that I never noticed those kind of things in systems, but seeing them explained and in many cases, even a link to find where to purchase them was fantastic. So our discussion here is not a derailing at all. All good.

I'd have sent you my question to begin with, but I figured anybody as far along in this hobby as you, would never have, nor take the time to reply. I'll certainly be giving your thought due consideration prior to cutting or mounting anything permanently. Thanks for your time.
 
Are you using RTD'S or thermocouples for feedback? With tHermocouples, the main problem is that any alteration of the wire between the input screw terminals of the PID controller and the sensing junction(end) of the thermocouple will alter the properties and therefore the feedback will be off.

Using the correct selector switch designed for thermocouples and feed wires will do the trick. Omega Engineering and many other companies sell the extension wires and rotary switches.

http://www.omega.com/pptst/OSW_SW14.html
 
Last edited:
I have a HERMS setup with 3 PIDs, one for each kettle. My mash PID doesn't control anything like you mentioned. It's useful because:

(2) It provides a backup.

Kal

^this! was brewing this weekend, started the boil process at 100% output and while i was cleaning out the mash tun, heard some 'cycling' sounds from the kettle. took a look at the pid display and output was jumping all over the place, certainly not 100% output. opened the panel up and didn't notice any obvious loose wires or similar. turned panel off and back on, same results. event 'whacked' the pid, no change. wanting to move the brew day forward, i simply moved the pid output wires that control the boil ssr from the boil pid to the mlt pid, unplugged the mlt rtd cable at the panel and moved the boil rtd cable at the panel from the boil connector to the mlt connector. boom, back in business! since i only run the boil at a simple manual percentage output, i wasn't worried about temperature calibration or auto tuning the mlt pid. next step is to try a factory reset on the boil pid but aside from that, thinking i may be in the market for a new pid...
 
Bingo! Beer saved. Cheers!

Kal

so i just did a factory reset on the pid, entered applicable parameters and fired up a 7 gal water batch. thing works like a charm. i was having a separate problem with the temp no longer reading correctly on that pid but since i was just running duty cycle, didn't care that much. factory reset fixed that problem too. it has been literally years since i touched any settings on that pid so chalk it up to gremlins.
 
Back
Top