Low bucks motorized grain mill

Homebrew Talk - Beer, Wine, Mead, & Cider Brewing Discussion Forum

Help Support Homebrew Talk - Beer, Wine, Mead, & Cider Brewing Discussion Forum:

This site may earn a commission from merchant affiliate links, including eBay, Amazon, and others.

J_Hanna

Well-Known Member
Joined
May 24, 2014
Messages
68
Reaction score
26
Location
Harrah
01 complete.JPG

Here's my motorized grain mill. Started with a $100 Cereal Killer.
Rather than spend the time and money to build a special cabinet to hold my grain mill I purchased a universal tool stand sold by Harbor Freight for $26 (P/N 95128, $29.99 plus tax minus a 20% coupon ).

02 wiring.jpg

Here's the wiring diagram I made for it.

04 connectors.jpg

To fit the everything onto the smallest possible board it was necessary to mount an 5" electrical box on the underneath side of the board, this power box holds the capacitor and the majority of the wiring.
Using crimp on spade connectors eliminates the need to solder any wires, the spade connectors can be quickly unplugged to make changes or repairs.

05 mill mounted.JPG

Here's the the stand assembled with a scrap 10" by 20" board mounted to the top of the stand. The mill assembly is mounted and the 3/8 inch coupler installed.
Unfortunately the mill shaft was not actually 3/8" as advertised but about 1/16" larger ( 7/16 I guess ).
About 15 minutes with a file got the shaft down to 3/8"; this bit of shade tree machine work probably hosed the runout but since it only runs at about 60 RPM it should be okay ( I hope! ).

06 mill bucket.JPG

Here's a 6.5 gallon bucket placed underneath the mill assembly, good fit!

07 coupling.jpg

Here's the motor mounted to the board. ( herbach.com, Molon EMR63-1, $17.95 plus $9 S&H ) it's a 63 RPM AC gearmotor with 10 lb/in torque, probably not enough to start with a full hopper but it I start the motor before slowly adding grain to the hopper it should be okay, if not then I'm only out 27 bucks and it won't be hard to change the setup to accept a bigger motor.
I rotated the motor to put the output shaft as low as possible, had to shim the mill assembly about 1/16" to line them up, not bad! Still fiddling with it to try to get the two shafts to align better.
I positioned the SPDT switch and drilled the hole for it.

08 switch plate.jpg

Here's the switch mounted to a small sheet metal plate I made.

10 capacitor.JPG

Capacitor installed in box, zip ties to the rescue! Test run was successful, motor turns in both directions.

11 box cover.JPG

Here's underneath. Excuse the sloppy woodworking; my philosophy is if you can't see it then it doesn't have to be pretty.

12 hopper.JPG

Mill with hopper installed, I might take it all apart to paint the board but not until I verify it works.

I believe the whole thing came in around $180, cheers!
 
63 rpm? Hmmm, sounds way too slow.

Why? Will it cause any issues other than taking longer to grind? It seems that at 200RPM these mills go through a batch worth of grain in 2-3 minutes. Id' be happy with 6-9 minutes to crush since you don't need to be sitting there watching it.
My concern about the motor would be if it had enough grunt. Most recommendations are at least 1/2 HP with 1/3 HP being minimum. The output power of 10 lb in and 63 rpm would be about 0.01 HP (even going by electrical input of 0.33A x 240V = 0.1HP)
 
Nice setup!:rockin: I have that very stand with an electric motor and wire wheel for rust removal etc. Hmmmm ... I see a reconfiguration looming on the horizon! Thanks for the writeup!
 
mattd2, You are probably correct about the motor being underpowered. I spent a couple of hours hunting for a better option that wouldn't set me back hundreds of dollars but did not find anything in my price range.
I'm hoping to get over to my local brew store this morning and pick up something to try it out on.
The next best motor option I found was a 12VDC car seat motor with fairly low RPM and lots of torque ( required to move a car seat and your average american adult ). Unfortunately that motor has a funky threaded shaft that would require some serious modification and I'd also need to buy a speed controller board and a 12V power supply. The total on those 3 pieces would be about $60, not too bad but still a gamble.

acidrain, As far as the 63 RPM thing goes, that's still way faster than I could crank it by hand.:D

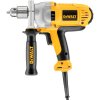
Here's my back up plan if the motor doesn't cut it...

Dewalt DWD216G.jpg
 
I don't. Know your budget but after a lot of searching I found a Power Grinder on eBay for $160 delivered. It has a built in gear reduction (180 rpm) and is purpose built for milling grain. You'll need two Lovejoys plus a spider similar to your current set up.
I have a 3 roller Monster Mill so I needed two different bore sizes for the Lovejoys & the one for the motor required a keyway.
Other than that it works great. Quiet, too.
ImageUploadedByHome Brew1410626558.774055.jpg


Sent from my iPhone using Home Brew
 
Test results are in!
Just ran a pound of 2 row through it with no problems.
Maybe I'd have problems if the hopper was completely full or if I had it set tighter than what came from the factory or maybe a different kind of grain but for right now it works great. It ran through that pound of grain in about 40 seconds.
Oh, and that was from a dead stop so apparently I won't have to start the motor before loading the grain. Woo Hoo!

13 output.jpg

I shot a mp4 video of it running but the file is too big to post here ( plus it's shaky as hell! ) if anybody wants to see it maybe I can e-mail it to you, it's 4.8 Mb.

Cheers!
 
Govner1, Yup, that is a super nice rig! Maybe I can talk my wife into getting me a good motor for Christmas.
 
Wow, this is awesome! I just pulled the trigger on this. I did have a motor on an old air compressor already that I had earmarked for my mill, but I really didn't want to deal with all the pulleys and wheels to get it to the right speed, and gear ratio boxes can be expensive as well. I don't think the slower speed will bother me much as 5 vs 10 min doesn't actually save me any time on brew day while I'm heating water. This is also one of the cheapest solutions I've seen, as well as sleek and simple. I can't wait until I get it all together! Looking through the interweb the only thing I could find on using a 1/8 hp motor for mill work was a pdf of someone who did it using one and said it worked fine for any grain as long as you started the motor before adding grain. I did order a 10mm coupling for the mill shaft, hopefully it will fit without any filing.
 
Spellman, you're probably correct that the shaft is 10mm, even though the ad copy for the cereal killer states 3/8". I've read that they are made in China and 10mm is "pretty close" to 3/8 :)
Other than the shaft size issue I'm pleased with the quality of the cereal killer.

FYI, the motor I got from herbach.com did not come with a start capacitor even though the ad seemed to imply that it would. I ended up buying one from amazon.com for $4.44 shipped, maybe you'll have better luck!
 
Damn, I thought it said it did come with one, thanks for the heads up. Do you happen to have a link for it? Sometime if you get a chance I think people would appreciate a parts list. I didn't know much about Lovejoy couplers before today and had to spend some time learning what I would need to get the right things (fingers crossed I ordered the right parts). I will certainly post back as to how the 10mm fits when I get it in. Once again thank you for sharing your find J_Hanna, its things like this that make this community so great!
 
Thanks for the kind words!
Here's a link to the start capacitor at Amazon...

http://www.amazon.com/gp/product/B008GVS4TO/?tag=skimlinks_replacement-20

It's possible that the guys at herbach.com just forgot to include the cap with mine but I don't know for sure as I didn't receive a reply to an email I'd sent them asking about it. Since the part was only $4.44 I didn't get too upset about ordering one from amazon.
Cheers!
 
Last edited by a moderator:
Just a quick little follow up, yes the 10mm coupling fits great on the cereal killer shaft. I haven't received the motor yet, but I will post if it does come with the capacitor.
 
Should have just waited, it finally came. Any reason why they would give me 3 capacitors? Maybe I have yours and someone else's! Hopefully I can get this wired up soon, still waiting on a new switch. The first I got turned out to be a micro spdt, which are about as big as a micro machine car.
 
So I was going to brew a batch of beer today and thought, maybe I'll throw together that motor for my grain mill! I had most of the day to brew, but was finishing up a few things on my glycol chiller first, then updated my stc-1000+ units in anticipation of the new beer fermenting. The brew start kept getting delayed. Got a scrap piece of wood out and cut the hole for the mill. Couldn't find the straps I was going to use so I improvised with a worm clamp. Got it all mounted then realized 2 things: the switch I got from amazon was 2 way, and I didn't have any of my crimp connectors at home. Had a wire that had 2 connectors on it and split it and wired up the hots to the capacitor, wire nutted everything else, left the reverse alone. Plugged into a switched outlet and viola! Even got it to start with a full hopper!

Now the troubles. It would go for a while and if it would begin to jam it would reverse direction. Flipping the switch on and off would eventually get it to go the right way, but not without making a mess of my grist in the bucket. Sometimes that wouldn't work and I would have to dump the hopper out and flip it on and off a few times. I had to spoon feed it in for quite a while, but even that didn't work well. Unmounted the mill and got the drill out to finish. Any idea if having a reverse wired in would prevent it flipping direction on me? I kind of doubt it would as when it is wired to the switch it shouldn't be getting any power to the reverse section anyway. I'm tired and gonna call it a night as far as my brew day goes. If it rains tomorrow I can hopefully get it in then. Now to clean up all the mess I made.
 
I have a box of similar gear reduction motors from old xerox and blueprint machines I used to service.... I tried using a greardrive with one but the rpm was so slow it ctually kept causing the driven roller to stop and the gears would jump... looking for puleys now since I would actually like to speed it up just a bit from the gear reduction speed...
 
Spellman, sorry the setup isn't working right, I probably should have waiting to run a full batch of grain before posting. Did you start with a full hopper? My test run was only a pound of grain which only filled the hopper maybe a fourth of the way up; I guess I need to try a full hopper myself.

As far as the motor reversing by itself when it jams ( if I'm reading that correctly ) I believe that is probably normal; I read one post where a guy hooked one of these motors up with no start capacitor and it still ran but it would randomly choose which direction to start turning in, this leads me to believe that if you prevent it turning one direction it will go the other direction regardless of which side of the cap it's getting power from, I think this applies to all reversible gear motors not just this particular one.

If you want to try an experiment you could wire up 2 of the caps you received in parallel which would be the equivalent of a 10MFD cap. I've read that you can "hotrod" a AC gear motor this way to generate more torque ( it won't run any faster however ), the down side is the motor will run hot and it will shorten the life of the motor dramatically. However since the milling process time is relatively short it might be possible to get several runs out of it before the motor croaked. At $27 buck each you could go through 4 or 5 cheap motors and still come out cheaper than buying a $180 motor. It's just a thought and if you were to try that experiment I wouldn't wander too far away from the power switch when you start it up!:cross:

Here's a wiring diagram showing a 2.5MFD cap added for more torque wired in through a second switch for a total of 7.5MFD, the second switch could be used to cut in the extra capacitance when the motor starts bogging down.

Augiedoggy, yeah that's the great thing about Lovejoy couplings, pretty much impossible to jump gears.

Turbo mode.jpg
 
Augiedoggy, did you mean the gears would jump inside the gear motor itself? If so never mind the Lovejoy comment!
 
Spellman, one last thing and then I'll shut the h#ll up. They may have sent you 3 capacitors thinking that one or more of them might be dead, by sending 3 you are bound to get at least 1 good one ( one would hope ). If you did hook up a dead cap the torque would be next to nothing, so you might try a different cap to see if there's any improvement. There is a test meter available to check capacitors but I don't have one myself. If you don't have one either you might try to find a air conditioning repair guy who happens to like beer and have him check those caps for you...
 
J Hanna, no worries, didn't want to sound like I was mad at you or anything! I had been running off of like 3 hrs of sleep and decided to throw it together using the bare minimum wiring that I had laying around that would make the motor turn, and trying to run 18 lbs through it in time to brew. Made for a lot of frustration. Glad I waited until the morning to brew because it was a pumpkin beer... I'll be sure to check the other capacitors, happen to know an easy way with a multimeter? If all else fails I will try to hot rod it like you said. The motor didn't seem to care how full the hopper was. It cared more if the grain passing through created too much resistance (foreign material, larger kernels, harder kernels). It would began to seize sometimes even if I only had a couple handfuls of grain in there and reverse. Maybe it would be worth trying to get an extra 2.5 MFD cap as a happy medium to test before giving it the full 10 MFD? Or maybe only running it for the 15 min it would take it wouldn't matter anyway.
 
Oh, and next time I will just do a test run, not worry about getting it milled in time to brew! I have learned a lot about electricity while incorporating it into brewing, and I conceptually know what a capacitor does, but it is still hard for me to wrap my head around the whole farad concept in laymen's terms. One thing to point out for people trying anything like this, remember that these capacitor can hold a charge for quite some time, so don't electrocute yourself. Thanks again for your help and insight!
 
Just a quick note regarding the start/run capacitor holding a charge. As long as the capacitor connectors going to the motor are not removed while the AC power is still applied to the equipment there should be no charge on the caps after the system is turned off. Under normal usage when power is turned off the charge in the capacitor drains through the motor windings fairly quickly.
That's why LEDs on some equipment don't go out immediately when power is turned off, the charge in that equipment's capacitors is keeping the LEDs lit until they drain. That being said, for safety sake always treat a capacitor like it IS charged.
Looking at my schematic for a second capacitor running parallel through a switch I see that it's possible for the second capacitor to retain a charge, to drain the second cap just put it back in the circuit after power has been turned off to allow it to drain. A second cap connected directly, i.e. not going through a switch, would drain normally.
Somebody wrote "a little knowledge is a dangerous thing", that's me; I know just enough to be dangerous!:)
 
Spellman, sorry the setup isn't working right, I probably should have waiting to run a full batch of grain before posting. Did you start with a full hopper? My test run was only a pound of grain which only filled the hopper maybe a fourth of the way up; I guess I need to try a full hopper myself.

As far as the motor reversing by itself when it jams ( if I'm reading that correctly ) I believe that is probably normal; I read one post where a guy hooked one of these motors up with no start capacitor and it still ran but it would randomly choose which direction to start turning in, this leads me to believe that if you prevent it turning one direction it will go the other direction regardless of which side of the cap it's getting power from, I think this applies to all reversible gear motors not just this particular one.

If you want to try an experiment you could wire up 2 of the caps you received in parallel which would be the equivalent of a 10MFD cap. I've read that you can "hotrod" a AC gear motor this way to generate more torque ( it won't run any faster however ), the down side is the motor will run hot and it will shorten the life of the motor dramatically. However since the milling process time is relatively short it might be possible to get several runs out of it before the motor croaked. At $27 buck each you could go through 4 or 5 cheap motors and still come out cheaper than buying a $180 motor. It's just a thought and if you were to try that experiment I wouldn't wander too far away from the power switch when you start it up!:cross:

Here's a wiring diagram showing a 2.5MFD cap added for more torque wired in through a second switch for a total of 7.5MFD, the second switch could be used to cut in the extra capacitance when the motor starts bogging down.

Augiedoggy, yeah that's the great thing about Lovejoy couplings, pretty much impossible to jump gears.

I had service call on a UV flatbed printer about a month ago were one of those couplers failed and took out 6k in printheads.. .. I'm very familiar with them and in this type of application they should work very well but my issue is that my motor is also only 60 rpm and this was too slow to reliably grind without causing the gears to jump and bind.
I have since bought pulleys at tractor supply and as soon as I am home this weekend I will have everything together to test out.
Fyi it was plastic gears from the Xerox machine I was using on the motor and mill shaft...
Funny thing Is I have a whole box of those capacitors... I wanted to buy two for my old metal halide salt water reef tank lights a few years back and the seller ended up sending me a whole box of like 20 of them.... been finding all sorts of uses for them :)
 
well funny story... in my haste to throw the electrical together last week I overlooked one crucial factor. The three caps that they sent me were not 440v 5 mfd as I had thought, they were 440v 1.5 mfd. Might explain a lot. I hooked them all up in a series and was able to run 3# 2-row and 3# of white wheat through with ease. I did start the motor first as I was a little gun-shy this time. I did go ahead and order the correct switch that I needed and a 5 mfd cap as I would rather hide one than the entire ghostbuster pack that I have now. Next time I'll try it out with a full hopper and report back, but my guess is it will work just fine! Thanks for all the help!
 
Spellman, well I guess 3 x 1.5 is pretty close to 5 :)
It would have been nice of them to have dropped a note in the box, oh well at least you got some kind of caps to go with your motor instead of the zero that came with mine.
You mentioned hooking them up in series, I'm not trying to be a know-it-all but the total capacitance of capacitors hooked up in series is not the sum of all 3 added together; in fact it will be less than just 1 by itself ( if I'm remembering correctly what they taught me at the tech school I attended about 40 years ago at Keesler Air Force Base in beautiful Biloxi Mississippi ). To get your 4.5 mfd I believe you need to hook them up in parallel. Cheers!
 
You are correct, I misspoke and actually have them in parallel, can't sneak nothing past you!
 
I was finally getting the motor screwed down to my still temporary board today and noticed something about the start of the motor. If it has drained caps it takes a second to "power up" when you start and stutters just a bit. But if the cap is charged it spins immediately. I think I may wire the switch when it gets here after the cap instead of before, that way it is juiced up before I start it, which may help if starting with a full hopper. Anyone see any problem with this? This won't be plugged in all the time so I don't anticipate there being any problem with it having a charged cap when not in use. Going to put 24 lbs through this little guy tomorrow.
 
I was finally getting the motor screwed down to my still temporary board today and noticed something about the start of the motor. If it has drained caps it takes a second to "power up" when you start and stutters just a bit. But if the cap is charged it spins immediately. I think I may wire the switch when it gets here after the cap instead of before, that way it is juiced up before I start it, which may help if starting with a full hopper. Anyone see any problem with this? This won't be plugged in all the time so I don't anticipate there being any problem with it having a charged cap when not in use. Going to put 24 lbs through this little guy tomorrow.

This is awesome guys! It has been great watching and seeing what my previous understanding on minimum power requirements get destroyed.
Doing a quick bit of back of ciggy packet maths and some big assumptions it would seem that the critical figure is the ~10 lbf. in. of torque. I suppose running it faster (and therefore needing more power) will help it power through bits of hard grain, etc. due to the angular momentum of the rollers/motor but is not 100% necessary.
My quick maths based on the same overall efficiency (10% input power -> output power which seems low?????) a 1/3hp motor running at 200 RPM give... ~10 lbf. in. of torque!
 
I was finally getting the motor screwed down to my still temporary board today and noticed something about the start of the motor. If it has drained caps it takes a second to "power up" when you start and stutters just a bit. But if the cap is charged it spins immediately. I think I may wire the switch when it gets here after the cap instead of before, that way it is juiced up before I start it, which may help if starting with a full hopper. Anyone see any problem with this? This won't be plugged in all the time so I don't anticipate there being any problem with it having a charged cap when not in use. Going to put 24 lbs through this little guy tomorrow.

Spellman,
Interesting! I'd think you'd need 2 switches to make it work, the original SPDT needed to switch between forward/off/reverse ( placed before the cap ) and a DPST ( after the cap ) to control the output from the cap to the motor. Cheers!
 
Yeah the more I thought about it I was wondering the same thing. I did my smoked porter thursday and did 24 lbs of grain with no problems. Had it do a cold start with full hoppers twice, went right through it with ease. It did take a while to go through that much grain, I think it was 20-25 min of grinding. I'll try and keep a better time clock next time. Yeah that is a while, but takes much longer than that to get my water up to temp, so I don't really care that much. I would say for simplicity, compactness, and price, these things are hard to beat!
 
Spellman, I am so happy that it worked this time!
It might be another month or so before I use mine as I am currently building a 3 tier gravity fed brewstand for my AG setup, I've got most of the steel I need, just need to cut all the pieces and start welding. I bought a new 220V stick welder for this project and had to wire in a new heavy duty circuit in the work shop to feed it; that slowed me down some but hopefully I'm back on track.
I'll take pictures as I go along on the brewstand, cheers!
 
Sounds like a fun project! I built an eherms setup last fall with some of PJ's diagrams and I love having a big boy setup. If you haven't thought about going electric, you should! They can be pricey to get all the bells and whistles at first, but I have ultimate surgical precision when brewing now!
 
Back
Top