• Please visit and share your knowledge at our sister communities:
  • If you have not, please join our official Homebrewing Facebook Group!

    Homebrewing Facebook Group

Love Temp Controller Series TS wiring diagram (2008+)

Homebrew Talk

Help Support Homebrew Talk:

This site may earn a commission from merchant affiliate links, including eBay, Amazon, and others.
posted by robstu
Has anyone else tried this? i wired my probe the same way, to both terminals, and i get really strange temps, like 200 degrees high, when i remove the splice the probe works correctly again.
If you are using your TSS2 for automatic cooling and heating use one probe only.
Set the parameter to one probe (P5) and connect the probe to input one only.
Channel 2 is now dependent on channel one temp.

Cheers,
ClaudiusB
 
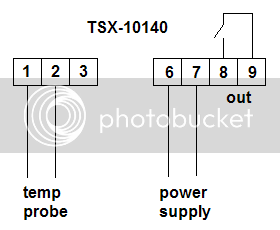
OK here is the updated schematic for a LOVE TSS2-2100 controller with a single probe

Wiring_diagram_fro_Love_TSS2-21002.bmp


When you first plug the controller in and fire it up a buzzer will sound and ErP will flash on the screen. Here is how to enter your controller into single probe mode:

1. Press and hold the "SET" button for 8 seconds or until "0" flashes on the screen.
2. "0" is the code to grant access to the controllers programming and can be changed to any digit 0-999 to selectively allow access tot he controller.
3. Press "SET" again to tell the controller "0" is the correct code ("0" is the default).
4. Now a parameter will be flashing on the screen. Cycle through the parameters using the "up arrow" until you reach "P5".
5. Press "SET" to enter "P5" programming.
6. Press the down arrow sot hat "1" is displayed on the screen. This indicates single probe operation.
7. Press "SET" again to select single probe operation and return to the parameter screen.
8. Press "SET" and the "down arrow" simultaneously to exit the parameter screen.

You are now operating normally in single probe operation.

To program the controller to work properly with heating and cooling as we have discussed above... follow the same programming steps (now that the beeping has stopped :D) to enter parameters "r0", "c1", and "c2" as indicated on the schematic.

"SP1" and "SP2" are set by pressing the set button. The current SP1 temp will flash. Use up/down arrows to pick desired temp, and hit set again. Do the same for SP2.

Thanks again ClaudiusB for the tip!
 
I can't find what is included with the controller anywhere on the web.

I am looking at getting the TS-13010 and wondering if it comes with the temperature probe?
 
I can't find what is included with the controller anywhere on the web.

I am looking at getting the TS-13010 and wondering if it comes with the temperature probe?

Yes my TS-13010 came with a temp probe. It did not come with any wires (other than the temp probe wires).
 
What does r0, c1, and c2 stand for?

They are program codes within the controller. When you start up the controller, you press and hold the set button to access the controllers programing. Pressing "set" again cycles through the various settings and parameters that one can use to customize the operation of the controller.

r0, c1, and c2 are three that set the operating mode. The manual that comes with the controller explains each parameter and what it does.
 
I don't have the paperwork that came with LOVE TSS2-2100.
I have it setup but don't know how to set the differential or
what the c1 and c2 operating modes are.
 
Thanks for the manual.

I have the controller setup and wired into my freezer, but I haven't wired in the heating element yet. So I haven't had to change from the default setting for SP2 yet - because I haven't tested it.

I have P5 set - for one probe.
I set SP1 and SP2.

(ie) for a fermentation temp of 50.
I set SP1=50 and SP2=48.

c1=dir (default)
c2=inv (non default)

So - I need to change c2 to be inv so the c2 goes hot when the probe reads 48 or below?

Thanks,
JD
 
So - I need to change c2 to be inv so the c2 goes hot when the probe reads 48 or below?
Correct

For your setup to work set r0 = dep
You can set SP2 = 0 and r2= 2 without worrying about SP2 and have the same result.

If you need to coast toward the set point like I require SP2 can be less than 0.


Cheers,
ClaudiusB
 
What do you mean by:
"If you need to coast toward the set point like I require SP2 can be less than 0." ?

You can set SP2 = 0 and r2= 2 without worrying about SP2 and have the same result.

I guess I still don't understand what the r2 setting does.

I'm testing my setup now and it looks like my secondary controller is always on.

I set SP1 to 65 and I set SP2 to 40. When the temp hits 65 - SP1 output becomes hot, but it seems SP2 output is always hot.
 
Boerderij_Kabouter tanks.

I will be using SP2 = -1.5 as well.

My parameters are set according to my heater performance, overshoot.
The heater only heats until the liquid temp rises by 0.1°F, not until it reaches SP1.

Here is an example how my setup works.
SP1 set to 68°F, r2 set to 0.1°, SP2 set to -1.4°F

Heater relay #2 turns on when probe temp is below SP1+SP2-r2
or 66.5°F and off SP1+SP2 or 66.6°F.
Now the heater's mass and insulation losses slowly raise the temp to the target temp of SP1 or 68°F without over shoot.

Cheers,
ClaudiusB
 
Great thread, this should be stickied.


I've got a question for all of you since I'm quite confused looking at the different Love Controllers models.

I am planning on building a kegerator with a built-in fan that will push the cold air through an isolated tube where my beer lines will run. The beer lines will come out on wall-mounted taps about 5 feet away in another room.

I'm wondering which Love Controller to buy so that the Fan circulating the air in the isolated pipe can start/stop independentely of the kegerator's compressor using the second temp probe.

ie:

Probe #1:
Location: Kegerator.
Relay #1 activates when temp on probe #1 is higher than 47*F, stops when temp is lower than 45*F

Probe #2:
Location: Inside the far end of the isolated tubes, where the shanks are.
Relay #2 activates when temp on probe #2 is higher than 52*F, stops when temps is lower than 47*F


I know I could simply buy two standalone single probe/single relay controllers, but they surely have a model that fit my needs, don't they ?

The TSS2 model seems like it could do the trick, but as the posted wiring diagram shows, it's more of a heater/cooler controller. I am worried than when one relay activates, the other will deactivate, which is not what I want.

Anybody out there can help me find the right one ?

Thanks.
 
No offense, but post #1 was the answer to your question....

LoveWiring2.jpg


If you do not know enough about electronics to follow the diagram, I REALLY recommend finding a friend to help you so you at least have two sets of eyes looking at things.
 
Been having a blast trying to get this controller wired to my chest freezer. HELP!!!

love_controller4.jpg

I don't know the answer, but this is a March, 2006, controller and is entirely different than the one in the msg #1 diagram.

P.S. I see you got it working. Great.

This is how I got it finally working, with help from the Brew_Haus and SawDustGuy:

Temp probe: Blue on terminal 2; Brown on terminal 4.

Jumper: terminal 6 to 9.

Neutral (white): Spliced to pass through from wall outlet on to compressor with a wire also going to terminal 7.

Black (hot) wire coming from wall outlet going to terminal 6.

Black (hot) wire going to compressor from terminal 8.
 
I have a TSX-10140, evidently the older, pre-2008 wiring (the unit has a 2007 date on it so I'm assuming).

Here is the unit's wiring diagram (terminal 3 is actually for a second probe but I left it off the drawing):

tsx-10140.png


Here's how I plan to wire it (thanks to -TH- for posting the original diagram for a different model; I borrowed the drawing):

tsx-10140_older.png

Look right?
 
i was wondering if anyone could help me out with a wiring diagram for this love controller?
IMG_3260.jpg


i cant seem to get it figured out :(
im using a 5cu holiday freezer if that matters.

i keep getting a EP2 error (defrosting probe error)
thanks in advance
 
Back
Top