• Please visit and share your knowledge at our sister communities:
  • If you have not, please join our official Homebrewing Facebook Group!

    Homebrewing Facebook Group

Keg to ekeggle conversion pics

Homebrew Talk

Help Support Homebrew Talk:

This site may earn a commission from merchant affiliate links, including eBay, Amazon, and others.
Thanks, Lorglath!

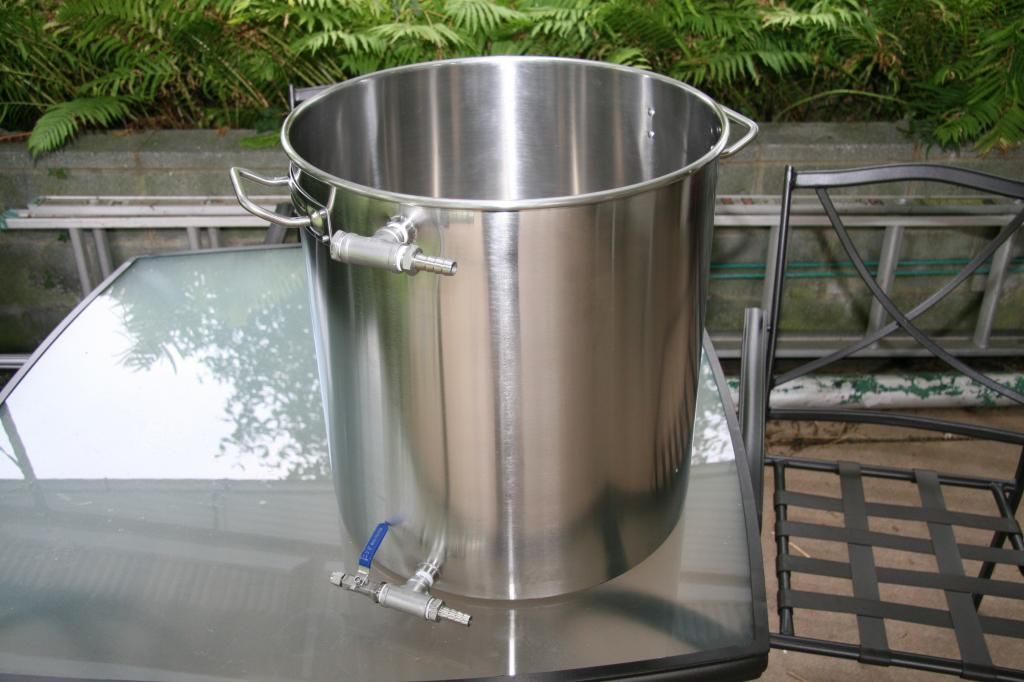
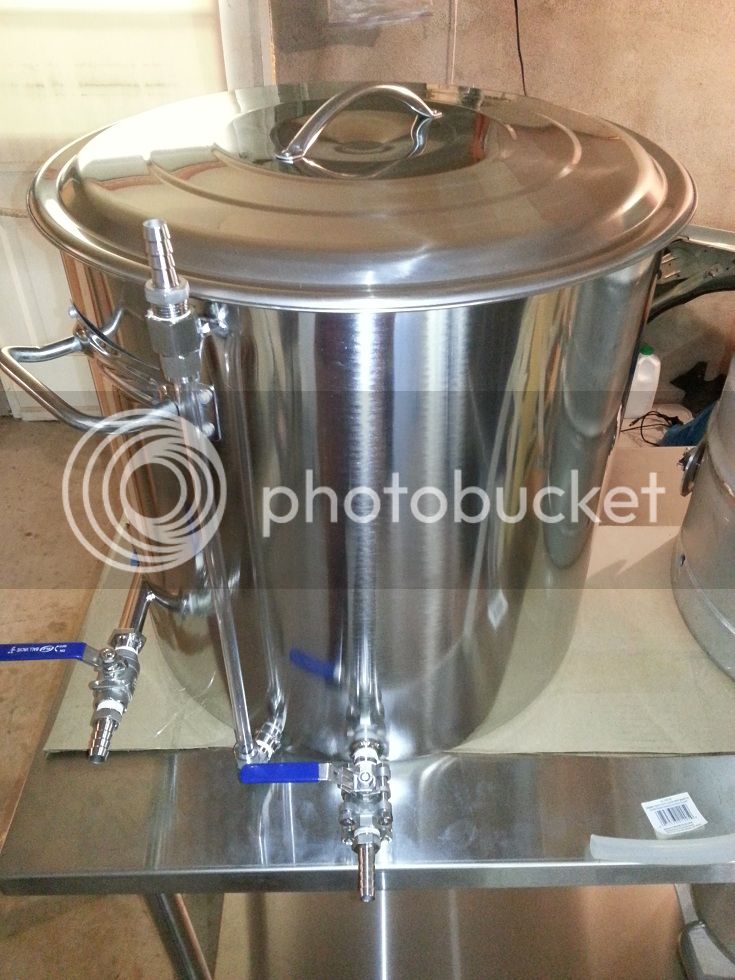
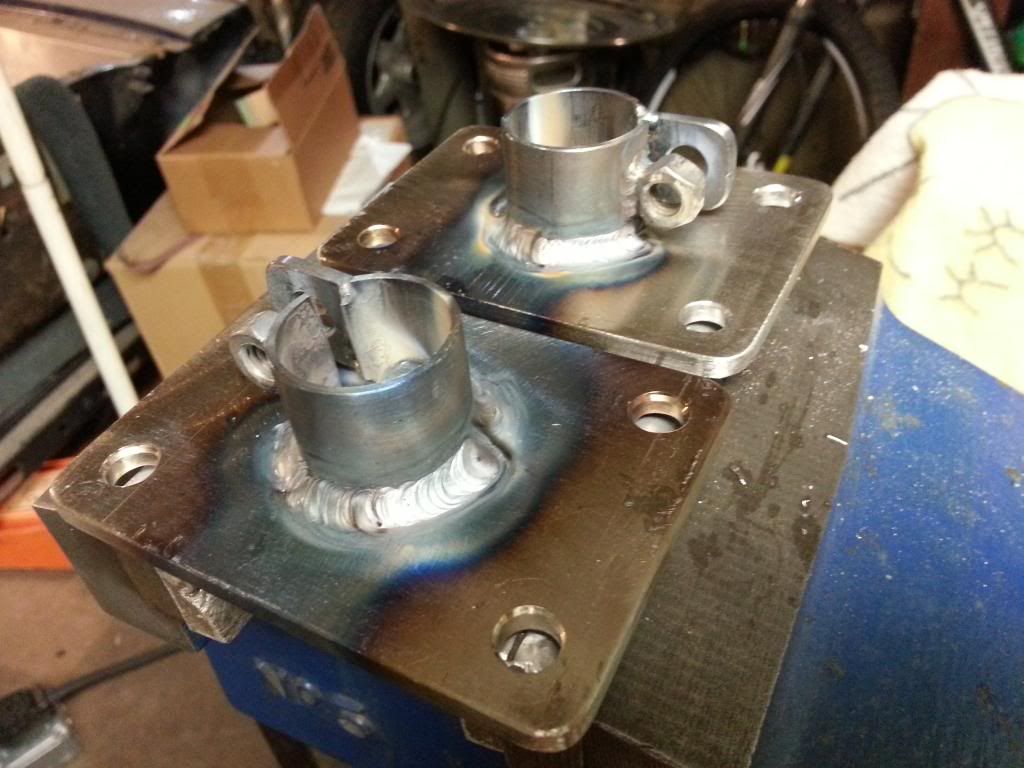
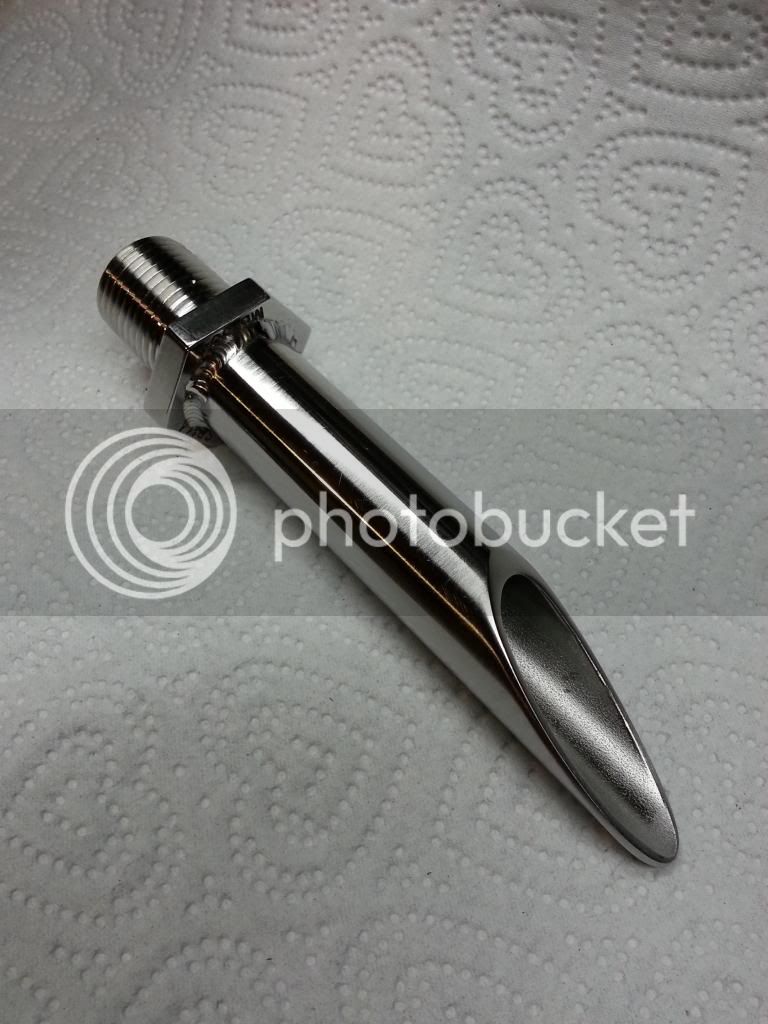
Here's the BK's tangential inlet ready to be welded to the vessel. It's a 6" long 1/2" npt nipple with one end cut off. I turned it down to clean it up a little and welded a 1/2" nps lock nut to it so it can be held from twisting when installing a ball valve. The kettle wall is thin, so I figured holding the inlet still is mandatory!


20131021_215619_zps6d7527d2.jpg
 
OK I'll bite.

I totally get the angle cut so it will point the ball valve at an angle and I agree with the nut to hold it during tightening but...

Where are you installing this?
 
Yep, it's a whirlpool inlet. Here's the completed kettle. It's a 25 gallon Concord pot. The element is tri clamp removable and mounts in a 3" ferrule. I have a "bazooka" tube that attaches to the dip tube that I'm going to experiment with. It will be used in conjunction with a large SS hop basket that I have yet to make. The hop basket will be similar to the one I made for my keggle shown earlier, just a larger diameter and a little shorter.

20131029_131042s_zps652f4ddd.jpg


20131103_144714s_zps8f3296e2.jpg
 
This has to be my favorite part of the new system- a tri clamp removable element and element enclosure. This makes clean up so easy. Not only does it let you clean the element easily, but it gets the cord out of the way when you're tossing the BK around.

I'm debating making the HLT's element tri clamp removable, but cleaning that shouldn't be an issue as it will only touch water.

IMG_9209s_zps050f3f31.jpg


IMG_9197s_zpsb779ecbb.jpg


IMG_9200s_zpsa13e3595.jpg
 
Thanks, Vadim!

I would rather have a little more room than just enough. My element passes through the enclosure unlike some other designs I have seen that use three tri clamps or some kind of box that covers the electrical connections. With those types, you can get away with smaller ferrules. Besides the ferrule on the BK and the end cap with the strain relief, the whole assembly is just one piece. In order to have plenty of room for the ground lug and wiring, I needed an enclosure of this length. With this length enclosure, a smaller diameter would not be possible. I actually had to ever so slightly straighten the bends of my ripple element just to get it through the enclosure. It is so slight that you can't even tell it has been straightened, but it was completely necessary to get it through the enclosure. Maybe I could have used a 2" or a 2.5" ferrule, but that would have required a shorter enclosure. Here's a pic of just the enclosure to give you a better idea of how it's constructed:

20131003_193230s_zps521623f8.jpg


And this pic shows the slightly straightened element:

20131103_144714s_zps8f3296e2.jpg
 
Your quality design work and craftsmanship, not to mention your considerable photo layout talent leaves me speechless... and bit envious.

You sir, have my respect and admiration.
 
Just one question. . . All the shiny parts and hard work yet you're choosing to use hose barbs over quick connects or camlocks. How come?
 
Just one question. . . All the shiny parts and hard work yet you're choosing to use hose barbs over quick connects or camlocks. How come?

FWIW, hose barbs make up most of my interconnections as well, both temporary and semi-permanent ones.

Not sure of Kevin's reasons, but they have been cheap, durable and reliable in my system
 
Just one question. . . All the shiny parts and hard work yet you're choosing to use hose barbs over quick connects or camlocks. How come?

The hard work isn't lost when you screw a hose barb in! I can always change the fittings, but so far I haven't seen the need. There's just not enough pressure in a home brew system to blow a silicone hose off of a barb. I have never had that happen, anyway. Plus, barbs are quick connects!

KPSquared and processhead- Thanks for the compliments!
 
That is the best DIY hop blocker I have seen yet. I'm going to give this a try for sure. The wire rim for support was the kicker. I don't have a welder but the silver solder approach sounds like a reasonable alternative. Very nice builds, and thanks for the ideas/instructions on the blocker :mug:
 
That is the best DIY hop blocker I have seen yet. I'm going to give this a try for sure. The wire rim for support was the kicker. I don't have a welder but the silver solder approach sounds like a reasonable alternative. Very nice builds, and thanks for the ideas/instructions on the blocker :mug:

Question for the OP:
Have you tried your hop spider design yet? Reason I ask is because I had one made for me very very similar to yours, where the od of the spider was just a couple inches less than the id of kettle. I had huge problems once things started boiling. First the stopper would bounce up and down from the bubbles, and each time a burst of bubbles and wort would shoot up the sides. THen I clamped it down to the kettle but I had huge boil-over problems coming up the sides when ever a burst of bubbles were released from under the stopper. For the next attempt I re-did the bottom of the stopper by making it tapered which did allow the bubbles to move up the sides smoothly, but after a while the bubbles would rise up the sides again until they were overflowing. I have now scrapped it altogether. Hopefully yours will work better than mine did!!!
 
That is the best DIY hop blocker I have seen yet. I'm going to give this a try for sure. The wire rim for support was the kicker. I don't have a welder but the silver solder approach sounds like a reasonable alternative. Very nice builds, and thanks for the ideas/instructions on the blocker :mug:

Thanks. The wire was key. Silver solder should work great! You will probably want to overlap the ends a half inch or so.
 
Question for the OP:
Have you tried your hop spider design yet? Reason I ask is because I had one made for me very very similar to yours, where the od of the spider was just a couple inches less than the id of kettle. I had huge problems once things started boiling. First the stopper would bounce up and down from the bubbles, and each time a burst of bubbles and wort would shoot up the sides. THen I clamped it down to the kettle but I had huge boil-over problems coming up the sides when ever a burst of bubbles were released from under the stopper. For the next attempt I re-did the bottom of the stopper by making it tapered which did allow the bubbles to move up the sides smoothly, but after a while the bubbles would rise up the sides again until they were overflowing. I have now scrapped it altogether. Hopefully yours will work better than mine did!!!

I had all of those problems! My pre boil volume was huge to begin with (14.5 gallons in a keggle!), so the hop spider made the first 15 minutes of the boil a nightmare. I think with half the boil volume it would have worked great, though. What was your boil volume? Luckily my new BK is huge at 25 gallons. I shouldn't have any problems with boil overs in it. I plan to clamp the spider to the side of the BK to keep it from bouncing around.

I did a water test with a few ounces of whole hops in the new BK with the hop spider and it seemed to work perfectly. I put the hops in the kettle, not the spider, so I could see circulation. About 75% of the boil went directly up into the basket (which will promote utilization in the basket) and the remaining 25% went into the liquid around the basket which kept everything circulating very nicely. My thought is to put pellets in the spider and whole hops in the kettle since the bazooka tube seems to handle them fine. Hopefully the spider doesn't let any pellet debris out and clog the bazooka...

Cool. Sounds like it should work out for you. My BK is only 10 gal and my pre-boil volumes are usually around 8 gal so I don't have a lot of room to spare. Also I think part of the problem for me was due to my mesh being too fine/tight. Anyway I decided to go with a hop blocker around the dip tube method. I've built it but haven't tried it yet. Fingers will be crossed :)
 
Where did you get your sight glass material?

The 3/8"x1/8" on my keg came from McMaster and the 1/2"x3/8" on my BK came from Bargain Fittings. I highly recommend the 1/2"x3/8". It works so much better than the 3/8"x1/8". I will never use that size again. The smaller tube is very tweak and bubbles get stuck in it more often. I always thought the ID of the smaller tube made it work poorly, and now that I have another sight glass with a larger ID, I'm sure of it. I think the issues with the small tube are due to capillary action.
 
personally, if I did it over, I would use 3/4" tri-clover on every single tube in a 5-15 gallon system... I used a lot of 1" tri-clover with 5/8" ID tube , because that was what was cheap for me years ago... now that I can get 3/4" stuff in three different pipe sizes from places like stilldragon.com

side note, if you cannot weld stainless, take a TIG class at the local community college, and buy a small DC only TIG welder (such as an invertig 131 for $900 ) and hit your buddies up for a few $$$ when you weld things for them, every homebrew community needs a few weldors...


FWIW, hose barbs make up most of my interconnections as well, both temporary and semi-permanent ones.

Not sure of Kevin's reasons, but they have been cheap, durable and reliable in my system
 
Thanks for the comments, everyone.

I just realized that there are no pictures of the complete system, so I'll try to get something up soon.

As for the barb fittings, they are perfect for me. I seem to change things so frequently and they're probably the cheapest, easiest type of connection to use while dialing a system in. Case in point: I was not happy with the flow through the copper manifold in my Coleman mash tun, so I decided to build a new, SS mash tun with a false bottom to increase the opened area. I just bought the vessel and am about to buy the false bottom, but I don't have to buy any fittings! The only place I would definitely use tri-clamps is on a fermentation vessel, but I would not use any tri-clamp fittings with threads on them. That kind of defeats the purpose.
 
The new MT is done! It's a 20 gallon Concord pot with a Jaybird false bottom. I ordered the false bottom about 1/32" - 1/16" big so I could grind it to a perfect fit as these pots are sometimes not perfectly round. The PID temperature probe will go in the T at the top of the MT. Going to brew this coming weekend...

IMG_9475_zps315ebb21.jpg


IMG_9476_zpsacbd531a.jpg


IMG_9477_zps6d469797.jpg
 
That false bottom is gorgeous.

I love the simplicity, like how the vertical pieces act as a stand and as a second barrier to grain that might have made its way past the main, horizontal part of the FB. That feature is especially beneficial if the FB doesn't fit the MT tightly. Even the outlet is protected by the second barrier with those little "legs" of the stand. I will be subjecting it to a 31.5 lb. grain bill this weekend.
 

Latest posts

Back
Top