mtbr_brewer
Well-Known Member
I know there is a pretty lengthy thread on this discussion, but I couldn't find it to post in! I wanted to attempt and polish my keggle, and had originally read the method using an angle grinder.
However, after consulting with my father (an avid classic car restorer) and some individuals in the polishing industry I changed my strategy. In my personal opinion I think angle grinders are turning a few too many RPMs to get a good mirror finish on a keg.
Nonetheless, I didn't want to invest in a ton of expensive equipment to get the job done. I was hoping I could use tools I already had laying around. After some discussions I attempted the following process with good results.
Tools
- 5" random orbital sander (from Harbor Frieght) that I already used for woodworking around the house.
-Hook and Loop sanding pads from a car paint supply store (needs to specialize in painting).
-7" variable speed polisher (borrowed)
-Meguiars polishing compounds
Process
In Hindsight I should have taken a lot more pictures, and I plan to when I polish my second keggle but I'll just describe it for the time being.
-Started with a 220 grit 6" hook and loop pad from a car paint supply store. I found these pads broken down in a 10 pack for $7. It took 4 pads of each grit to get through an entire keg. In hindsight if you want a perfect mirror I might recommend starting with 80 grit and then moving to 220. There are some scratches I just couldn't get out with 220, but I was comfortable with that.
-After sanding the complete keg with 220 (takes the longest of all the grits, roughly an hour) move to a 400 grit pad and complete the process again. I found that each step up took about 10 minutes less than the previous step since you're removing less material. However, you have to be diligent and ensure you are getting all the 220 grit scratches out.
-Continue the process with a 600 grit, 800 grit, 1000 grit, and 1200 grit pads. Then move onto the buffer with a pretty abrasive compound (mine indicated it would remove 1200 grit scratches).
-Next move to a finer grit polish on the buffer, and remove all residue with a microfiber.
Again the total time for completion was 4 hours, but that's not including breaks for numb hands! Again, I might start with an 80 grit pad if you want to get all the scratches out, but you'd probably be adding another hour and a half or more to the total process.
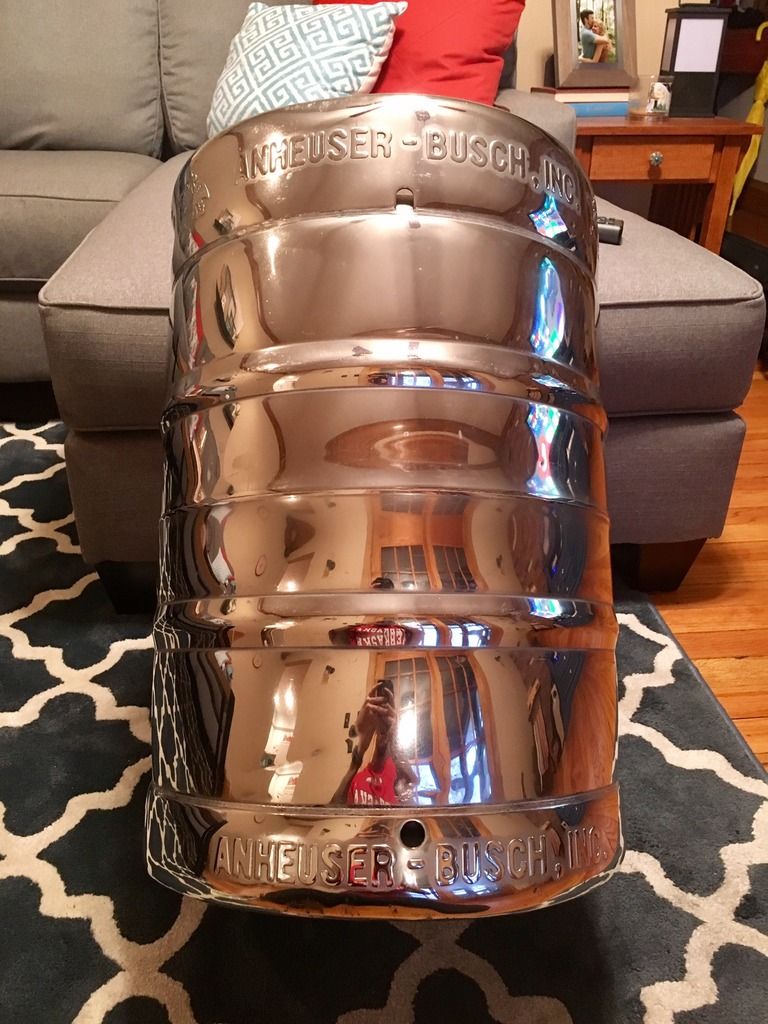
I realize not everyone will have these tools or want to spend $75+ for the pads and compound, but if you are looking to get a mirror finish this is the easiest process I have seen. Below is a picture of the keggle after I finished. Again, it's not perfect but I think moving down to 80 grit would have gotten me there. I might try using 80 grit on just the heavily scratched areas on my next keggle. Let me know if you have any questions.
However, after consulting with my father (an avid classic car restorer) and some individuals in the polishing industry I changed my strategy. In my personal opinion I think angle grinders are turning a few too many RPMs to get a good mirror finish on a keg.
Nonetheless, I didn't want to invest in a ton of expensive equipment to get the job done. I was hoping I could use tools I already had laying around. After some discussions I attempted the following process with good results.
Tools
- 5" random orbital sander (from Harbor Frieght) that I already used for woodworking around the house.
-Hook and Loop sanding pads from a car paint supply store (needs to specialize in painting).
-7" variable speed polisher (borrowed)
-Meguiars polishing compounds
Process
In Hindsight I should have taken a lot more pictures, and I plan to when I polish my second keggle but I'll just describe it for the time being.
-Started with a 220 grit 6" hook and loop pad from a car paint supply store. I found these pads broken down in a 10 pack for $7. It took 4 pads of each grit to get through an entire keg. In hindsight if you want a perfect mirror I might recommend starting with 80 grit and then moving to 220. There are some scratches I just couldn't get out with 220, but I was comfortable with that.
-After sanding the complete keg with 220 (takes the longest of all the grits, roughly an hour) move to a 400 grit pad and complete the process again. I found that each step up took about 10 minutes less than the previous step since you're removing less material. However, you have to be diligent and ensure you are getting all the 220 grit scratches out.
-Continue the process with a 600 grit, 800 grit, 1000 grit, and 1200 grit pads. Then move onto the buffer with a pretty abrasive compound (mine indicated it would remove 1200 grit scratches).
-Next move to a finer grit polish on the buffer, and remove all residue with a microfiber.
Again the total time for completion was 4 hours, but that's not including breaks for numb hands! Again, I might start with an 80 grit pad if you want to get all the scratches out, but you'd probably be adding another hour and a half or more to the total process.
I realize not everyone will have these tools or want to spend $75+ for the pads and compound, but if you are looking to get a mirror finish this is the easiest process I have seen. Below is a picture of the keggle after I finished. Again, it's not perfect but I think moving down to 80 grit would have gotten me there. I might try using 80 grit on just the heavily scratched areas on my next keggle. Let me know if you have any questions.


![Craft A Brew - Safale BE-256 Yeast - Fermentis - Belgian Ale Dry Yeast - For Belgian & Strong Ales - Ingredients for Home Brewing - Beer Making Supplies - [3 Pack]](https://m.media-amazon.com/images/I/51bcKEwQmWL._SL500_.jpg)