Kal Clone

Homebrew Talk - Beer, Wine, Mead, & Cider Brewing Discussion Forum

Help Support Homebrew Talk - Beer, Wine, Mead, & Cider Brewing Discussion Forum:

This site may earn a commission from merchant affiliate links, including eBay, Amazon, and others.

Yaksha808

Supporting Member
HBT Supporter
Joined
Dec 31, 2012
Messages
175
Reaction score
5
Location
portales
Well I figured I would start a thread for this... just to show that I have been doing something.

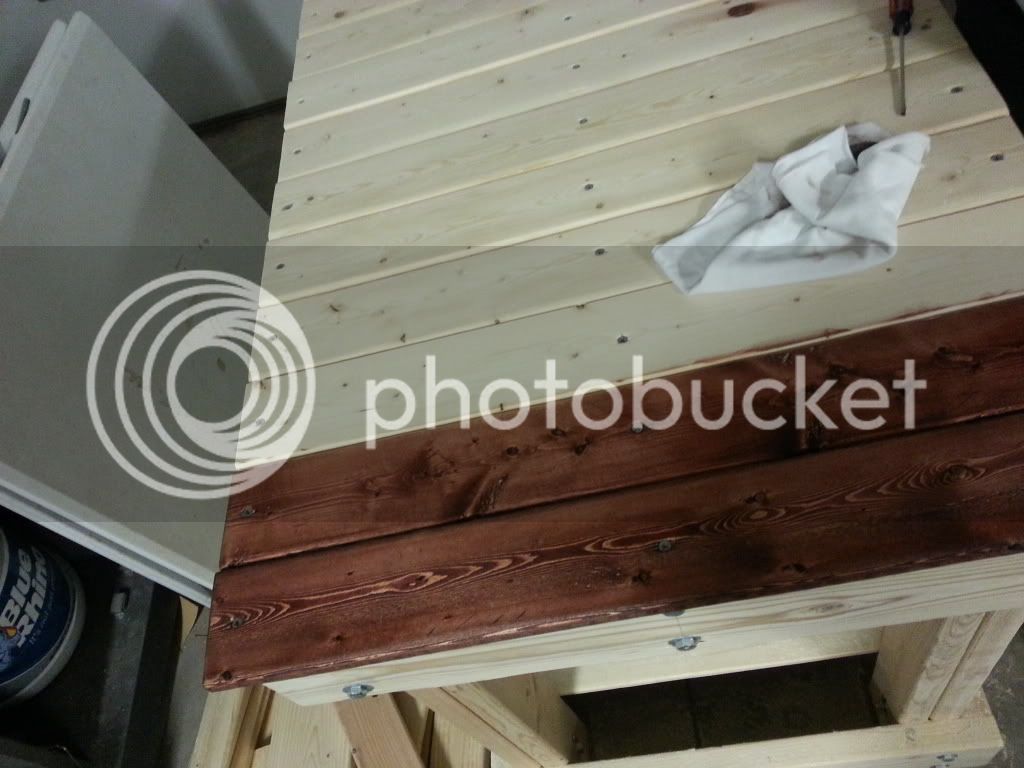
Bought the lumber, bolts, washers and all that wonderful stuff on Presidents day. Then with the help of a buddy of mine, started cutting and putting the main frame together(pictures later). Tonight I got the top boards put on and am now taking a break from the sanding to let my hands rest and so that I can keep you guys entertained as much as possible.

So far I have gotten about 3/4 of the top sanded with 80grit, trying to get off as much of the random ass stamps that they put on the wood as possible. If anyone has some suggestions they would be greatly appreciated.
 
What stamps do you mean? I'm not aware that lumber was stamped (except maybe wolmanized lumber). Either way, my only suggestion is to use a palm sander or orbital sander to get rid of any ink stamps. That would probably reduce the amount of elbow grease involved.
 
quarter-sheet palm sanders are worth their weight in gold (okay, that may be an exaggeration). But, it is an essential tool for any DIYer - wood or metal work!
 
I just left any imperfections in my stand... There weren't many, but I just figured it was just added character. It's a brew stand man. You are going to drip wort on it, and it is going to get beat up anyway. Stain it... Seal it up with no fewer than 3 coats of Poly... Brew on it!
I built a Kal-inspired brewery last year. I will hope to answer any of your questions. Plus... have you found the discussion forum on Kal's site? Good group of guys over there, all willing to help out. I have the same screen name there as here.
55848d1333749951-my-brew-stand-brew-stand-w-poly.jpg
 
A picture would help out tremendously. A close-up and an angle like mine. I'm not sure what you are talking about being different height.
 
BTW, I mounted my long middle beam across the top a few inches back from what Kal indicates. That allowed me to bottom drain my keggles with them being in the center of the stand.
 
What you're seeing is differences in the thickness of individual boards. that, or the horizontal framing boards that you used aren't level/true.

If you have access to a planer, you can plane them all to the same thickness.

Or you can just go through piece by piece and exchange any pieces that are too thick or too thin and cause height issues.

Lastly, you could just not worry about it and accept that wood thickness is variable and imperfections like that are part of working with it.
 
I built my "kal stand" last weekend. I'm a annoyed with myself for not doing my own calculations first. I followed kals build/measurements exactly. The 1x4 widths don't cover the top evenly which I find annoying, I have about 3/4" gap on both ends of the top (or a 2" gap in the center". I haven't screwed down the 1x4's yet as I need to decide if I want to fill in one skinny board in the middle or just leave the end gaps. If I could do it over again I would have made the stand about 2" shorter so the top and bottom would be flush and look much cleaner. But as in the previous comment it is "just a brew stand" and will inevitably get dinged up and spilt on. However quite a bit of work goes into the stand so its hard not to get annoyed with "imperfections".

Corey
 
smittygouv30 said:
I built my "kal stand" last weekend. I'm a annoyed with myself for not doing my own calculations first. I followed kals build/measurements exactly. The 1x4 widths don't cover the top evenly which I find annoying, I have about 3/4" gap on both ends of the top (or a 2" gap in the center". I haven't screwed down the 1x4's yet as I need to decide if I want to fill in one skinny board in the middle or just leave the end gaps. If I could do it over again I would have made the stand about 2" shorter so the top and bottom would be flush and look much cleaner. But as in the previous comment it is "just a brew stand" and will inevitably get dinged up and spilt on. However quite a bit of work goes into the stand so its hard not to get annoyed with "imperfections".

Corey

If you are trying to top it w/1x4 like a table top, you need the spaces for expansion unless you are using biscuits or dowels and glueing it up. Otherwise it will warp and give you all kinds of issues ( especially when wet).

I'd say a minimum of 1/16" I between boards unless I was trying to eat up space in which case I'd place the end boards and evenly distribute the boards in-between.

If you are glueing it, use a lot of biscuits and glue and be sure to plane it and seal it well.
 
Yaksha808 said:
Here you go

That's the difference in crowning and warping. The lumber is dimensionally the same but not straight and cupped. It will happen with all lumber to a certain extent.

Essentially your decking. Try to use straightest boards and orient all the crowns up ( cupped down). If you have a good lumber yard or friend, get them to run the boards through a planer to square them up before you put them down. That will help a lot.
Regardless of what you do, unless you glue it up into one pieces (which I wouldn't recommend with these boards without a planer and joiner), give the boards room to move or it'll warp.
 
If you are trying to top it w/1x4 like a table top, you need the spaces for expansion unless you are using biscuits or dowels and glueing it up. Otherwise it will warp and give you all kinds of issues ( especially when wet).

I'd say a minimum of 1/16" I between boards unless I was trying to eat up space in which case I'd place the end boards and evenly distribute the boards in-between.

If you are glueing it, use a lot of biscuits and glue and be sure to plane it and seal it well.

Thanks for reply. My plan was to just use wood screws, not glue, but i'm not opposed to using glue if it's better. Looking at Huaco's picture posted earlier, he ran into the same issue I did with his build. He has a gap at the end of the table top much like mine would be. Going back to Kal's site and looking at his pictures he doesn't have gaps on the end of his table nor does he have significant gaps between his boards.
I'd def like to have a table top look without gaps between each board and without gaps on the end. What kind of problems will I have in the future if I screw down the boards snug to one another?

By the way sorry for hijacking this thread
 
If you place the long sides of the 1x4 stock together and nail tight you will eventually have the boards cup and separate or force the frame apart from swelling against each other. The wood will swell with humidity changes as well as water.

That will bend your framing making it wobble or force your framing joints apart.

I would look into 3/4" birch plywood cut to size. It's around $35-40 a 4' x 8' sheet but it's strong and can be finished so it dosen't look crappy. Lowes Depot should be able to cut it for you.
 
Did you drill and countersink prior to screwing the boards? I did and it allowed the boards to all pull up VERY tight to the sub frame.
I followed Kal's specs except for the location of the mid beam. Mine came out excellent. I did notice that because I installed fresh "wet" wood, that when it dried out I had nice little gaps between each board. I did not set them with a gap, I just jammed them right up next to each other and attached them. No problems. I don't know if you can see it in the photo I posted, but I notched the 1x4's around the legs on the bottom shelf and it turned out quite nice. I went into this knowing that I wasn't building a "fine furniture" item, more like a sealed workbench. With that mindset, I don't care if it is dinged up. Hell, it still gets raving reviews by people seeing it the first time!
 
I already bought, cut, and stained the 1 x 4's I just haven't put them on yet, so unfortunately the birch idea isn't a good solution for me. I have the frame completely built following kal's build exactly. I drilled and countersunk all the bolts and everything is very solid/tight. I'm going to add some casters to it as well and overall I'm very happy with it.

Huaco, it's tough to see in your photo but is there a decent size gap from the last 1x4 and the edge of the wood frame? Your stand looks very sharp, I like the dark color.
 
Yeah, I worked (laid-out) from the center so I could maintain the same "gap" at the end. Really there is no gap persay... it is just that the 1x4's terminate about 3/8" shy of the 1x6 side boards of the sub structure. Also... I didn't lay it out with any attention to grain cupping and I am not having any problems.
I used a hand plane to chamfer the corners and then an electric 1/4 sheet palm sander to radius the corners. Heck, the whole stand was built with a circular saw and speed-square! It's amazing what you can do with minimal tooling. lol.

Here is a photo of the bottom shelf at the legs, Unfortunately you can't see behind the legs well. But, also just throwing out my pump mounting solution. I like them mounted to the legs like this!
70250d1343708680-my-brew-stand-finished-pumps-plumbed-large-.jpg


Here you can see the top a little better. From the wrong angle though. haha! It looks just fine and doesn't bother me...
384656_10151172368394224_1862920138_n.jpg

Nice, thanks for the info! I just went to your build thread too. Well done man! I can't wait to get mine complete and finally up and running. I ended up building a a pump stand, like kal. If i had seen your thread I may have ended up following suit and mounting mine like you did.

-Corey
 
Alright guys, well I decided on just sanding the boards down as well as possible and getting them nice and smooth... this is what im working with right now... tried to get it as smooth as possible and tried out the prestain and stain on two boards to see how I liked it... comments are welcome
74597FA4-orig.jpg
 
Looks GREAT! Will look better with several coats of Poly on it!
On the bottom where the gap is, Screw on some scrap 2x4 cleats to the legs level with the bottom of the 1x4 boards next to it. You will then have a surface to screw the in-fill piece to close the gap.
 
Oh.... about that.... I haven't started on the bottom yet... I wanted to get the top done first... so I can atleast get the kettles on it to clear up some room in my garage
 
So far I have 2 coats of poly on it, im thinking about doing a third but im not sure how necessary it would be. Today ill be sanding the bottom boards and maybe staining them also
 
alright guys... i did a few things... i know its been a while since i updated this, i ended up taking off those 1x4's I had on originally. Got some better ones to work with... so without further adieu...


Latest posts

Back
Top