Igloo 7.1 cu ft FRF795 Black Keezer Build

Homebrew Talk - Beer, Wine, Mead, & Cider Brewing Discussion Forum

Help Support Homebrew Talk - Beer, Wine, Mead, & Cider Brewing Discussion Forum:

This site may earn a commission from merchant affiliate links, including eBay, Amazon, and others.

reim0027

Well-Known Member
Joined
Apr 19, 2008
Messages
439
Reaction score
9
This is going to be a very basic keezer. My manual skills are pretty piss-poor. But, I'll document it here so you can see and maybe give advice. It'll take a while for this project, but it should look acceptable when I'm done.
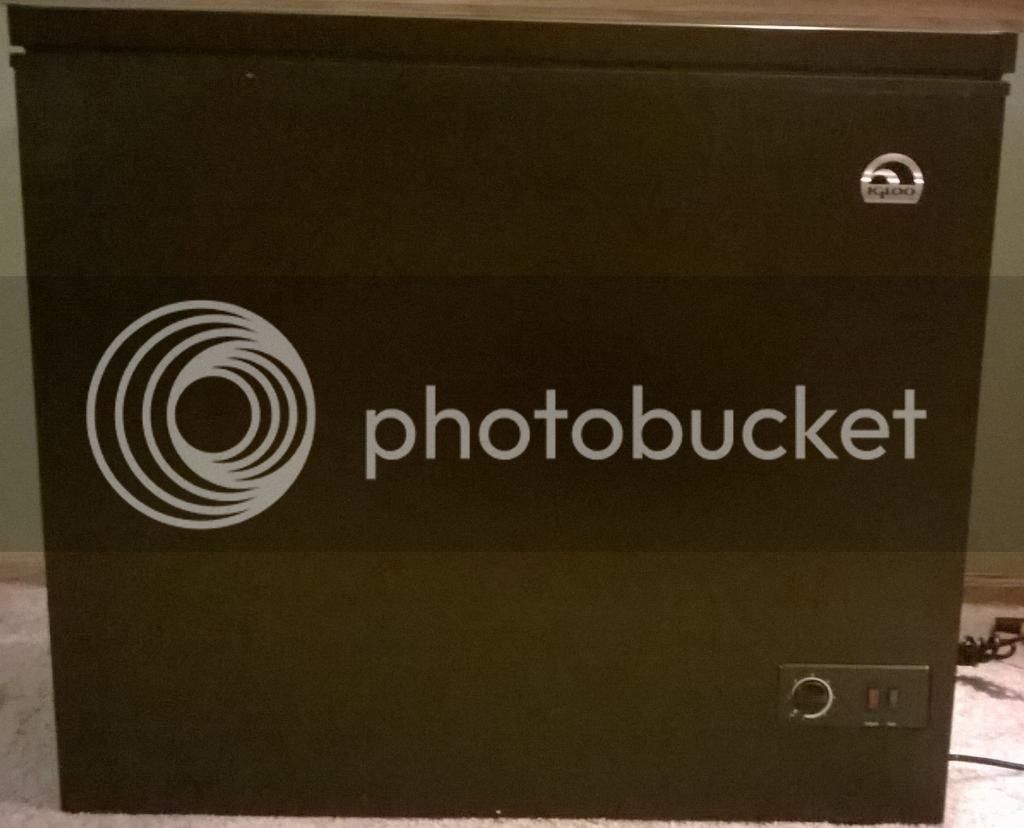
Here are the stats:
Igloo 7.1 cu ft FRF795, Black
Energy Star, $24 yearly cost, 198 kWh est yearly electricity use

Outer dimensions (LxDxH): 36.75 x 20.25 x 33
Inner dimensions 31.5 x 15 x 27.27
Inner Base 23 x 15 x 33
Platform 8.5 x 15 x 18.5

WP_20141127_21_01_41_Pro_zps0aa1b558.jpg


WP_20141127_002_zps192d7b7f.jpg


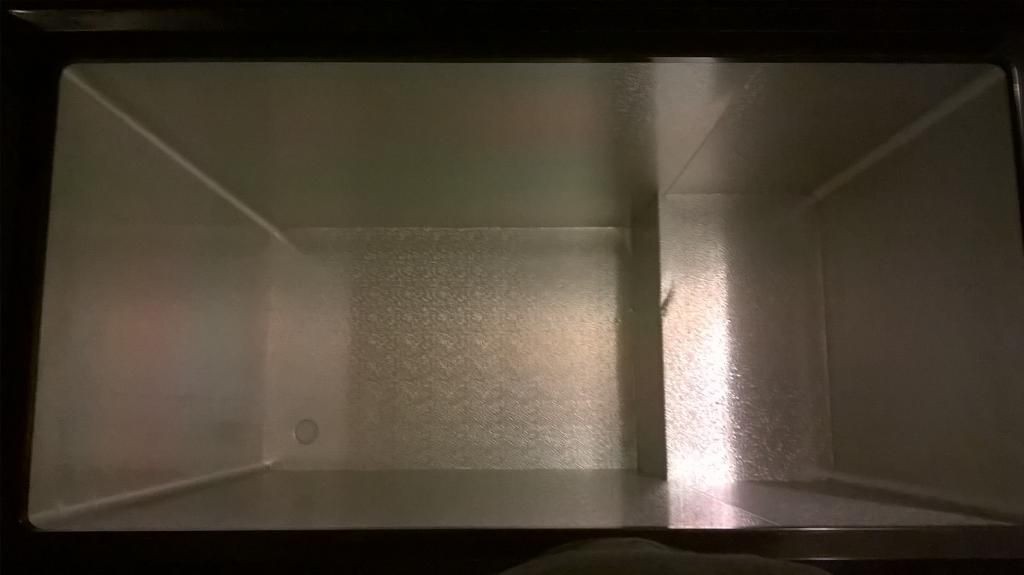
The first problem I have are the short hinges. They are only about 2.5" apart and there is no room for vertical adjustment. Maybe I can buy another set of hinges?

I'm going to use 2x6 pine boards to raise the lid. They will fit nicely. I plan on having 4 taps in this thing (I can get 3 corneys on the base and a 4th on the platform, if I raise the lid 6 inches). And, cut out a spot for my thermostat.

CO2 tank will be outside.


I'll have to cut some insulation to fill in the horizontal gaps.

I'm also happy I found a black freezer, and it was on sale for $148. This will be a major project for me (not mechanically inclined).
 
I'm interested in this build as I just bought one also. First, are u positive you cannot squeeze a fourth ball lock on the floor? Second, these are supposed to have a thermostat that adjusts up to 50d, making a temp controller unnecessary.
Good luck on the build
 
I bought one too but mine will be used for fermentation. I built a controller with a $10 STC-1000 from wilconrad and an old computer power supply housing. Using bits and pieces I had laying around I have a total of $12.25 invested and it looks pretty good.
 
I know for a fact that you can NOT fit a 4th keg on the floor. I just tried last night. Just a bit too small (by an irritating amount too).

I plan on making a 2x8 collar, so a 4th will fit on the ledge above the compressor.

What do you guys use to seal the collar to the freezer?
 
sub'ed...

I just bought the same one and will be doing a keezer build myself. I'm still trying to figure out and order all the kegging stuff so will take some time for me to get going as well. Maybe we can compare notes along the way...

:mug:
 
I bet if you made a platform that was level with the top of the hump, you could get 5 of them in there with the collar.
 
Looks about right. You'll need a 2x8 collar to fit those kegs on the ledge.
 
I bought the Black Friday deal also for the same reason. Will be following post to see your progress! Prost!!
 
I've decided on a color for the collar. It will be a dark cherry red.

I got some silicone to attach the collar to the freezer. Any thoughts on that? I want something that is removable, in case I want to use the freezer in the future.

I also got some fluorescent dry erase markers that I can write directly on the lid, labeling what is on tap, and what is on the ready.
 
I just finished mine last night, minus the temp controller. I plugged it in to test it, and even on the warmest setting the thing got down to less than 25 degrees and started to ice up in about 20 minutes. For the seal I used the spongey weather stripping and placed an outer "apron" collar to the main collar. I used 2x8's for the inner and 1x10 for the outer. It also gave me a place to attach a drip tray. Take a look at the pics. Good luck

John

IMG_2946.jpg


IMG_2961.jpg


IMG_2964.jpg


IMG_2965.jpg
 
Those look fantastic. I've got all my parts together and will start on the collar this weekend. I'm not "handy" in the slightest, so mine probably won't look anywhere near as nice as yours. But, I reckon it will do the job.
 
I just finished mine last night, minus the temp controller. I plugged it in to test it, and even on the warmest setting the thing got down to less than 25 degrees and started to ice up in about 20 minutes. For the seal I used the spongey weather stripping and placed an outer "apron" collar to the main collar. I used 2x8's for the inner and 1x10 for the outer. It also gave me a place to attach a drip tray. Take a look at the pics. Good luck

John

Clean simple build. Nice job!!

:mug:

I see you added some casters as well. Did you make the frame or re-purpose a frame from something else?
 
Going to be cutting the collar today. This will be interesting . . . I'm not much of a handy man (at all). Updated pictures with all my items:


Thank you. I welded some old bed frames together to make a nice tight fit and then added some 3" caster wheels from harbor freight.
 
I just finished mine last night, minus the temp controller. I plugged it in to test it, and even on the warmest setting the thing got down to less than 25 degrees and started to ice up in about 20 minutes. For the seal I used the spongey weather stripping and placed an outer "apron" collar to the main collar. I used 2x8's for the inner and 1x10 for the outer. It also gave me a place to attach a drip tray. Take a look at the pics. Good luck

John

That looks really good. Did you cut the black diamond strips of metal for drip tray yourself? Or were you able to pick that up commercially? Also curious if you used 4" shanks or if you were able to use 3 1/8. Thanks.
 
Any idea if a 20lb Co2 tank will fit on the floor with 3 ball lock cornies? I believe the 20lb tank is 7 inches in diameter.
 
Any idea if a 20lb Co2 tank will fit on the floor with 3 ball lock cornies? I believe the 20lb tank is 7 inches in diameter.

I think it would be tight but the interior dimensions on the floor are 23" by 15.5" and 26.5" for the height. Height might be a touch less deepening on the lip of lid. And the hump is 8.75"H x 8.75"D and 15.5"W
 
Couple quick pics on how mine came out. I did a 8 X 2 collar but finished the outside with cabinet toe kick and 3" filler. I did this because it matches the rest of my bar. I made the collar a bit too narrow and had to cut away at the corners of the collar so the lid could come all the way down and sit comfortably. I'm happy I can get a 1/6 Sankey keg on the hump using a low profile Sankey coupler, but slightly disappointed I can't fit 3 on the floor. But it looks like I will be about to do 2 1/6 Sanke and one 5 gallon ball lock.

IMAG0627.jpg


IMAG0626.jpg
 
what is the overall height after the collar is installed thinking of building one with that same freezer . It needs to be able to fit under my existing bar. they both look good .what is the black diamond plate strip mounted to the back of the first one ?
 
what is the overall height after the collar is installed thinking of building one with that same freezer . It needs to be able to fit under my existing bar. they both look good .what is the black diamond plate strip mounted to the back of the first one ?

Without casters and an 8" collar mine stands at 40 1/4.
 
Kadding,

Looks great! You may want to look in to painting the inside too just to help with moisture to the wood. Also,mare you using a temp controller or did you just dial down the settings? I put a temp controller on mine, but that was mainly because I didn't take the time to test out the different settings with the collar installed. Also, I am going to be insulating my collar, I am getting a lot of condensation on my taps and bolts through the collar. Great job!
 
what is the overall height after the collar is installed thinking of building one with that same freezer . It needs to be able to fit under my existing bar. they both look good .what is the black diamond plate strip mounted to the back of the first one ?

It is just a piece of diamond plate that was bent in to shape and then spray painted.
 
Well, got the collar sanded and stained. Now, it is time to put it together. Hopefully, I'll have it done this weekend.
 
I am working on a collar for the same freezer. 2x8 pine, 1x10 red oak outer. I overlapped the top about 3/4 inch to hide the lid seal. One thing I did notice is with the disconnects attached to the kegs, it is going to be a tight squeeze when you close the lid since the inside of the lid is lower than the seal.
 
I had to trim off the inside of the collar (at the top) to accommodate for this. It should work. We'll find out today when I put the collar together and attach the lid.
 
Still a work in progress. This one is a FRF705 but i think it is identical to the previous models. The shanks and faucets should be shipped today from homebrew.org and the STC-1000 is in the mail.

Eventually I will add a platform on the bottom for castors and a 1x4 skirt on the same material as the collar.

067.jpg


069.jpg


083.jpg


085.jpg


095.jpg


102.jpg
 
Still a work in progress. This one is a FRF705 but i think it is identical to the previous models. The shanks and faucets should be shipped today from homebrew.org and the STC-1000 is in the mail.

Eventually I will add a platform on the bottom for castors and a 1x4 skirt on the same material as the collar.

Purdiful!!
 
Looking great. Hopefully, if real life doesn't intervene (again), I'll be gluing and bracketing my collar tonight.
 
Still a work in progress. This one is a FRF705 but i think it is identical to the previous models. The shanks and faucets should be shipped today from homebrew.org and the STC-1000 is in the mail.

I was going to order my faucets about three weeks ago but decided to wait until closer to build time. Went to place the order this weekend and now they are out of stock... DOH!

Eventually I will add a platform on the bottom for castors and a 1x4 skirt on the same material as the collar.

Kinda like this?? :mug:

Base Frame with casters.jpg

Drain Plug Cutout.jpg

Attach Skirt to base.jpg

Stained skirt.jpg

Installed base.jpg
 
I was going to order my faucets about three weeks ago but decided to wait until closer to build time. Went to place the order this weekend and now they are out of stock... DOH!


Kinda like this?? :mug:


Exactly Like that!!!! :rockin:


I put the final polyurathane coat on this morning so in a day or two I will assemble the collar. I need to add some sort of strap to the back using the existing screws for the hinges and attaching it to the collar.
 
Feeding off your guys builds! I have the same freezer I'm building into keezer. Please keep the info/pics coming! Dimensions would be great as I have yet to do the woodworking! I have four all SS Perlick 630s coming from Birdman that shipped yesterday so will let you know how they are. Cheapest price I've found $63 ea! Built a temp controller for my ferm fridge as well thanks to this site!View attachment ImageUploadedByHome Brew1420583837.610015.jpg
 
Still a work in progress. This one is a FRF705 but i think it is identical to the previous models. The shanks and faucets should be shipped today from homebrew.org and the STC-1000 is in the mail.

Eventually I will add a platform on the bottom for castors and a 1x4 skirt on the same material as the collar.

do you have pics of the hinge system you used on the back and where did you get them? Also I have read that some are having problems with the lid interfering with the keg on the compressor hump. I have the 705 as well and need to know if you ran into any issues! thanks!:rockin:
 
do you have pics of the hinge system you used on the back and where did you get them? Also I have read that some are having problems with the lid interfering with the keg on the compressor hump. I have the 705 as well and need to know if you ran into any issues! thanks!:rockin:

I used the existing hinges screwed into the collar. I will get some pics up after I assemble it. I was giving the polyurathane a few days to completely dry before I put it together.

and from eyeing it out the lid may hit the hoses on the disconnects. Im not sure yet, but its going to be close. I may have to raise the collar up another inch.
 

Latest posts

Back
Top