• Please visit and share your knowledge at our sister communities:
  • If you have not, please join our official Homebrewing Facebook Group!

    Homebrewing Facebook Group

I decided to start building a brewing system

Homebrew Talk

Help Support Homebrew Talk:

This site may earn a commission from merchant affiliate links, including eBay, Amazon, and others.
This thread is awesome and I would love to subscribe...only problem is that for the life of me I can't find the subscribe icon/button...can someone help me out (I'm sure its right in front of me.)
 
Yep at the top of the first post of this page you'll click on thread tools and it will drop down and you'll see subscribe
 
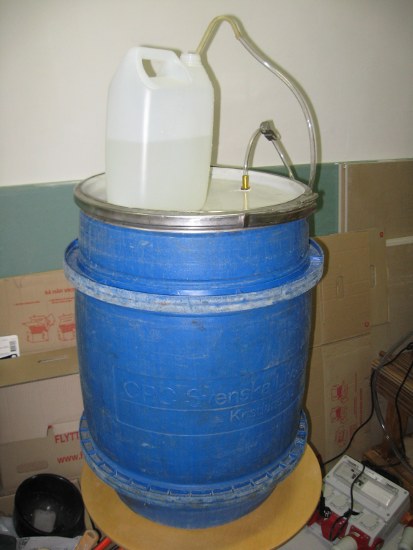
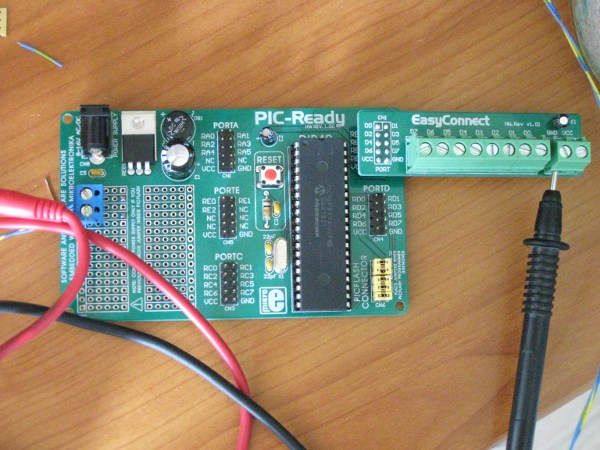
I made a demo video where I show the temperature controller (that I now call KarmaControl)
Video quality is quite bad - and somehow my accent became Swedish in the upload...strange ;)

[SNIP

That's funny, your post don't have any Swedish accent at all...hmmm
 
The milestone for today was to move the brew cart, HLT and MLT to the brew room.

I mounted a valve on the MLT and I have also created "rocket feet" (if you have the chance, read the Belgian Tintin comic books and you will know where the design comes from)

mlt_rocket_feet.JPG


After passing the mandatory leak test, the MLT was emptied...

mlt_wet_test.JPG


...and turned up-side-down...

mlt_foaming.JPG


...where it would undergo some extreme foaming (want it to be super insulated)

--------------------------------------------
Milstone: Put HLT and MLT on the brew cart
--------------------------------------------
Finally time to do the assembly.
Between the tuns you can see the silicone tubing that I will use to connect it all together (but that's in the next post)

hlt_mlt_brewroom.JPG
 
Another milestone to reach during the day was to assemble the hoses and then to perform tests of:

1. Heating the HLT (only used 1 heating element)
2. Heating the MLT by circulation of water through the heat exchanger in HLT
3. Drinking an ESB while watching and listening.

The test setup:

test_setup.JPG

Note: The tap that I intend to use for iodine tests and gravity readings was useful to let air pockets out so that the circulation pump can run smoothly.

testing_1_element.JPG

I only used one 2000 W heating element for this test

cipump_pumping.JPG

I let this test run for a couple of hours (long after I had finished drinking the ESB) as I want to wash out any possible residue from hoses, fittings and the tuns.
Aiming to do the first brew on the system today.
 
Aiming to do the first brew on the system today.

WOW! Good luck with the brew if you get it underway! Keep us posted, I'm a huge fan of this project as I've been following it from the beginning, and would love to do something like this someday on my own!:mug:

Just one question, how tall is it to the rim on top of the brewcart and the 'rocket feet'? Are you a giant? or will you need a step/milk crate? :D
 
Short update.
Am right now in the garage and the first brew on the system is mashing now at 65 C. Smells wonderful in here.

I trashed the only temperature sensor I had (for my control system) so I am doing it all manual today.
Speed to heat water in the HLT was amazing, way faster than I could have imagined so I got a bit stressed for a while earlier. But all is well :)
 
Just one question, how tall is it to the rim on top of the brewcart and the 'rocket feet'? Are you a giant? or will you need a step/milk crate? :D

Hehe...no not a giant.
Hmmm from the bottom of the rocket feet to the top of the tun it's about 1 meter ~40"
Then add another 20" for the brew cart (when I put the wheels on). So when I was to stir the mash, the easiest approach was to stand on the brew cart.
 
Time to see how the brewing system works in operation (manual operation at this stage)

This is the setup:
brewday_setup.JPG


One addition that I have made compared to previous posts. A T-connection with valves. One (the one closest) is for heating the mash and the second (in the back) is used when to chill wort.

mult_valve.JPG


In the boiler, I have added a drain/manifold. What you can't see in this picture is a SS mesh that I have made that works as a sock over the silcone hose.

boiler_drain.JPG


As I wrote yesterday, the HLT heated water way faster than I expected, so I got a bit stressed when doing mash-in and forgot to turn the valve off so I transported all the water to the MLT. This of course affected the efficiency and I had to work around it by using continuous lautering instead. Filled some more water in the HLT so I still could benefit from the heat exchanger.

cont_lautering.JPG


What you see on top is just a plastic lid that I drilled some random holes in, this is to avoid getting chanelling in the grainbed.
 
Made a similar draining/manifold in the MLT as the one in the boiler. Didn't use any mesh in this one though, as I had a malt bag in the inner bucket. Getting a slow flow through the grainbed - which I like - and resulting in quite particle free mash outside the inner bucket.

mlt_drain.JPG


I must say that I am quite impressed and proud of the boiler, it works excellent!
Giving good rolling boils at 4 kW.

wort_boil.JPG


Time to chill the wort.
Posting two pictures, one with illustration

chilling_wort.JPG


chilling_illustrated.JPG
 
Almost all wort transported.
Tilting the boiler around 2" to extract as much wort as possible. The SS mesh and the hop cones filters the wort quite well.

tilted_boiler.JPG


Wort aerated (using a pump that came with an inflatable bed that I bought on a road trip in the US, only problem that I have with this method is that I need to have a voltage converter from 230-110 VAC).
Yeast is pitched and lid is sealed on the tun.

I made a CO2 vent that I connected an old racking cane to and then put in water.

fermentor.JPG


Conclusions:
1. I will not automate the boiler, the temporary setup that I used with normal switches worked well.
2. Even if I have a DIY soul I will buy a monster mill, because crushing 20 lbs grains manually took a looooong time
3. Chilling the wort the way I did it worked well - but you need to restrict the flow (slower flow = better chill).

Went to bed around 7.30 AM so it was more a brew night than a brew day ;)
 
Congrats on the brew day!

Thanks. Now it's just a matter of waiting for the fermentation to do its work.

How do you remove the spent grains from your mash tun?

I just lift the inner bucket up with spent grains. If any grains have escaped from the inner bucket, then I can tip the mash tun and get rid of them that way. :)
 
I have made a butt ugly ppt sketch of the piping in my system.

That and the illustration above should make it pretty clear how it works.

piping.jpg


Flaws, questions, comments, ahas, suggestions are welcome.
 
Went to bed around 7.30 AM so it was more a brew night than a brew day

is this one of those crazy times of year in sweden where it stays light or dark all the time?? ;)

seriously, this is one of the coolest builds i've seen. what a way to make your dagligen brod!

can't wait to see it all done. :mug:
 
I found some of those exact same containers at, of all places, a metal salvage yard. I turned around and walked away cause I just spent $400 already upgrading, and suddenly going electric will probably kill me. lol

I do have a one of those HUGE plastic barrels (100 gallons?) that bulk LME comes in though.. I'm pretty sure I could score 2 more from local ubrews, but I think that is for another day. :D
 
is this one of those crazy times of year in sweden where it stays light or dark all the time?? ;)

seriously, this is one of the coolest builds i've seen. what a way to make your dagligen brod!

can't wait to see it all done. :mug:

Hehe...no not those crazy times of year yet...just a semi crazy swede that started brewing too late in the evening. (Part from that I live in the very south of Sweden and it's only in the very north that they get that 24 hour daylight)

Glad that you like the build. :)
 
I do have a one of those HUGE plastic barrels (100 gallons?) that bulk LME comes in though.. I'm pretty sure I could score 2 more from local ubrews, but I think that is for another day. :D

100 gallons....wow that would be an awesome project. Would probably need a barn to house a 100 gallon E-HERMS sysem....and a powerplant to run it :D
 
Back to the controller drawing board.

Now after doing a couple of brews on my system, I have thought about a couple of changes that I will do in the program for the PIC controller as well as retiring two SSR's from the controller box (can always use them to a fermentation chamber/room).

A while I intended to automate as much as possible, but now I am thinking more about only automating mash temperatures and HLT temperature.

I kind of like the parts where I can regulate flows manually by opening and closing valves...to automate it too much currently would feel like cooking microwave food instead of gourmet dinners.
 
As I was opening your thread... "Allegro- Sonata No. 6 BWV 1019" came on... (Bach) I completely Agree with you, there are certain things that should be done by the brewer, especially at this scale... valve manipulation, pump control? yeah... I am completely in awe of your handiwork. Keep us posted... Music to my ears.
 
I argued with myself regarding purchasing or creating own boards for the controller. Think I ended up half way between the options.

Bought these prototype boards for the controller. And then I just use the IDC10 (10 pin) connectors to hook up whatever I want/need.

So for $23 each I got a pretty looking board as seen below.

MBOARD.JPG


the Digital User Interface (DUI - no pun intended...) is a creation of mine, currently on experiment board, which has a display, some buttons and connectors to the temperature sensors.

I might etch a prettier board later, but for now I will use what I created.

Dui.JPG
 
Sweet, and may I again make the statement.
You suck!
I wish I had the space for that!
Please keep posting, it is fantastic.
 
Have made many dry runs with my perifials i.e. the temperature sensors for a while now.
Decided to put it together this evening.

sensor_rod.JPG


I have welded/soldered temperature sensor rods (2 of them) as shown in the picture above. They have a length of around 2 feet each.

In the other end of the cable I have created some easy-connect connectors that I made out of pin connectors (3-pins) and some experimental board cut in a small size.

temp_sensor_connector.JPG


The connector plugs into the DUI (the one with the display and buttons).
 

Latest posts

Back
Top