I built a walk in cooler - on wheels

Homebrew Talk - Beer, Wine, Mead, & Cider Brewing Discussion Forum

Help Support Homebrew Talk - Beer, Wine, Mead, & Cider Brewing Discussion Forum:

This site may earn a commission from merchant affiliate links, including eBay, Amazon, and others.

orono

Supporting Member
HBT Supporter
Joined
Sep 10, 2019
Messages
52
Reaction score
56
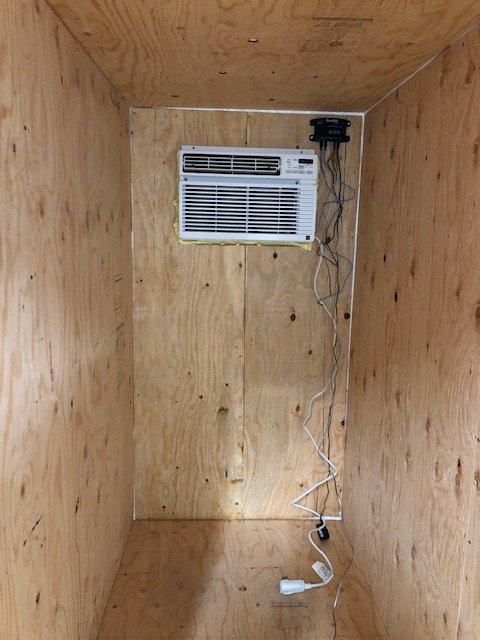
I just finished building a walk in cooler on wheels. Outer dimensions are 4' x 8' x 7' (h) including wheels. Inside dimensions are 34" x 82" x 65" (h). It is going to be cooled by a LG 8000 BTU A/C controlled by a CoolBot Pro with wifi. I panelized all the walls, floor and ceiling because I was building this on my own. The panels are basically sandwich panels (3/4" plywood, 2 x 6 lumber, 5.5" of rigid insulation (gaps filled with spray foam insulation) and 3/4" plywood). All framing is 16" O.C. The door was custom made to 32" x 60". I will be putting a couple of outlets and a light inside of the cooler. The AC only draws 6.2 amps. These pictures were taken while the spray foam was still hardening. I mainly make lagers so I plan to use this mainly for fermenting and storage. If I need a warmer temp, my plan will be to put a conical heater (or an electric heating wrap controlled by an Ink Bird controller) on the conical and wrapped in a moving blanket.

IMG_6476.jpg
IMG_6475.jpg
60401105590__787DB957-2095-43B4-ACF0-FA41724C3D36.JPG
60399709081__D0A7BB44-8540-49EE-8470-9332352F9E3D.JPG
 
So that I can move it from my shed into our garage. I made it only 7' tall (83" actually) so that it will fit into the garage, too. I'm not sure how often I plan to move it once I find a semi-permanent home for it.
 
Nice build. I have thought about building something similar but unfortunately do not have the space. One suggestion would be to finish the inside walls/ceiling with rigid foam board insulation to minimize loss of cooling.
 
One more thing to consider would be to drill a hole in the bottom of the AC casing and install a section of tubing that runs to a drain/bucket as you will quickly collect large amounts of condensation
 
I would love to hear reviews on this once you get using it.
What was the build cost?
I will post more info on the operation of it once I get it up and going. Just finished 2 coats of primer and 2 coats of paint (pre-catalyzed waterbased epoxy (food grade paint)) both from Sherwin Williams. My build cost is skewed because I had a lot of this material around since another project. However, I'll give you a material list and prices from a local lumber yard by me. Materials may be cheaper from a box store (Home Depot - Lowes, etc.).

A/C - LG 8000 BTU (1) = $ 279
CoolBot Pro - (1) = $399
2-8 x 5-0 door (1) = $205
2x6x8 - (26) $4.29 = $111.54
3/4x4x8 CDX - (12) $27.13 = $325.56
1/2x4x8 CDX - (2) $19.48 = $38.96
2x4x8 Closed cell Insulation - (8) $24.12 = $192.96
1.5x4x8 Closed cell Insulation -(5) $18.78 = $93.90
Canned spray foam -(15) $4.68 = $70.20
Primer 1/2 gallon (1) $23.20 = $23.20
Paint 1/2 gallon (1) $ 28.04 = $28.04
1/2" x 3 x 4 rubber mats for floor (2) from TSC $ 26.99 = $53.98
Total if you were to buy all new materials - $1821.34 +misc screws, fasteners, etc.
 
Nice build. I have thought about building something similar but unfortunately do not have the space. One suggestion would be to finish the inside walls/ceiling with rigid foam board insulation to minimize loss of cooling.
Thank you! If I understand you correctly, I have done the finishing you are suggesting. The walls, floor and ceiling are all 7" thick (3/4" plywood + 5.5" lumber and rigid insulation + 3/4" plywood) adding up to a R Factor of about 29.38 (.94 plywood, 27.5 rigid insulation (5pts/inch) .94 plywood). All joints/connections are overlapped and caulked with silicone. This cooler is very airtight.

One more thing to consider would be to drill a hole in the bottom of the AC casing and install a section of tubing that runs to a drain/bucket as you will quickly collect large amounts of condensation
My AC has a drain plug on the exterior that I will be attaching a hose to and running towards a drain. I also slightly angled my AC unit (1/2" downward) to help with draining. Are you suggesting an additional hole in the case of the AC?


Nicely done!
Thank you! I need to clean up the wiring. Once that's done I'll take additional pictures pre-start up and during operation. I will also try to show a graph of the temps as displayed by my CoolBot.
 
Any concerns about condensation on the inside?

Honestly, my short answer is "no, not really on the inside of the cooler itself."

However, the longer version is....no, not really inside the cooler itself; however, it has crossed my mind numerous times and obviously I have tried taking that into consideration with my construction method and materials. I'm probably going to get thermal bridging from the 2x6 framing lumber. Condensation (in wall systems are calculations on thickness, conductivity, resistance, materials, exposures, etc.) is probably going to happen inside the wall cavity. Maybe inside the box, too, but I'm hoping to limit that. IMO this cooler is very airtight and that should help to keep moisture down. At least I am hoping that it will. If it does show inside the cooler, I will have to address it at that time. Fingers crossed that if it does happen inside the cooler, I can minimize it.....somehow. IMO the weak point of my cooler is the door.
 
Back
Top