HOWTO - Make a BrewPi Fermentation Controller For Cheap

Homebrew Talk - Beer, Wine, Mead, & Cider Brewing Discussion Forum

Help Support Homebrew Talk - Beer, Wine, Mead, & Cider Brewing Discussion Forum:

This site may earn a commission from merchant affiliate links, including eBay, Amazon, and others.
Status
Not open for further replies.
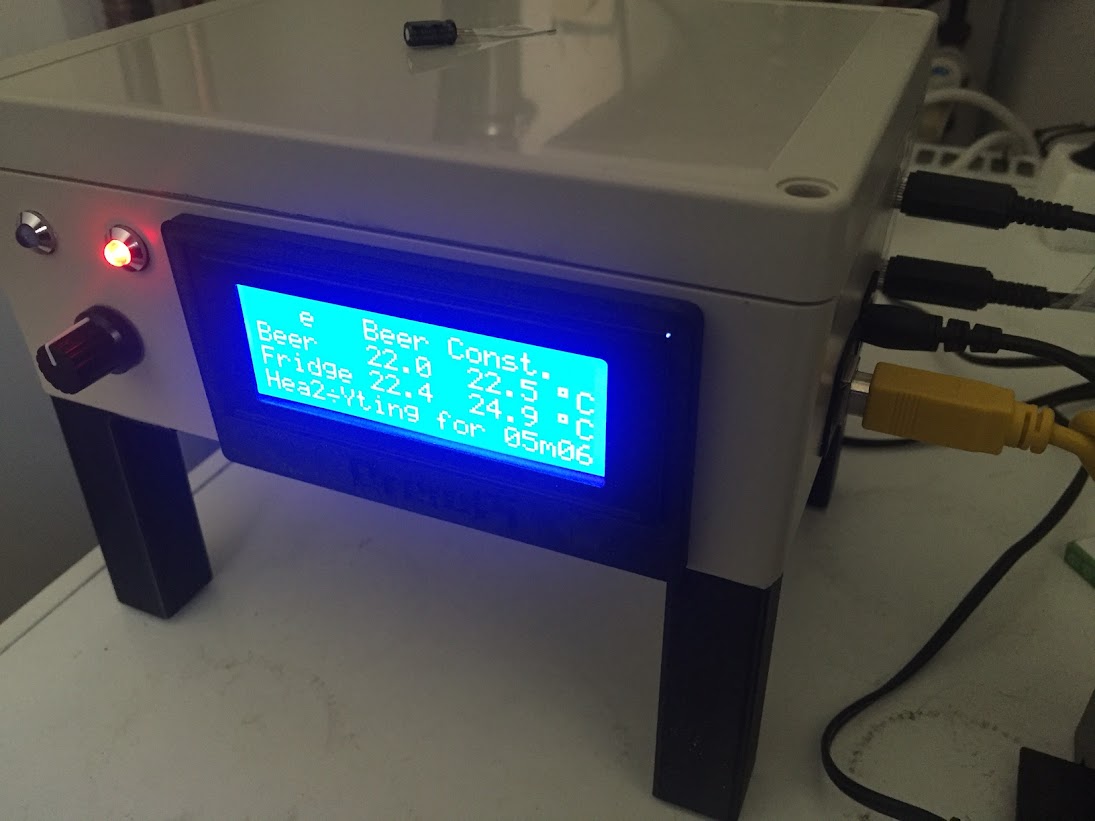
I just finished my build today. It works great!! Just 1 annoying thing happens from time to time and I can't figure out why. When the heating relay jumps on (maybe the same happens with the cooling side but I did not see it yet), the display starts acting out. It does not go away once the relay is off again. you realy need to turn of the power in order to get the display to act correct again. 2 examples here:

IMG_6501.JPG


Here it is just the "M" from mode that is missing and a slash symbol in the heating word:
IMG_6507.JPG


Here some photo's from the completed build with some 3D printed details to finish it up :)

IMG_6495.JPG


IMG_6498.JPG


IMG_6503.JPG


IMG_6505.JPG


IMG_6506.JPG
 
LCD scrambling when a relay fires has been a problem for many folks.
Powering the Arduino and relay module via USB is one of the possible aggravators, and has been associated with comm errors depending on the length and quality of the USB cable.
It's not unusual for the Arduino to see its 5V supply sitting around 4.5V when powered via an RPi USB port.
Better results have been obtained powering the Arduino with a 9V wall wart...

Cheers!
 
Oh thats good to know! So a possible sollution might be:

1: testing out a shorter USB cable (now I'm using a very long cable)

2: powering the arduino with a second adapter on 9volts (apart from being powered by the raspberry already)

Correct?

I'll also add a switch to be able to turn of the LCD when not in use. Maybe by powering the display on and of, the problem is gone too (for a while/untill the next relay switch)
 
If you're using an Uno, it auto-senses an active wall wart connection and disconnects the board from the USB 5V rail, putting the load entirely on the wall wart via an onboard LDO regulator. This is A Good Thing as otherwise it would back-feed the RPi. All of my Unos run on 9V wall warts. It's just more reliable.

As for the LCD, the stock BrewPi hex file has a timer that will shut off the LCD backlight until the rotary encoder switch is manipulated.
It requires a p-channel FET, but it works very well. That said, a toggle switch would serve just fine.

I don't know that turning off the backlight will have any effect on the scrambling syndrome, however...

Cheers!
 
I don't see any capacitors on your board. You should place a cap at the power inputs to the lcd, and the ic. A 1uf cap between 5vdc and neg. The 9 volt supply for the Arduino will help as well, but won't keep the display from scrambling. Another top I read was to use a star configuration for power distibution.
 
If you're using an Uno, it auto-senses an active wall wart connection and disconnects the board from the USB 5V rail, putting the load entirely on the wall wart via an onboard LDO regulator. This is A Good Thing as otherwise it would back-feed the RPi. All of my Unos run on 9V wall warts. It's just more reliable.

As for the LCD, the stock BrewPi hex file has a timer that will shut off the LCD backlight until the rotary encoder switch is manipulated.
It requires a p-channel FET, but it works very well. That said, a toggle switch would serve just fine.

I don't know that turning off the backlight will have any effect on the scrambling syndrome, however...

Cheers!

If someone were to tweak the avr code to refresh the entire LCD screen periodically, say after a relay fires, would that help?
 
New member here. I built up a brewpi setup tonight, seems to be working well. I'm going to be using it to control an aging fridge first, and a fermenter later when I start brewing.

My question is if anyone has tried to build this with a smaller arduino board. I've built projects in the past with a pro micro board which I love due to it's small size (smaller than a stick of gum). However it requires special libraries in the arduino suite to compile sketches for the board. I'm curious if anyone has tried to use this board and if brewpi was able to flash the board.
 
If such a hack included re-initializing the shift register as well as the LCD, it should work as intended.
If entry to that routine could also be inspired by a button-press, that might be even better...

Cheers!
 
I do have 2 capacitors on the board, check the second photo. The big one hou can see, the small orange one is a bit hidden behind one of the resitors. I used the same layout as posted on this thread, one of 100uF and 10nF I believe .

Regarding the 9v power supply: you say it might help, but then you say it wont help with the scrambling, with what exactly Will it help then?
 
I went to a local harware store to get myself a 9v power supply for the arduino. I tested it out and: Problem is still there :-/

Here you can see the connection on the right: the 2 sensors, the USB connection to the raspberry and the 9volt power in to the arduino:

IMG_6511.JPG


Still scrambling of the LCD :-(

These are the 2 capacitors I have connected to the + and - line (small one is 50v 100nf and big one is 50v 10uf)
bought them at aliexpress:

http://nl.aliexpress.com/item/100pc...00nF-104M/32429917283.html?detailNewVersion=2

http://nl.aliexpress.com/item/10uF-...-Electrolytic-capacitor-10pcs/1936790535.html

IMG_6512.JPG
 
[...]Regarding the 9v power supply: you say it might help, but then you say it wont help with the scrambling, with what exactly Will it help then?

Read it again. "I don't know that turning off the backlight will have any effect on the scrambling syndrome, however..." has nothing to do with the power supply...

Cheers!
 
Ok, but as previous post of me shows: the power supply is not a sollution for the problem. Is there anybody that found the issue? I assume the USB cable wont be it since now it gets its power from the 9v supply..

As long as this issue is not resolved, the display is kind of useless, if I need to reset the complete system each time to be able to read the display..
 
Also, does it matter where the 2 capacitors are soldered in the Chain. The schematics show that they are both just soldered to the - and + outputs of the arduino, in the scheme they are just on a different location.

I soldered 2 "power" lines onto my pcb, one for + and 1 for -. I just soldered both capacitor to that "power line" if you understand what I mean.

Edit: here you see what I mean, the 2 lines on the bottem are the "power lines" im talking about. Both the capacitors are soldered to it:

aG5mLwY0wFLdFbbu8qe-ZUL-uKJpXd5Ns5VgIshS4oo80_vKHO_9rjZtrFIY5cPO_8RU=w1500-h2668-no
 
New member here. I built up a brewpi setup tonight, seems to be working well. I'm going to be using it to control an aging fridge first, and a fermenter later when I start brewing.

My question is if anyone has tried to build this with a smaller arduino board. I've built projects in the past with a pro micro board which I love due to it's small size (smaller than a stick of gum). However it requires special libraries in the arduino suite to compile sketches for the board. I'm curious if anyone has tried to use this board and if brewpi was able to flash the board.

I dont think so unfortunately, usually the smaller boards like the Nano etc use smaller Atmel chips that have smaller memory capabilities, and the BrewPi code as it is now is maxxing out the Uno memory capabilities.
 
I dont think so unfortunately, usually the smaller boards like the Nano etc use smaller Atmel chips that have smaller memory capabilities, and the BrewPi code as it is now is maxxing out the Uno memory capabilities.

The mini works, I use it no problem. Doesn't @wbarber69 use the nano? The nano uses the Atmega328, same as the uno and mini. The micro appears to use the atmega32u4, I've never used it and can't speak as to whether or not brewpi-avr will fit on it.

[EDIT]
Just ran the compiler for the micro. FuzzeWuzze is correct, it looks like the sketch is too big for the micro. But the mini and nano will still work.

Code:
Build options changed, rebuilding all

Sketch uses 30,550 bytes (106%) of program storage space. Maximum is 28,672 bytes.
 
I dont think so unfortunately, usually the smaller boards like the Nano etc use smaller Atmel chips that have smaller memory capabilities, and the BrewPi code as it is now is maxxing out the Uno memory capabilities.


Not true. the nano is basically an uno just smaller. the mini is also the same without a sub port. the micro however is a totally differently setup needing a separate library to code for them like previously mentioned. many of us have had great results using the mini and the nano
 
If the lcd scrambles when powering on the heater or cooler, use SSRs instead of mechanical relays
 
Is it not possible to get it working with mechanical relays? If that is THE sollution im willing to go that path but only if thats a guaranteed sollution..

If someone found a way to get it working with a "normal" mechanical relay, I want to solve it that way since everything is already nicely build into my project box
 
Possibly, if you could find a way to totally separate the power from the arduino from the power going to the lcd, that may stabilize things. but for now the only way that seems to work is to switch over to ssrs.
 
Thanks for the responses on the arduino options. I'll look at those options. Good to know that it's memory limitations.

I've had my fridge running for a day and a half now, seems to have leveled itself out. Added bottles to it to see how that changes it's behavior. So far I'm happy with how it's working.
 
We've had screen glich issues with another long running arduino project. The solutions a snubber circuit across the switching relay, and reducing exess HV wire aswell as keeping HV away from the pcb as much a practicable.
 
I Saw that those SSR relays only cost about 6-7 dollars on aliexpress. I think im going to order 2 of those and spare me further problems with the display :)
 
Cheap ssrs are fake. but I can't comment on price it's been almost a year since I bought one
 
Ok guys I'm diving in. I bought everything mentioned except for the Raspberry Pi. I have a VM running Windows Server 2008 for my web server at home that I should be able to use - I installed all the PHP/Python libraries and I'm getting a test page of BrewPi with some canned data on IIS. I'll wire this up soon and hopefully I can get it working with my Windows box without any issues

If it doesn't play nice I'll wind up making a linux VM but I'm not sure if that's really needed. My only concern is securing the UI since at the moment it's reachable over the internet since I'm running my site on the same webserver

Good luck to me!!
 
Has anyone pulled the old UNO arduino out and put a photon in it's place? I have no interest in an lcd screen or anything like that so I'd like to just pull the uno and maybe replace it with a photon to keep out of the legacy repository. The main thing that pops up when I look at the difference between the uno and the photon is the 3.3v vs 5v and I'm assuming that might screw with the onewire temp sensors and then I read about pull-up resistors and then it gets a bit over my head. Maybe the relay board needs more than 3.3v as well?

There's not a separate thread for this is there?

edit:
I found this in the reviews on the amazon page for the relays. No idea if it actually works yet.

"This compact relay board is easy to interface to 3.3v microcontrollers, like those on wireless routers and Netduinos, with a little setup.
The relay coils require 5v to switch, in my testing 3.3v on relay coils was not enough to switch the relay (but did activate the indicator LED.)
If your project uses a 3.3v microcontroller, you can still get great results from this relay. The left set of 3 pins come with a jumper across JD-VCC and VCC, causing the relay coils to operate from the VCC supplied on the switching side pin header.
To use the relay board with a 3.3v micro, remove this jumper and save/discard it, connect GND to common power supply negative, supply 5v for relay coils on the pin labeled JD-VCC, and supply 3.3v on either pin labeled VCC. Your 3.3v micro connects to IN1 and IN2, and because of the transistors on the relay board will only switch 3.3v at a low current (about 20 mA.)
As other reviewers have noted, IN1 and IN2 must be pulled LOW to switch the relays. This works out well; micros can generally sink more current than they can source. I was able to control this relay board with the GPIO pins on a TP-LINK MR3020 router without burning out the SoC, supplying the 5v coil power from the USB input. Overall, this relay board is a great low-cost solution for enabling Internet control of just about anything."
 
This thread is for uno based brewpi builds. but only because that was the only offering at the time of its creation. in fact there is an entire community based around brewpi over at brewpi.com. The latest version includes the photon as its micro controller and its wifi enabled with an lcd touch screen interface.
 
PySerial was updated 2 days ago to 3.0.

This broke some things in the BrewPi code, which I have now fixed.

I have updated the legacy branch with most of the backwards compatible changes.

this includes:
- Receiving serial data continuously in a background thread. This increases responsiveness.
- A button in the web interface to reset EEPROM
- In the profile entering "1d4h10m" is now a supported
- some smaller fixes to HTML and JavaScript.

To update:
sudo python ~/brewpi-tools/updater.py --ask

Make sure you pick the legacy branch if you have an Arduino.
 
Is it not possible to get it working with mechanical relays? If that is THE sollution im willing to go that path but only if thats a guaranteed sollution..

If someone found a way to get it working with a "normal" mechanical relay, I want to solve it that way since everything is already nicely build into my project box

(My 1st post on my way to Sylvester Party ...)

So what you are experiencing is what makes combustion engines work: When you stop powering the relais it works like a power source itself. It will overcharge your system. I think thats what screws up your system...

Google for "flyback diode".

Best regards from germany...
 
Hey everyone, I'm pretty new to the Rpi scene and I am having a couple of issues but I am confident that you all can help me!

Here is what I have so far-

- Rpi running raspbian with all updates installed
- sainsmart arduino connected to Rpi via usb
- automated install of brewpi completed (arduino was not flashed in this step)
- attempted to program arduino through brewpi and that is where I am having problems.
- (BTW I don't have the relay board installed yet)

I downloaded 'brewpi-arduino-uno-revC.hex' and uploaded it through brewpi. I chose UNO as my board type and answered 'no' to 'restore old settings after programming' and 'restore installed devices after programming'. Pressed 'program' and got this message:

Dec 31 2015 08:42:03 Opening serial port
Traceback (most recent call last):
File "/home/brewpi/brewpi.py", line 330, in
ser = util.setupSerial(config, time out=0)
File "/home/brewpi/BrewPiUtil.py" line 132, in setupSerial
ser = serial.Serial(port, baudrate=baud_rate, timeout=time_out, writeTimeout=0)
TypeError: _init_() got an unexpected keyword argument 'writeTimeout'


Brewpi script is not running and top left LCD says "Cannot receive LCD text from Python script"


I have no idea what any of that means!!! :confused: Hopefully someone smarter than me can help me out!!!
 
PySerial was updated 2 days ago to 3.0.

This broke some things in the BrewPi code, which I have now fixed.

I have updated the legacy branch with most of the backwards compatible changes.

this includes:
- Receiving serial data continuously in a background thread. This increases responsiveness.
- A button in the web interface to reset EEPROM
- In the profile entering "1d4h10m" is now a supported
- some smaller fixes to HTML and JavaScript.

To update:
sudo python ~/brewpi-tools/updater.py --ask

Make sure you pick the legacy branch if you have an Arduino.

Thanks Elkoe

I updated and it's a step in the right direction! It opens the serial port, script started for beer, 'My First BrewPi Run' , but then says 'checking software version on controller....'

It's been checking for almost an hour now.
Also the brewpi screen never actually started the script. The LCD says "Cannot receive LCD text from Python script",
"Script not running" in red on right hand side and its fermenting "Sample Data"
 
PySerial was updated 2 days ago to 3.0.


This broke some things in the BrewPi code, which I have now fixed.


I have updated the legacy branch with most of the backwards compatible changes.


this includes:

- Receiving serial data continuously in a background thread. This increases responsiveness.

- A button in the web interface to reset EEPROM

- In the profile entering "1d4h10m" is now a supported

- some smaller fixes to HTML and JavaScript.


To update:

sudo python ~/brewpi-tools/updater.py --ask


Make sure you pick the legacy branch if you have an Arduino.


Thanks for still sticking with it elkoe
 
More info from update. This is the message I received after running the update a second time. Same message was given the first time as well.

Checking whether the update script is up to date
/home/pi/brewpi-tools is up-to-date.


*** Updating BrewPi script repository ***

Stopping running instances of BrewPi
[Errno 2] No such file or directory
Could not connect to socket of BrewPi process, maybe it just started and is not listening yet.
Could not send quit message to BrewPi instance with pid 4013!
Killing it instead!
SIGKILL sent to BrewPi instance with pid 4013!
You are on branch legacy

Available branches on the remote 'origin' for /home/brewpi:
[0] develop
[1] legacy
[2] master
[3] Skip updating this repository
Enter the number of the branch you wish to update [legacy]:1
The latest commit in /home/brewpi is b79d379be0589db40025fbed9be5ae662464e7a0 on Thu, 31 Dec 2015 08:51:57
The latest commit on origin/legacy is b79d379be0589db40025fbed9be5ae662464e7a0 on Thu, 31 Dec 2015 08:51:57
Your local version of /home/brewpi is up to date!


*** Updating BrewPi web interface repository ***
The path '/var/www' does not seem to be a valid git repository
What path did you install the BrewPi web interface scripts to?
 
I'm new to this scene, trying to get up and running with a RPi2 and UNO, this is what I'm getting when trying to update w/ legacy:

pi@raspberrypi ~/brewpi-tools $ sudo python updater.py --ask

Using interactive (advanced) update with user input


######################################################
#### ####
#### Welcome to the BrewPi Updater! ####
#### ####
######################################################

Checking whether the update script is up to date
/home/pi/brewpi-tools is up-to-date.


*** Updating BrewPi script repository ***

Stopping running instances of BrewPi
Quit message sent to BrewPi instance with pid 1910!
You are on branch legacy

Available branches on the remote 'origin' for /home/brewpi:
[0] develop
[1] legacy
[2] master
[3] Skip updating this repository
Enter the number of the branch you wish to update [legacy]:1
The latest commit in /home/brewpi is b79d379be0589db40025fbed9be5ae662464e7a0 on Thu, 31 Dec 2015 16:51:57
The latest commit on origin/legacy is b79d379be0589db40025fbed9be5ae662464e7a0 on Thu, 31 Dec 2015 16:51:57
Your local version of /home/brewpi is up to date!


*** Updating BrewPi web interface repository ***
The path '/var/www' does not seem to be a valid git repository
What path did you install the BrewPi web interface scripts to? /var/www/html
You are on branch legacy

Available branches on the remote 'origin' for /var/www/html:
[0] develop
[1] feature/notifications
[2] legacy
[3] master
[4] Skip updating this repository
Enter the number of the branch you wish to update [legacy]:2
The latest commit in /var/www/html is 4a3feee42ef650803d3e49d3ccbbd26512397acf on Thu, 31 Dec 2015 15:39:03
The latest commit on origin/legacy is 4a3feee42ef650803d3e49d3ccbbd26512397acf on Thu, 31 Dec 2015 15:39:03
Your local version of /var/www/html is up to date!

No changes were made, skipping runAfterUpdate.sh.
If you encounter problems, you can start it manually with:
sudo /home/brewpi/utils/runAfterUpdate.sh

The update script can automatically check your controller firmware version and program it with the latest release on GitHub, would you like to do this now? [Y/n]:y
Stopping any running instances of BrewPi to check/update controller...
[Errno 111] Connection refused
Could not connect to socket of BrewPi process, maybe it just started and is not listening yet.
Could not send quit message to BrewPi instance with pid 2220!
Killing it instead!
SIGKILL sent to BrewPi instance with pid 2220!

Checking current firmware version...
Jan 01 2016 01:35:19 Opening serial port
Unable to connect to controller, perhaps it is disconnected or otherwise unavailable.


*** Done updating BrewPi! ***
 
Arhh..

I just put together my second brewpi. First one was earlier this year and the install went off without a hitch. I ordered the exact same part numbers from amazon but this time no dice....

When trying to program the arduino with the most recent firmware I get the ol


" Warning: Cannot receive version number from controller. Your controller is either not programmed or running a very old version of BrewPi. Please upload a new version of BrewPi to your controller."

error.

I've tried clearing the epromm as suggested on other threads but it's not working. Any suggestions??

Thanks
 
Status
Not open for further replies.

Latest posts

Back
Top