HOWTO - Make a BrewPi Fermentation Controller For Cheap

Homebrew Talk - Beer, Wine, Mead, & Cider Brewing Discussion Forum

Help Support Homebrew Talk - Beer, Wine, Mead, & Cider Brewing Discussion Forum:

This site may earn a commission from merchant affiliate links, including eBay, Amazon, and others.
Status
Not open for further replies.
Which ground are you talking about, the ground from the arduino that connects to the temp probes and the relay board, or the ground that comes in from your house power? Don't connect your house power ground to the relay board.

I suspect that your relay board or if in fact you are using an ssr, your ssr is bad. You can swap your freezer with the heater and reconfigure your devices and see if your freezer kicks on.

Thank you. Swapping the heater and freezer fixed the problem. Now the outlet that had only 56V measures 120V and runs the heater just fine. The other outlet runs the freezer. Wish I could understand why this simple adjustment fixed the problem. I really need to take an electrical class!

As for the ground, here is the schematic I was referring to with the ground wire indicated by an arrow. I was missing this ground in my original build of my BrewPi.

temp wiring schematic.png
 
That ground connection is nonsensical, it truly serves no legitimate purpose.
And you should never connect a DC return to AC safety ground...

Cheers!
 
If I'm hooking up a 5v switching power supply in my box to power the Arduino and a keezer fan, can I use 16 gauge hookup wire to run 120v to the power supply, or do I need to stay with 14 AWG like I use to the relay and the outlet?
 
Considering an Uno and peecee fan together aren't going to pull more than a couple of amps DC hence the supply will only be drawing a tenth of an amp or so AC, 16 gauge for AC to the PS would actually be overkill :)

Cheers!
 
I thought such. But in my boxes, I use a wire nut to take my power cord and splice a wire off to the relay board and another to the switching power supply. It just feels wrong to splice a 22 gauge wire in with the 14 AWG from the wall.
 
Lol! You'll get over it when you enjoy how much easier it is to route the smaller wire :)
Obviously you want to maintain gauge if you're passing the mains along (eg: the AC in and out of the relays along with their neutral wires and safety grounds) but for small branched loads - particularly inside an enclosure - it is appropriate to down-gauge...

Cheers!
 
Come to think of it, every time I've broken apart a wall wart to steal the power supply from inside, there have been tiny wires soldered directly to the blades that go into your wall outlet. They didn't seem to be even 22 gauge. But it makes sense because the wires won't carry more amperage than what the supply will produce.
 
I've noticed in my last few batches that once fermentation nears completion the temperature starts to swing. It's not a huge swing initially (+/- 0.3 deg C) but gets worse as time goes on. I'm still in a constant hold at 20 deg C, not a ramp.
Screen Shot 2018-02-05 at 9.10.27 PM.png

Here are my settings. I am running legacy branch.
Screen Shot 2018-02-05 at 9.02.48 PM.png

I've been switching to fridge constant mode as a countermeasure. Any advice on how I can address this with the settings would be welcome. Thanks.
 
I've noticed in my last few batches that once fermentation nears completion the temperature starts to swing. It's not a huge swing initially (+/- 0.3 deg C) but gets worse as time goes on. I'm still in a constant hold at 20 deg C, not a ramp.
View attachment 556866

Here are my settings. I am running legacy branch.
View attachment 556868

I've been switching to fridge constant mode as a countermeasure. Any advice on how I can address this with the settings would be welcome. Thanks.

It looks to be associated with the heating. I’m no expert though. I had similar issues of overheating then chasing down with cooling and showing instability. What I found was my 100 watt personal Heater was too powerful for the space inside mY chest freezer (that and it staying hot after its shutoff). I since have changed to one of those I think 25watt reptile Heater cables for a more gentle approach. And I no longer overshoot or get drastic changes in my temp and stability. In fact heating shuts off and no need to cool back down. It’s plenty for inside a chest freezer. So when it comes to heating I figure slow and steady wins the race. I hope this helps you.
 
It looks to be associated with the heating. I’m no expert though. I had similar issues of overheating then chasing down with cooling and showing instability. What I found was my 100 watt personal Heater was too powerful for the space inside mY chest freezer (that and it staying hot after its shutoff). I since have changed to one of those I think 25watt reptile Heater cables for a more gentle approach. And I no longer overshoot or get drastic changes in my temp and stability. In fact heating shuts off and no need to cool back down. It’s plenty for inside a chest freezer. So when it comes to heating I figure slow and steady wins the race. I hope this helps you.
Thanks, I'll try playing with my heater. I use a paint can with a 60W incandescent bulb. Maybe I'll try a lower wattage bulb. Getting harder to find these days :-\.
 
How many cubic feet is the freezer and how many gallons of beer are fermenting?
The chamber temperature slew rate is quite sharp in both modes...

Cheers!


hysteresis.jpg
 
Thanks, I'll try playing with my heater. I use a paint can with a 60W incandescent bulb. Maybe I'll try a lower wattage bulb. Getting harder to find these days :-\.

He’s right it does appear quick on the cool Mode too. I found I usually do 5gal batches but occasionally I do 3 gallon batches. Because the smaller mass of fluid the temp changes faster with the 3 gallon I found it not to work as well with a small Batch. So it could be batch size too. However another possibility is that I also found that there was a major difference in stability when using a thermowell and when just trying to tape to the probe side of a fermenter. So depending on how you have your beer probe set up could affect your stability. Good luck.
 
He’s right it does appear quick on the cool Mode too. I found I usually do 5gal batches but occasionally I do 3 gallon batches. Because the smaller mass of fluid the temp changes faster with the 3 gallon I found it not to work as well with a small Batch. So it could be batch size too. However another possibility is that I also found that there was a major difference in stability when using a thermowell and when just trying to tape to the probe side of a fermenter. So depending on how you have your beer probe set up could affect your stability. Good luck.
Thanks @bscuderi and @day_trippr. I do 5 gallon batches and I think my upright freezer is 14 cu. ft. I'm using a thermowell. I asked Elco on the BrewPi forum and he told me to reduce Ki to 0.1 and that helped bring it within about 0.1 deg C variation. He also acknowledged that it may be due to a flaw in the legacy version and I remember reading this somewhere before on the forums.
 
Thanks @bscuderi and @day_trippr. I do 5 gallon batches and I think my upright freezer is 14 cu. ft. I'm using a thermowell. I asked Elco on the BrewPi forum and he told me to reduce Ki to 0.1 and that helped bring it within about 0.1 deg C variation. He also acknowledged that it may be due to a flaw in the legacy version and I remember reading this somewhere before on the forums.

Any chance he gave a fix for it? I know he has stopped developing it but maybe he has made some fixes?
 
Thanks @bscuderi and @day_trippr. I do 5 gallon batches and I think my upright freezer is 14 cu. ft. I'm using a thermowell. I asked Elco on the BrewPi forum and he told me to reduce Ki to 0.1 and that helped bring it within about 0.1 deg C variation. He also acknowledged that it may be due to a flaw in the legacy version and I remember reading this somewhere before on the forums.

Stick with the thermowell. Do you have a fan in the fridge? I have a tiny (like 20mm) fan in my mini-fridge. I unhooked it once and forgot to plug it back in during the start of a batch. I was having weird temp swings until I plugged it back in...might hep
 
I'm having some trouble getting the script to start on a new build. I'm running Jessie on an odroid xu4 with an arduino uno rev C installed. The system recognizes the arduino board but states that arduino-core is most likely not installed. I've re-installed both arduino and brewpi multiple times. I've used the updater.py file and tried legacy and legacy dev in addition to the newest version which does not support arduino boards.

Brewpi starts up and looks like it was successfully installed however the script will not start. When I try to load the hex file it has trouble reading boards.txt. Any help would be appreciated as I'm not sure if anyone has tried to install brewpi on an odroid before. Thanks in advance
 
I have two brewpi running in ferm chambers for a couple years. One of the them has an issue with it's internal clock and is several hours behind my local time. I search and tried multiple fixed for it and none of them seem to work.

My question is, can I image the SD card from the build that's working correctly and copy that image to rasppi that's not working? They are both rasp pi 2B, running the same OS. And the microSD cards are the same storage capacity. If this is an option what is the best software? I do have a card reading on this windows 10 pc so I could do all the work on this pc.

When you say that there is an issue with the internal clock, do you mean that the timezone is different (it keeps correct time, just a few hours back) or that the clock actually runs fast/slow, and drifts away from where it should be?

If it's the latter, it's a hardware issue unfortunately. If it's the former, there should be a software fix - either changing the timezone using raspi-config or tweaking settings within BrewPi.

It's a time zone issue. The internal clock is set 12 or so hours behind my time zone. I've tried manually setting it in the settings but it won't work. In the settings the time zone is displayed correctly CST. It's strange. Like I've said I tried multiple fixes short or wiping the card and starting over. I'd rather image my other pi since that'd be a fast fix. I'm just not sure if that'd work.
 
I have an RPi2B inside an enclosure with a metric crapton of stuff that runs the cold side of my brewery (RaspberryPints, a multi-channel temperature logger, and multiple BrewPi instances including Bluetooth remoted minions).
I have a hot-spare clone of that system that runs on my desk that I use to try new stuff on.
I routinely live-clone the SD card from the desktop machine for use on the active system.

The things that need doing afterward is changing the system name and IP address and a pointer to a NAS backup partition and pointers to the batch of minions downstairs, not too onerous but they definitely have to be done otherwise it's Conflict City on the lan and a couple of fridges left wondering wtf they're supposed to be doing. When I pull the cloned SD card from the desktop system I pop its LAN cord before sneaker-netting the card to the production machine...

Cheers!
 
Well last night I was bored and just wiped the card and put a fresh image wheezy on the card. I manually set the region and time zone in advanced settings, reboot and well damn the time is still wrong. I must have faulty hardware. I guess I'll just use another pi I have laying around for another product that doesn't depend on an accurate card.
 
I'm not sure if Raspbian uses NTP by default, but I would think one could come up with a work-around using NTP with whatever time zone offset it takes to get the correct local time...

Cheers!
 
EDIT: Nevermind. I got it working with a newer Jessie image instead of using the old wheezy image.
 
Last edited:
Welp, I thought I was sorted. I really did.

Got my Pi and two minions running along perfectly last year (!) via bluetooth. But thanks to an issue with my brewstand, haven't been able to brew until I got some stainless welding done (blah blah blah)

Finally all set to brew this weekend, and yesterday decided to make sure everything was ready to go on the BrewPi side of things. Glad I did.

Try as I might, I couldn't get the Pi to see either of the minions over bluetooth. Lots of odd behaviour - one would suddenly be recognized, but the other wouldn't. Then the one that was recognized would randomly reset to default. Then the other would suddenly be recognized. At one point briefly both were recognized, but neither would recognize their temp sensors. When I tried to add them back in via the maintenance panels... they reset again. So gave up with bluetooth, and decided to rebuild from scratch, this time sticking with USB.

Wiped the SD Card and reinstalled Noobs (v2.1) and then followed the detailed docs as before:
http://diybrewpi.wikia.com/wiki/Multiple_Fermentation_Chamber_Control_with_BrewPi

Didn't go as smoothly as before. Running sudo apt-get upgrade threw me some errors -
Unable to autolaunch a dbus-daemon without a $DISPLAY for X11. Plodding onwards, noticed that PHP5 is no longer a thing, so the command

Code:
sudo apt-get install libapache2-mod-php5 php5-cli php5-common php5-cgi

was replaced by

Code:
sudo apt-get install php libapache2-mod-php php-mcrypt

which seemed to do the trick and get apache installed. But the web interface isn't working at all - despite redirecting Apache's root to /var/www instead of /var/www/html - it's showing the directories chamber1 and chamber2, but clicking on either just gives me a blank page.

Bearing in mind that I know sod all about PHP or linux, anyone got a suggestion to where I've gone wrong?
 
Farg, it looks like the issue is that the instructions are no longer applicable, and I need to start again with Jesse and not stretch. Derpa derp...
 
Since you are starting over anyway, go with Fermentrack. It is much easier to get multiple chambers working with Fermentrack. Reflash your SD card with either Jessie or Stretch. Then go to Fermentrack.com. Run one command and you're done. We can even get your Bluetooth functionality working again once you get things set up via USB.
 
Since you are starting over anyway, go with Fermentrack. It is much easier to get multiple chambers working with Fermentrack. Reflash your SD card with either Jessie or Stretch. Then go to Fermentrack.com. Run one command and you're done. We can even get your Bluetooth functionality working again once you get things set up via USB.
Huh - never heard of it. (This is what I get for being away for a year!). So my Brewpi minions (using your fine shields!) work without issue, or do they need some reconfiguring? (Will dive off and start reading FAQs and support threads!)
 
Nope, no reconfigure at all. Fermentrack will load them right up, with all their devices already programmed. You'll be amazed how much easier a multiple installation is.
 
Nope, no reconfigure at all. Fermentrack will load them right up, with all their devices already programmed. You'll be amazed how much easier a multiple installation is.
Wow. Certainly appeals more to my graphic design-trained eye. Much cleaner and... it kinda just worked without an issue.

Now to get them working via Bluetooth, and I might not have to resort to buying the SS Brewtech FTSS boxes after all!
 
The Bluetooth support is a non standard option, so it isn't as smooth as the initial install, but it's pretty straight forward. Follow the instructions in @day_trippr's thread for How To Brewpi Over Bluetooth to program the HC-05 modules. If you've already done that and they are recognized by your Raspberry Pi, no need to do that again. Disconnect the USB and then use the Bluetooth program in the Pi desktop to find and connect to that Bluetooth module. Make sure you check the options to automatically bind. Then make note of the port that it hooks up on. The first one is most likely rfcomm0. Then go to Fermentrack and pull up the device configuration for that controller. Under the serial port option, instead of "auto" you'll use "/dev/rfcomm0" or whatever port you used on the Pi. I can't remember if I checked or unchecked the udev checkbox, so try it both ways if it doesn't work. Do your controllers one at a time and it should work.
 
The Bluetooth support is a non standard option, so it isn't as smooth as the initial install, but it's pretty straight forward. Follow the instructions in @day_trippr's thread for How To Brewpi Over Bluetooth to program the HC-05 modules. If you've already done that and they are recognized by your Raspberry Pi, no need to do that again. Disconnect the USB and then use the Bluetooth program in the Pi desktop to find and connect to that Bluetooth module. Make sure you check the options to automatically bind. Then make note of the port that it hooks up on. The first one is most likely rfcomm0. Then go to Fermentrack and pull up the device configuration for that controller. Under the serial port option, instead of "auto" you'll use "/dev/rfcomm0" or whatever port you used on the Pi. I can't remember if I checked or unchecked the udev checkbox, so try it both ways if it doesn't work. Do your controllers one at a time and it should work.
Yup, easy peasy. Just went into the Django admin panel, and replaced the ttyACM with rfcomm0 and rfcomm1 respectively.

Only problem - for some reason, the pi isn't keeping the pairing after a reset. I can pair them manually using

Code:
sudo rfcomm bind 0 98:D3:34:90:D5:73 1

sudo rfcomm bind 1 98:D3:33:80:E0:6A 1

and previously, adding those to the beginning of the /home/pi/.config/lxsession/LXDE-pi/autostart file did the trick. Not now - wonder if it's because of a newer version of Raspbian.
 
My fridge has evaporator fans/condenser fans that run independently of the thermostat, so rather than plug the fridge into my Brewpi box, I want to bypass the wire to the thermostat. I know how to extend the thermostat wires outside of the fridge and get them to my box, but what is a safe method for using a quick disconnect at my Brewpi box so that I don't have to hardwire the thermostat wires directly into the relay? I've seen the Neutrik stuff, but is there another option that I'm not aware of? Being as though that wire is 110v ac, I'm wanting to be fairly safe :)
 
I fired up one of my ferm fridges for the batch I brewed today and as it was settling in I noticed an aberration I'd seen before and thought I'd document it here.

I pitched this batch around 18:30 and loaded the fridge and fired up the BrewPi minion. It was working the Fridge Temp to get the Beer Temp on target, then the anomaly begins at the first marker - around 21:20. BrewPi is calling for "cold" but the Fridge Temp is drifting towards Room Temp.

Around 21:45 the Fridge Setting makes a sharp rise - due to me resetting the minion while in incipient freak-out mode ;)
If not for that the Fridge Setting would have continued the plateau down in the high 50s.

Finally at 22:30 you see the Fridge Temp start diving.

defrost.jpg


So, what happened? This 17cf top-freezer fridge has an automatic evaporator defrost function and it kicked in around 21:10. Once the defrost timer expired at 22:30 the compressor was available again and immediately came on-line...

Cheers!
 
Ooof. See, it's stuff like this that makes me terrified to actually implement BrewPi in a functioning environment. Never mind the fact that I've spent the better part of a year getting it working in the first place.
 
Well, yeah, ya gots to take the freakouts in stride (if they resolve favorably it does make that easier ;))
I had seen this before with this fridge (it's companion doesn't have an auto-defrost and that was the fridge I did nearly all of the fermentations in until now) but it still freaked me enough to cycle the minion.

Where are you at these days with yours? Anything I can help with?

Cheers!
 
Man, there's some angry yeast in this weeks batch!
I split 10 gallons of 73 point wort between 1318 and A38 and the two of them are beating up my #2 ferm fridge!

NEIPA_02.jpg


Poor fridge. I knew it well...

Cheers! ;)
 
Not my first rodeo :D


NEIPA_03.jpg


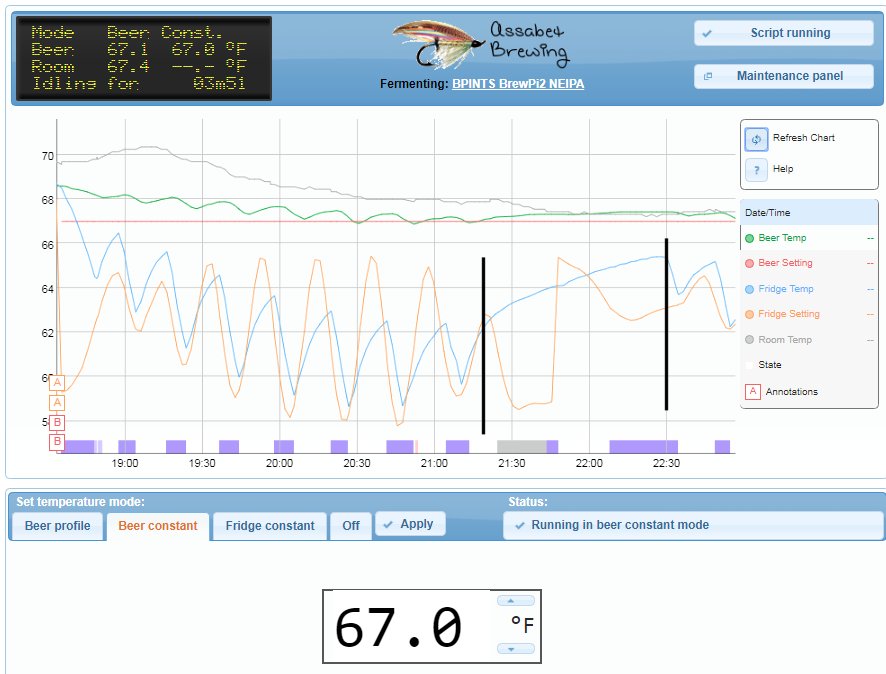
I think the 67°F wort temperature setting seems like it's gonna make it without any blow-off.
I was in a similar situation with the batch on the left last week and dropped to 66°F for a couple of days.
This time I wanted to ride it out...

Cheers!
 
Yeah it is :D
I'm refilling the pipeline after a six month shut-down during a home reno.
I was jonesing something awful all that time and now I have a lot of empty kegs that need filling.
If the gas hardware I ordered for my third fridge shows up in time I'll be brewing again this weekend, otherwise next weekend for sure...

Cheers!
 
Status
Not open for further replies.
Back
Top