How to add permanent volume markings to a kettle (illustrated)

Homebrew Talk - Beer, Wine, Mead, & Cider Brewing Discussion Forum

Help Support Homebrew Talk - Beer, Wine, Mead, & Cider Brewing Discussion Forum:

This site may earn a commission from merchant affiliate links, including eBay, Amazon, and others.
I have a 12 year old daughter who's tried all kinds of hazardous things with supervision. Yes, keep the level of hazard in perspective; don't blow it out of proportion. It's a yucky chemical solution, not nuclear waste.

Metabisulfite is good at reducing hexavalent to trivalent. Most of us have it, just dissolve in solution for added measure of safety.
I'm sure Ward would test, but then you might turn your house into a superfund site when it leaks to the epa. Kidding.
 
I can't wait to do this to my new boil kettle when it comes tomorrow. Thanks to the OP for posting. I have done a bit of searching about this technique and cam e across a really nice DIY electro-etching power supply. Perhaps a little over the top, but if you want to etch a lot of items it might be fun to build. I'm still scouring the house for an unused AC to DC adapter that I can sacrifice.

Edit: another informative site for building an etcher-marker-plater interesting site for
 
I went to two different Michaels and could not find the stencils in either store, even with help from the employees. I ended up finding them online for $6.49 with free shipping.....I might have to go to Michaels and check out the section for glass etching and see if they are there
 
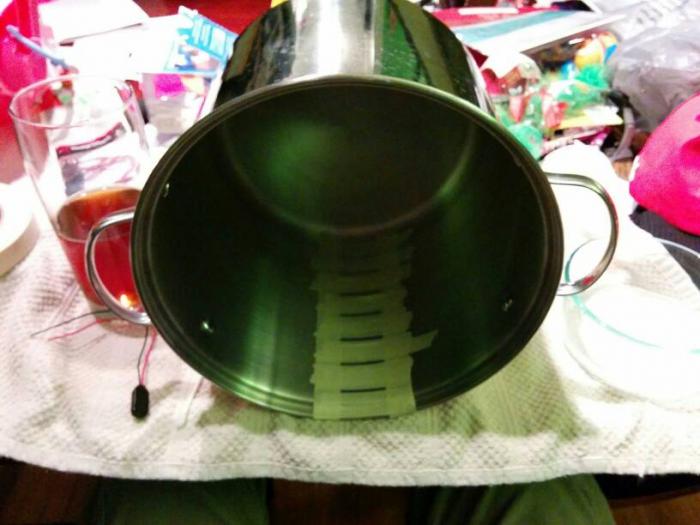
Took ALL day to trace and cut stencils through masking tape. Local hobby shop didn't have adhesive stencils. Would dramatically decrease time. Still think it came out pretty damn good. Looking forward to brewing with it this weekend.
ImageUploadedByHome Brew1396028227.744471.jpg
ImageUploadedByHome Brew1396028249.081571.jpg
ImageUploadedByHome Brew1396028265.642981.jpg
ImageUploadedByHome Brew1396028280.858551.jpg
 
I seem to be having trouble getting the etching to work on my pot. I have the circuit set up correctly (tested on a spoon), but I'm not getting any effect on my kettle. I had always thought my kettle was aluminum (crab pot I picked up here in South Korea), but maybe it's tin or something less conductive?

Anybody have a similar experience or possible solutions? I've also tried increasing the salt concentration. ImageUploadedByHome Brew1396074820.538970.jpg


Sent from my spaceship in low orbit.
 
I seem to be having trouble getting the etching to work on my pot. I have the circuit set up correctly (tested on a spoon), but I'm not getting any effect on my kettle. I had always thought my kettle was aluminum (crab pot I picked up here in South Korea), but maybe it's tin or something less conductive?

Anybody have a similar experience or possible solutions? I've also tried increasing the salt concentration. View attachment 189281


Sent from my spaceship in low orbit.

That looks like stainless, definitely not tin. Make sure you have solid connections, alligator clips work well on the lip of the pot. Use a fairly wet q-tip. What is your power source? Are you seeing any visible signs?
 
That looks like stainless, definitely not tin. Make sure you have solid connections, alligator clips work well on the lip of the pot. Use a fairly wet q-tip. What is your power source? Are you seeing any visible signs?

I may try connecting it more securely tomorrow, but every one of my tests on some metal spoons worked just fine. Using a new 9V battery right now, but I may dig around for a charger that I can tear up.

No visible signs on the kettle.


Sent from my spaceship in low orbit.
 
I may try connecting it more securely tomorrow, but every one of my tests on some metal spoons worked just fine. Using a new 9V battery right now, but I may dig around for a charger that I can tear up.

No visible signs on the kettle.


Sent from my spaceship in low orbit.

If you have a automotive battery charger it works great and has alligator clips on it. Set it on the lower settings if adjustable. You don't need to destroy a good power adapter and determine polarity if you all ready have a charger. Good luck.


MaxOut Brewstat
 
I noticed the type of vinegar made a big difference for me. My first attempt I used what we had which was Apple cider vinegar. Didn't work so good. Next day I bought some distilled white vinegar and the difference was unmistakable.


I know you said the spoons worked ok. But thought I'd just pass along something I found along the way.

Hope that helps! Cheers!


Sent from my iPhone using Home Brew
 
I did men and not sure if it was the wires I used or what but it wasn't easy. Ended up dipping the qtip and dabbing it on the area then taken the wire separatelyImageUploadedByHome Brew1396102016.507456.jpg took forever


Sent from my iPhone using Home Brew
 
I seem to be having trouble getting the etching to work on my pot. I have the circuit set up correctly (tested on a spoon), but I'm not getting any effect on my kettle. I had always thought my kettle was aluminum (crab pot I picked up here in South Korea), but maybe it's tin or something less conductive?

Anybody have a similar experience or possible solutions? I've also tried increasing the salt concentration. View attachment 189281


Sent from my spaceship in low orbit.

Make sure you connect the (+) lead to the main pot - not part of the handles/rivets etc.
 
I noticed the type of vinegar made a big difference for me. My first attempt I used what we had which was Apple cider vinegar. Didn't work so good. Next day I bought some distilled white vinegar and the difference was unmistakable.


I know you said the spoons worked ok. But thought I'd just pass along something I found along the way.

Hope that helps! Cheers!


Sent from my iPhone using Home Brew

Thanks for the insight. I actually was using apple cider vinegar because it was just what we had on hand. I may pick up some white vinegar with a higher acetic acid concentration.

And Pickles, I think this may be an aluminum pot too, but I can't be sure since I bought my entire setup from some random guy. The process does work on aluminum, though.


Sent from my spaceship in low orbit.
 
I just finished mine. I initially had trouble getting it to work because of poor connections to my 9v battery. As soon as I fixed the connection the q-tip immediately started turning yellow and then darkened as I continued. I struggled a bit keeping a solid connection to my battery. Using a wall wart probably would have been easier but I couldn't get up the nerve to use one. Regardless, it ended up turning out great (except for the brain fart I had with the 11) and I'm looking forward to brewing with the new markings tomorrow!

ImageUploadedByHome Brew1396230221.802792.jpg


Sent from my iPhone using Home Brew
 
What???????? I hope you mean you are using extention cord wire on your 9V battery?

Only things would be more salt and check you have a decent charge on the battery.


I got a good chuckle out of that image...


Sent from my iPad using Home Brew
 
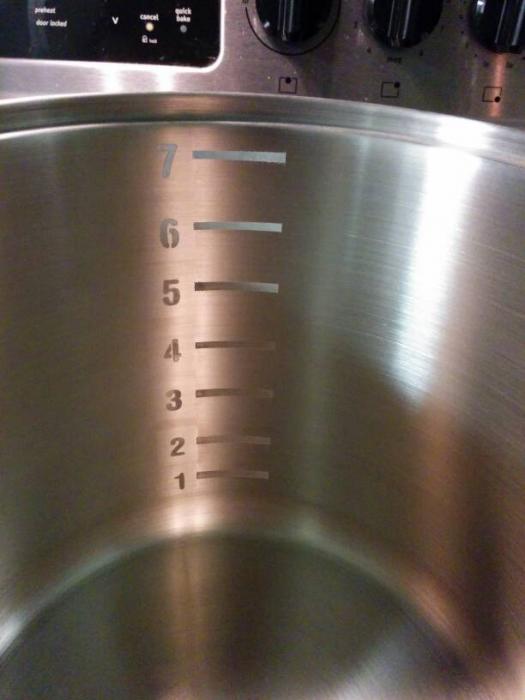
Here's a pic from my brew today. The volume etching worked perfectly! Some of the markings are hard to see but that was due to the lighting in my garage.

ImageUploadedByHome Brew1396296013.788337.jpg


Sent from my iPhone using Home Brew
 
A new use for my portable battery powered jump-starter comes to mind...massive terminal clamp included! :D :eek:
 
Took a 9V 800ma dc power supply and soldered small alligator clips to it this weekend to try this out. Worked pretty well, if somewhat slowly. I was practicing on the cutout portion of my keggle (the former top with the tap connection in the center) and it initially didn't work on the outside surface. After a brief cooling off period (aka the RDWHAHB period), I tried the same setup on the inside of the keggle top and it worked gloriously. Any thoughts as to why?

I have been measuring the depths for the actual keggle markings and am going to mark shortly. Just wonder why I could barely etch to the former top of the keg. I will admit that I didn't measure the salt the first time and remixed with .25 tsp to .25 cup vinegar, but I can't imagine that would be critical.

On a related note, more salt (to the point of saturation) is good, right? Faster ferric chloride production means faster etching, right? An alternative would be faster q-tip dipping, I suppose.


Sparky
Making beer and hard cider in Southern Virginia since 2011.
 
here's my contribution. Finally got around to doing it.


20140401_183849_zps6ef07ea5.jpg


Nothing fancy. Just thought I would etch my brewery name. The inside just has half gallon marks up to 2.5 gallons. I had no test material, so I just used my 3 gallon kettle as the guinea pig.


One thing for those looking to etch their brewery name or some other words or phrases. I would consider buying more than one pack of the stick on stencils. That way you can have more than one letter and it makes the etching go a bit faster since you don't have to stop, peel off, then re-apply the stencil.


Can't wait to get my mash tun finished!
 
One thing for those looking to etch their brewery name or some other words or phrases. I would consider buying more than one pack of the stick on stencils. That way you can have more than one letter and it makes the etching go a bit faster since you don't have to stop, peel off, then re-apply the stencil.

HAHA...I went to Michael's this weekend and saw that all the Martha Stewart stencils were only one off's. Went over to Office Max and found stencils with 13 of each letter. Yep, too heck with you Martha! (And at $17 a pack too compare to OM's $6.)

(just really hoping the graphics guy i have working on a logo is going to use Helvetica now....LOL)
 
I'm going to mark the tare weight on my stainless containers, including kitchen mixing bowls and measuring items. It helps when I weigh out ingredients for bread and other recipes and have forgotten to tare out the scale first. It also helps when weighing hops and water adjustments.
 
I'm going to mark the tare weight on my stainless containers, including kitchen mixing bowls and measuring items. It helps when I weigh out ingredients for bread and other recipes and have forgotten to tare out the scale first. It also helps when weighing hops and water adjustments.

But you are going to throw off your tare weights and then have to take into account the material lost from the etching process!
Only kidding of course...!
 
So I've tried doubling my voltage and greatly increasing the amount of salt in solution, and I just can't get the etching to work with my pot. It fizzes like crazy on my test metals, but I can't get any sort of reaction with my pot, which I've assumed this entire time to be aluminum.

Kinda bummed about this, but I'll continue to think about ways to make it work.


Sent from my spaceship in low orbit.
 
I used the recommended .25 tsp table salt and .25 cup distilled vinegar and it worked great, obviously. I found 2 things that really helped speed up the process.

1 the distance from the working area that the positive lead is in contact. I stuck it under one of the horizontal pieces of tape between the two lines I was working on. As I got farther away it didn't sizzle as much.

2 the amount of solution on the tip. I'd swirl the qtip around in my bowl then wrap ~.5" worth of the wire around the fattest part of the tip. So it was nice and soggy, and the negative lead was close but not touching the work area. Just move slowly and consistently back and forth with a medium pressure. I knew it was right when the tip turns yellow then to dark red/brown.


Good to know. I've been hesitant on doing this to my 10 gallon kettle, because of how inconsistent and hazy the results were on my smaller 3 and 5 gallon kettles. I'm not getting that consistent shade of white like I see on your pot and the others on here.

Some of the pics I see here the numbers and lines really pop out in the pics. Could I go back on my small kettles and even out those areas to where the shading is consistent or is the etching procedure a "one and done" process?

I'm fine with my small kettles looking like a hack job, but I want my 10 gallon tun to look professional like some of the pics posted in this thread.
 
Back
Top