• Please visit and share your knowledge at our sister communities:
  • If you have not, please join our official Homebrewing Facebook Group!

    Homebrewing Facebook Group

Hoppo's E-Brewery Build

Homebrew Talk

Help Support Homebrew Talk:

This site may earn a commission from merchant affiliate links, including eBay, Amazon, and others.
That is a lot of brewing, having your own RO system will help a lot. A side benefit is having really good drinking water, we can't drink beer all the time right?

Whatever I can do to help, I will.

Nothing wrong with drinking RO water, but be aware that you are not getting the mineral content that you would be getting otherwise.
 
Hoppo,
A friend of mine does water treatment and has put/moved a ro system in three houses now. He had taught me a lot on how to set them up for brewing. One of the things you can do is to T off the line going to the tank and add a 4 gallon tank. If you put a shut off valve on each you can wait till evening to fill the big one and your consumption points, ice and drinking, will have plenty of water. I am adding a thirty gallon non pressure tank with a float switch because the water at my new house is horrible. If you use a non pressure tank and a pressure tank for drinking you have to put a check valve on the pressure tank line so it does not get emptied into the other tank.

Good luck with ro water, I hope that your beers come out even better than they are now.

Sent from my SAMSUNG-SGH-I337 using Home Brew mobile app

OK.....I have a bit of time to ask a few questions about the proper way to set up an R/O system for a home brewery. So are you saying to use a large tank (14 gallon) and a smaller tank (6 gallon) in the system. For that type of a setup, would I simply just be using the smaller tank for everyday domestic needs? Having a shut off valve on each, then would I turn supply onto the larger one for brew days to get more volume? Then do I turn off the supply and drain the larger tank after I get the volume that I need? I'm just trying to wrap my head around this.

I spoke with a guy from Titan who tried to educate me on R/O systems. He explained that the GPD production rate listed for any particular unit is based off of controlled testing with supply water temps at 77 degrees. Obviously this is not a realistic supply temp for most, so he said that I would then simply reduce the production volume by 2% for every degree my supply water is below 77 degrees. Based on his information I did some calculations to see where I was at and I fall > 25 degrees F below the testing temp, so I could anticipate slightly greater than a 50% loss in volume production compared to what is listed by the manufacturer.

My thinking was to go with a higher output unit of 300 GPD and use a 14 gallon tank that holds 11 gallons of actual water volume. I typically use 20 gallons of water volume for my 10.5 - 11 gallon batches. I was thinking that the night before or the morning of brew day, I could drain off 10 gallons, leaving a gallon for the ice makers to keep functioning. Then according to my calculations a unit of this capacity with my water temps should be able to produce 150 GPD or 6.25 gallons per hour. So, within an hour and a half, I should have the remaining volume needed to fill my system and start brewing.

Is there a significant down side to having one large tank as opposed to a larger and a smaller tank as you propose? Is there a problem oversizing the tank that holds far more volume than is needed for everyday domestic purposes? I'm just trying to wrap my head around this, so your experience and expertise is appreciated.
 
Here are my thoughts based on what I have been taught. Starting with production, temp is one factor, the other is pressure differential. The bigger the pressure difference on the incoming side of the filter and the outgoing side of the filter the more efficient it will be. That is why systems can come with electric and hydraulic pumps. I have a hydraulic on mine. So, without knowing your incoming water PSI it is hard to guess what your real output is going to be.

The next issue is storage. There are two main options, pressure vessel or open atmosphere. Both have their pros and cons. With a pressure vessel the rate of flow decreases as volume decreases. So lets say that you have one gallon left of 11 original. You may not have enough pressure to properly feed an ice maker and your drinking water output at the sink will be very low. This is because as the air bladder expands the psi it is exerting on the water bladder decreases. If you go this route this is why I would recommend a small secondary tank for your drinking water and ice maker. You don't even have to use shut off valves, a check valve would do the same thing.

The pros of a big pressure vessel is that it is sealed, no bugs. The cons are increased cost, can require a bigger gallon per day system, you have to wait on more water to be produced, and it takes more time to dispense the water (the output can be 1/4").

The other option is a open atmosphere tanks. For example a friend of mine bought a 55 gallon food grade drum on Craigslist for $15. It had been used to store food grade phosphoric acid so it was bug free. He put a hose to the bottom of it to draw from, he has a pump that pulls a suction, a float switch to turn off the incoming water when it is full, and a inline hepa filter as a breather to keep bugs out of it. I am going to do the same with my setup exept that I am going to put mine on a shelf and put a ball valve on the bottom so I don't have to use a pump.

If you do the second option you will need a small pressure tank for ice and drinking. You T the line coming out of the membrane, one goes to the big tank, the other goes to the pressure tank. You have to put a check valve on the line to the small pressure tank so that it does not flow back into the big tank. Also, while the big tank is filling the small tank will not fill. Water will go to the path of least resistance.

Cons,
It is not a closed system.
Pros,
Cheaper tank, don't need 300 GPD system, have all of your water ready at the start of your brew day, faster dispensing of brew water.

I would recommend option 2. I looked at doing a large pressure vessel but the cost was too high. Secondly, option 2 is going to dispense a lot faster.

If figure that this is just the start, let me know what you think and what questions you have.


OK.....I have a bit of time to ask a few questions about the proper way to set up an R/O system for a home brewery. So are you saying to use a large tank (14 gallon) and a smaller tank (6 gallon) in the system. For that type of a setup, would I simply just be using the smaller tank for everyday domestic needs? Having a shut off valve on each, then would I turn supply onto the larger one for brew days to get more volume? Then do I turn off the supply and drain the larger tank after I get the volume that I need? I'm just trying to wrap my head around this.

I spoke with a guy from Titan who tried to educate me on R/O systems. He explained that the GPD production rate listed for any particular unit is based off of controlled testing with supply water temps at 77 degrees. Obviously this is not a realistic supply temp for most, so he said that I would then simply reduce the production volume by 2% for every degree my supply water is below 77 degrees. Based on his information I did some calculations to see where I was at and I fall > 25 degrees F below the testing temp, so I could anticipate slightly greater than a 50% loss in volume production compared to what is listed by the manufacturer.

My thinking was to go with a higher output unit of 300 GPD and use a 14 gallon tank that holds 11 gallons of actual water volume. I typically use 20 gallons of water volume for my 10.5 - 11 gallon batches. I was thinking that the night before or the morning of brew day, I could drain off 10 gallons, leaving a gallon for the ice makers to keep functioning. Then according to my calculations a unit of this capacity with my water temps should be able to produce 150 GPD or 6.25 gallons per hour. So, within an hour and a half, I should have the remaining volume needed to fill my system and start brewing.

Is there a significant down side to having one large tank as opposed to a larger and a smaller tank as you propose? Is there a problem oversizing the tank that holds far more volume than is needed for everyday domestic purposes? I'm just trying to wrap my head around this, so your experience and expertise is appreciated.
 
Good day today! I won one of the grand prizes yesterday in the big 2014 HBT Giveaway from Keg Connection. I won the two tap jockey box, two new ss kegs, and the regulator and hoses to operate it. Pretty cool! Should make for some fun neighborhood pool parties this year. :tank:

PS....thanks for the R/O pics cfrazier77, very helpful.

You do know that you cannot just use that jockey box as is. You have to clad it in knotty pine. It just won't look right without it!:mug:
 
You read my mind. Now if I could just get Txbrew to reply to my PM to verify my claim of the prize, that would be a relief. I sent a PM last night and another this a.m. with my shipping info, but so far.....no response. I know he had his hands full with this drawing, so I'm sure he is getting around to it, but I would hate to miss out on it.
 
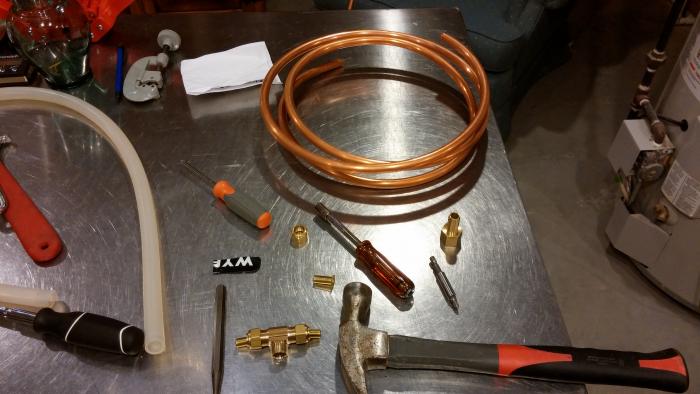
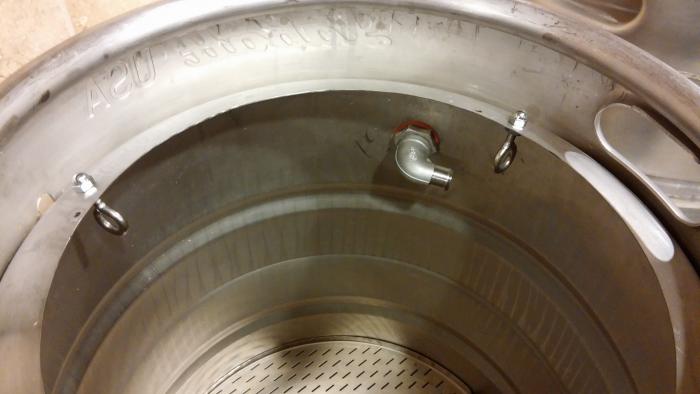
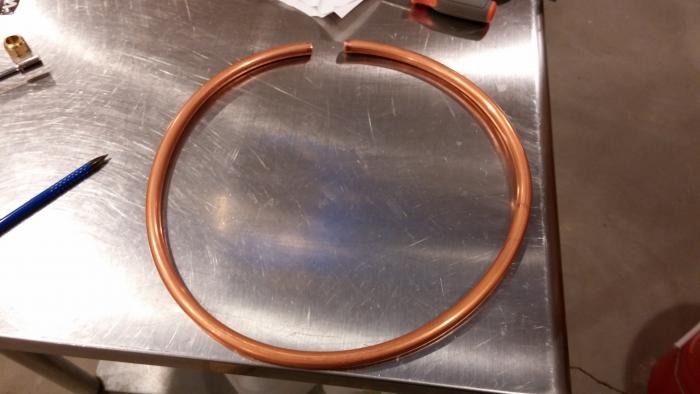
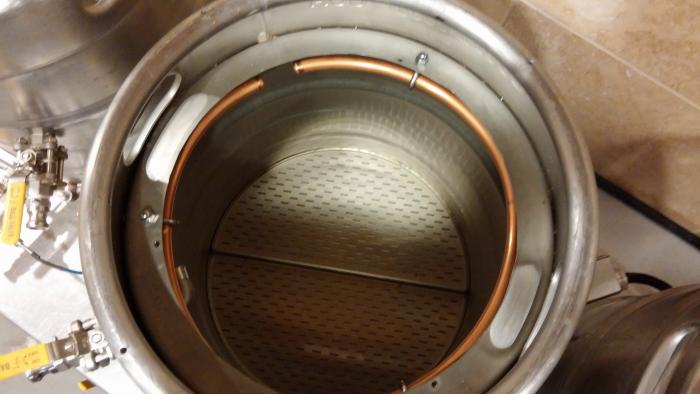
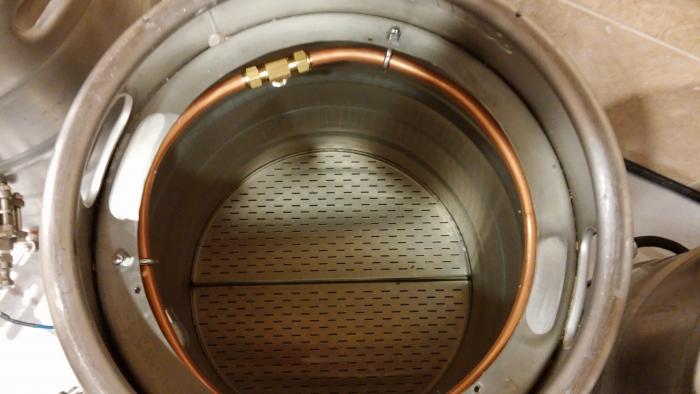
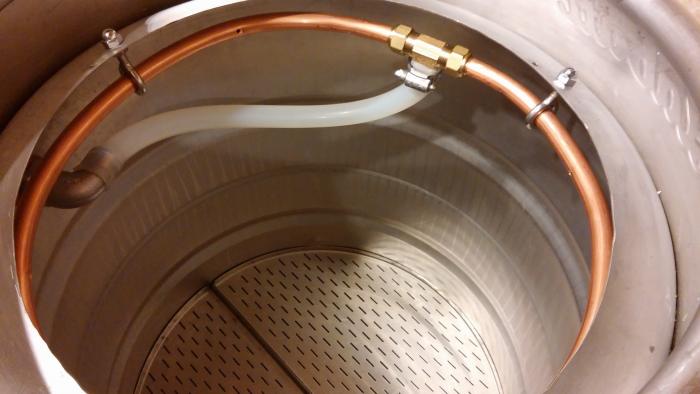
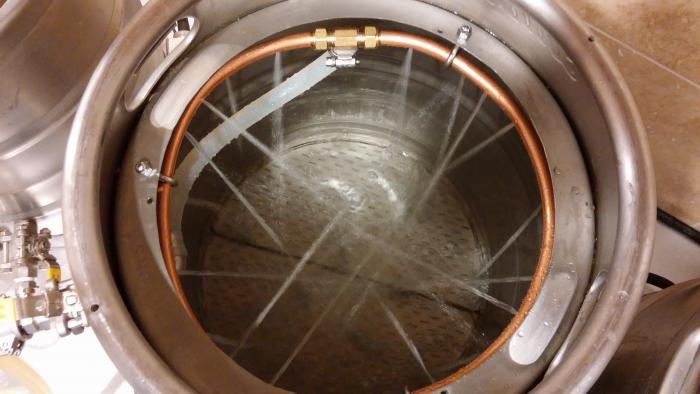
We had some massive storms sweep through SE Michigan on Saturday knocking out power at my business, which is still out, so I had another day off of work. I decided that I wanted a different recirculation and sparging component in my MLT other than the simple silicone hose laying on top of the grain bed. I had some leftover copper from building my HERMs coil, so I built a sparge coil today. I stopped at HD and picked up some stainless eye bolts and acorn nuts to suspend the coil from the top of the MLT. I also picked up a brass compression "t" fitting as well. I wanted a coil that would not get in the way of my mash paddle doughing in the grains, while still showering the entire surface of the grain bed. Here are a few pics of the test fitting.

0415141015b.jpg


0415141015a.jpg


0415141020.jpg


0415141022.jpg
 
I then drilled a bunch of 1/8" holes at predetermined angles to ge a somewhat uniform spray patter. Once I installed the compression "t" fitting, I used a short piece of silicone hose to connect to the existing hose barb at the inlet. I may re-drill another coil for a more precise spray pattern, but for now this should do the trick and helped me kill a couple of hours today.

0415141109a.jpg


0415141117.jpg


0415141122.jpg
 
"I decided that I wanted a different recirculation and sparging component in my MLT other than the simple silicone hose laying on top of the grain bed." For additional bling, or were you unhappy with the performance of the simple sparge hose?
 
Awesome sparge build. Thanks for sharing that it gave me an idea cheers


Sent from my iPhone using Home Brew
 
Thanks guys. I actually built it for a few different reasons. First of all as mentioned, I was bored due to a 4 day power outage that shut down my practice. Thankfully we didn't lose power at home, so I needed a project to kill some time. Also, I find that the hose gets in the way when I'm doughing in the grains for the mash. I have to pull the hose out of hot strike water and snake it though the handle of the keggle to keep it out of the way, which drips all over the place. Another reason is that I have been experimenting with different fly sparging methods. I know that in theory the grain bed should remain under a couple of inches of sparge water during the fly sparge until the entire pre-boil volume is collected. Some home brewers then collect the second runnings for a smaller batch, "little brother" version of their primary recipe. I do not, so this extra volume just goes down the drain.

I still do not have my R/O system at home, which means that I have to manually fill 5 gallon jugs at the self serve R/O station at Meijer and haul every bit of water that goes through my system down to my basement. My last couple of batches, I have been keeping the grain bed completely under sparge water until I get to about 2/3 of my pre-boil volume. At that point, I drop the flow rate of sparge water and increase the outflow of wort to use up more of the volume in the MLT and not waste as much water. As the volume in the MLT drops below the surface of the grain bed, I usually stand there holding the end of the hose with my heat resistant gloves manually saturating the surface of the grain bed to continue rinsing. With this method, I only waste a couple of gallons of water and my efficiency hasn't suffered a bit. Rather than dealing with the stupid silicone hose, I thought I would build an aparatus that showes the grain bed for me. With this method, I conserve more volume in the HLT, which I then use for cleaning purposes.

May not be the ideal, text book way of doing things, but so far this method has been working well for me.
 
You may want to drill out the holes bigger. I had something similar when I was not recirculating and when I went to recirculating, RIMS, it would get clogged. At the beginning of the mash some grain and husks got underneath my false bottom when I stirred it in. This then went through the pump and got stuck in the copper tube.

But, it looks great and with big holes should do perfectly.
 
I was thinking the exact same thing. I have more copper and wanted to make a second coil with larger diameter holes with a little different configuration of the spray pattern. Probably will knock out the second coil tomorrow and cross compare. Thanks!
 
Yeah, I looked at that stuff at one point and was strongly considering it over the simple silicone hose configuration, but I went with the cheaper option at the time. I believe Bobby sells it Brew Hardware for like $18. I had the extra copper laying around and the "t" fitting was only $4, so I went that route. I'm going to make another coil with larger holes and a more precise drilling pattern for better surface coverage with the spray pattern. I guess I really won't know how it works until I brew another batch. I just kegged 25 gallons of brew and have another 10 gallons sitting in carboys, so I really don't need to brew right now. However, since I did win the Jockey Box prize in the big drawing, I guess there's no such thing as having too much beer on hand for taking with me to parties, events, vacations, etc. I may brew a batch next week to test it out. I have a buddy that want to collaborate on a beer and split the batch, so I may give him a call and set something up.
 
I think you might run into trouble clogging the ring with grain husks if you try to recirculate wort through it. Could you setup a grant type vessel in the recirculation circuit perhaps, or a coarse filter inline with that ring? Be fine for sparging, but recirculation might cause problems.
Only reason I say this is because I tried building a similar yet different design for recirculation out of PVC. First use it got massively clogged with grain, and once that happens there is essentially no way to remove the grain husks.

In other thoughts, I'm having a sort of remorse about my own home plans. I did an addition a couple years ago. I wish I had made allowance for air exhaust in my basement so that I could do an electric brewery. Right now I wheel out my propane rig to patio. Bad weather and evening brewing are not possible for me. This restricts my brewing to basically Saturdays Sundays or vacation days. I think there MAY be a way I could install an exhaust vent. What diameter hole is needed for adequate removal of the water vapor? What electrical requirements for your setup just for the wort production and boiling? Only concern I have is about spills. I have no floor drain. I typically make quite a mess when brewing outside.

TD


Sent from my iPad using Home Brew
 
I still do not have my R/O system at home, which means that I have to manually fill 5 gallon jugs at the self serve R/O station at Meijer and haul every bit of water that goes through my system down to my basement.


I've been doing this too, but from a small under-sink unit upstairs. It only holds enough to fill 5 gallons at a time, and then has to regenerate. Makes about 1 gallon per hour. Tedious, and in general a total PITA. I finally broke down and have ordered a RO setup with a 20 gallon tank for brew basement area. One more step towards spontaneous brewing ability. Can't wait to use it on Tuesday, as long as the weather holds out. Springtime storms rolling through all them time.

TD

Edit- did a bit of looking, and a 6" vortex inline fan can get me enough CFM to run a single 5500 watt element, and an 8" I can get nearly 750cfm. Already have a 240v receptacle. Hmmm.. Here we go ...again?


Sent from my iPad using Home Brew
 
Very good points TrickyDick.....see below. :mug:

I think you might run into trouble clogging the ring with grain husks if you try to recirculate wort through it. Could you setup a grant type vessel in the recirculation circuit perhaps, or a coarse filter inline with that ring? Be fine for sparging, but recirculation might cause problems.
Only reason I say this is because I tried building a similar yet different design for recirculation out of PVC. First use it got massively clogged with grain, and once that happens there is essentially no way to remove the grain husks.

Excellent points. I am going to drill out the holes to a larger diameter and hope that my false bottom does an adquate job of filtering. If not, then I will likely install a bazooka tube filter on my MLT dip tube as a secondary filter. If all else fails, I will either add another recirculation port in the kettle with some other contraption or resort back to the original set up. It's just a matter of trial and error I suppose. I use a large bazooka tube in my boil kettle, which does a nice job of filtering out trub and hop particulate, so If I can squeeze one under the false bottom, it may work. Thanks for the input, it is very much appreciated!

In other thoughts, I'm having a sort of remorse about my own home plans. I did an addition a couple years ago. I wish I had made allowance for air exhaust in my basement so that I could do an electric brewery. Right now I wheel out my propane rig to patio. Bad weather and evening brewing are not possible for me. This restricts my brewing to basically Saturdays Sundays or vacation days. I think there MAY be a way I could install an exhaust vent. What diameter hole is needed for adequate removal of the water vapor? What electrical requirements for your setup just for the wort production and boiling? Only concern I have is about spills. I have no floor drain. I typically make quite a mess when brewing outside.

I built this brewery for the exact reasons that you mentioned. I kept all of my brewing equipment in the basement and had to haul everything up the stairs out to the patio in the summer or garage in the winter. Turned into a royal PITA! I used a 6" vortex fan, which I believe is just shy of 500 cfm. I have about a 25 ft. run to get out the back wall, so I went with the 6" instead of the 4". I wasn't thrilled about punching a 6" hole through the side of my house, but in retrospect I'm glad that I went with the larger unitl. I have a floor drain, but it's on the other side of the room next to my furnace. I purchased a large plastic boot mat to catch any drips or spills around my brewing system. I found it at HD for like $9 and it has worked great. I plan on buying another to put under the drip pan on my sink and maybe another for next to my ss island where I do most of my racking. They are nice, because I just slipped them under the brewing table or island out of sight when not in use. I think I put a pic earlier in my thread.

TD


Sent from my iPad using Home Brew
 
Thanks,


As it turns out, in my basement area, which is a walkout, there is ample room to install a hood and as large a hole as I like for ventilation. I have 240 voltage down there too, though unsure how many amps I can pull..need to check the wiring size. Might only be 40A. Regardless, I think that I will start planning to either convert my existing system to electric, or start from scratch and design entire new setup to brew with, utilizing old equipment if I choose to or not. Definitely going to think this one through very very carefully. Thought about just going with the new, but as of yet unavailable Blichmann BoilCoil and RimsRocket. Probably other more versatile units available though. Hopefully within the next year I can get this all going. Lots to research and plan. Probably have to re read your thread here too! What other resources did you use to plan out your brewery?
I know it's advised not to crush grain in same room where you do rest of brewing for risk of airborne particles containing organisms on released into air during crushing process getting all over and possibly contaminating your stuff. Last I asked, I thought you said that you zero issues with this. That still true?

TD


Sent from my iPad using Home Brew
 
Like many of the member of HBT that have converted to electric, Kal at www.theelectricbrewery.com has by far the most extensive write up pertaining to building an eHERMs system. I also used Bobby's information at www.brewhardware.com for some of my keggle conversion ideas. Basically my system is a hybrid that incorporates ideas from both of them. Kal's system is 100% top of the line and by far the best that I have seen (especially his newest build). As you can see, I didn't use fancy Blichmann kettles and components, as I went for a little more cost effective method. I spent hours on end combing through Kal's step by step "how to" instructional pages and cross referenced with Bobby's keggle conversion information to mesh everything together. I was going to purchase an unassembled control panel from Kal and build it myself, but then came across Ryan's panels with www.ebrewsupply.com and could get an already assembled unit along with temp. probes, power cables, etc. for the same price.

I elected to go with the 30 amp panel and I installed a 30 amp GFI breaker in my main supply panel, which was not cheap ($135) to protect it. I had already run the appropriate wiring and receptacle for a 30 amp system, but in retrospect wish that I would have wired for a 50 amp. Historically I have been a "marathon brewer" knocking out 2 or 3 consecutive batches in a brew day on my old propane system. I figured that with the larger capacity to brew 10-12 gallon batches with my new system, doing multiple batches in a brew day would not be on the radar. Well, it has come up while doing collaborative brewing with buddies. Only having a 30 amp panel, I cannot run both 5500w elements at the same time, so I have to be done boiling my first batch before I can start heating strike for the second. With a 50 amp system, I could be heating strike for another batch immediately after the sparge while beginning to boil the first. I would consider a 50 amp panel if you ever feel the need to run both elements at once.

As for my grain mill being located in my brewery.....I am very careful and have still not run into any problems. I typically mill my grains the night before brew day, but have done it the morning of as well. I place a towel over my hopper when milling and with the discharge located inside of a sealed cabinet there is little dust outside. I thoroughly shop vac out the cabinet and wipe down the mill and countertops after milling. All of my fermentation happens in temperature controlled enclosed chambers, so no exposure to airborn particulate is possible. I recently built a stir plate, so that I can start making my own yeast starters, as opposed to buying Wyeast Smack packs at $8 bucks a pop ($16 for a 10 gallon batch). I plan on using a bung + airlock to seal my erlenmyer flask while on the stir plate and will likely set the stir plate down in my ale chamber to control the temperature of the yeast starter and protect against any contamination as well. Absolutely no problems so far, but as I mention before I am extremely diligent with cleaning after milling and sanitizing everything thoroughly. I could see where people that aren't as sanitary with their brewing processes could run into problems, but for me.....none so far. :mug:
 
Sounds great! Thanks for the info and resources. I am pretty sure I will need to run a larger wire to get 50A service. Need to check on that tonight. I saw the electric brewery website and the control panel is really nice. Lots of good info there. I may break done and even buy the book. Something to be said about old fashion paper books. I have blichman kettles now, and could adapt those pretty easily with the new Blichmann products which aren't out yet. I think I need to review more ebrew setups here and read the electric brewery book or thoroughly go through the site. I have a great spot for my setup, which doubles as a storage room. Going to have to rearrange the whole storage area once this is finished. Think I like your built in look more than building it all on a rolling stand/cart. Though a mobile setup would be pretty slick too, or even a hybrid propane/electric that could do both. I've been doing the milling outdoors along with most of the measuring. So far I've been pretty lucky as my sanitation of the motorized mill and cart has been fairly negligible aside from sweeping off the gross pulverized powder and stray kernels.

Thanks for the inspiration,

TD

Edit - seems like there is only a pull cord for adding a circuit to the junction box in the basement going to the break box upstairs. They'll have a fun time pulling a 6ga wire. Could have them pull whatever wire will fit, maybe go 4ga! Not sure what size the conduit is.


Sent from my iPad using Home Brew
 
You want oxygen to fuel yeast reproduction in a starter, so an airlock is not recommended. Either a sanitized piece of aluminum foil or a porous foam stopper would be better.
 
Understood. But couldn't I use my aeration wand with a 2 micron stone and thoroughly oxygenate the starter at the start? I spoke with the manager at my local HBS and he felt that that would be an acceptable approach. Im new to making my own starters and as ways appreciate the advice given by HBT members with more brewing wisdom than myself. Thanks in advace for your further input.
 
Understood. But couldn't I use my aeration wand with a 2 micron stone and thoroughly oxygenate the starter at the start? I spoke with the manager at my local HBS and he felt that that would be an acceptable approach. Im new to making my own starters and as ways appreciate the advice given by HBT members with more brewing wisdom than myself. Thanks in advace for your further input.

Assuming you provide the "correct" amount of oxygen, then it would work. I have no idea what would be "correct" and find it much simpler to just let the yeast figure it out for themselves. :)

If you are conscientious with your sanitation (and you certainly appear to be), then just use a sanitized piece of foil. Not airtight, so there can be oxygen transfer, but highly unlikely to allow any bugs in with proper care.
 
Yup. Don't fight the foil! Works great. You need to let the yeast have as much o2 as they need. Not making beer...making yeast. The stone will work but you'll be choked if the yeast run out of o2...why take the chance?
 
Also, if you use foil the results should be the same all of the time and you can figure out exactly how much yeast you will have.

Just remember, in the absence of air currents, nasties do not fall up.
 
Awesome build thread! Took me a while to read through it all but I am glad I did! Love your build threads! :) thanks for the inspiration
 
Thanks....I appreciate it. Now I just need to find time to actually use the brewery. We put a pool in late last summer and every waking moment outside of work so far this summer has been devoted to landscaping and my kids soccer activities. Not enough hours in the day. I plan on scaling back down to 5 gallon batches, brewing more frequently, and getting some variety in the pipelines asap. I'm the only one in my house that drinks beer and all of my friends and neighbors are just as busy as we are, so doing 10 gallon batches like I have been doing is too much for just me. I have had an IPA and an indian wheat beer on tap for the past several months, which were fantastic, but I just tapped the other 5 gallons of each, which have been sitting in kegs under gas in my wine cellar for 3 months. The hop aroma and flavor, just isn't as fresh as I like. From this point forward, I am going to for smaller batches, so that I have fresh beer on tap, as opposed to stock piling beers in cold storage that aren't suitable for aging.
 
Thanks....I appreciate it. Now I just need to find time to actually use the brewery. We put a pool in late last summer and every waking moment outside of work so far this summer has been devoted to landscaping and my kids soccer activities. Not enough hours in the day. I plan on scaling back down to 5 gallon batches, brewing more frequently, and getting some variety in the pipelines asap. I'm the only one in my house that drinks beer and all of my friends and neighbors are just as busy as we are, so doing 10 gallon batches like I have been doing is too much for just me. I have had an IPA and an indian wheat beer on tap for the past several months, which were fantastic, but I just tapped the other 5 gallons of each, which have been sitting in kegs under gas in my wine cellar for 3 months. The hop aroma and flavor, just isn't as fresh as I like. From this point forward, I am going to for smaller batches, so that I have fresh beer on tap, as opposed to stock piling beers in cold storage that aren't suitable for aging.


I'm somewhat in the same boat. Really am thinking about converting to electric so as not to be restricted to brewing on days off, or weekend days. Had been doing 10 gallons, but I've got more than I can consume on hand. The thought was to keg half and bottle half. I'm not quite ready to buy two cases of bottles every time I brew though, and friends are poor at returning empties with proper rinsing. I've had in the past a beer in a carboy for over a year before transferring it to a keg, and it wasn't because I was intentionally aging it. Family time and demands are far more important, and increasing as my kids get older. I'm going to, for now, persevere and continue the ten gallon batches, and try to bottle more. Aside from hop forward beers, especially dry hopped beers, I don't think a bit of time in the bottle, even months has been all that detrimental. Oxygen scavenging caps may help as well. Funny when I started (with a 2.5 gallon mr beer setup) I couldn't brew fast enough! Maybe I need to throw more parties or invite friends to bring growlers over...

TD


Sent from my iPad using Home Brew
 
Friends with growlers are the ticket! Just make them buy them (or give them out as Gifts) if your beer is good, they will put a strain on your pipeline. No bottles, no stress!
 
Brewing heavy and stock piling used to work out well, because we had a pretty tight knit neighborhood in years past with parties happening nearly every weekend. I had a hard time keeping the pipelines full, hence my progression towards a 10 gallon setup. Now, two years later, two sets of our neighbors (and good friends) moved out of state due to job transfers and one set has cottage up north, so they are gone most of the summer and nearly every weekend now. Like ourselves, our other neighbors and most of our closest friends have multiple kids at that age where sports and family obligations fill most weekends. The preference of most was pale ales, IPA's, and wheat beers, so I brewed various versions of these styles frequently. I also tried to keep an amber or brown ale on tap most of the time as well.

Now I have 8 cases of bottled beer in my cold storage, half of which are my Amarillo Wheat IPA or Citra IPA's that should have been consumed many months ago and have declined in quality/hop freshness. The rest is a combo of Ambers and Honey Nut Browns, that can benefit from the aging. I have a buddy/business partner that is taking the later off of my hands, but I also have 5 gallon kegs full of each of these styles and 10 gallons of another amber ale sitting in carboys for the past 3-4 months. Unfortunately, I used a ringwood ale yeast (never used it before) for this Fat Tire clone in the carboys and absolutely hate it. It may sound wasteful, but a lot of this beer is going to go down the drain and I'm going to start over fresh and revert back to smaller batches. At this phase of the game I would rather have smaller quantities of fresh, high quality beer to enjoy rather than being overwhelmed with huge quantities of beer that have progressed beyond their prime. I will only "experiment" with small batches and really want to focus on dialing in some of my favorite recipes in 5 gallon batches.
 
All good points! Try making some sours!! I've rather fallen into a sour addiction after a business trip to San Diego last fall.
They can age gracefully! I hear what you are saying though. I have a bunch of beers sitting in kegs that isn't even on tap yet. It is nice to be able to brew ten gallons, but I may be headed in the same direction as you are very soon, scaling down instead of up. Most of my friends are wine drinkers, not beer drinkers.
TD


Sent from my iPad using Home Brew
 
Back
Top