Homebrew Talk 3D Print Thread.

Homebrew Talk - Beer, Wine, Mead, & Cider Brewing Discussion Forum

Help Support Homebrew Talk - Beer, Wine, Mead, & Cider Brewing Discussion Forum:

This site may earn a commission from merchant affiliate links, including eBay, Amazon, and others.
My little Chinese Pursa i3 kit is coming along.

I have installed the E3D v6 hot end as well as a bowden feed.

If you do not like to tinker, I would not suggest buying one of these as they take some modifications.

Printing a calibration cube now, I'll add the results to this post when finished.

Edit: Noticed that my circles are coming out as ovals when I was printing the calibration piece.

The belt gears are by no means round, they are printed. I ordered some aluminum GT2 gears, they will be here Wednesday.

Still pretty happy with the actual print quality.
 
attachment.php
 
cool stuff, but I wish people would just post their ideas instead of jumping to pm -- maybe the rest of us want to try them too :)
 
How much are 3D printers and supplies to get started? Thank-you in advance John
Unfortunately that's like asking how much it is to start Homebrewing.

I work with a gentleman that spent about $350 for a kit and he's quite happy with it (some are even less but I think a guy needs to draw a line on "cheap.") I spent about $700 on mine (still a kit) and am happy with that. You can easily spend from $1,500-15,000 on a fully assembled printer ready to print out of the box.

Filament is your expendable. A kilo roll costs between $15 and $45 generally. That box I showed for BrewPi takes about 160 grams of filament - the lid another 50 or so.

The one thing in common to all printers it is takes time and a desire to learn some new things. You will learn software called a "slicer" which prepares solid models for 3D printing. You will likely learn a few different programs designed to fix models and do simple modeling. You might want to learn one of the various design programs to make your own models. You will lose countless hours just sitting and watching the printer run because it's amazing.

Just like with Homebrew, saying that you can save money with 3D printing is an amusing statement. Especially when time is factored in, you should be able to commercially obtain whatever it is you need at a lower cost. But, you will never be able to say "I made this" by just buying, and when you create your own models you create something that nobody else could have an exact copy of.

Do I recommend it? Yeah, I do. I'm a geek though and I like to make "stuff." Most people get into Homebrew because they share a similar mentality. Or is that mental affliction? I'd probably not recommend it however if you really do brew to save money, if you have a studio apartment with a premium on space, and/or if you really hate tinkering to make things right.
 
Sorry, not exactly 3d printing related but close.. does anyone on here use the vray rendering plugin with sketchup? Or something similar.
 
I just ran into this video this week, thought I'd share it here since it's relevant...

 
Last edited by a moderator:
Bringing this thread back. Tonight I am going to start a little project for the fun of it. I'd like to start making more brewing videos for youtube but I haven't because I don't have a tripod for my gopro. Sounds like a fun project! Going to start the design tonight and 3d print it when I'm satisfied with it.
 
A little late to the party, but I've been cranking away with my Anet A8 (knockoff Prusa clone) for a few weeks now.

I've found tinkercad.com to be incredibly useful for mocking up parts...very easy to use.

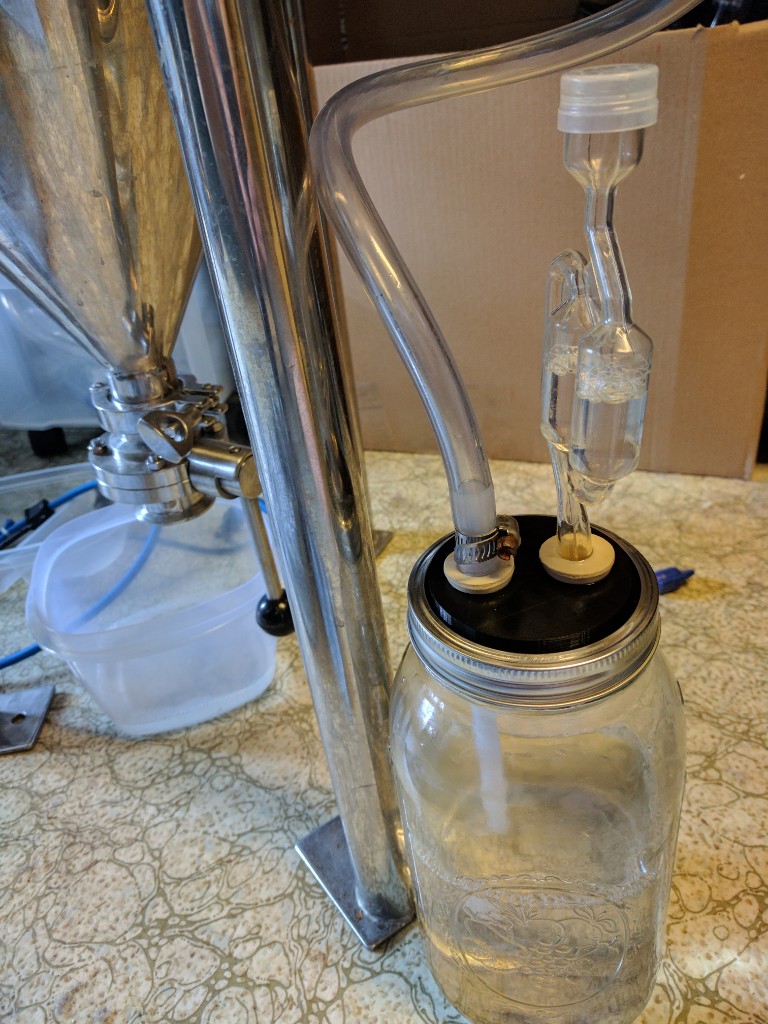
I made this last night. It's a mason jar cap for a blowoff container to keep dust/debris out of the starsan. Going to give it a go after chilling today!

IMG_20170629_145435~01.jpg


.STL is at https://www.thingiverse.com/thing:2410000

I also made a spacer to turn bottle caps into fridge magnets easily at https://www.thingiverse.com/thing:2401581 :ban:
 
I'd be interested to hear your thoughts on the Anet A8. I've been considering one for some time, but haven't been able to pull the trigger on it.

I've been pretty happy with it, overall. The frame is a little chintzy so I'd probably opt for the metal framed A2 if I were buying again. I printed/built a y tensioning assembly off of thingiverse that helped a lot with stability. Haven't gotten around to printing any frame braces yet, but they're on the list.

There are a few recommended upgrades such as directly soldering the wires to the bed and installing mosfets on the hearing block and bed. I haven't installed the mosfets yet.

It's definitely a very DIY printer because you get virtually no instructions along with it. YouTube videos helped a lot, as well as a Facebook support group for it. I'd still recommended it as a solution to get into 3d printing for <$200.
 
Tough to go wrong for $200. Just do it Donnie, you know you want to! :)

Of course, I've always got your back when you need stuff printed.
 
I've had my Geeeetech $200 kit printer for more than a year now and it's never really worked properly. If I had it to do again, I'd spend $300 for the assembled one from Monoprice with a 1 year guarantee. I'm actually thinking of buying that one now, so I can use it to print parts to get the other one working, and then giving one of them to my son.
 
There seems to be more tweaking necessary on the lower priced printers. I don't mind a little tweaking, but eventually one gets frustrated.
 
Bringing back the zombie thread as I'm about to purchase a printer myself.

I've read a lot about the Anet A8 and found that it is likely to cause damage if not modded. There has been more than a few occurrences of the A8 causing fires. (another here)

If you do have an Anet A8, it is highly advised to make a few mods to the printer. This is copy/pasted from a reddit post.

NOTICE: I'm just posting this to make sure you guys are aware of some issues with this and other machines. I'm planning on getting a Monoprice Maker Select v2, on which I'll be doing the MOSFET mod for both bed and extruder. I'll be buying this kit from Amazon and following these directions. YMMV.

f you've never worked with a printer before, the answer is still buy another printer. Seriously. Please. Do not buy an Anet A8, or another cheapy clone as your first printer, it's fairly likely to not be a fun experience. They're not good "beginner" machines, they're not useful ways to "get started," and there are better options for beginners on the market at just about every price range, regardless of what the reviews on the shady sites (that delete most negative reviews instantly) selling these say. If you've worked with printers enough to be at a skill level where purchasing this has a decent chance of not just being a massive headache, then you don't really need to ask these questions.

EDIT: If you're still going to, you need to buy the following things in order for it to be safe.

  • An external MOSFET for the bed. Do not, I repeat, do not buy a cheap clone printer with a large heated bed without buying an external MOSFET. The connectors and traces on the board were never meant to handle the amount of current being sent to the bed.
  • A new PSU. The easiest way is to just buy an ATX (desktop) PSU and run the 12v rails into the connectors. The cheap little power supplies these ship with are not putting out the wattage they claim, and are juuust barely enough to run the machine at full load, which means they're at risk of blowing out.
    Install a different firmware. By default, the Anet A8 and clones like it typically don't have thermal runaway protection enabled. This means, if something goes wrong with the heatbed or hotend, it will not notice, and will keep pumping out heat to the heating elements, possibly pushing them far past their specs can handle, and also causing possible fires.
  • Install an E3Dv6 like heatblock. Some of the factories making these clone frameworks still use E3Dv5 styled heatblocks, where the heater cartridge is held in place with just a setscrew. These can easily loosen and drop the heater cartridge, also, you guessed it, causing fires. A v6 style heatblock has jaws that sturdily clamp the heater cartridge in place, keeping it from falling.
  • Lastly, if you have to buy a cheapy clone, I suggest picking up a specific type of one. There's a common Prusa i3 derivative often found on eBay that uses a fairly thick, solid wooden frame instead of a flimsy acrylic one made of a bunch of separate parts. I don't remember what it's called, but they're always pictured with an Angry Bird printed in three colors on their beds, despite being single extruder machines. The melamine coated plywood making these up means they're much more reliable in the long run, and serve as a better base than the typical i3 clone, but they still cost about the same.
  • By the way, I'm sure either you or I will get a reply saying something to the effect of "I run an Anet A8 at stock and it works fine!!" Okay. Some Takata airbags deploy successfully. Not every Galaxy Note 7 caught fire. Most laptops subject to the Nvidia recall of the last decade didn't melt. That doesn't mean they aren't significantly more at risk to do these things, it just means the person in question didn't encounter the problem. These printers have documented risks, and just ignoring them is how a house caught fire last month.

EDIT 2: Oh, also, if buying something like an A8, buy a reel of GT2 belts. The cheapest clones use GT2 belts that aren't made out of standard materials, and unlike pretty much every other belt on the market, are susceptible to stretching.


Again, I'm just trying to spread the word about some shortcomings on some cheaper printers. Not saying this WILL happen to you, but 1) Knowing is half the battle, and 2) Safety First! :D Cheers! :mug:


P.S. I'm loving the ideas I'm finding on here! I'm going to make a White Labs Vial Holder that can be mounted to the wall. I use old vials to store tons of stuff. Having them handily available on the wall (or magnetic on the fridge!) would be super handy! :D
 
Last edited by a moderator:
I'll have to take/post photos this weekend, but I realized last week that a big part of why I take so long to make batches of mead is that on the weekends when I have time to brew I don't think I'll have time during the week to properly nutrify the must. I use goferm at the start + 3 nutrient additions, for a total of 4 nutrient blends per batch.

"What if," I thought, "I just pre-mix the nutrients on the weekend so I can just dump them in? But how will I store the pre-mixed nutrient blends?"

The answer was disposable 15ml centrifuge tubes + a 3D printed, 4 vial, stackable tube rack I designed. The rack design is available on Thingiverse.
 
Last edited by a moderator:
I've since upgraded my Anet A8 with an aluminum frame and installed Marlin firmware to add some safety features and calibration tweaking.

I've fooled around with FreeCAD to create a few homebrew-related files:

https://www.thingiverse.com/thing:2594006
https://www.thingiverse.com/thing:2593958

co2 Regulator thumbwheel and a Pinlock gas post depressurizer. Surprised neither of these was already on Thingiverse.

I saw that depresser a couple days ago and added it to my “to make” collection. Thanks for adding that! :mug:
 
Just posted my Pinlock QD to Barb adapter. It allows you to connect your pinlock QDs to a 1/2" hose. I'll be using mine for line cleaning, allowing me to clean out the QDs as well as the lines. :ban:

https://www.thingiverse.com/thing:2768993

Let me know if you have any questions/comments!
 

Attachments

  • IMG_5421.jpg
    IMG_5421.jpg
    275.3 KB · Views: 217
  • IMG_5423.jpg
    IMG_5423.jpg
    325.9 KB · Views: 224
  • IMG_5425.jpg
    IMG_5425.jpg
    736.1 KB · Views: 209
Interested in what others are doing as well. Diving into the 3D printing world Wednesday if my Ender 3 V2 shows up on time.
 
Interested in what others are doing as well. Diving into the 3D printing world Wednesday if my Ender 3 V2 shows up on time.
Everyone spends a while on Thingiverse (and now Prusa's website) for models to print. After a bit, you either find a way to make your own or the fun tapers off. If you are not the CAD type, Tinkercad is really easy to get going with. You add a positive shape, then add a negative shape, and then merge them. In that way, I used a "cube" positive and a "cube" negative inside it to make a tray for my coffee scale. You just have to look at things a little differently. I made that Tilt rack above in Tinkercad.
 
I've got a some background in drafting and CAD. In high school I took 3 years of drafting/architecture but am old enough we used paper and pencil. As a first year engineering student my engineering drawing class that was a mix of mechanical drawing and CAD with an early 3D modeling package. Early in my career I did a lot of Autocad, primarily industrial electrical drawings. Later I got pretty good with Sketchup for modeling planned woodworking and remodeling projects. I hadn't used it for several years but picked it back up quickly when we did a basement remodel in 2019. A coworker suggested Tinkercad and Fusion 360. Conceptually they appear similar to Sketchup so I imagine I'll be able to pick them up quickly. Planning to peruse YouTube for tutorials this weekend since my fermenters are full.

I've already been perusing the Thingverse site and found a few things I want to make but the first thing I'll probably print is some simple small parts to fix the@#$% drawers on our fridge. I see that kind of thing being my primary use.
 
I've already been perusing the Thingverse site and found a few things I want to make but the first thing I'll probably print is some simple small parts to fix the@#$% drawers on our fridge. I see that kind of thing being my primary use.

The ability to create functional prints really is what makes 3D printing shine in my opinion. I used mine to print some leg extensions for our coffee table to raise it up a bit for eating and they both work better and look nicer than any non-purpose-designed part you could get on Amazon.

Or maybe I should say the first week after you get it running right. :)

This point cannot be stressed enough. If you expect to get your printer, plug it in, and start printing, you're going to be in for a Bad Time. Spend the time up front to get it dialed in and calibrated - it's frustrating (and you'll end up with a lot of Benchys!) but it's worth the effort.
 
I printed an o-ring "holder" for the lid of my FastFerment to lock the sealing o-ring into place. Without this holder the o-ring would squeeze out and fall into the fermenter if the lid was tightened enough to stop it from leaking CO2. The ring captures the o-ring against the outside of the lid to keep it in place no matter how tightly the lid is screwed down. The ring is sealed to the lid with the original foam gasket and some keg lube, then the o-ring is fit into the groove between the lid and the ring.

https://www.thingiverse.com/thing:4642703
IMG_1704.jpg IMG_1706.jpg
 
Back
Top