Help with finding lines within freezer walls

Homebrew Talk - Beer, Wine, Mead, & Cider Brewing Discussion Forum

Help Support Homebrew Talk - Beer, Wine, Mead, & Cider Brewing Discussion Forum:

This site may earn a commission from merchant affiliate links, including eBay, Amazon, and others.

Gloogloos

Member
Joined
Apr 29, 2020
Messages
10
Reaction score
4
Hello everyone, new to the forum, been brewing for about a year and some change and am moving into kegging!

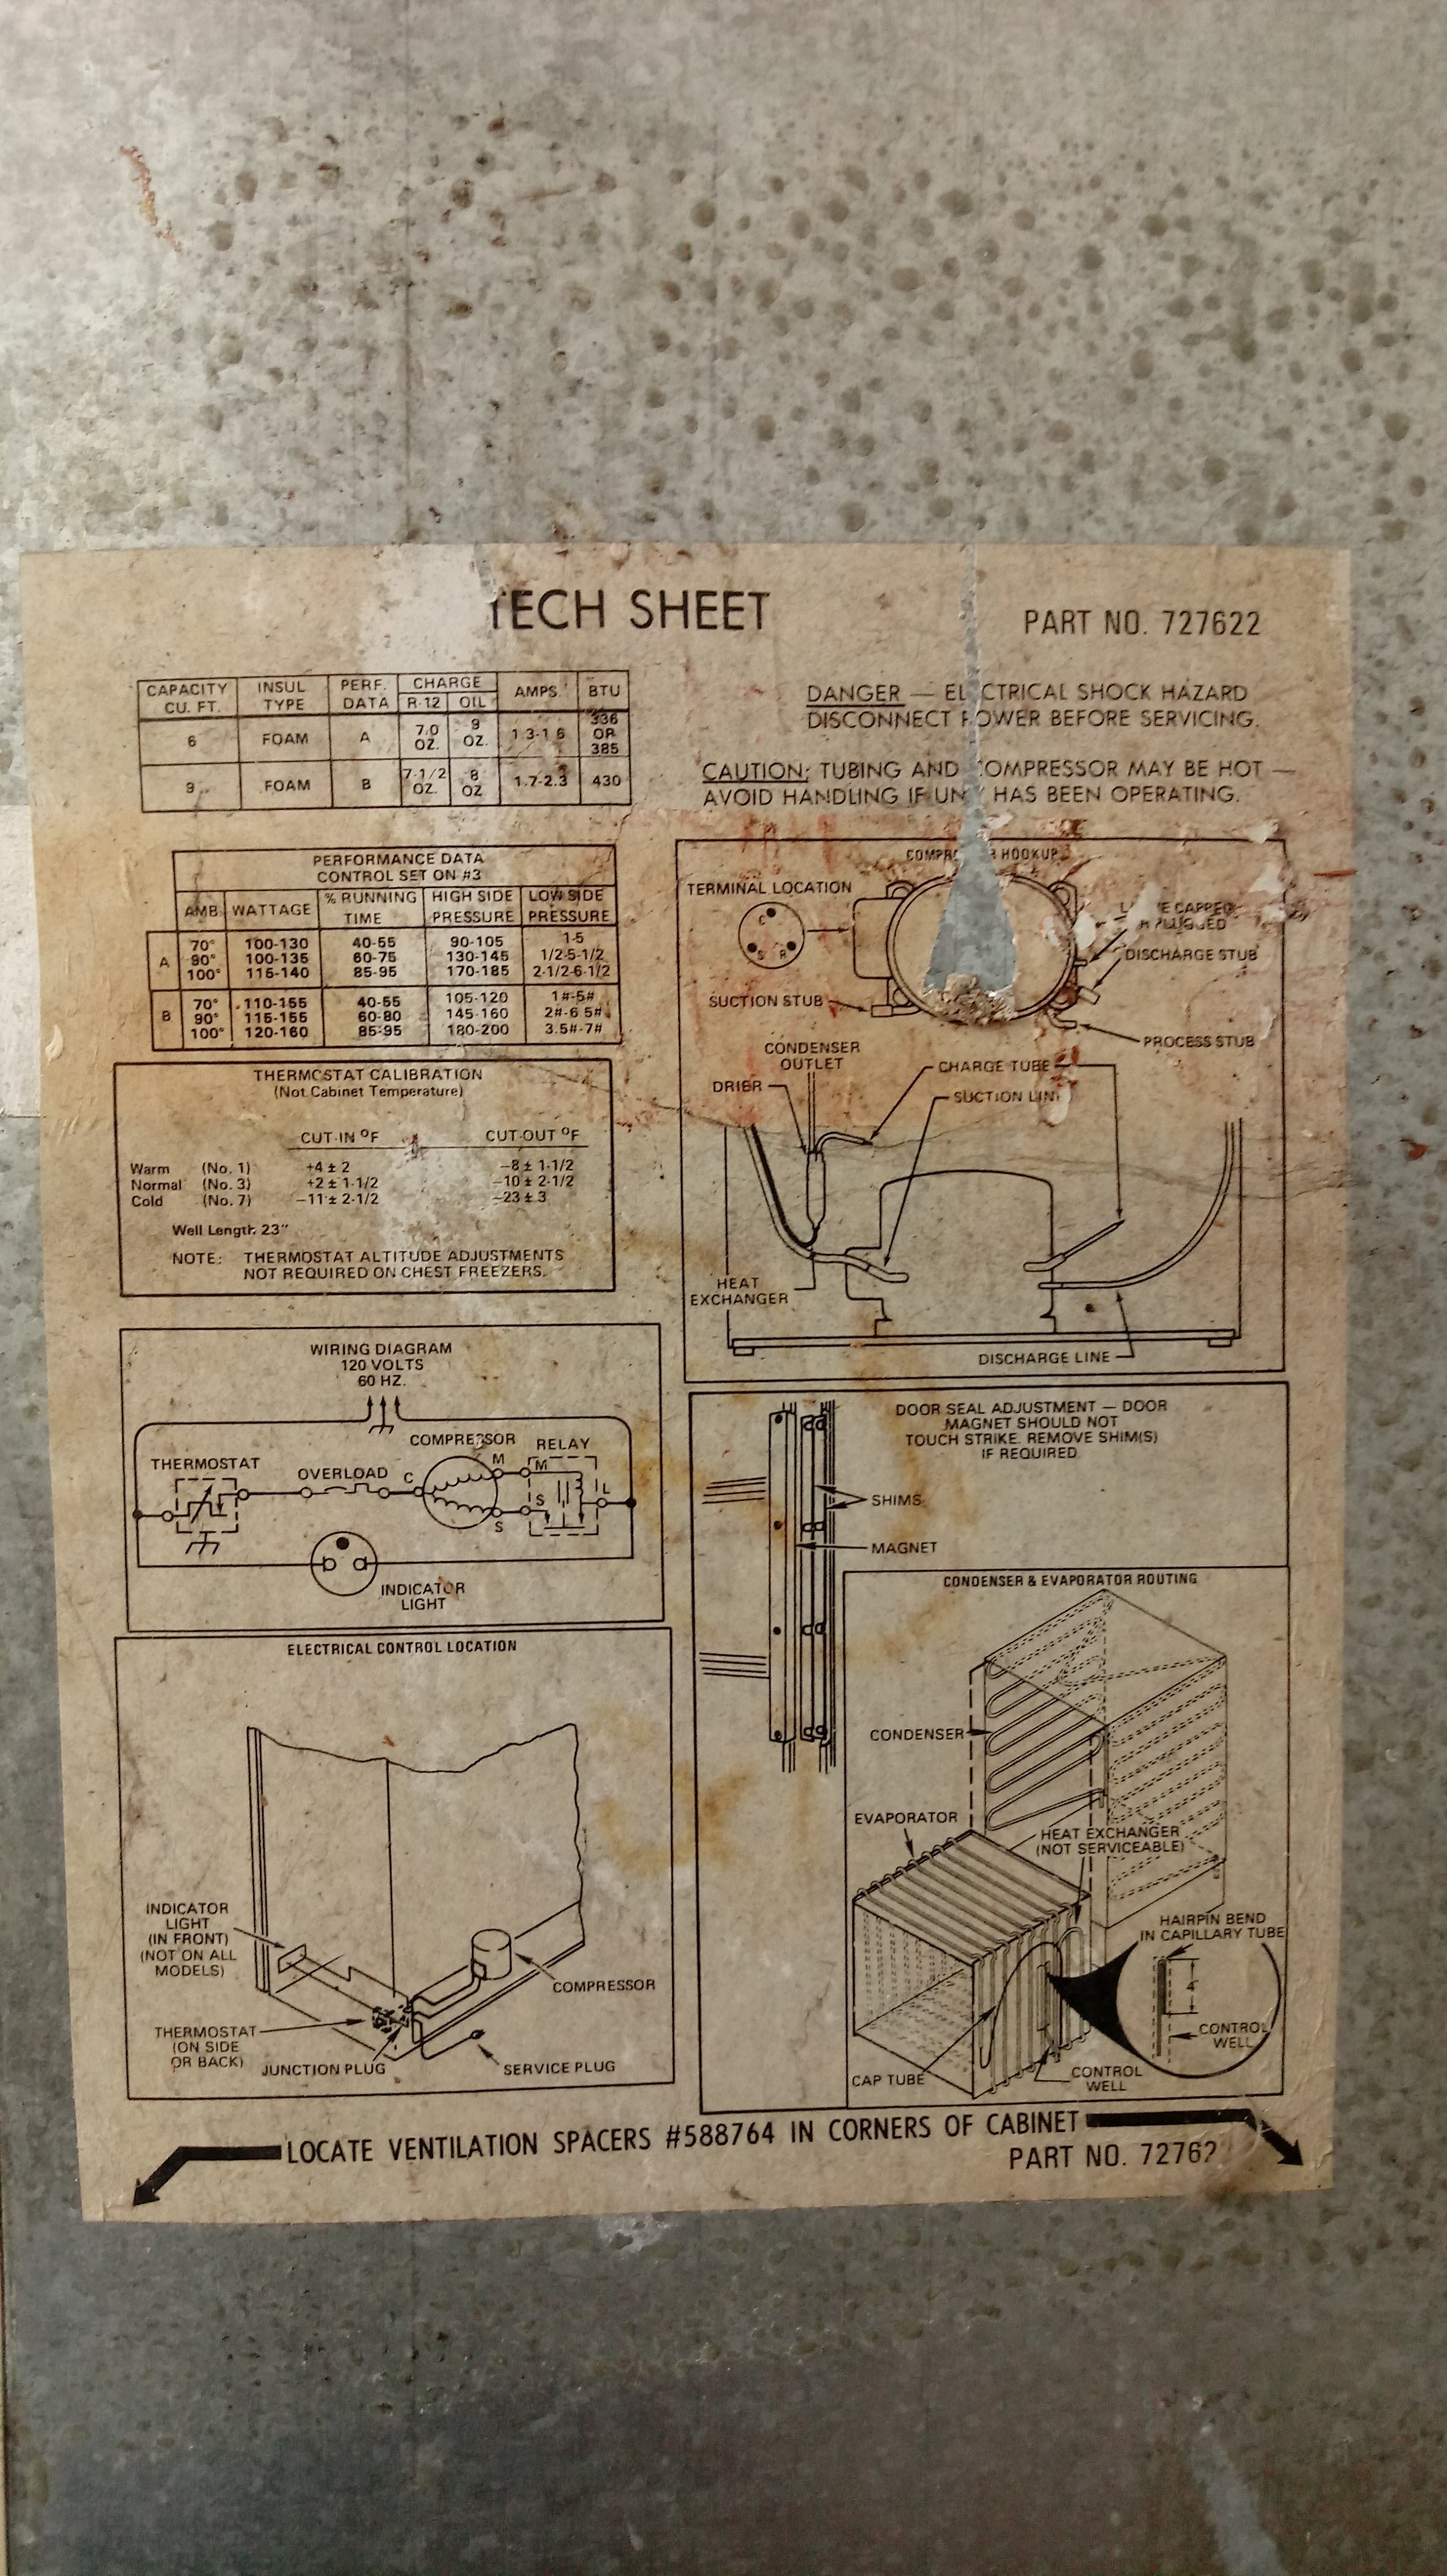
I recently got a decent sized upright freezer, comfortably fits 4 cornies and with some room to play with. I live in a pretty small apartment and due to where the keezer will be the best place to put the taps will be just above the door (on the door might work, but a wall is right next to it, and its only a matter of time before I bash the faucets into the wall while opening). The freezer has a diagram on the back, one picture shows the evaporation lines, the other shows condenser lines. The issue is that I dont undertand this damn thing at all, ive included both an image of the freezer itself and the diagram, the lower right window is the one in question. The condenser diagram is clear and is obviously the freezer, but the evaporator one confuses me.

Its not even the same shape or size as the freezer itself, im not sure if its a different unit (as there is data for two different units on this card) or if its just not to scale, and just meant to show where the lines are regardless of how long they are. I suspect that the latter is the case, and those dashed lines are meant to demonstrate that its just scaled down to fit. If that is the case it doesnt look like its safe to drill anywhere except the very back of the top, the back itself and the door. Got it off craigslist for super cheap and it works just fine, so I wont want to break it!

0429201046.jpg
0429201022a.jpg
 
The best advice I have seem to try to not screw yourself, was to take the smallest nail or drill bit you have, and place a tiny hole where you would like to make a bigger hole. Then, move the nail or bit around inside said hole, and see if you can feel a coil or anything close. This can work, but can also be a crap shoot. You may find a good spot when you drill a 1/16" hole, but you need a 7/8" hole to install a faucet. And by the time you get to the 7/8" hole, you may find trouble.

My suggestion would be to go through the door. Place something on the wall that can absorb a small bashing from a faucet or 2, while doing minimal damage to the apartment wall. Maybe hanging a bar mat from some command strip hooks? Just spitballing here.

Best of luck!
 
ill probably have to do that, I can put a door stop to prevent the door from hitting the wall, it will just limit the range of the door. The other option would be to run through the back and over the top but that would be a pain in the ass. Door it will be!
 
With the freezer lines going like that, both around and across, there's no safe place to drill, except maybe the back. But the door is safe. You may want to reinforce the back of the door, depending on how rigid it is, and what materials are used. You're lucky to have one of those diagrams! It's a true crime nowadays for the lack of details supplied with appliances, while it's become so much easier to supply them...

Since you're building new, use EvaBarrier lines (and push fit adapters) for both beer and gas. Plenty of threads on those. And stainless steel shanks and faucets (front sealing).
 
Just ordered everything, SS shanks, nipples, and front sealing intertaps, only ordered vinyl tubing though, havent heard of these EvaBarrier lines, ill be sure to check them out. Tubing was cheap enough and hasnt even shipped yet.
 
I'm confused by the diagram too. Unit looks like one that would work well with a tower but diagram seems to day their are evaporator coils in the top. What kind and model number is that freezer>
 
Kenmore 198.8230982, I cant find anything online in regards to it and kenmores own manual directory doesnt have it listed. I have seen someone say that running the freezer with the door open will cause condensation accumulation where the condenser lines are present so im giving that a shot now to verify there are lines in the roof.
 
It looks like the back wall is wide open for a hole.
Evaporator wraps around inside of cabinet side-top-side while the condenser wraps around the same way.
I'd have zero issues putting holes through the back, but I'd still start from the inside with a pilot hole through the liner and probe through the insulation to the back skin...

Cheers!
 
You got to be very careful when drilling a pilot hole through the shell. The tubes are spot welded to the inner and outer skins. You only want to make a shallow divot into the skin to check for hollowness behind it, without touching the tubes if they happen to be right behind it.

Aside from frost lines appearing, I've read an old fashioned trick to see where evap tubes are is painting the shell with a paste of baking soda and water or alcohol. Don't remember the exact details.
 
From looking at that diagram, I THINK it's saying there's a V-shape of tubing across the top -
you MIGHT be able to drill through there, towards the back, and be safe - but safer still is going through the door.
You were mentioning a backstop for the door swing, maybe attach a chain from the door to the body, limiting the swing, unless you specifically want to open it all the way, in which case you disconnect the chain.
 
@day_tripper Back wall is good to go for sure, just will take a bit of leg work to orient everything back to the front, doable, just not ideal (my apartment is stupid limited in space, so even putting things behind the kegerator begins to take up space! But I need somewhere to put all these extra feet of line anyway, might as well route it over top. And the diagram just confused me due to the size difference in the two models and the that there was no indication that it was scaled irregularly, that and the fact there is data on two models in this sheet. I dont look at these things for a living, im a damn pathologist, my "diagrams" are signal pathways, you drill all the fridges you want, i just dont want to mess up my only spare :)

@IslandLizard, I agree and I am not touching the top or sides AT ALL. Im going through the back if I can make it work, front if I cant. The method your referring to ive seen as corn starch and alcohol. As the evaps heat up the shell there will be localized evaporation of the solvent, leaving behind the solute as a brighter, drier deposit. Baking soda might work too, but corn starch will create a thicker solution so it would be easier to use on slopes or vertical surfaces and will be less likely to dilute drying areas, water evaporates at a higher temp so alcohol is just quicker acting. Also checked out those lines you mentioned, cancelled my orders for vinyl tubing and picked those up instead, even with all the compression fittings and extra stuff, still came out cheaper than vinyl. Only doing it for my liquid lines though, already got manifolds and regulators fitting 5/16ths and already have the tubing anyway. I saw some people using it for gas lines, but even with the gas permeability of vinyl, the high pressure CO2 environment would allow for very little diffusion of oxygen. Still would be some though, so maybe in the future.

Thanks for the help my dudes! Ill be sticking to the front or back on this one. Ill put together pictures and a walk through of my build. Won't be as cool as some of the others of course, but it might be fun anyway, function over form over here! Super stoked for this build, I almost have more fun building **** for brewing than brewing itself.

Cheers!
 
From looking at that diagram, I THINK it's saying there's a V-shape of tubing across the top -
you MIGHT be able to drill through there, towards the back, and be safe
I was looking at the same area. It depends on how close those lines are in the inner shell to put a tower somewhere near the middle.

I have full height upright keezer with 5 taps coming out the door. It's not the prettiest yet very functional.
If I had half or 3 gallon corny kegs I could put those above the full height ones, and have 10 taps, 2 rows of 5... Now you've got me thinking about that again.
 
@jrgtr42 So the V shape area is definitely fine, the issue is the lower diagram shows lines crossing the top sides and bottom, and pretty dense. Drilling anything in that would be dubious as all hell.

@IslandLizard I cant handle that many taps, Im only planning 2 for beer and 2 for mixed drinks and carbonated juice cocktails! Makes me want to have a brew club, have a whole damn bar to ourselves :)
 
I thought the issue was getting lines into the unit (like gas, temp probe, fan power, etc). I'd bring those through the back.
As for taps, if they can go on the door that's definitely the safest route, because trying to punch a tower through that evaporator (never mind missing the cross-over condenser tubing) would be sphincter tightening at best ;)

Cheers!
 
I saw some people using it for gas lines, but even with the gas permeability of vinyl, the high pressure CO2 environment would allow for very little diffusion of oxygen. Still would be some though, so maybe in the future.
Yeah, I thought that too, but then @doug293cz reminded us again about partial pressures...
I still use thick walled beer vinyl lines for gas supply. They're fairly short, but will switch to EVABarrier for those soon. Maybe replace my 19' long BevSeal Ultra 235 lines with 5-6' of EVABarrier too. I don't mind losing those stiff large coils lying on top of the kegs.
Back wall is good to go for sure, just will take a bit of leg work to orient everything back to the front,
How do you envision beverage lines coming out the back? They need to be kept cold...
 
@IslandLizard

The cold issue is definitely paramount. The idea (now at any rate) is to bring them out of the kegerator as high as possible ( I have never worked with this tubing so I have no idea what to expect as far as turn radius is concerned), all the lines would be bundled and wrapped in thin insulation tightly. All of this would be fed through PVC pipe wrapped in pipe insulation. I plan to use 4mm tubing so volume of liquid in the tubing is very little, a few ozs at most, so if that warms up between pours Im not too worried, during pours I hope that is enough. My biggest concern is how hot the surface of the freezer gets in use, but I dont have my external temp controller yet so in use a kegerator that might not be so bad. Nonetheless, there would be at least a few centimeters of airspace between the PVC and the surface so as to not exchange heat.

The partial pressure issue is definitely valid, and ill have to visit his argument as my gas pressure understanding was definitely faded since college :). But surface area will be very limited in the gas line so I cant imagine the difference will be terribly noticeable. This could be determined chemically too, might be fun experiment to come up with!

Going through the front would be easier, I would just have to coil my lines inside to the get proper length. The fun thing about this freezer is its height, its just a tad too short to go through the front, and a tad too tall to build a full tower towards the back. The best place, for my height at any rate, is just above the door. Beggars cant be choosers of course, so it will probably be front.
 
So, with beer lines coming out the back, over the top, in some sort of chilled pipe, are they going into some sort of tower placed toward the front? Would that tower be mounted on something? You can't drill holes in that front area as the condenser tubes are there (the bottom of the V).

Towers really need to be chilled. It's to keep the shanks and faucets cold too.
 
If the OP were to go with 4mm ID EVAbarrier tubing, it only takes a scant six feet to tame beer dispensed at up to ~12 psi (five of my six faucets have been running on six foot 4mm ID lengths for a few months now with lovely pours). With the crazy tight bend radius (I have pics that suggest verging on 1") it's NBD to coil a run atop a corny or sixtel keg.

Don't try this with Bev Seal Ultra 235 as both the bend radius and 1/5th" ID will work against the notion...

Cheers!
 
@day_trippr thats good to know, I would love to keep the majority of my tubing within the freezer and that would make it simpler. And im planning to use the same 4mm tubing you use so putting it atop the kegs should be easy then.

@IslandLizard My buddy and I were discussing this actually, it likely would need active cooling. The idea would be that all of it would pipe into a box on the top front of the freezer, flush with the front of the door and the shanks would be housed within, all insulated. My original idea was that the each each pair of kegs (left 2 and right 2) would come come through holes in on their side, within the front 3 or 4 inches of the freezer. This way the box that would contain all the shanks and insulation would only contain a few inches of the lines. The bulk of the lines would be in the freezer. I didnt think too much about all the steel and how much heat it would would keep and conduct and now that I know that virtually the entirety of the ceiling cant be drilled through thats a no go regardless. The more I look at this the more the door seems the best bet, sides are out of the question for many reasons now and having faucets directly on the back would just be a PITA to work around (I would need ample free space on both sides to work with).

Only way I can imagine cooling a system that went over top would be running a fluid loop with a pump through all of it, with a reservoir within the freezer. Seems a like a bit much for my current situation.
 
Back
Top