You are using an out of date browser. It may not display this or other websites correctly.
You should upgrade or use an alternative browser.
You should upgrade or use an alternative browser.
Heatstick = awesome!
- Thread starter BackBayBrewing
- Start date

Help Support Homebrew Talk:
This site may earn a commission from merchant affiliate
links, including eBay, Amazon, and others.
davidr2340
Well-Known Member
I have one of these left over from an old aquarium - it should work, right?
Look at you using you using your "old aquarium stuff"!!!

s2cmpugh
Well-Known Member
You applied silicon after the JB weld? If so the silicon may be drying first, and not allowing the JB weld to cure properly? Just a thought
I let the JB weld dry for about 4 days, tested it only to find it tripping the GFCI, and then added aquarium silicone around the threads on the reducer AND at the heating element.
I brewed with it on Saturday and it worked OK. No tripping of the GFCI and it brought my mash and sparge water up to the temp. I wanted.
I did see some bubbles come up around the threads where the reducer attaches to the pipe so maybe I"ll apply a tad more silicone to be safe.
Thanks for the help guys!
Look at you using you using your "old aquarium stuff"!!!

Ha - I thought through what I might possibly need for this hobby when I broke down the tank. Turns out, not much.
I built a 2000 watt heatstick a couple months ago. I did a 90 degree stick with a "U" on the top to hang over the top of my kettle. I put a 20 amp plug on the heatsick, which I plug into a waterproof switch box that has a 20 amp GFCI outlet and switch. This has a regular 15 amp plug on it that I only plug into circuits that I know are rated for 20 amps. I have only used it once so far, but it worked like a charm. Once I got to a boil I could dial back the stove burner to Med Lo and had a very nice boil.
I wasn't real crazy about the way the nut held the element in the tube, so I found a stainless steel machine bushing of the approximate size. I had to enlarge the buching a bit to fit over the threads of the element and grind it down a bit to fit inside the nut but I feel the element is a lot more secure. It didn't take too much JB Weld to seal it up. I let it cure for about a week and then put it in a pail of water for a couple days. No leaking so I figured I was good to go.
It makes brewing in the winter a lot more user friendly than standing outside in a cold garage over a propane burner.

$172.35
2 Inch Tri Clamp Keg Manifold With Ball Lock Posts, Pressure Gauge, PRV (0-30 PSI) – Homebrew, Fermentation, Kegging System
wuhanshijiayangzhiyimaoyiyouxiangongsi

$7.79 ($7.79 / Count)
Craft A Brew - LalBrew Voss™ - Kveik Ale Yeast - For Craft Lagers - Ingredients for Home Brewing - Beer Making Supplies - (1 Pack)
Craft a Brew
![Craft A Brew - Safale S-04 Dry Yeast - Fermentis - English Ale Dry Yeast - For English and American Ales and Hard Apple Ciders - Ingredients for Home Brewing - Beer Making Supplies - [1 Pack]](https://m.media-amazon.com/images/I/41fVGNh6JfL._SL500_.jpg)
$6.95 ($17.38 / Ounce)
$7.47 ($18.68 / Ounce)
Craft A Brew - Safale S-04 Dry Yeast - Fermentis - English Ale Dry Yeast - For English and American Ales and Hard Apple Ciders - Ingredients for Home Brewing - Beer Making Supplies - [1 Pack]
Hobby Homebrew

$39.22 ($39.22 / Count)
Brewer's Best Home Brew Beer Ingredient Kit - 5 Gallon (Mexican Cerveza)
Amazon.com

$10.99 ($31.16 / Ounce)
Hornindal Kveik Yeast for Homebrewing - Mead, Cider, Wine, Beer - 10g Packet - Saccharomyces Cerevisiae - Sold by Shadowhive.com
Shadowhive

$22.00 ($623.23 / Ounce)
AMZLMPKNTW Ball Lock Sample Faucet 30cm Reinforced Silicone Hose Secondary Fermentation Homebrew Kegging joyful
无为中南商贸有限公司

$53.24
1pc Hose Barb/MFL 1.5" Tri Clamp to Ball Lock Post Liquid Gas Homebrew Kegging Fermentation Parts Brewer Hardware SUS304(Gas MFL)
Guangshui Weilu You Trading Co., Ltd

$58.16
HUIZHUGS Brewing Equipment Keg Ball Lock Faucet 30cm Reinforced Silicone Hose Secondary Fermentation Homebrew Kegging Brewing Equipment
xiangshuizhenzhanglingfengshop

$33.95
Five Star - 6022b_ - Star San - 32 Ounce - High Foaming Sanitizer
Bridgeview Beer and Wine Supply

$53.24
1pc Hose Barb/MFL 1.5" Tri Clamp to Ball Lock Post Liquid Gas Homebrew Kegging Fermentation Parts Brewer Hardware SUS304(Liquid Hose Barb)
yunchengshiyanhuqucuichendianzishangwuyouxiangongsi

$176.97
1pc Commercial Keg Manifold 2" Tri Clamp,Ball Lock Tapping Head,Pressure Gauge/Adjustable PRV for Kegging,Fermentation Control
hanhanbaihuoxiaoshoudian

$33.99 ($17.00 / Count)
$41.99 ($21.00 / Count)
2 Pack 1 Gallon Large Fermentation Jars with 3 Airlocks and 2 SCREW Lids(100% Airtight Heavy Duty Lid w Silicone) - Wide Mouth Glass Jars w Scale Mark - Pickle Jars for Sauerkraut, Sourdough Starter
Qianfenie Direct
wilserbrewer
BIAB Expert Tailor
Just plugged mine in to test - we have heat! 3 seconds plugged in and out of water is apparently enough to almost burn you, lol. Didn't expect it to hear up so fast.
Not only will it heat up fast...it will burn, glow, and then go snap crackle pop bang, and never heat up again...never, never plug in dry!
bja
Well-Known Member
Just plugged mine in to test - we have heat! 3 seconds plugged in and out of water is apparently enough to almost burn you, lol. Didn't expect it to hear up so fast.
Yeah but it didn't do that because I unplugged it after a couple seconds.
I'm a brewing noob but I'm not a moron.
Really?
jk
I've learned that most NEVER EVER DO THIS rules aren't actually never do this rules. They're just good guidelines. I don't mind bending guidelines when I know the risks, i.e. plugging in a heatstick for 3 seconds to test the connections before I seal it all up.
Pixalated
Well-Known Member
That's a bit dramatic 
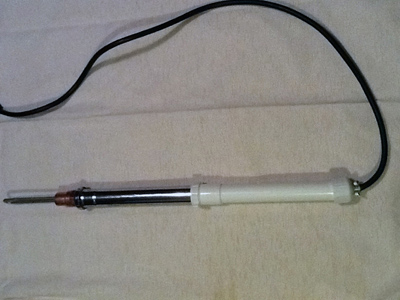
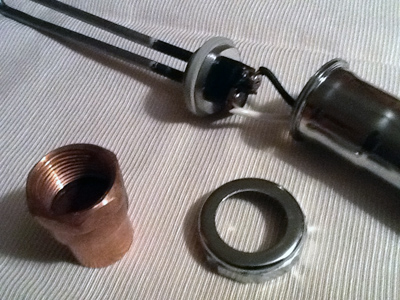
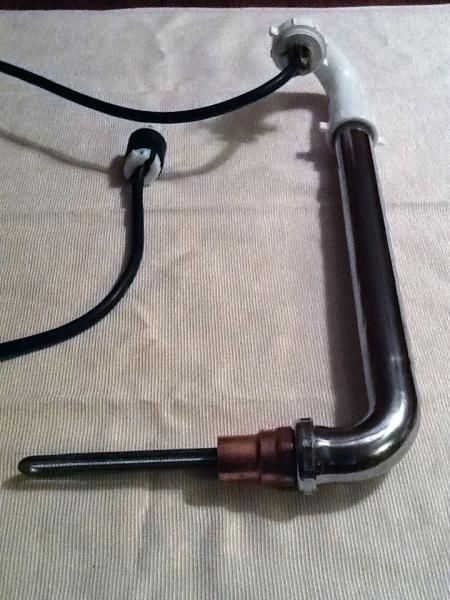
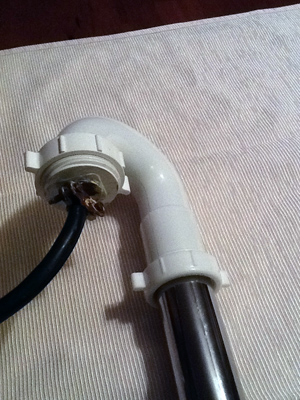
Heatsticks with no jb weld.
I rounded the nut on the heater element and this allowed it to slip back in the metal drain pipe which then allowed the 1 1/2" to 1 1/4" drain pipe nut to seal on the gasket. Heater element was first pushed through the gray gasket and was able to use a 1" copper female pipe thread fitting to draw the heater element to the gray gasket. My only concern is the gray gasket and may replace with a silicone high temp food grade gasket.
Haven't done a full brew session yet but did bring 7gal of 120º starting water to boil in 35 min using both 2000 watt sticks. Heat rose at a rate 10º every 4 min.


federaleigh
Member
Heatsticks with no jb weld.
I rounded the nut on the heater element and this allowed it to slip back in the metal drain pipe which then allowed the 1 1/2" to 1 1/4" drain pipe nut to seal on the gasket. Heater element was first pushed through the gray gasket and was able to use a 1" copper female pipe thread fitting to draw the heater element to the gray gasket. My only concern is the gray gasket and may replace with a silicone high temp food grade gasket.
Haven't done a full brew session yet but did bring 7gal of 120º starting water to boil in 35 min using both 2000 watt sticks. Heat rose at a rate 10º every 4 min.
How is this working out for you? Any leaks? Did you keep the gray gasket or go with a new one?
Finding a gasket was not easy. I ended up using a 1" Tri Clover Gasket Silicone.
Here's the link:
http://www.brewershardware.com/1-Tri-Clover-Gasket-Silicone-TC10SILGASKET.html
I had to alter it so I didn't get leaks. The copper fitting I used I ended up cutting the excess copper off the fitting so I basically just had a copper nut that screwed onto the stick. What I had left over was used as a punch for the center of silicone gasket. I sharpened the copper pipe fitting end and centered it on the gasket and used a hammer to punch out the center hole so that it fit snugly over the heating element. I also had to carefully cut of the raised ring that runs on both sides of the gasket so that it was flat on both sides. The reward off all this is that I now have a stick I can take apart and replace elements if I need to.
I have brewed 7 12 gallon batches so far with no problem.
Rhuarc
Well-Known Member
I have not read the entire 53 pages in this thread, but do have a question. What is your average indoor stove element? I would love to build one of these 2000W sticks to be able to compliment the electric stove using a 10g pot. Has anyone tested boil times for 7g water using both the stove element and a heat stick?
Pixalated
Well-Known Member
I brew in a bag, and I can bring 8 gallons to mashing temps in under 30 minutes. After mashing it takes under 30 minutes to bring it to a boil. My pot is wrapped in reflectix which helps a lot.
Rhuarc
Well-Known Member
I brew in a bag, and I can bring 8 gallons to mashing temps in under 30 minutes. After mashing it takes under 30 minutes to bring it to a boil. My pot is wrapped in reflectix which helps a lot.
Is this using an electric stove and heating element?
Pixalated
Well-Known Member
Yes, I have the electric element on and the heat stick.
After the wort comes to a boil, I can shut off the stove and still maintain a vigorous boil. This slows down my evaporation a bit.
After the wort comes to a boil, I can shut off the stove and still maintain a vigorous boil. This slows down my evaporation a bit.
NBABUCKS1
Well-Known Member
Not sure how to search the thread but...
I did my first boil last night w/ my 2000 watt stick in my keggle. It Boiled, but it was not vigorous. If I put two heat sticks in there it is vigorous, but w/ one it's a light boil.
Will insulating w/ that metallic bubble wrap help enough to make for a more vigorous boil? Or is it a waste of money?
What volume of water are you heating? I get a vigorous boil using 2600 watts and 7 gallons of wort.
Insulating the kettle will help as well as partially covering the top of the kettle. I wrap my kettle with a movers blanket. If the metallic bubble wrap is cheap okay, but otherwise find something around the house.
You might have a voltage drop problem if you are not close to the main breaker panel. If you have a volt meter check the voltage at the socket with no load and then with one stick running, see if the supply voltage takes a big dip.
Heatsticks with no jb weld.
I rounded the nut on the heater element and this allowed it to slip back in the metal drain pipe which then allowed the 1 1/2" to 1 1/4" drain pipe nut to seal on the gasket. Heater element was first pushed through the gray gasket and was able to use a 1" copper female pipe thread fitting to draw the heater element to the gray gasket. My only concern is the gray gasket and may replace with a silicone high temp food grade gasket.
Haven't done a full brew session yet but did bring 7gal of 120º starting water to boil in 35 min using both 2000 watt sticks. Heat rose at a rate 10º every 4 min.
I took your idea and used a 1" NPS stainless steel lock nut and a silicone o-ring. Got the lock nut from bargainfittings.com. I could not get a seal without it. I thought filing the nut on the element would be much more difficult, but it's made of a very soft material (aluminum I guess) and a bastard file made quick work of it, took me about 30 minutes. I will be testing the assembly this week sometime.
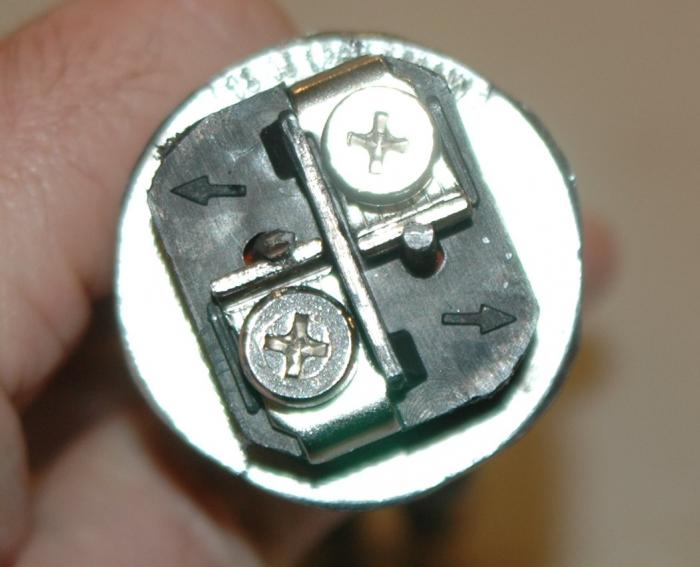
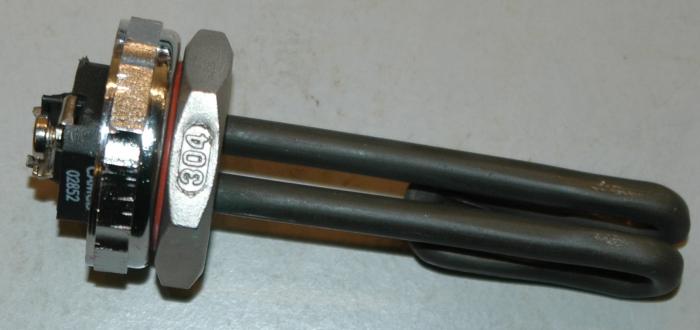

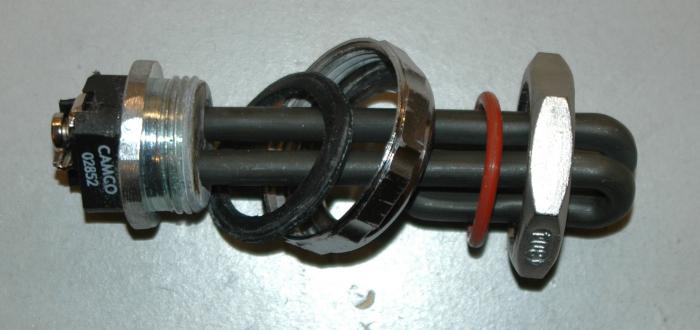
TheCanisDirus
Well-Known Member
Would love to see a DIY for this sealant-free stick! I need to make one and would prefer to avoid using any sealants if possible.
TheCanisDirus
Well-Known Member
Finding a gasket was not easy. I ended up using a 1" Tri Clover Gasket Silicone.
Here's the link:
http://www.brewershardware.com/1-Tri-Clover-Gasket-Silicone-TC10SILGASKET.html
I had to alter it so I didn't get leaks. The copper fitting I used I ended up cutting the excess copper off the fitting so I basically just had a copper nut that screwed onto the stick. What I had left over was used as a punch for the center of silicone gasket. I sharpened the copper pipe fitting end and centered it on the gasket and used a hammer to punch out the center hole so that it fit snugly over the heating element. I also had to carefully cut of the raised ring that runs on both sides of the gasket so that it was flat on both sides. The reward off all this is that I now have a stick I can take apart and replace elements if I need to.
I have brewed 7 12 gallon batches so far with no problem.
Would you be able to post dissembled pics of your new set-up? Going to try building one of these but def want to stay away from any sealant.
I took your idea and used a 1" NPS stainless steel lock nut and a silicone o-ring. Got the lock nut from bargainfittings.com. I could not get a seal without it. I thought filing the nut on the element would be much more difficult, but it's made of a very soft material (aluminum I guess) and a bastard file made quick work of it, took me about 30 minutes. I will be testing the assembly this week sometime.
I did this as well. Never thought to post it. I didn't need to round the element, simply center it and tighten the nut. I did use a dab of sealant on the threads with Teflon tape. I don't trust tape on coarse threads like that.
Sent from my SCH-R970 using Home Brew mobile app
TheCanisDirus
Well-Known Member
1" Silicon sealing washer (if you search silicon gasket you'll never find it) also available from Zorro tools. Got mine off them via eBay.
Sent from my SCH-R970 using Home Brew mobile app
Any pictures of your version without the filed element collar? Curious to see how it fits without the filing.
No, I'd rather not disassemble it. It simply fit inside the bell of the pipe and I placed the nut over it. It was a hassle to keep it strait as I tightened everything together. A round element base would have been better, but this worked. The threads received a bit of Teflon tape and silicon sealant. The sealant should be food safe. Mine wasn't, but there isn't really any exposed and I let it cure for a week, then boiled with it in 5% ph for an hour to remove any possible flavors/surface contaminates. A sealing washer goes over the compression nut, and a 1" npt ss nut over that. Also used Teflon tape and a bit of sealant on the threads here. I was worried that wort might make its way through the threads and short out the stick, that is the reason for the sealant on the threads.
BTW, I did not seal contacts on the backside of the element with jb weld or whatnot. I figured that if it is built right there is no need for it. It works great!
Sent from my SCH-R970 using Home Brew mobile app
BTW, I did not seal contacts on the backside of the element with jb weld or whatnot. I figured that if it is built right there is no need for it. It works great!
Sent from my SCH-R970 using Home Brew mobile app
I just don't get how a good seal is being made between the pipe and compression nut. Does the rounded element go in deep enough for the flat sealing washer to contact both surfaces? If so then that is perfect!
Sent from my SCH-R970 using Home Brew mobile app
Sent from my SCH-R970 using Home Brew mobile app
wilserbrewer
BIAB Expert Tailor
I just don't get how a good seal is being made between the pipe and compression nut
As said above, with Teflon tape and silicon sealant.
The weak link will still be the pipe connection and plumbing nut.
I have made and repaired heat sticks for years, and have found cleaning contact surfaces with rubbing alcohol and sealing with silicon sealant to work pretty darn well, yea nothing lasts forever, but that's why I keep a spare or two ready to go.
Fwiw, I would still coat the electrical connections on the element with silicon sealant as an extra measure. Also, leave the end of the stick open for a few days, as I found out the hard way uncured sealant is a conductor not an insulator.
Wilserbrewer
Http://biabbags.webs.com/
Similar threads
- Replies
- 6
- Views
- 2K


