• Please visit and share your knowledge at our sister communities:
  • If you have not, please join our official Homebrewing Facebook Group!

    Homebrewing Facebook Group

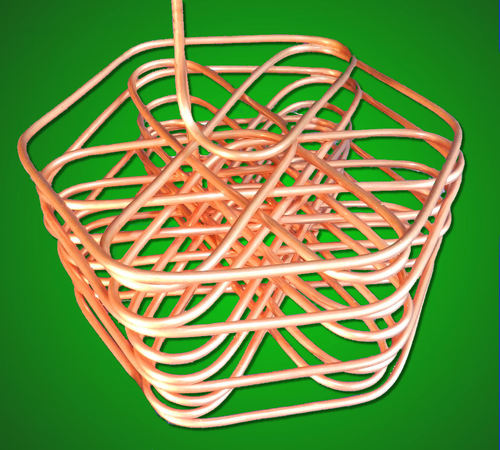
Have not seen this wort chiller before

Homebrew Talk

Help Support Homebrew Talk:

This site may earn a commission from merchant affiliate links, including eBay, Amazon, and others.
Wow seems the folks in this thread have mostly negative opinions about this design however the mood of the forum is often slow to change until clear evidence to the contrary. I on the other hand am very curious to test especially with the brew2live's positive report.

I already have a 25 ft 3/8" conventional IC but am very interested in getting something that is more efficient and will work for if I ever move up to larger batches. Don't have a recirculating system to whirlpool and don't really like stirring the wart manually because 1) I am lazy 2) would rather spend that time cleaning or getting my carboy ready and 3) I worry about introducing nasties (although don't think this has ever happened in the past).

So my question is how difficult to replicate this design as a DIY. I have been studying the picture and think it may not be too difficult. From the overhead shot it looks like you could use 4 cylinders (such as spray paint cans) to help form the tube in this design for the inner pattern. For the outer portion of the pattern maybe carefully bending by hand or using more cylinders can help with the 90 bends.

Looking at pricing:
1/4" copper tubing 100ft $52-63 (coppertubingsales.com vs. orange big box respectively)
1/2" copper tubing 50ft $49-57

If you DIY the cost of copper for the "thing" chiller only is about 1/4 that of the standard design of 1/2" 50ft. The cost of water savings over time may also make this more fiscally appealing.

Anyone willing to try to DIY this and share how you did it? I might I have a go at it since I want to get myself a b-day present and I like tinkering.

If I do it I am going to double the length of copper. Brew2Live, would a 50ft length of this design be submerged in 5 gallon of wort? Can garden hose fittings be soldered on to this small of tube?
 
Oh, same guy on ebay also has this design

Copper tube pic.JPG
 
So my question is how difficult to replicate this design as a DIY. I have been studying the picture and think it may not be too difficult. From the overhead shot it looks like you could use 4 cylinders (such as spray paint cans) to help form the tube in this design for the inner pattern. For the outer portion of the pattern maybe carefully bending by hand or using more cylinders can help with the 90 bends.

If I do it I am going to double the length of copper. Brew2Live, would a 50ft length of this design be submerged in 5 gallon of wort? Can garden hose fittings be soldered on to this small of tube?

As for the DIY: it looks like it can be done but the coils look smaller than paint cans and it seems like it would be hard to hold the paint cans in place as the the chiller has rather tight coils.

If you do one with 50ft it should fit in 5 gallons without a problem. I can compress this one to have all the coils in a 1.5 gallon extract batch.


brew2live, how hard was it to clean this chiller after you were done???

It was really easy, I just washed it with the output hose, it cleaned off the wort and hops residue without a problem.

So I brewed an extract batch today and decided to agitate the chiller the whole time to see what it could do. It went from boiling to 79 degrees in 7 min. and used just under 6 gallons of water. The crazy part about it was that I checked the tap water temp and it was 69 degrees! I am planning on a double batch of extract for my next brew and I will let you guys know how it does.
 
We already know this chiller will outperform chillers with a shorter length of larger diameter tubing when you leave the wort sitting still. In my opinion, it's a wasted test because you SHOULD be stirring the wort. If your goal is to chill without stirring, go ahead and use 50' of 1/4" OD (for up to 5 gallons). I think 50' of 3/8" is a better compromise for 5 gallon batches and then 1/2" makes more sense when you want to be able to do 10 gallons occasionally.

1.5 gallon batches? I'd be ice bathing that in the sink.
 
We already know this chiller will outperform chillers with a shorter length of larger diameter tubing when you leave the wort sitting still. In my opinion, it's a wasted test because you SHOULD be stirring the wort.

I am just trying to wrap my brain around the physics on this and could use a little help. If it outperforms a larger diameter constructed chiller while still why would this value be lost when stirring? Will the volume of water in the 1/4" simply get too hot early on its way through the tube thus loosing ability to transfer cold/take heat out? Couldn't you keep increasing flow pressure to make up for the loss in diameter?
 
We already know this chiller will outperform chillers with a shorter length of larger diameter tubing

The 1/2" tubing that was tested was the same length as the 1/4" chiller, both 25'.

In my opinion, it's a wasted test because you SHOULD be stirring the wort. If your goal is to chill without stirring, go ahead and use 50' of 1/4" OD (for up to 5 gallons).

Not constantly stirring enabled us to be sanitizing and doing other things :mug: instead of sitting at the kettle looking at the wort. Not sure how having more information on how chillers perform in varied conditions is a wasted test, but I'm really happy with this chiller and thought others would be interested in the results as well.

I think 50' of 3/8" is a better compromise for 5 gallon batches and then 1/2" makes more sense when you want to be able to do 10 gallons occasionally.

So the main reason for getting this chiller was the water savings and relatively low overall cost of the chiller compared to counter flow or plate chiller with pump and the additional time to clean them. It looks like the 50' version that these guys sell is set up for a keggle. I would like to hear feedback from somebody that bought that and has used it on a 10 gallon batch.

1.5 gallon batches? I'd be ice bathing that in the sink.

The total size of the brew was a standard five gallon batch. I had a 1.5 gallon boil prior to DME (my mistake) . I was doing ice baths when I started brewing and it could take over 30 minutes to cool down a single batch, costing around $4 in ice. Considering the cost of the ice and wasted time, I figured I could recoup the cost of the chiller rather quickly. So far so good!!:ban:
 
For what it's worth, it appears that either of these designs could be made without to much effort. You would only need to build a jig with round posts attached to a plate in an upright position at the point of the bends. For example on the six cornered chiller you would need six posts on the six corners of the hexagon and one in the center. 2 inch pipe welded to a plate would work great for mass production, but just some round lumber or even plastic pvc attached temporarily to some plywood to keep them spaced and solid. Then just weave the soft copper to form the pattern starting with the down spout from top to the bottom and work your way up in a weaving pattern. The round posts would keep the tubing from forming sharp corners. When you run out of tubing, form the up spout. Then pull the whole mess straight off the top.

That being said i don't plan to make one like this because I prefer JZ's whirlpool chiller. As previously posted moving the wort optimizes the efficiency of a standard chiller, and the whirlpool leaves the break material and hop bits in the center of the pot and not in the fermenter. Cheers!
 
In case anyone still looks at this thread...here's my handywork...I had a small 1/4" IC and aquired a short 3/8" IC...so I married them together (outside of the brewpot in case of leakage) to form what I called frankenchiller (which is a name I think I've read elsewhere so no intent to step on other's toes). It works great...and if you read any of my other posts you'll see that I'm "wicked cheap" (as we say up here in Maine).

frankenchiller.jpg
 
In case anyone still looks at this thread...here's my handywork...I had a small 1/4" IC and aquired a short 3/8" IC...so I married them together (outside of the brewpot in case of leakage) to form what I called frankenchiller (which is a name I think I've read elsewhere so no intent to step on other's toes). It works great...and if you read any of my other posts you'll see that I'm "wicked cheap" (as we say up here in Maine).

I just have to say I feel bad for that poor copper. Look at all those kinks! Glad it works well for you though and it is definitely a monster of a mess.
 
Actually I often reduce the water pressure because the exit water isn't warm enough. 5 gallons boiling wort into an ice bath to 70 degrees in 20 minutes sometimes less, depends on if I have the time to stir it.
 
Brewsday said:
In case anyone still looks at this thread...here's my handywork...I had a small 1/4" IC and aquired a short 3/8" IC...so I married them together (outside of the brewpot in case of leakage) to form what I called frankenchiller (which is a name I think I've read elsewhere so no intent to step on other's toes). It works great...and if you read any of my other posts you'll see that I'm "wicked cheap" (as we say up here in Maine).

I have one very similar what do you use to clean it off. I think I may have ruined mine. I let it sit in a bucket over night with 1 cup bleach and it turned the bucket and water black with significant oxidation on the copper. I have scrubbed it and now boiling the chiller again Will PBW be safe?
Can this be made usable again?
 
I once used a pretty strong white vinegar with a little warm water mix to clean the inside of some old copper tube...worked pretty well and at least vinegar's cheap. I'd try that. Maybe you could fill an old milk jug with water stuck inside the coil to displace some of the bucket contents and keep the solution stronger. From what I've read you really don't want any of the green oxidation in your beer. Also, once you get it clean again just rinse with water after a batch...there's no need to sanitize (since you boil it for 10 minute (right?!) and the wort will keep it nice and shiny forever!
 
Back
Top