
StupidAboutBeer
New Member
- Joined
- Feb 11, 2009
- Messages
- 4
- Reaction score
- 0
Let me start by saying that this project is not for everyone. In my opinion a keezer is the best option for building a kegerator. I merely built this mini fridge because I this is the equipment I had fall into my lap. I hope someone can use my ideas for a better purpose. This should work with most mini fridges that are not the super small ones. Mine was a magic chef. Also I am sorry for the semi-bad pics. I do these posts from work and paint is all i have to work with. 1. First we start with a mini fridge.

I suggest not spending money on the fridge. Go to craigslist and wait for a free one or one you can get real cheap. You are about to really destroy this fridge and it will not be pretty. Also keep in mind there is a real chance you may break it while doing my method. Bring a corny keg with you when you go to get the mini fridge. Make sure the fridge is tall enough for the keg. You will need a little room on top of the keg for the connectors. Don't worry about the freezer tray. We will be moving that in a moment. 2. This is the part where you are most likely to ruin your fridge. Locate the freezer tray and remove all the fasteners. Some have clips, some have screws, but you should be able to get is loose. Be gentle but firm here. You are going to bend the metal ice tray back and if it cracks you are screwed.

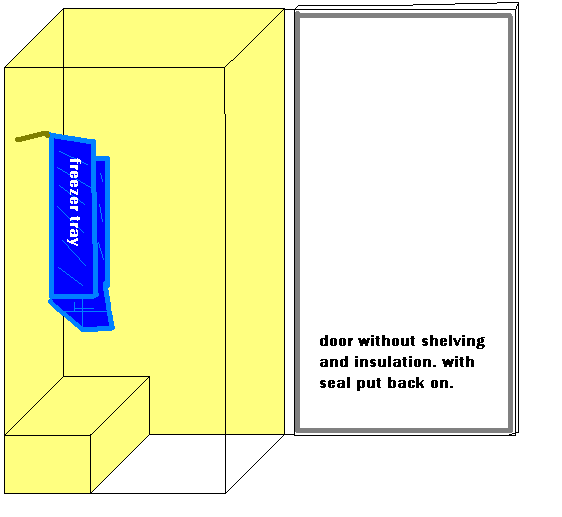
Do this part outside because you make spring a leak in the metal line. I think the gas in the fridge might kill you. I don't really know but it can't be good for you. 3. Now we really get to break things. Remove the plastic insert for the inside of the door. Often there are screws under the door seal. With whatever tools or scrapers you have remove as much insulation from the door. You want to see metal almost everywhere. But make sure you can still put the door seal back in place when done.
4. Go to HomeDepot (or Lowe's or where ever) and buy: a. insulation (They sell it in pink foam sheets.) b. liquid nails (or some other good cheap adhesive.) c. latches that will hold the door closed. The kind that pulls the door shut as it latches is best. Cut the pink foam to the size of the door and glue it to the outside. You may want to tape it in place as well. Install the latches so it pulls the door tight. 5a. For just two kegs they should fit like this.

Wait to drill (for the air line and taps) until after you have seen how the kegs will fit. 5b. If you want 4+ kegs you will need to buy a cold plate. I suggest checking craigslist but they are not that bad on ebay if you can avoid shipping. I had a coldplate around the house.
 This pic is how I have mine set up. I have a 3 tap cold plate. And since I can also fit 1 keg in the fridge with the trash can, i have 4 taps on one mini fridge. Fill the trash can with water. The beer is cooled by the cold plate as it comes into the fridge. If you find that the pressure is still too high at the faucet you can adjust by adding more hose. If you are having a party and plan on dispensing a lot of beer in a short amount of time you might want to add some ice to the water. Wait to drill (for the beer, air lines, and taps) until after you have seen how the keg and trash can will fit. Any questions?

I suggest not spending money on the fridge. Go to craigslist and wait for a free one or one you can get real cheap. You are about to really destroy this fridge and it will not be pretty. Also keep in mind there is a real chance you may break it while doing my method. Bring a corny keg with you when you go to get the mini fridge. Make sure the fridge is tall enough for the keg. You will need a little room on top of the keg for the connectors. Don't worry about the freezer tray. We will be moving that in a moment. 2. This is the part where you are most likely to ruin your fridge. Locate the freezer tray and remove all the fasteners. Some have clips, some have screws, but you should be able to get is loose. Be gentle but firm here. You are going to bend the metal ice tray back and if it cracks you are screwed.
Do this part outside because you make spring a leak in the metal line. I think the gas in the fridge might kill you. I don't really know but it can't be good for you. 3. Now we really get to break things. Remove the plastic insert for the inside of the door. Often there are screws under the door seal. With whatever tools or scrapers you have remove as much insulation from the door. You want to see metal almost everywhere. But make sure you can still put the door seal back in place when done.
4. Go to HomeDepot (or Lowe's or where ever) and buy: a. insulation (They sell it in pink foam sheets.) b. liquid nails (or some other good cheap adhesive.) c. latches that will hold the door closed. The kind that pulls the door shut as it latches is best. Cut the pink foam to the size of the door and glue it to the outside. You may want to tape it in place as well. Install the latches so it pulls the door tight. 5a. For just two kegs they should fit like this.
Wait to drill (for the air line and taps) until after you have seen how the kegs will fit. 5b. If you want 4+ kegs you will need to buy a cold plate. I suggest checking craigslist but they are not that bad on ebay if you can avoid shipping. I had a coldplate around the house.
