First electric brew completed

Homebrew Talk - Beer, Wine, Mead, & Cider Brewing Discussion Forum

Help Support Homebrew Talk - Beer, Wine, Mead, & Cider Brewing Discussion Forum:

This site may earn a commission from merchant affiliate links, including eBay, Amazon, and others.

missing link

Well-Known Member
Joined
Jul 2, 2007
Messages
650
Reaction score
4
Location
Highland, MI
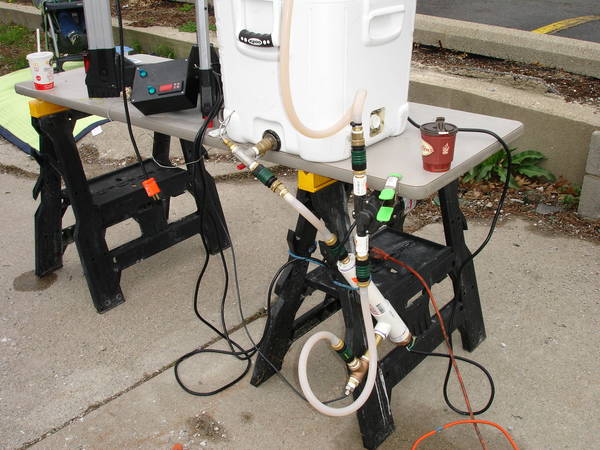
I built electric HLT and MT over the last few weeks and tested them with water.

Wed I used them for a 5 gallon brew. My first all grain. I was surprised by how easy AG is and by how well the electric coolers worked.

My tap water comes out about 125 degrees and it took less than 15 minutes to heat my MT to strike temp. I doughed in and hit my temp exactly. While my mash sat for 60 min, I plugged in the HLT with my sparge water and after 15 minutes or so it was up to 168. After 30 minutes I needed to heat my mash up a bit so I just plugged in the mash cooler and stirred until my mash came up to temp, unplugged the cooler and closed the lid. I only had to re-heat once.

I was pretty excited to have it all go so smooth.

Thanks for all the help from HBT!!

Linc
 
Yes, My tap water is about 125 - 130 degrees. I added hot and cold water to the garage and bought an RV hose to fill all my tanks with.

So far it makes for a smooth brew day.

Linc
 
Very cool, but
worthless.gif
 
I think lead free solder has been used for 5+ years now so it depends on the age of your house too. The house I live in has all PEX tubing and no solder joints at all on the drinking water lines
 
I think this is the setup I want to build. Can you show any links or pics?
 
DSC02842.JPG


Sorry the set-up is a bit of a mess. Now that I like the way it works, I need to get things organized better and adjust my hoses and cords to not make sucha mess.

I have a pump now for the HLT so I can put both coolers on the table.

DSC02843.JPG


Black box is from radio shack, love control is the same as Lonnie used for Brutus, I measure the wort temp coming out of the heat exchanger with the Love and just for kicks I have an electronic thermometer on the output of the Mash tun. After about 10 minutes both are within 1 degree of each other.

The blue switch next to the love stops the heating element from turning on, I turn the switch off when heating sparge water if I am limited to one circuit. That way I can monitor the mash temp without worrying about the element kicking on and blowing the fuse. The other blue switch is for the pump.

Now I just need to build a second control box for the HLT, or add to the current one. I'm not sure which to do.

Linc
 
I'm guessing you are using 110v elements, have you tried heating cold water with them? One drawback to using hot water is that you can't use a carbon filter.

At least you can go get your teeth cleaned while waiting on the mash...
 
The pics are from National Homebrew day so we are brewing behind the homebrew shop!!

I am using 110v elements. When brewing at home I use pre-heated water from the house, it comes out if the tap at about 130 degrees so it doesn't take long at all to pre-heat to my strike temp.

For brewing away from home, I pre-heated water in my boil kettle using propane until I reached my strike temp, I dumped this water using a pale into my mash, got the pump going and waited a bit for the temps to settle down before mashing in.

On a 5 gallon batch I get about 1 degree of temp change per minute in the mash tun with the pump at full flow. This ensures the element stays on. Not to bad for a 5 gallon batch but on a 10 gallon batch it would be to slow. The problem comes when I throttle the pump down to a trickle during the mash. The element cycles on and off in the heat exchanger to keep the wort from exceeding my set temp so I get much slower temp changes. I have countered this by using beer smith help me with boiling water infusions.

In essence, I am using electrics to maintain my mash and sparge temps. It is amazingly consistent once it gets going. I was always frustrated by over or undershooting my temps.

Linc
 
I'm thinking of going plastic for my MLT if I ever get time to go to 10g batches. How did you seal that element? Did you silicone a flange mount element from the inside...
 
I used a universal mounting kit and silicon on my HLT. In hindsight I would just build another heat exchanger like I have for the MLT. This way I don't actually have to modify the cooler, just unscrew the drain and install valve.

If you want to use it as a static HLT and gravity, the mounting kit and silicon worked great.
 
any good "how to's" on putting a 110 element setup with a temp controller together? It might be cool to add one to a keggle and still have a burner for the first burst of heating up, with electric maintaining a set temp after you get there.
 
Back
Top